Advertisement
Table of Contents
- 1 Safety Measures
- 2 Downloadable Software
- 3 Markings and Signs Applied to the Receiver
- 4 Basic Information about the Receiver
- 5 Remote Control
- 6 Learning Function
- 7 Installation of Batteries
- 8 First Steps
- 9 Information about the User Menu
- 10 Installation
- 11 Satellite List
- 12 Attachment a - Glossary of Terms
- Download this manual
Advertisement
Table of Contents

Related Manuals for Ferguson Ariva 52E


Summary of Contents for Ferguson Ariva 52E
- Page 1 User manual 102mini 102E 103mini 202E 150Combo 152Combo 153Combo 250Combo 252Combo 253Combo English...
- Page 2 WARNING !!! Ferguson satellite receivers support recording on external hard disk drives (HDDs) and flash memories (pendrives). In all instances, the correct operation of the recording function depends on the type of connected memory! You must read the following limitations.
-
Page 3: Safety Measures
• DOWNLOADABLE SOFTWARE Ferguson has taken every effort to provide users with software updates in order to ensure that the parameters of the satellite television receiver are up to date. Ferguson reserves itself the right to amend, change or modify the software used in the satellite television receiver as it shall choose and without prior notification. -
Page 4: Markings And Signs Applied To The Receiver
Ferguson Sp. z o.o. has made every effort to provide the most current information about its products. Ferguson Sp. z o.o. does not grant any guarantee as to the contents of the present instruction manual and disclaims any implied guarantees concerning market value or suitability for specific purposes. -
Page 5: Basic Information About The Receiver
BASIC INFORMATION ABOUT THE RECEIVER 1. Main features Reception of high definition channels ✔ Scaling of PAL signals to a resolution of 720p or 1080p ✔ Availability of programmable timers ✔ Separate lists of favourite, TV and Radio channels ✔ Quick channel search function (QuickFind) ✔... -
Page 6: Remote Control
4. Remote control Due to the standardization of Ferguson equipment, the majority of these devices use the same remote control unit RCU540 or RCU650. This means that not all keys are used by this equipment model! 150Combo 250Combo 102mini 102E... - Page 7 Power button turns on the device or sets it in standby mode. Blue LED flashes to show that button is pressed. Predefined stb button for Ferguson Ariva STBs. It is not possible to setup another code set or use learning function.
-
Page 8: Learning Function
Setup device via brand name code 1. Switch on the device that you like to control. 2. Find the code number of your device brand in the code list (e.g. Ferguson 1244) from the relevant device group (e.g. DVB-T). 3. Press and hold the device button (e.g. AUX) for three seconds. Release the device button as soon as LED lights up, now it is in set up mode. - Page 9 1. Press down and hold the device button which you wanted to learn (e.g. BD player), and press find button at the same time, when LED turns on then release the both pressed keys, now remote control is in learning mode for BD codes.
-
Page 10: Installation Of Batteries
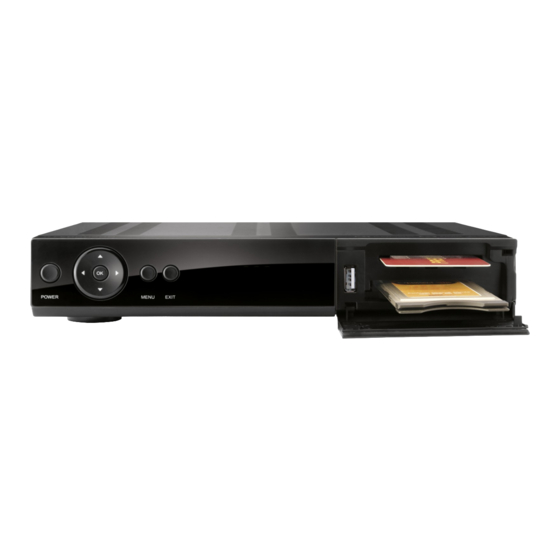
4.1 Installation of batteries Remove the cover of the battery compartment on the rear panel of the remote control unit; slide it downwards and put it aside. Insert two AAA (R03) batteries into the compartment, observing the indicated polarity. Do not mix old and new batteries, or batteries of different types. - Page 11 5.1. CAM module and subscriber's card Inserting the module and subscriber's card The conditional access module resembles a PC card (known as the PCMCIA) for laptop computers. There are different types of CI modules, suitable for various encoding systems. 1. First, turn off the receiver. 2.
- Page 12 Ferguson receiver. In order to connect an antenna system to a USALS positioner, you should connect the positioner out to the LNB IN of the Ferguson receiver. The role of the positioner installed between the mast and the antenna is to turn the bowl in such a way as to ensure that it is directed to various satellite positions.
- Page 13 9. Connecting the receiver The following illustrations show cable connections for a television and other devices connected with the receiver. If you require any assistance in connecting individual devices, contact your local technician. Before connecting or altering cabling, disconnect the receiver from the mains !!! Note: Availability and type of connection depends on your receiver model! Not all of the connections are applicable for your receiver!
- Page 14 9.2 Connection by means of SCART cables 1. Connect the antenna to the LBN IN socket of the receiver. 2.Connect the television to the port in accordance with the description. We recommend using shielded SCART cables. 9.3 Connect composite port 1.
- Page 15 9.4 Connection of an audio system Digital sound (including surround sound, if broadcast) can be obtained from two • sockets: coaxial (1) or optical SPDIF (2). Stereo sound may be obtained by connecting cinch cables (white and red) for the •...
- Page 16 9.6 Connection of another receiver Another receiver may be connected through the LNB OUT socket. Please keep in mind, however, that only one device may be used at one time! Permanent damage may result if both are turned on simultaneously. NOTE: LOOP OUT in all Combo receivers is the only signal loop-through.
-
Page 17: First Steps
9.8 Connection to the computer by means of an RS232 Null Modem cable For connection to a computer, use a Null Modem cable. FIRST STEPS 1. Insert the plug of the receiver and other additional devices to a wall socket. 2. -
Page 18: Installation
10. Main menu Press the MENU button on the remote control in order to display the following main menu, which contains six items: 1. editing channel lists 2. installation 3. system settings 4. tools 5. entertainment 6. recording settings 11. Installation The installation menu is used to set antenna installation parameters and to search for channels on a satellite. - Page 19 11.3 Antenna setup This menu is used to set detailed operating parameters for previously selected satellites, depending on your antenna system. Select a satellite by pressing the left/right arrow keys. Only satellites marked on the list of satellites will be available. Now select the converter type (usually, you do not have to change this option and may leave it set to "universal").
- Page 20 11.4 Single satellite search In this menu you can search for channels from one selected satellite. To this end, select a satellite by pressing the left/right arrow keys. Only satellites marked on the list of satellites will be available. Next, select whether you want to search only for free to air channels or for all channels, or for radio channels, television channels, or all channels.
- Page 21 11.6 List of transponders Channels on satellites are located in "sets". Such a "set" of channels comprises a transponder. A list of transponders is a list of frequencies available on a given satellite. In this menu you can edit, add and remove individual frequencies. Select a satellite by pressing the left/right arrow keys, and the desired frequency using the up/down arrow keys.
- Page 22 11.7 Terrestrial Automatic Scan (Combo models only) In this menu, you can search for channels automatically - the receiver searches only frequency by frequency according to the saved list of DVB-T. This list can not be edited in a separate menu.
- Page 23 11.10 Cable TV (only for models 153 Combo and 253Combo) To access the cable (dvb-c) change the settings of LNB2. Note including cable tuner disable access to terrestrial television. It is impossible to simultaneously handle both standards. Automatically search Cable TV In this menu, you can search for channels automatically –...
- Page 24 12. System settings 12.1 Language This menu is used to define the language in which the receiver's menu is displayed. The preferred and second language options refer to audio soundtracks. If a given channel supports more than one audio soundtrack, the receiver will by default search for soundtracks in the selected languages in this order.
- Page 25 12.3 Display setting This menu is used to adjust the image displayed by the receiver. You can change the brightness, contrast and colour saturation. By default, all of these values are set to 50. 12.4 Local time settings This menu is used to set the time and date. The receiver can automatically download the time and date from the satellite (recommended), or you may set the time and date manually.
- Page 26 12.5 Parental lock In this menu you may specify whether the receiver is to use a parental block or not. In addition, you can turn on or off the password protection function for selected menu options and change the default password. The default password is four zeros: 0000. 12.6 OSD settings In this menu you can define the basic parameters of the on-screen menu (OSD).
- Page 27 12.8 Other In this menu you can change the remaining options, such as the power supply of the tuners, select the types of channels played, and how the receiver is to behave when switching channels. Clock In Standby enables or disables the clock on the front panel display in standby mode. Note: only if the clock in standby mode is off the receiver draws less than 1W of energy!!! Radio Equalizer enables or disables the audio graphic equalizer display while listening to...
- Page 28 13. Tools 13.1 Information In this menu you can obtain detailed information about your software version. The software structure is divided into a number of independent databases. The most important of these from the point of view of the user is the userdb, which archives current settings and channel lists. The receiver's software version is a symbol placed next to maincode.
- Page 29 13.4 Conditional access In this menu you can obtain additional information about the subscriber's card in the card reader. The information presented depends on the type and version of your card. 13.5 Upgrade by USB This menu is used to update the receiver. The latest software is available on the manufacturer's website.
- Page 30 13.7 Upgrade by network The receiver allows you to update software over the Internet. Detailed information about current connection parameters can be found on the manufacturer's website. 13.8 Network DDNS Setting A popular application of dynamic DNS is to provide a residential user's Internet gateway that has a variable, often changing, IP address with a well known hostname resolvable through standard DNS queries.
- Page 31 14. Entertainment The receiver allows access to certain network services and embedded games. Tetris (classic arranging of successive levels using blocks of various shapes). • Othello (a logical game, which consists in the placement of your colour on a board and •...
- Page 32 15.2 DVR configuration In this menu you can adapt preferences concerning recording to an external USB memory device. In the first option you decide whether you want to use the time shift option. This mode makes it possible to stop the current transmission at any moment by pressing the PAUSE button and resume it after a break by pressing the PLAY button.
- Page 33 Select the event that you want to programme and press OK. Set the timer activation frequency. Select the channel (press OK to display the simplified channel list). Next set the date, start time and duration. Select ‘record’ to return to the events list. A new item has been added. 15.4 Media Player The receiver is equipped with a simple multimedia player.
- Page 34 Web radio The receiver support system for receiving audio in the form of a data stream - the so-called Internet Radio. This feature works only with a properly configured connection to the Internet. Press [Yellow] button to get a current list of radio stations in chosen category. Categories can be changed by selecting [Red] button.
- Page 35 Recordings This tab is used to play back recordings made using the receiver. Each recording may be blocked by a password, deleted, or its name changed. Options available during playback (subtitles, teletext, audio soundtracks) depend on the selected recording format!!! During playback, press the INFO button in order to display the information bar.
- Page 36 16. Edit channels 16.1 TV channels list In this menu you can edit the list of television channels. Editing is effected by means of the coloured buttons on the remote control unit. The raised colour function is active – select OK on the selected channel in order to use it.
- Page 37 How do I delete a channel? Proceed to the editing of channel lists. Select a channel and press OK in order to see a preview in a small window. Press the blue button in order to pass to the channel edition menu. Press the blue button in order to switch on the channel delete function and OK on the channel that you want to remove.
- Page 38 How do I change a channel name? Proceed to the editing of channel lists. Select a channel and press OK in order to see a preview in a small window. Press the blue button in order to pass to the channel edition menu. Press the green button in order to switch on the channel name change function.
- Page 39 16.2 Radio channel list In this menu you can edit the list of radio channels. Editing is effected by means of the coloured buttons on the remote control unit. The raised colour function is active - select OK on the selected channel in order to use it.
- Page 40 In order to change a name, select the favourites group and press OK. Next use the numerical and coloured buttons to input the name. Confirm the changes by pressing the yellow button on the remote control. 17. Basic functions supported by the remote control 17.1 Guide This function displays a programme guide.
- Page 41 17.3 TXT - teletext This function displays the teletext, provided that it is broadcast by the selected television station. Keep in mind that correct code page (diacritical marks) displayed depending on the language settings made in the language settings menu! 17.4 AUDIO The green audio button displays a window with available audio soundtracks.
- Page 42 17.6 REC - recording This function is available only when an external USB memory device is correctly connected!!! ● 1. Select a channel and press the REC button. The present channel will now be recorded. 2. If you press the REC button again, a list of options will be displayed, where you can determine the duration of the recording (by default, this is 2 hours).
- Page 43 From the moment you switch on the time shift mode, the Ferguson receiver will constantly record the signal from the satellite in a buffer. The buffer is created automatically on the external USB memory device.
- Page 44 Recording the time shift buffer 1. This option is available only if previously switched on in the receiver's menu. 2. Switch on the time shift mode by pressing PAUSE. 3. Press REC in order to record the existing buffer and continue recording the channel.
-
Page 45: Attachment A - Glossary Of Terms
ATTACHMENT A - GLOSSARY OF TERMS Pay-TV – Pay-per-view digital television, CA - Conditional Access – a coding system which only subscribers have access. The used in order to protect transmitted data service is provided by satellite, cable, over against unauthorised access. - Page 46 ATTACHMENT B – RCU650 Device Brand Code List Long list of models can be downloaded from www.ferguson-digital.eu Ferguson: Code Device RCU-200 1244 DVB-T RCU-580 1246 RCU150 1247 HDplayer RCU310 1245 HDplayer AV-770 1248 TUNER 0057 0083 0056 AIWA 0056 0643...
- Page 47 0056 0006 0008 0009 0012 0013 0020 0022 0027 0030 0032 0033 0045 0080 0060 0062 0068 0069 0074 0083 HITACHI 0002 0057 0035 0111 0112 0504 0510 0514 0517 0522 0525 0527 0528 0529 0128 0130 0133 0542 0568 0574 0575 0148 0605 1078 0007 0008 0009 0016 0006 0017 0021 0023 0025 0002 0036 0043 0042 0057 0051 0053 0063 0064 0065 0060...
- Page 48 0000 0006 0016 0017 0018 0021 0025 0026 0035 0038 0041 0046 0051 0056 0057 0059 0071 0073 0076 0078 SCHNEIDER 0083 0094 0097 0099 0105 0110 0508 0532 0538 0574 0586 0616 0006 0024 0033 0048 0502 0517 0519 0130 0137 0147 SHARP 0592 SIEMENS...
- Page 49 ITD(SAGEM) 0311 0323 ITT/NOKIA 0753 0784 0802 KATHREIN 0383 0393 0739 0783 0345 0848 0856 0867 0208 0381 0394 0776 MEDIASAT 0734 0822 0382 0384 0385 0730 0742 0768 0778 0786 0788 0800 MEDION 0820 0833 0834 0857 0364 0873 0877 1167 1133 1132 1125 MITSUBISHI 0739 0784 0825...
- Page 50 PREMIERE 0843 SAGEM 0876 1137 SONY 0747 1121 1080 THOMSON 0798 DVB-T FERGUSON 1244 CableBox 0811 CANAL PLUS 0765 MOTOROLA 0779 PIONEER 0791 0792 SAMSUNG 1142 SCIENTIFIC ATLANTA 0794 0795 1137 0670 1001 AIWA 0698 0703 AKAI 0670 0680 0694 0702 1001...
- Page 51 0403 0407 0416 0420 0674 0690 0445 1060 1061 1062 PHILIPS 1124 1123 1105 PIONEER 0404 0693 1054 1058 0704 0716 SAMSUNG 0413 0418 0673 0692 1016 1050 SANYO 0414 0670 0680 0699 SCHAUB LORENZ 1001 1110 SCHNEIDER 0670 0680 0681 0682 0686 0700 1001 SCHWAIGER 0679 SHARP...
- Page 52 0621 0627 0643 0659 0690 0456 0462 0466 0471 0474 TOSHIBA 0477 0480 AUX/TUNER/TAPE AIWA 0698 0948 DUAL 0671 0677 0695 0908 0935 0958 0978 0990 ELTA 0886 0887 0935 FERGUSON 1248 GRUNDIG 0911 0925 0926 HARMON/KARDON 0895 0896 IPOD 0998 1051 1056...
- Page 53 PHILIPS 0614 1124 SAGEM 1137 SCHWAIGER 0788 1145 1127 SIEMENS 1148 SKY+ 0812 SONY 0545 1066 1068 THOMSON 0614 0663 0798 TIVO 0614 TOPFIELD 0782 TOSHIBA 1117 ADSL FREEBOX TV 1162 ORANGE 1166 SAGEM 1163 SAMSUNG 1143 THOMSON 1166 TPS ADSL 1165 1166 1137 CD/LD...
- Page 54 Blu-Ray, DVD DENON 1186 1191 MARANTZ 1192 1193 1194 ONKYO 1190 OPPO 1196 PANASONIC 1197 PHILIPS 1198 1199 PIONEER 1200 1201 SAMSUNG 1202 SHARP 1203 SONY 1204 YAMAHA 1207...
- Page 55 ATTACHMENT C - SPECIFICATION Ariva 102E 202E 150Combo 250Combo mini mini W: 11 W: 12 W: 22 W: 22 W: 26 W: 26 W: 26 W: 26 W: 26 Dimension (cm) D: 7 D: 7.5 D: 15.3 D: 15.3 D: 15 D: 18 D: 15 D: 18...
- Page 56 Ariva 152Combo 252Combo 153Combo 253Combo W: 26 W: 26 W: 26 W: 26 Dimension (cm) D: 18 D: 18 D: 18 D: 18 H: 4.5 H: 4.5 H: 4.5 H: 4.5 Net Weight 1.4 kg 1.5 kg 1.4 kg 1.5 kg Input Voltage AC 175-250V~ 50Hz/60Hz AC 100-240V~ 50Hz/60Hz...
Need help?
Do you have a question about the Ariva 52E and is the answer not in the manual?
Questions and answers