
Subscribe to Our Youtube Channel
Related Manuals for Craig CHT755


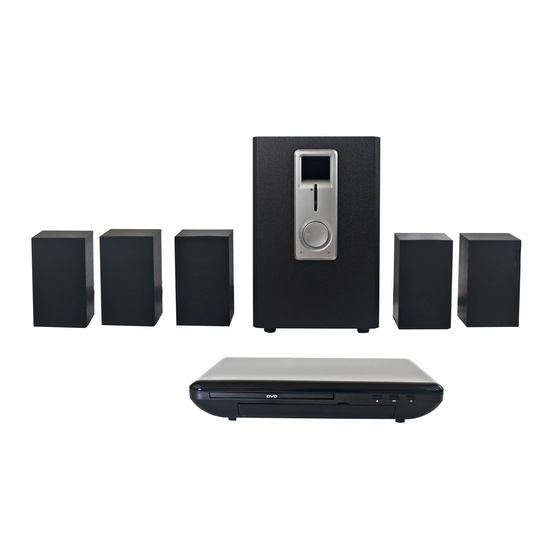
Summary of Contents for Craig CHT755
- Page 1 CHT754 Eng IB IB Size: 105.5 x 210mm (A5) 5.1 CHANNEL HOME 5.1 CHANNEL HOME THEATER SYSTEM THEATER SYSTEM with DVD Player with DVD Player Owner's Manual PLEASE READ BEFORE OPERATING THIS EQUIPMENT. Model: CHT755...
-
Page 2: Important Safety Instruction
IMPORTANT SAFETY INSTRUCTION The lightning flash with arrowhead symbol within an equilateral triangle is intended to alert the user to the presence of uninsulated dangerous voltage within the product`s enclosure that may be of sufficient magnitude to constitute a risk of electric shock to persons. CAUTION: TO REDUCE THE RISK OF ELECTRIC SHOCK, DO NOT The exclamation point within an equilateral REMOVE COVER (OR BACK). - Page 4 IMPORTANT SAFETY INSTRUCTION 17) Overloading Do not overload wall outlets and extension cords as this can result in a risk of fire or electric shock. 18) Object and liquid entry Never push objects of any kind into the product through openings as they may touch dangerous voltage points or short out parts that could result in fire or electric shock.
-
Page 5: Notes On Handling
IMPORTANT SAFETY INSTRUCTIONS(CONTINUED) NOTES ON MOISTURE CONDENSA TION: NOTES ON HANDLING: Moisture condensation damages the DVD player When shipping the unit, always use the Please read the following carefully original shipping carton and packing materials. Moisture condensation occurs, for example, when you For maximum protection, repack the unit as it pour a cold drink into a glass on a warm day. -
Page 7: Location Of Controls
LOCATION OF CONTROLS DVD PLAYER PLAY/PAUSE Button 1. Disc Tray . Remote Sensor Display OPEN/CLOSE Button POWER Button . Standby Indicator Pb/Cb Pr/Cr VIDEO 120V~60Hz COAXIAL 4. Coaxial Digital Audio Output 1. Component Video Output omposit utput 5. AC Power Cord 6. -
Page 8: Remote Sensor
CAUTION RISK OF ELECTRIC SHOCK DO NOT OPEN ATTENTION RISQUE DE CHOC ELECTRIQUE NE PAS OUVRIR CHT755 5.1 CHANNEL HOME THEATER SYSTEM WITH DVD PLAYER POWER SUPPLY: DC 12V, A POWER CONSUMPTION:3 W DC IN 12V, A Remote Sensor Audio Input Jacks... -
Page 9: Remote Control
LOCATION OF CONTROLS REMOTE CONTROL Power On/Off (Standby) button STEP button GOTO button Number (0-9) buttons REPEAT button SLOW button VIDEO button ANGLE button SETUP button Direction buttons Stop button MENU button AMP ( Amplifier ) On/Off button VOL ( Volume ) + button VOL ( Volume ) - button Disc Door Open/Close button PROG ( Program ) button... -
Page 10: Battery Installation(Remote Control)
BATTERY INSTALLATION(REMOTE CONTROL) battery door and lift it off. 2.Install two(2)x A A A size ment as the figure on right and the polarity markin directions. ) Remote Control Power Amplifier: Fig.2 Fig.1 Remarks: 1. The AMP ON/OFF INPUT VOL + VOL - SUB VOL - and SUB VOL + Buttons are for Amplifier only. - Page 11 CONNECTION TO TV Connection to TV through Video (Composite) and Audio Output Jacks (Video Connection cable included): Pb/Cb Pr/Cr VIDEO COAXIAL Note: Video = yellow, Audio Left = white, Audio Right = red White AV Cable Yellow Connection to TV through Component Video and Audio Output Jacks (YUV Connection cable NOT included): Pb/Cb Pr/Cr VIDEO...
- Page 12 CONNECTION TO TV AND EXTERNAL AMPLIFIER Connection to External Amplifier (with built-in decoder) through Coaxial Output Jack ( C oaxial Connection cable NOT included): White A/V CABLE SUPPLIED Yellow Pb/Cb Pr/Cr VIDEO COAXIAL External Amplifier with built-in decoder - 11 -...
- Page 13 DC IN 12V, A DC IN 12V, DC IN 12V,...
-
Page 14: Playback Of A Dvd
OPERATIONS Playback of a DVD: 1. Connect the Home Theater and DVD Player together then power source as previous procedures, the Standby Indicator on the DVD Player will light. Press the POWER ON/OFF button on the DVD Player or Remote Control. -
Page 15: Important Notes
OPERATIONS 3. During playback: ~ Press the buttons repeatedly to search for a specific section forward/backward. Press Play button to resume normal playback. ~ Press the buttons repeatedly to skip to specific track. ~ Press button to pause, press button again to resume normal playback. ~ Press the VOL (Volume) +/- buttons on the Remote Control or turning the Volume Knob on the Power Amplifier to adjust volume level. - Page 16 OPERATIONS GOTO: During playback, press the GOTO button, the searching menu will pop up. Using the Direction and Numeric buttons to select and set the desired Title; Chapter or Time then press Enter button to start playback as the selection. STEP: During movie playback, press STEP button repeatedly to plays the movie frame by frame.To resume normal playback, press the play...
- Page 17 PROGRAM DVD Program: During DVD Playback, press the PROG (Program) button, the program setting menu will pop up. ~ Use the the Direction button to highlight Title and Chapter column then using Numeric button to enter the desired Title number and Chapter number. The setting menu will appear on the screen as Fig A below. Repeat the same procedures until all specific tracks were selected.
-
Page 18: System Setup
SYSTEM SETUP Setting Menus: Press the SETUP button, the setting menu will appear on the screen as below. Using the Direction ◄, ►, ▲, ▼ you need to set or reset. Press the ENTER button to enter or confirmed buttons to select and highlight the function the selection. - Page 19 SYSTEM SETUP set it On or Off. If the supplied If Subwoofer is selected, using the direction and ENTER buttons to Home Theater is connected, set it to set it to On, Off or Auto to match If PRO Logic II is selected, using the direction and ENTER buttons to the sound recording format of your playing disc.
- Page 20 SYSTEM SETUP In Preference Setup Page: PAL, AUTO or NTSC to match If TV Type is selected, using the direction and ENTER buttons to set to the color system of the connected TV. (Note: The TV system in USA, Canada and Mexico is NTSC ). If Audio, Subtitle or Disc Menu is selected, using the direction and ENTER buttons to set the priority as desire.
-
Page 21: Care And Maintenance
CARE AND MAINTENANCE Caring for Discs Treat the disc carefully. Handle the disc only by its edges. Never allow your fingers to contact with the shiny, unprinted side of the disc. Do not attach adhesive tape, stickers, etc. to the disc label. Clean the disc periodically with a soft, lint-free,dry cloth, Never use detergents or abrasive cleaners to clean the disc. -
Page 22: Troubleshooting Guide
TROUBLESHOOTING GUIDE Check the following before requesting service: SYMPTOM POSSIBLE CAUSE POSSIBLE SOLUTION DVD Player AC plug unplugged Insert the AC plug to Wall Outlet No power. Unplug the unit and wait about one to Condensation has formed. Power on, but unit not functioning two hours until the player is dry. -
Page 23: Specifications
SPECIFICATIONS Power Source: DVD Player ........................... AC 120V~ , 60Hz, Max. 10W Home Theatre System ........................ 12V, 3A Remote Control 3V, 2 x AAA size batteries, included ....................DVD Player: Signal System ..............................NTSC/PAL Discs Played: DVD -VIDEO Disc 8cm single-sided, single layer 12cm single-sided, single layer 8cm single-sided, dual layer 12cm single-sided, dual layer... -
Page 24: Limited Warranty
Under no circumstance shall Craig be liable for any loss or consequential damage arising out of the use of this product. This warranty gives specific legal rights. However, you may have other rights which may vary from state to state.
Need help?
Do you have a question about the CHT755 and is the answer not in the manual?
Questions and answers