Advertisement
Quick Links
Advertisement

Subscribe to Our Youtube Channel
Related Manuals for Shark S3101N Series


Summary of Contents for Shark S3101N Series
- Page 1 WWW.SHARKNINJAMANUALS.COM S3101N Series OWNER’S GUIDE...
-
Page 2: Important Safety Instructions
IMPORTANT SAFETY INSTRUCTIONS For Household Use Only WARNING: WHEN USING YOUR SHARK ® STEAM MOP, BASIC SAFETY TO REDUCE THE RISK OF FIRE, ELECTRIC SHOCK OR INJURY: PRECAUTIONS SHOULD ALWAYS BE FOLLOWED, INCLUDING THE 1. Use the system only for its intended use. - Page 3 13. DO NOT unplug by pulling on power 24. Extreme caution should be exercised when cord. To unplug, grasp the plug not using this appliance to clean stairs. the power cord. Do not use extension 25. Never use steam mop without cleaning pad cords or outlets with inadequate current attached.
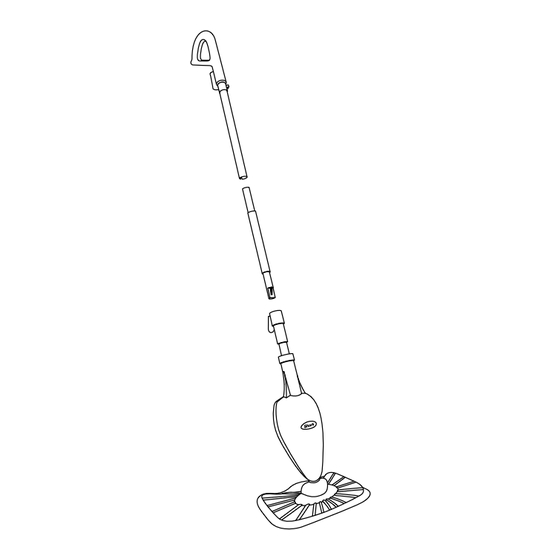
- Page 4 Quick Start ASSEMBLE FILL Fit together the extension tubes as shown Remove the cap to fill the Water Tank. in the illustration. See page 2 for more Using the filling flask, fill the tank, keeping detailed assembly instructions. the water under the “MAX FILL” line. Don’t forget to replace the cap.
- Page 5 PRIME STEAM QUICK TIP: Customise steam Plug in the mop. Wait 30 seconds for the output by slow or fast mopping with unit to heat up and the steam to be ready. a forward and backward motion. Push the handle toward the mop head in a pumping motion.
- Page 6 THIS BOOK COVERS MODEL NUMBERS: S3101N***** 11 TECHNICAL SPECIFICATIONS Voltage: 220V-240V~, 50/60 Hz. Power: 1550 Watts Water Capacity: 220 ml Euro-Pro, and Shark are trademarks of Euro-Pro Operating LLC. All other brand names may be trademarks of their respective owners. IPX4 TOLL FREE: 1-877-646-5288...
-
Page 7: Table Of Contents
Contents Thank you for GETTING STARTED ................2 purchasing the USING YOUR STEAM MOP ..............6 Shark Steam ® USING YOUR ACCESSORIES..............8 Mop. CARE OF YOUR STEAM MOP...............9 TROUBLESHOOTING ................10 ORDERING REPLACEMENT PARTS ............11 WARRANTY AND REGISTRATION ............12 www.sharkninjamanuals.com... -
Page 8: Getting Started
When assembling your steam mop there may be a little water in or around the water tank. This is because we test all our steam mops 100% before you buy them, so you get a quality Shark Steam ® Mop. - Page 9 Insert the pieces you assembled in Step 2 into IMPORTANT: Always make sure that your the pump actuator (the tube that leads to the Steam Mop is unplugged from the wall before tank). Push the extension tube assembly and you attach the cleaning pad. pump actuator together in until you hear it click into place.
- Page 10 Getting Started Always attach the cleaning pad to the mop head or you may scratch your floor surface. PLACING THE CLEANING PAD NOTE: Don’t be alarmed if the first time you use your Steam Mop, you notice water inside the Place the cleaning pad underneath the mop water tank or drops of water in the packaging.
- Page 11 The water tank cap has an arrow to indicate the locked and unlocked position. FILLING THE WATER TANK The filling flask included with your Steam Mop makes filling the water tank as simple as getting IMPORTANT: Before you fill up the tank, make a glass of water from the sink.
-
Page 12: Using Your Steam Mop
Never use your Steam Mop without unwrap the power cord completely. Plug into an water in the tank. electrical outlet. The LED light around the Shark ® logo will turn on. Success! If your light doesn’t Sweep or vacuum your floors before using your turn on reference the Troubleshooting section on Steam Mop. - Page 13 When your Steam Mop stops steaming, it could be out of water. Unplug the power cord from the electrical outlet and refill the water tank at anytime. It takes about 30 seconds for the steam to get IMPORTANT: When your floors are sparkling going.
-
Page 14: Using Your Accessories
Using Your Accessories The Steam Mop won’t clean your carpeting or areas rugs, but it’s great for deodorising and freshening carpets and area rugs. THE CARPET GLIDER USING THE CARPET GLIDER Plug in your Steam Mop and begin freshening Just like you, your Steam Mop is versatile! The carpet glider transforms your Steam Mop in no your carpet by pushing the mop and glider back time. -
Page 15: Care Of Your Steam Mop
Care of Your Steam Mop Always remove the cleaning pad from the Steam Mop head when you store your Steam Mop to avoid damage to your floors. KEEPING YOUR STEAM MOP IN TIP-TOP KEEPING YOUR CLEANING PAD AS GOOD AS SHAPE If you love your Steam Mop, let it show. -
Page 16: Troubleshooting
Trouble Shooting PROBLEM POSSIBLE REASONS & SOLUTIONS Your steam-mop should be securely plugged into an electrical outlet only. The Steam Mop will not Check your fuse or breaker. turn-on. If your unit still doesn’t work, give us a call 1-800-798-7398 Steam Mop will not make Is there water in the water tank? If not, add water to your Steam Mop steam. -
Page 17: Ordering Replacement Parts
Ordering Replacement Parts ORDERING REPLACEMENT PARTS PART PART NO. To order additional parts and accessories, feel free to Micro-Fibre Pad P099W call 1-800-798-7398. All Purpose Pad P112W Carpet Glider XCG3101N www.sharkninjamanuals.com... -
Page 18: Warranty And Registration
Product Registration Please visit www.sharkninjamanuals.com or call 1-800-798-7398 to register your new Shark ® product within ten (10) days of purchase. You will be asked to provide the store name, date of purchase and model number along with your name and address. - Page 19 Product Registration Please visit www.sharkninjamanuals.com or call 1-800-798-7398 to register your new Shark ® product within ten (10) days of purchase. You will be asked to provide the store name, date of purchase and model number along with your name and address.
- Page 20 Main unit voltage: 220-240V~, 50/60 Hz. COPYRIGHT© EURO-PRO OPERATING LLC 2013 PRINTED IN CHINA Euro-Pro, and Shark are trademarks of Euro-Pro Operating LLC. All other brand names may be trademarks of their respective owners. S3101N*****11.E.131211.1 IPX4 Illustrations may differ from actual product.
Need help?
Do you have a question about the S3101N Series and is the answer not in the manual?
Questions and answers