
Related Manuals for Currys Essentials CCHOBKN13


Summary of Contents for Currys Essentials CCHOBKN13
- Page 1 BUILT- IN ELEC TRIC CER AMIC HOB I N S T R U C T ION / I NS TA L L AT I ON MA N UA L CCH O B K N13...
-
Page 3: Table Of Contents
Contents Safety Warnings ..........................4 Unpacking ............................. 6 Installation ............................ 7 Location ..................................7 Preparing the Worktop ............................8 - Cut-out Dimensions ............................8 - Product Overall Dimensions ........................8 Fitting the Hob into the Worktop ........................8 Connecting the Hob to the Mains Power Supply ............... 9 Product Overview ........................ -
Page 4: Safety Warnings
Safety Warnings IMPORTANT SAFETY INSTRUCTIONS READ CAREFULLY AND KEEP FOR FUTURE REFERENCE • It is recommended that this appliance is installed by a qualified electrical engineer. The manufacturer is not responsible for any damage caused by incorrect installation. • Check whether there is any damage to the appliance after you have unpacked it. - Page 5 • Children should be supervised to ensure that they do not play with the appliance. • The appliance and its accessible parts become hot during use. Young children should be kept away. • During use the appliance becomes hot. Care should be taken to avoid touching the cooking zones.
-
Page 6: Unpacking
Thank you for the purchase of your new Logik Built-in Electric Ceramic Hob. You must read this manual in order to fully understand how to operate it correctly. This unit MUST be installed by a competent and registered engineer. Please allow the installer to view the installation section of this manual. -
Page 7: Installation
Installation The electrical connection of this hob should be carried out by an authorised service personnel or a qualified electrician, according to the instructions in this guide and in compliance with the current regulations. • Before connecting your appliance to the mains at home, make sure to check the conformity of voltage settings, which are specified on the information sticker attached to the appliance and/or packaging, with the usage conditions available. -
Page 8: Preparing The Worktop
Preparing the Worktop Cut out the work surface following the dimensions shown in the drawing below. • For the purpose of installation and use, a minimum distance of 5cm space must be left around the cut out. • Be sure the thickness of the work surface is at least 20mm. Use a heat-resistant work surface material to avoid deformation caused by the heat from the hob. -
Page 9: Connecting The Hob To The Mains Power Supply
Connecting the Hob to the Mains Power Supply • If the mains cable is damaged and needs to be replaced, this should be done by a qualified person using the proper tools, so as to avoid any accidents. • If the ceramic hob is being connected directly to the mains supply, an omnipolar circuit breaker must be installed with a minimum gap of 3mm between the contacts. -
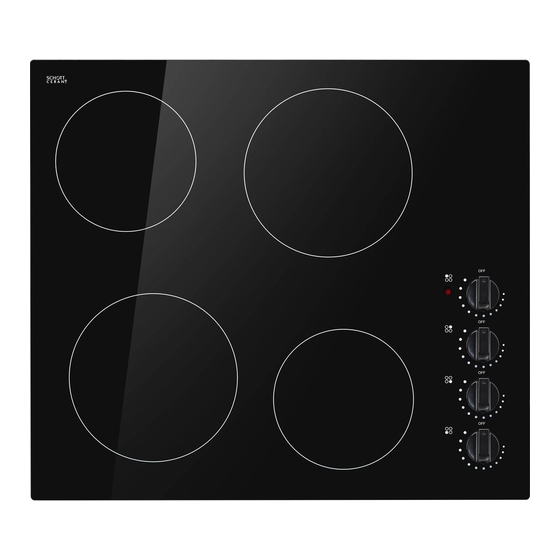
Page 10: Product Overview
Product Overview The Main Unit Small Ceramic Heater Large Ceramic Heater Control Panel Large Ceramic Heater Small Ceramic Heater Residual Heat Indicator Control Panel To select upper right heater To select upper left heater To select lower left heater To select lower right heater * All images are for indication only;... -
Page 11: Before Use
Before Use Before using your new hob, please: • Read this manual fully taking special note of the ‘Safety Warnings’ section. • Plug the hob into the electricity supply and turn it on so that the ignition circuit will work. Remove any protective film that may still be on your ceramic hob. -
Page 12: Choosing The Right Cookware
Choosing the Right Cookware Do not use cookware with jagged edges or a curved base. Make sure that the base of your pan is smooth, sits flat against the glass, and is the same size as the cooking zone. Always centre your pan on the cooking zone. Always lift pans off the ceramic hob –... -
Page 13: Cleaning And Maintenance
Cleaning and Maintenance What? How? Important! Everyday soiling on Switch the power to the ceramic • When the power to the ceramic hob glass (fingerprints, hob off. is switched off, there will be no ‘hot marks, stains left by surface’ indication but the cooking Apply a ceramic hob cleaner while food or non-sugary zone may still be hot! -
Page 14: Specifications
Specifications Model CCHOBKN13 Rated Voltage 230 V Rated Frequency 50 Hz Power Consumption 6000-6500 W Net Weight 7.5 kg Product Dimensions External Width 59 cm External Depth 52 cm Product Dimensions Internal Width 56 cm Internal Depth 49 cm Features and specifications are subject to change without prior notice. - Page 16 There are separate collection systems for recycling in the EU. For more information, please contact the local authority or your retailer where you purchased the product. DSG Retail Limited (Registered in England No. 504877) Maylands Avenue, Hemel Hempstead, Hertfordshire HP2 7TG. UK IB-CCHOBKN13-130411V1...
Need help?
Do you have a question about the CCHOBKN13 and is the answer not in the manual?
Questions and answers