Table of Contents
Advertisement
Advertisement
Table of Contents

Related Manuals for Falcon EYE-ON 04/08


Summary of Contents for Falcon EYE-ON 04/08
- Page 1 Digital Video Recorder User’s Manual EYE-ON 04 / 08 / 16 / 16R+...
- Page 2 Thank you for using our product. 1. This is user's manual for H.264 HD DVR (Digital Video Recorder). 2. This manual contains product specification and introduction, installation guide, operating guide and other necessary matters for easy understanding. Users should read this user's manual carefully for proper use. 3.
-
Page 3: Table Of Contents
CONTENTS Contents CH 1. Product Introduction` 1-1. Product Contents 1-2. Specifications 1-3. Product Characteristics 1-4. Name of Each Part CH 2. Installation Guide and Cautions 2-1. Cautions 2-2. Product Installation 2-2-1. Power Connection 2-2-2. Connecting External Device CH 3. How to Use 3-1. - Page 4 CONTENTS Contents Trouble Shooting Warranty Appendix A CMS(Client Management Software) Appendix B Catcheye for Android mobile Appendix C Catcheye for iPhone...
-
Page 5: Ch1. Product Introduction
CH 1 Product Introduction CH1. Product Introduction 1-1. Product Contents(EYE-ON 04/08) After removing packing materials of this product, check whether all following contents are included. Main Body (DVR): This converts the analog video and audio signal to the digital signal and saves on HDD. - Page 6 CH 1 Product Introduction 1-1. Product Contents(EYE-ON 16R/16R+) After removing packing materials of this product, check whether all following contents are included. Main Body (DVR): This converts the analog video and audio signal to the digital signal and saves on HDD. Adapter: This 12V adapter supplies power to the product.
-
Page 7: Specifications
CH 1 Product Introduction 1-2. Specifications (HD-SDI) EYE-ON HD SDI Model HD04 HD08 HD16R Description HD-SDI only 1080p real time DVR Camera input 4 BNC 8 BNC 16 BNC Individual HD/Analog sel HD-SDI ectable Video Available source 720p25,30,50,60/1080p25,30,50,60/1080i50,60/Mixed Output 1 HDMI+1 VGA (simultaneously) / 1 Programmable SPOT with OSD Audio input 4 RCA 16 RCA... - Page 8 CH 1 Product Introduction 1-2. Specifications (HD-SDI, continued) EYE-ON HD SDI Model HD04 HD08 HD16R Network Interface Gigabit Ethernet Speed 15fps@1080p 60fps@1080p 120fps@1080p Protocol TCP/IP, HTTP, DHCP Network Application Windows 2000 / XP / 7 / 8 (PC Client system& IE)/MAC Web Browser Internet Explorer, Safari, Chrome, Firefox Smart phone App...
- Page 9 CH 1 Product Introduction 1-2. Specifications (ALL HYBRID) EYE-ON ALL HYBRID Model 16R+ Description Hybrid(HD-SDI, Analog) 1080p real time DVR Camera input 4 BNC 8 BNC 16 BNC 16 BNC Individual HD/ All Hybrid(Patent) Analog selectable Video Available source 720p25,30,50,60/1080p25,30,50,60/1080i50,60/Composite/960H/Mixed Output 1 HDMI+1 VGA (simultaneously) / 1 Programmable SPOT with OSD Audio input...
- Page 10 CH 1 Product Introduction 1-2. Specifications (ALL HYBRID, continued) EYE-ON ALL HYBRID Model 16R+ Network Interface Gigabit Ethernet Speed 15fps@1080p 60fps@1080p 120fps@1080p Protocol TCP/IP, HTTP, DHCP Network Application Windows 2000 / XP / 7 / 8 (PC Client system& IE)/MAC Web Browser Internet Explorer, Safari, Chrome, Firefox Smart phone App...
-
Page 11: Product Characteristics
CH 1 Product Introduction 1-3. Product Characteristics 1) Full HD real time and All Hybrid This DVR can record HD and Full HD video with extreme quality. Also it displays real HD(1920X1080) resolution, and therefore it provides the most clear image quality and the best security level. - Page 12 CH 1 Product Introduction 11) Display information in easy-to-understand information method This enhanced convenience of user by displaying information (date, time, recording method, recording frame number, HDD capacity and others) in monitoring, recording and playing mode in easy-to-understand way. 12) P/T/Z control By built in RS485, various P/T/Z cameras can be used.
-
Page 13: Name Of Each Part
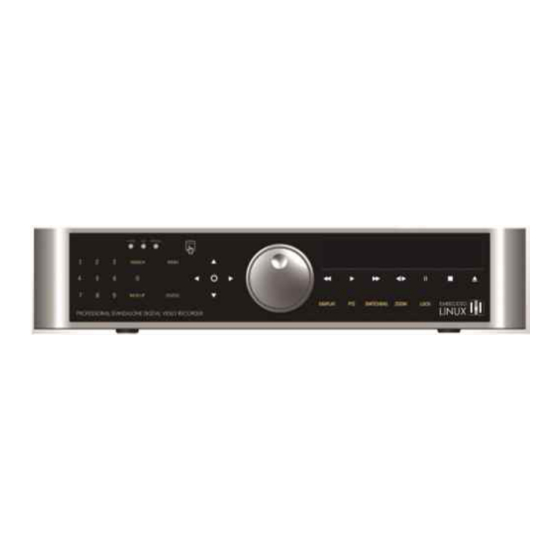
CH 1 Product Introduction 1-4. Name of Each Part [Front Panel] <EYE-ON 04/08> 1. USB ports : These USB ports are for mouse and USB devices. You should connect correctly the USB devices and mouse as picture directed. 2. Status lamps POWER : Blue color back light. - Page 14 CH 1 Product Introduction [Front Panel] < EYE-ON 16R/16R+> 1. Playback buttons : It will be used on playback. If you press these buttons in live mode, it will be automatically changed to the Instant Play mode. ‘Stop’ button changes from the play mode to the live mode. 2.
- Page 15 CH 1 Product Introduction 7. Number buttons : If you press this button, it will be changed to full screen in live viewing or playback. Also 10+ button is used for ‘Hold’ while Jog Shuttle action. (※ In menu and password setting, it is automatically converted to number buttons) 8.
- Page 16 CH 1 Product Introduction [Rear Panel] < EYE-ON 08> 9.SENSOR IN 10. AUDIO IN 11.AUDIO 8.RELAY 7.RS485 3. LAN 12.HDMI 4.SPOT 5. VGA 1.FAN 13.Xbox 6. POWER 2.VIDEO IN Extender (option) 1. Cooling Fan 2. Video In: This receives images from analog/960H/SDI cameras. 3.
- Page 17 CH 1 Product Introduction [Rear Panel] < EYE-ON 16R/16R+> 2.Audio Out 14.Spot Out 12. Sensor, Alarm, RS485 13. Extend 3. Switch 4.Adapter 5. RS232C 7. LAN 6. e-SATA 9. Audio In 1.Video In 10.HD Out 8. USB 11. VGA 1. Video In : This receives images from cameras and sends them to monitors. Loop Out : This sends the images from the cameras to the other devices.
-
Page 18: Cautions
CH 2 Installation Method and Cautions CH2. Installation Method and Cautions 2-1. Cautions WARNING Risk of electric shock. Do not open the cover of the product. Servicing of this product by unauthorized personnel is prohibited and will result in a void of warranty. In order to ensure the most stable conditions for power, the use of a UPS (Uninterrupted Power Supply) is recommended. - Page 19 CH 2 Installation Method and Cautions - Keep the power cord untwisted. (May cause fire or electric shock.) - Use proper adapter. (Using too much electric power may cause fire or electric shock.) - Do not install it at where exposed to rain and wind and water drop. (May cause fire, electric shock and transformation.) - Keep away from fire.
- Page 20 CH 2 Installation Method and Cautions Note : This equipment has been tested and found to comply with the limits for a Class A digital device, pursuant to part 15 of the FCC Rules. These limits are designed to provide reasonable protection against harmful interference when the equipment is operated in a commercial environment.
-
Page 21: Product Installation
CH 2 Installation Method and Cautions 2-2 Product Installation This product may be composed of camera and monitor in default, and additionally the sensor, microphone, speaker and PC for network can be connected if necessary. 2-2-1. Power Connection 1) Connect adapter cable to power connection terminal at rear side. 2) Input AC power to the adapter. - Page 22 CH 2 Installation Method and Cautions v Read this notice before connecting HD-SDI cameras. You cannot mix NTSC and PAL cameras with DVR products. 1. Please check the type(NTSC or PAL) of cameras. NTSC : 30fps, 60fps PAL : 25fps, 50fps •...
- Page 23 CH 2 Installation Method and Cautions 2) How to connect external sensor Sensor terminal is composed of 1 input channel and 1 output channel. Sensor out terminal is relay output with 1A, 24V or 0.5A,125V. SIREN SENSOR POWER Sensor In : Connect the sensors. The sensor are composed of both signal and ground terminals, with a voltage difference of 5V.
- Page 24 CH 2 Installation Method and Cautions 4) Connection Using PTZ camera In case of using pan and tilt cameras, connect PAN/TILT DRIVE to product as shown at following figure. VIDEO CABLE SPEED RS485 CABLE DOME 5) Installing Hard disk drive In case of installing the hard disk drive, open the upper case and install the hard disk drive on the hard bracket.
-
Page 25: Ch3. How To Use
CH 3 How to Use CH3. How to Use 3-1. General Usage Information The EYE-ON series can be operated with a mouse or remote controller under the four main modes listed below: Live Mode – This is the “main or default” mode. From this mode you can view in real time all currently operating cameras, information regarding camera status, and have access to Pan/Tilt camera controls. -
Page 26: Live Mode
CH 3 How to Use 3-2. LIVE Mode In this section you will know how to split the video mode into 1, 4, 6, 8, 9, 12, 16, as well as auto sequencing, PTZ Control, Mouse control, Setup configurations, Backup 3-2-1. - Page 27 CH 3 How to Use 3) Live Popup Menu By Right-Clicking anywhere on Live Screen, you may view the Live Popup Menu. By using the Live Popup Menu, you can quickly jump to the necessary configuration and settings.
-
Page 28: Live Mode Feature
CH 3 How to Use 3-2-2. LIVE Mode Feature 1) Setup : refer to 3-4 2) Split Change video split mode for Live View. 3) Audio Out You can choose the audio out from this menu. 4) Instant Replay This is very convenient function to catch the abrupt accident. During live viewing, you can go directly to the playback screen. - Page 29 CH 3 How to Use 6) Backup There are two ways to enter the backup. The first one is that right click on the live screen, and the second one is that enter directly from ‘Search’ upon playback. If you choose the ‘backup’...
- Page 30 CH 3 How to Use 7) Snapshot You can save the live snapshot by this menu. All channel will be saved individually to the USB memory by JPG format . You should put in USB memory before saving. 8) Freeze You can freeze the current live video channels.
- Page 31 CH 3 How to Use • Preset : You can enter the preset number using the keypad appearing the preset button or ‘Enter’ button on the remote controller. Run[Enter] Move to preset number Set[Menu] Set a position and name of a preset number Clear[Stop] Clear a preset set Exit[Exit]...
- Page 32 CH 3 How to Use • Camera : You can choose the PTZ camera with mouse or [0] buttons on the remote controller • Setup : If you press Setup using mouse (or [9] button on the remote controller) in PTZ Menu, PTZ setup window will appear.
- Page 33 CH 3 How to Use 10) Zoom Digital zoom of live screen for selected channel. It can be 8x zoom and also control the position by mouse dragging. CH 1 (x2) • Camera : You can choose the camera for zoom with mouse or [0] buttons on the remote controller.
- Page 34 CH 3 How to Use 11) Sequence Sequence Mode On /Off: Switches screens as set on Dwell time under Screen Setup 12) OSD This feature shows current settings of product through GUI (Graphic User Interface) and INFO button at front side is used for this feature. When you turn on power, this will show current date and time, System Lock Setting, HDD usage, Video Loss Check, Sensor ON/OFF, Motion Detection Check, Recording Status and Schedule Feature Usage.
- Page 35 CH 3 How to Use 15) Alarm Control You can control all alarms connected and the DVR system buzzer.
-
Page 36: Search Mode
CH 3 How to Use 3-3. Search Mode Search mode consists of two different modes of searching. The video data can be selected by 5 modes. Time : Search by Month / Day / Time selection. Event : Select from Event Log POS : Search by POS transaction data Thumbnail : Play the specific channel by user defined interval Panorama : Play the specific channel continuously... - Page 37 CH 3 How to Use 2) Event Based Search Selection • Select search date from calendar • Event log will be displayed according to the chosen date • Preview pane above the Event Log will show preview of currently selected video 3) POS Search •...
- Page 38 CH 3 How to Use 4) Thumbnail Search • Select search date from calendar • Choose the channel and interval, then select the time from bar or typing • The selected channel will be played individually by interval time difference 5) Panorama Search •...
- Page 39 CH 3 How to Use 6) Search Related buttons • You may click on Refresh, Option, Backup, Import, Exit , Full Screen for additional features and options Reload all data list. Search option. Backup recorded data to external USB device. Playback recorded data from external USB device.
-
Page 40: Play Mode
CH 3 How to Use 3-3-2. Play Mode If you choose ‘Full Screen’, the full screen appear. You can control the play speed in here. ▶ Play Screen GUI 1. Split Screen 2. Sequence 3. FB (Fast Backward): FB×2, 4, 8, 16, 32, 64 times faster 4. -
Page 41: Setup Mode
CH 3 How to Use 3-4. SETUP Mode Access Setup menu from Right Clicking mouse button to Popup Menu. Configure Display, Record, Device, Network, System which is navigated by clicking on corresponding tab menu at the top of the screen. Apply Apply changes Default... - Page 42 CH 3 How to Use 2) Display • You can use dual monitors that show same image by setting VGA+HDMI. • Configure and view Resolution, Sequence Dwell Time and Display control settings. 1280x720(60Hz), 1280x720(50Hz), Resolution 1280x1024(60Hz),1920x1080(60Hz), 1920x1080(50Hz) Device VGA+HDMI, VGA, HDMI Sequence dwell time 1 sec ~ 60 sec Brightness...
- Page 43 CH 3 How to Use 3) HD Spot • If you are not using VGA+HDMI for display, you can use HD Spot. 1280x720(60Hz), 1280x720(50Hz), Resolution 1280x1024(60Hz),1920x1080(60Hz), 1920x1080(50Hz) Device VGA, HDMI, None Mode (Split Screen ) 1, 4, 9, 16 Screen Sequence dwell time 1 ~ 60 sec Switching...
- Page 44 CH 3 How to Use 4) SPOT Control • Set the SPOT output . CVBS Choose NTSC or PAL Mode 1, 4, 9, 16 Screen Sequence dwell time 1 ~ 60 sec Switching You can program the sequence time. If you want to just see ch1, you set all box to ‘1’.
- Page 45 CH 3 How to Use 5) Analog Color • Adjust color of analog cameras. Brightness Adjust brightness Contrast Adjust contrast Saturation Adjust saturation Adjust hue Default Return to factory default settings. Apply All Apply changes to all channels.
-
Page 46: Record
CH 3 How to Use 3-4-2. Record Configure and view Event In, Record, Group, Holiday settings 1) Record Rec type None, Conti, Event, C/E Audio Rec To select audio recording or not. v ALL Apply Apply the setting to whole channel. Resolution 1920x1080, 1280x720, 960x540 Continuous... - Page 47 CH 3 How to Use v Event recording has priority in recording. In C/E recording, the recording will follow conti recording setup in normal condition while it would follow event recording setup in event generation. v For convenience, you can use the ‘Apply All’ menu to change with the same preference.
- Page 48 CH 3 How to Use 3) Schedule • In recording, Schedule recording setting is most preferred. So if you activate the weekly scheduler, you cannot record manually. • Schedule On : The weekly scheduler is activated. • Holiday On : The holiday that set by user is activated. •...
- Page 49 CH 3 How to Use 4) Holiday With this menu, you can add the holidays. Use the ‘Add’ button for adding the holiday and use the ‘Delete’ or ‘Delete All’ buttons for removing the existing holidays.
- Page 50 CH 3 How to Use 5) Event In • With this menu, you can set sensor input, motion detection setup. You can also set each channel individually. • Although you set Motion Detection and Sensor Setting to On in Event menu, if Event Input in Rec Menu is set to None, it only detects and does not record.
-
Page 51: Device
CH 3 How to Use 3-4-3. Device • Configure and view Camera, Private Zone, Audio, Motion Detection, Alarm Out, PTZ settings and Controller. 1) Camera Signal type All video input is detected automatically/ Detected Detected camera video type Name You can set the camera name. Disable current camera. - Page 52 CH 3 How to Use 2) Private Zone If you want to hide some part of the picture for privacy, you can choose the area by dragging the mouse. The selected area will be changed to black screen. All Off All off the private zone Apply All Apply the setting to whole channel...
- Page 53 CH 3 How to Use 3) Audio EYE-ON 04/08 Audio 1~4 EYE-ON 08R Audio 1~8 Assign audio input to a video channel. EYE-ON 16R/16R+ Audio 1~16 Select which channel will be heard during All Series Audio Out Live View.
- Page 54 CH 3 How to Use 4) Motion Detection • Change settings for Motion Grid selection and Sensitivity Level. You can set multiple area. Sensitivity Low, Mid, High All On This will activate the motion detection of the all area. All Off This will deactivate the motion detection of the all area.
- Page 55 Relay, Popup, and Buzzer Alarm Out. Each type can have separate Duration value and also linked to selected camera. 5-1) Sensor Type Selectable option is N.O. (Normally Open) / N.C. (Normally Close) EYE-ON 04/08 N.O(Normal Open) / N.C(Normal Close) EYE-ON 08R 1~16 EYE-ON 16R/16R+ v For more details, refer to [CH 2.
- Page 56 CH 3 How to Use 5-2) Sensor In • You can choose the action after sensor in between relay, buzzer sound, pop up, spot pop up and HD spot pop up. Also you can choose more than one action. • Choose a sensor connected to a channel. •...
- Page 57 CH 3 How to Use 5-3) Motion Detection • You can choose the action after motion detection between relay, buzzer sound, pop up, spot pop up, and HD spot pop up. • Also you can choose more than one action. Furthermore you can set the preset position number by motion detection.
- Page 58 CH 3 How to Use 5-4) POS • You can choose the action after POS transaction or video loss between relay, buzzer sound, pop up, spot pop up and HD spot pop up. • Also you can choose more than one action.
- Page 59 CH 3 How to Use 5-5) Video Loss • You can choose the action after motion detection between relay, buzzer sound, pop up, spot pop up, and HD spot pop up. • Also you can choose more than one action.
- Page 60 CH 3 How to Use 5-6) Duration • You can choose the duration time from 5 to 60 seconds after motion detection between relay, buzzer sound, pop up, spot pop up, HD spot pop up, and preset.
- Page 61 CH 3 How to Use 6) PTZ Configure Pan/Tilt/Zoom camera for control via DVR System and Remote client. Driver Choose Driver to be suitable for PAN/TILT Camera manufacturer. Address Choose address to be suitable for PAN/TILT Camera manufacturer. Baudrate Choose baudrate to be suitable for PAN/TILT Camera manufacturer. •...
- Page 62 CH 3 How to Use v There are more kinds of camera which can be supported. Please contact the tech support to want to know the other cameras. Driver Baudrate PELCO D type 2400~9600 PELCO P type 2400 PANASONIC 2400~19200 ORIENTAL 2400(Fixed) LPT-A100L...
- Page 63 CH 3 How to Use 7) Controller This sets the ID of remote control. If you have many DVRs in the same place, you can control separately the DVR by different remote control ID. v Remote controller ID setup Use the ID setup and number key to set the ID of remote control on the remote controller.
- Page 64 This sets the POS interface(text inserter) with the DVR and cash register. ※ If you are using a USB hub, you can use up to 4 USB POS. ※ EYE-ON 04/08/16R/16R+ have a 1 serial port. Channel Select a Channel of POS...
- Page 65 CH 3 How to Use v How to Connect POS 1. Connect the USB between POS and DVR. *POS *DVR 2. To set manually, at first you should know the setting values of the POS. You can get the information from the POS setting screen. 3.
-
Page 66: Network
CH 3 How to Use 3-4-4. NETWORK Configure and view Address, Port, DDNS, E-mail, Control and Status settings. 1) Address Configure Network information for Remote client connection. DVR Name Type the URL of DVR using virtual keyboard. Type It can be supported only Ethernet. Set whether you want to use DHCP or not (On/Off). - Page 67 CH 3 How to Use 2) Port There are 4 kinds of ports for the case such as watch, search, setup and web. You can individually set the port number of the DVR. The default is 8000. You can choose from 8000 to 9999.
- Page 68 CH 3 How to Use 3) DDNS This is the function to automatically change the IP of DVR to URL. This product supports the automatic DDNS service using manufacture’s internal server. Also you can choose Dyndns. v If you choose dvrinside.com DDNS, the domain name is http://xxxxxx.dvrinside.com.
- Page 69 CH 3 How to Use 4) E-mail You can send the event with snapshot by email. Fill all the information correctly and push the ‘Email Test’. Also you can select each event individually by ‘Event Set’. Receiptor Type the email address of the receiptor. Sender Type the name of the sender.
- Page 70 CH 3 How to Use v Event Set Set events to send the email. Sensor Detect a sensor input. Motion Detect a motion detection. Video Loss Detect a video loss. Send inserted text of POS to the email. S.M.A.R.T. Send checked HDD S.M.A.R.T result to the email. System log Send system log to the email.
- Page 71 CH 3 How to Use 5) Control CMS will use the ‘High resolution’ setting in the case of full screen or quad screen, and will use the ‘Low resolution’ setting in the case of more than 4 split. You can adjust the number of split to switch from High to Low resolution.
- Page 72 CH 3 How to Use 6) Status This shows the information how many connections and what is the action of each connection. MAC Address This displays MAC address of DVR. Connected IP This displays all the connected IP. This displays how many connection for live viewing. Watch User This displays how many connection for playback.
-
Page 73: System
CH 3 How to Use 3-4-5. SYSTEM Configure and view system Date/Time, User Authority, Storage, System Log and Configuration settings 1) Date/Time Choose the time zone of your site. If you using the NTP Timezone function, it must be set correctly to your zone. Daylight Saving Time It enables to adapt the day light saving time automatically. - Page 74 CH 3 How to Use 2) User Authority This sets User authority individually. You can give to each users the authorities such as setup, search, backup, PTZ, network and camera control. Type an ID. Password Type a password. Setup Authorizes the setting of the system. Search Authorizing the search of the system.
- Page 75 CH 3 How to Use 3) Storage Display the information and usage of the hard disk drives. EYE-ON 04/08 You can install 2 Hard disk drives. EYE-ON 16R/16R+ You can install 4 Hard disk drives and 1 eSATA Display all the HDD usage being used for the product. If you press Total the ‘Enter’...
- Page 76 CH 3 How to Use 4) S.M.A.R.T :Self-Monitoring Analysis and Reporting Technology This function lets you probe the hard disk drives and investigate the status of the drivers automatically. S.M.A.R.T. S.M.A.R.T. On Set whether you want to use S.M.A.R.T. or not (On/Off). Determine the date to perform the S.M.A.R.T.
- Page 77 CH 3 How to Use 5) System Log You may view all System administration log from Setup à System à System Log. Also you can export the system log and easily send it to technical support for trouble shooting. Refresh Refresh the system log.
- Page 78 CH 3 How to Use 6) Configuration Shown at the following screen, from Setup à System à Firmware, you may view the current firmware version as well as Upgrade the firmware and additionally, Export, Import, and Default DVR Configuration. Firmware version Show the firmware version.
-
Page 79: Firmware Upgrade
CH 3 How to Use 3-5. Firmware Upgrade 1) Upgrade by Network After installing the client software, you can find the ‘NetDownloader Program’ in the window programs (Start -> programs -> DVR Client -> NetDownLoader) . Please execute this ‘Net Downloader Program’ to upgrade the firmware of the DVR. After typing the IP and password of the DVR, click the ‘Connect’... - Page 80 CH 3 How to Use When you connect the DVR, click the ‘open’ button on the ‘NetDownloader Program ’and select the update file and then press the ‘start’ button. You can see the below download window on the DVR screen. ☞...
- Page 81 CH 5 Client Program 2) Upgrade by USB If you want to upgrade by USB memory, 1. Download the latest firmware to USB memory root directory. 2. Put this memory to USB slot. 3. Choose ‘Upgrade’ button in MENU->SYSTEM->Configuration. 4. You can see the below screen will appear. 5.
-
Page 82: Trouble Shooting
Trouble Shooting Trouble Shooting Symptom Checkpoint Countermeasure ● Is DVR connected to power ● Can't turn on power ● Connect power cable supply cable? ● There is no image on monitor ● Are DVR and monitor turned ● Turn on power. ●... -
Page 83: Warranty
Warranty Warranty This product guarantees free repair based on guarantee regulations only if the malfunction is caused while customers were using it properly. Warranty Period Warranty period begins from the day this product is delivered to customer. Model Name Warranty From . - Page 84 Appendix. A Appendix A. CMS(Client Management Software) A-1. Install CMS for Windows PC CMS is a program for communication between DVR and PC to control signal and video. Insert the enclosed CD, and go to CD-ROM Drive and operate installer file, CMS Installer 32(64).msi, to operate the installer program.
- Page 85 Appendix. A ▶ System Minimum Requirements •CPU : intel core 2 duo 3.0MHz processor or better •RAM : 1GB or more •LAN : support network adapters 100Mbps or better If there are many connected channels more and more in case of Favorite, CPU share will be more occupied.
- Page 86 Appendix. A ① Insert the enclosed CD, and go to CD-ROM Drive and operate installer file, CMS Installer 32(64).msi, to operate the installer program. ② Click the Next for installation. If you don’t choose a directory to install program, it will be located at C:\ProgramData\CMS.
- Page 87 Appendix. A ③ Click the Next for installation. ④ When CMS installation program is processing, you can see the message that CMS is being installed on the screen.
- Page 88 Appendix. A ⑤ Click the Close after done with all installation tasks. ⑥ CMS installation is completed.
- Page 89 Appendix. A A-2. Mac CMS Installation This CMS supports Mac OS X 10.6.8 or later. For the first installation, you have to log in your Mac with an administrator account. If you log in with other account, it would be not installed t ①...
- Page 90 Appendix. A ③ Type your password to install CMS program. TVLogic ④ Configuring the installation.
- Page 91 Appendix. A ⑤ After the installation, click the close button.
- Page 92 Appendix. A . CMS Web installation (CMS for windows) CMS web is a client program using web browser. It supports IE8 or higher. ① Open internet browser on PC ② Type the internet address to connect the DVR you want to connect.
- Page 93 Appendix. A ③ When you try to connect it at first, Plug-in message will be pop up. Click the Ok. ④ Click run or save to install the set up file.
- Page 94 Appendix. A ⑤ After done with Plug-in installation, close the internet browser and open it again.
- Page 95 Appendix. A A-4. CMS Web installation (CMS for Mac) CMS web is a client program using web browser. It supports latest versions of safari and Firefox., but it doesn’t support chrome. ① Open internet browser on PC ② Type the internet address to connect the DVR you want to connect.
- Page 96 Appendix. A ③ When you try to connect it at first, Plug-in message will be pop up. Click the Ok. ④ Click save to install the set up file.
- Page 97 Appendix. A ⑤ Move to the path the file is downloaded from Finder. Double click the file. ⑥ Click Continue for installation.
- Page 98 Appendix. A ⑦ Type your password to install CMS plug in and click Install Software. TVLogic ⑧ Configuring the installation.
- Page 99 Appendix. A ⑨ Click Restart to finish installing the software.
- Page 100 Appendix. A A-5. How to use CMS After done with CMS installation tasks, it created a CMS icon on the desktop. In order to run the CMS, double click the icon on the desktop. Type ID and password to log in. v There is no limit the number of concurrent connections on CMS in theory.
- Page 101 Appendix. A The initial screen of CMS (Live view) The initial screen of CMS (Search view)
- Page 102 Appendix. A <CMS Composition> Toolbar View Screen Widget Status bar...
- Page 103 Appendix. A A.5.1 Widgets You can load many functions of widgets to this area freely, and delete them. • DVR List Widgets: add and connect to DVR devices. Current connected DVR Show a DVR List Disconnected DVR devices Connect a DVR List Connected DVR devices Add DVR devices Delete DVR devices...
- Page 104 Appendix. A • Device Monitor Widget : Show the information of the added DVR devices. - Show the information of the connected DVR devices. - The information is updated automatically depend on it’s status connected or disconnected. • Calendar Widget : Show the recorded data of date. Calendar shows the recorded data of date on a DVR Device.
- Page 105 Appendix. A • Pan tilt Control Widget : Control a video of pan tilt camera. 1. Pan tilt Control Zoom Control Focus Control Iris Control Panning and Tilting Control 2. Preset Preset is a function that memorize the temporary position of camera. Set : Memorize a position of a number that you want to use from 1 to 256 with the Set button.
- Page 106 Appendix. A A.5.2 Tab (Live Tab / Search Tab) You can create taps for live or search video. 1. How to make a new tab Click button on the tab, it will make a Empty tab. Choose a new view. (Live, Search, and Favorite View) A new Live View is created when you click the icon.
- Page 107 Appendix. A 2. Play Time Line You can check and change the time of recorded video on Search tab. mode (24 hour M mode(60 minute) Change the mode of Time Line - The time is loaded as shown in the figure when you choose the date of existed data from Calendar.
- Page 108 Appendix. A • Instance Backup Widget : Backup a video. Backup Data information Selected DVR Selected channel of Select time and date Get Estimate capacity Recording stop Recording start - Instance Backup is the function that save the recorded video on the PC from DVR device.
- Page 109 Appendix. A • Time navigation Widget: Control the playback with Time navigation Widget that can play, pause, play speed, and so on. Set up play speed Play individual frames Play / Pause - Set up play speed (-16 ~ + 16). - Play &...
- Page 110 Appendix. A A.5.3 Tool Bar Screen Capture Favorite List Go to Page Add to Previous Favorite Page User Settings Rotate Pages Audio Split Screen Switch to full screen Next Page Change Live/Search View of split mode. (from 1 to 144 ) Capture screen of the current View.
- Page 111 Appendix. A Rotate pages the current split screen to click the icons, but only the number of current split screen has less than video channels. Rotate pages the current split screen to click the number of page, but only the number of current split screen has less than video channels.
- Page 112 Appendix. A A.5.4 Configuration Click the icon and Configuration window will be pop up. 1. Localization Language settings will apply after CMS program restart if you change to other language.
- Page 113 Appendix. A 2. Device - Connect • Device-Connect shows the information of connected devices and is able to add and delete. • Add devices with Add button as Device Tree Widget. • If you change setting on Device-Connect, Device Tree Widget is also immediately updated.
- Page 114 Appendix. A 3. Device – OSD - Device-OSD : Select options and colors used for Event Status, Date/Time, Frame Rate, Device Camera Name, and Resolution. - If you change setting on Device-OSD, it is immediately updated on screen.
- Page 115 Appendix. A 4. Rotation / Touring - Rotation/Touring : Set the rotate time of pages. - It skips empty pages, if you check Skips empty pages.
- Page 116 Appendix. A 5. Export. Import - Export, Import is a function that make other users use the same setting to have Device, Favorite, View, and Client Configuration when other users import the exported setting. - Export : Export a set file to path. - Import : Import a exported file.
- Page 117 Appendix. A 6. Account - Account : Add / Delete a user account. - You can modify added account when you double click it. - Auto Login : Connect a account that connected account at the last.
- Page 118 Appendix. A 7. Snapshot Directory - Snapshot Directory : Set a path to be saved a Screen Capture. - Image format : Set a image format BMP or PNG...
- Page 119 Appendix. A 8. Backup Directory - Backup Directory : Set a path to be saved a backup file. - Backup format : Set a backup format Avi or Exe. If you choose Auto, it will be Exe.
- Page 120 Appendix. A 9. Change Streaming • Change Streaming : Set a change streaming by number of split screen. • if you set a change streaming to 4 split screen as default, you will see a video with high resolution supporting devices up to 4 spit screen. If you set a split screen more than 4 split, you will see a video with low resolution.
- Page 121 Appendix. A A.5.5 Status Bar • Status Bar : Show a status of CMS, current connected account, kind of view, Language, date, and time from the left.
- Page 122 Appendix B Appendix B EYE-ON for Android mobile The EYE-ON allows for you to monitor DVRs. It now supports Live mode. Playback mode will be added soon. It is easy and convenient to use. The functions of EYE-ON: • Live View •...
- Page 123 Appendix B 2. Server Management Enter the appropriate data of your DVR server. Server Name : Name that you want to associate with the DVR server. IP address : IP address or a DDNS name. Server Port : Port number(watch port in DVR setup). User Name : Username(default is "admin").
- Page 124 Appendix B Tap the DVR information for a few second in order to modify the sever setting. 3. Live Viewing Tap the DVR server information. The app will show “Please wait” as below. ** Wait Until it receives DVR channel data, it will take a few seconds depending on the network environment.
- Page 125 Appendix B The next screen shows the first channel on DVR live view. 4. Multi Channel Viewing If you tap buttons, sliding view will appear in live view so that you can change the channel or division that you want. Max channel depends on server’s max channel, and division type is 1,4 and 16 division mode.(16 division mode works on products support over 16channels.
- Page 126 Appendix. B 5. Image Saving If you push the left button of phone, ‘Save Image’ will be appeared on bottom screen. If you save a snapshot, you can find in the phone’s Gallery menu. 6. PTZ Control Mode If the PTZ camera is set on the DVR , PTZ button will appear automatically and allow you to control PTZ camera.
- Page 127 Appendix. B 7. Digital-Zoom Mode Digital zoom in and zoom out will be done by two finger touch and dragging like a smart phone zooming. 8. Search If you tap the button, you can search the recorded file. - Select the wanted date. - Drag the blue time bar as you wanted time Also you can see the multi channel playback by choosing the ‘Division’...
- Page 128 Appendix C Appendix C EYE-ON for iPhone The EYE-ON allows for you to monitor DVRs. It now supports Live mode. Playback mode will be added soon. It is easy and convenient to use. The functions of EYE-ON: • Live View •...
- Page 129 Appendix C 2. Server Management Enter the appropriate data of your DVR server. Title : Name that you want to associate with the DVR server. IP address : IP address or a DDNS name. Port : Port number(watch port in DVR setup). Username : Username(default is "admin").
- Page 130 Appendix C The "Edit“ button modifies the information of the selected DVR Server. 3. Live Viewing Go ahead and tap the DVR server item in EYE- ON screen when you register DVR server. The app will show “loading circle icon” as below. ** Until it received DVR channel data, it takes a few seconds(it depends on network environment.
- Page 131 Appendix C The next screen shows DVR live view for first channel. 4. Multi Channel Viewing If you tap button, you can choose 4, 8 and 16ch viewing in live view and you can change channel and division mode. Max channel depends on server’s max channel, and division type is 1 channel, 4 channel and 16 channel mode.
- Page 132 Appendix C 5. Image Saving You can save the snapshot by tapping button. If you capture image by tapping "Save Image" button, you can find image file in iPhone's photo album menu. 6. PTZ Control Mode If the PTZ camera is set on the DVR , PTZ button will appear automatically and allow you to control PTZ camera Every PTZ function is controlled by touch.
- Page 133 Appendix C 8. Search If you tap the button, you can search the recorded file. - Select the wanted date from the calendar. - Drag the blue time bar as you wanted time Also you can see the multi channel playback by choosing the ‘Division’ selection..
Need help?
Do you have a question about the EYE-ON 04/08 and is the answer not in the manual?
Questions and answers