Table of Contents
Advertisement
Table of contents
Front panel ................................................................................................... 2
Rear panel ................................................................................................... 4
Unpacking ................................................................................................... 6
Set-up and installation ................................................................................ 7
Installing the spikes (optional) .................................................................. 7
Location ...................................................................................................... 8
A word about cables ................................................................................ 8
A word about balanced output ............................................................. 9
Connecting digital sources to the PDP 3 ................................................ 9
Connecting the PDP 3's analog outputs ................................................ 9
Connecting the PDP 3's digital output (optional) ................................. 9
Power supply connection ...................................................................... 10
master power switch ............................................................................... 10
Care and maintenance ........................................................................... 11
Specifications ............................................................................................ 12
Pin assignments, male XLR balanced analog output ......................... 12
Pin assignments, female XLR digital input ............................................. 12
Troubleshooting ......................................................................................... 13
Service ....................................................................................................... 14
1
Advertisement
Table of Contents

Subscribe to Our Youtube Channel
Summary of Contents for PROCEED PDP 3
-
Page 1: Table Of Contents
Location ...................... 8 A word about cables ................8 A word about balanced output ............. 9 Connecting digital sources to the PDP 3 ..........9 Connecting the PDP 3's analog outputs ..........9 Connecting the PDP 3's digital output (optional) ......... 9 Power supply connection .............. -
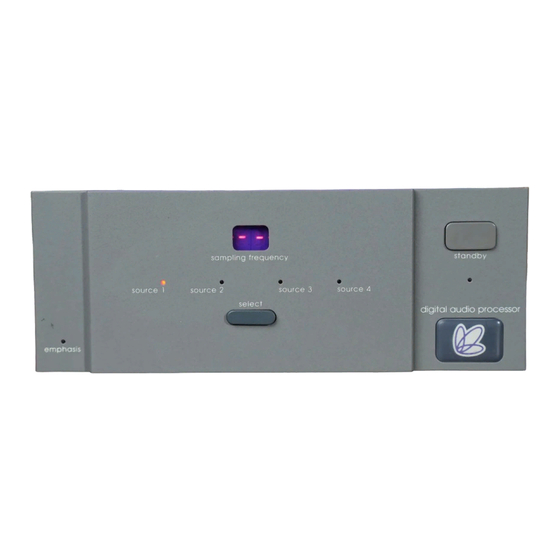
Page 2: Front Panel
Only one source at a time may be selected. When the PDP 3 is taken out of the standby mode, the source last selected before going into standby will be automatically selected and the LED above that source will light; for example, source 1. - Page 3 This isn’t a malfunction of the PDP 3. Rather, it’s the result of incorrect signals generated by the program source’s transport. Depending on your transport and how you operate it, you may never see this condition.
-
Page 4: Rear Panel
PUSH made in u.s.a. master power This switch turns the PDP 3 on and off. The switch must be in the "|" (on) position for the processor to operate. (See "Set-up and installation.") NEVER operate the master power switch without first making sure... - Page 5 AC power cord This cord supplies AC power to the PDP 3. (See "Set-up and installation.") Fuse This holder contains the main fuse for the PDP 3. If the fuse ever needs to be replaced, contact your Proceed dealer.
-
Page 6: Unpacking
Unpacking Carefully open the shipping carton and remove the contents. You should have: Proceed PDP 3 Owner’s manual Four spikes Hex key Save the shipping carton and all packing material. Though it may be inconvenient to store, it’ll come in handy for shipping if you move, or if the unit needs to be shipped for service. -
Page 7: Set-Up And Installation
Installing the spikes 2. Place the PDP 3 upright on a flat, stable surface. Carefully tip it so it (optional) rests on its top; protect its finish with a soft cloth. -
Page 8: Location
PDP 3’s ventilation or that of another component could cause either to overheat, resulting in damage to your system. 5. Make sure that power is turned off to both the PDP 3 and your receiver, integrated amplifier, or preamplifier/power amplifier. -
Page 9: A Word About Balanced Output
Make sure to connect the left output of the PDP 3 to the left input of the receiver, integrated amplifier, or preamplifier, and likewise for the right channel. -
Page 10: Power Supply Connection
Power supply connection 9. Connect the power supply cord of the PDP 3 to an unswitched convenience outlet (like those on the rear panel of many audio components). If you connect the PDP 3 directly to a wall outlet, make sure that the outlet has polarized sockets. -
Page 11: Care And Maintenance
Care and maintenance To clean your PDP 3, use a soft cloth moistened with plain water. Don’t apply water, dusting sprays, solvents, abrasives, or cleaning fluids directly to the cabinet. -
Page 12: Specifications
Specifications Frequency response: 10 Hz - 20 kHz +0dB, -0.2dB Total harmonic distortion (THD): 0.004% @ 1 kHz, 0dB Dynamic range: 104dB (or better) Signal-to-noise ratio: 107dB Channel separation: 120dB Intermodulation distortion (SMPTE IMD): 0.008% Digital-to-analog conversion: Two precision 20-bit DACs Filtering: 8x oversampling digital filter Analog filter, linear phase to 40 kHz... -
Page 13: Troubleshooting
The PDP 3 is in standby mode (check to see if the standby LED is lighted; see “Front panel”). To take the PDP 3 out of standby, press the standby button on the front panel. -
Page 14: Service
“Troubleshooting” section, contact your Proceed dealer. Your dealer will tell you what to do next. It’s important that your Proceed PDP 3 be serviced only by an authorized Proceed service facility. This will ensure that proper repairs are made, and that your Proceed PDP 3 warranty stays in effect throughout the warranty period. - Page 16 MADRIGAL AUDIO LABORATORIES, INC. 2081 South Main Street, P.O. Box 781 Middletown, Connecticut 06457 USA Telephone: (203) 346-0896 or 344-9300 Fax: (203) 346-1540 630108 ©1992 Madrigal Audio Laboratories, Inc. All rights reserved. Printed in U.S.A...
- Page 17 PDP 3 digital audio processor...
- Page 18 WARNING: TO REDUCE THE RISK OF FIRE OR ELECTRIC SHOCK, DO NOT EXPOSE THIS APPLIANCE TO RAIN OR MOISTURE. CAUTION RISK OF ELECTRIC SHOCK DO NOT OPEN CAUTION: TO REDUCE THE RISK OF ELECTRICAL SHOCK, DO NOT REMOVE COVER. NO USER-SERVICEABLE PARTS INSIDE.
- Page 19 Important Safety Instructions To get the best performance from your Proceed PDP 3, and for your safety, read and follow these important safeguards. 1. Before operating the product, read all safety and operating instructions. 2. Keep all safety and operating instructions for future reference.
- Page 20 Thank you for choosing the Proceed PDP 3. Manufactured under strict quality control, the Proceed PDP 3 is a superb example of state-of-the-art digital technology. Though you probably aren’t a newcomer to high-fidelity audio equipment, we urge you to read this manual thoroughly and to carefully follow all operating and safety instructions.
Need help?
Do you have a question about the PDP 3 and is the answer not in the manual?
Questions and answers