Table of Contents
Advertisement
Advertisement
Table of Contents

Related Manuals for Alcatel One Touch Pop 10 P360X


Summary of Contents for Alcatel One Touch Pop 10 P360X
- Page 1 User manual...
-
Page 2: Table Of Contents
Table of Contents Your device ..................17 Keys and connectors ................17 Getting started ..................19 Home screen .....................21 Text input ..................29 Using Onscreen Keyboard ..............29 SwiftKey ......................29 Text editing ....................30 Contacts ...................32 Understand your contacts ..............32 Add a contact ...................33 Manage contact groups ................34 Edit your contacts ..................35 Import, export, and share contacts .............35 Accounts ....................36... - Page 3 Maps ....................66 Get My Location ..................66 Search for a location ................67 Star a location ...................68 Get driving, public transportation or walking directions ....69 Arrangement of Layers ................70 Others ....................71 10.1 Calculator ....................71 10.2 File Manager .....................71 10.3 Sound Recorder ..................72 10.4 Other apps ....................72 Settings ....................73...
-
Page 4: Safety Information
Safety information We recommend that you read this chapter carefully before using your device. The manufacturer disclaims any liability for damage, which may result as a consequence of improper use or use contrary to the instructions contained herein. • TRAFFIC SAFETY Given that studies show that using a device while driving a vehicle constitutes a real risk, even when the hands-free kit is used (car kit, headset...), drivers are requested to refrain from using their device... - Page 5 Switch the device off when you are near gas or flammable liquids. Strictly obey all signs and instructions posted in a fuel depot, petrol station, or chemical plant, or in any potentially explosive atmosphere. When the device is switched on, it should be kept at least 15 cm from any medical device such as a pacemaker, a hearing aid or insulin pump, etc.
- Page 6 Do not paint it. Use only battery chargers and accessories which are recommended by TCL Communication Ltd. and its affiliates and are compatible with your device model. TCL Communication Ltd. and its affiliates disclaim any liability for damage caused by the use of other chargers or accessories.
- Page 7 When you play games on your device, you may experience occasional discomfort in your hands, arms, shoulders, neck, or other parts of your body. Follow the instructions to avoid problems such as tendinitis, carpal tunnel syndrome, or other musculoskeletal disorders. • PRIVACY Please note that you must respect the laws and regulations in force in your jurisdiction or other jurisdiction(s) where you will use...
- Page 8 - Municipal waste disposal centers with specific bins for these items of equipment. - Collection bins at points of sale. They will then be recycled, preventing substances being disposed of in the environment, so that their components can be reused. In European Union countries: These collection points are accessible free of charge.
- Page 9 Your device is a radio transmitter and receiver. It is designed not to exceed the limits for exposure to radio waves (radio frequency electromagnetic fields) recommended by international guidelines. The guidelines were developed by an independent scientific organisation (ICNIRP) and include a substantial safety margin designed to assure the safety of all persons, regardless of age and health.
-
Page 10: Legal Information
hands-free accessory to keep the wireless device away from the head or body during use, or reduce the amount of time spent on the device. • LICENCES microSD Logo is a trademark. The Bluetooth word mark and logos are owned by the Bluetooth SIG, Inc. -
Page 11: General Information
General information • Internet address: www.alcatelonetouch.com • Hot Line Number: see “TCL Mobile Services” leaflet or go to our website. On our website, you will find our FAQ (Frequently Asked Questions) section. You can also contact us by e-mail to ask any questions you may have. - Page 12 TCL Mobile shall not be held legally responsible for such differences, if any, nor for their potential consequences, which responsibility shall be borne by the operator exclusively. This device may contain materials, including applications and software in executable or source code form, which is submitted by third parties for inclusion in this device (“Third Party Materials”).
- Page 13 The availability of the applications may vary depending on the countries and the operators where the device is used; in no event shall the list of possible applications and software provided with the devices be considered as an undertaking from TCL Mobile; it shall remain merely as information for the purchaser.
- Page 14 Warranty Your device is warranted against any defect or malfunctioning which may occur in conditions of normal use during the warranty period of twelve (12) months (1) from the date of purchase as shown on your original invoice. Batteries (2) and accessories sold with your device are also warranted against any defect which may occur during the first six (6) months (1) from the date of purchase as shown on your original invoice.
- Page 15 3) Modification or repair performed by individuals not authorised by TCL Communication Ltd. or its affiliates or your vendor; 4) Modification, adjustment or alteration of software or hardware performed by individuals not authorized by TCL Communication Ltd.; 5) Inclement weather, lightning, fire, humidity, infiltration of liquids or foods, chemical products, download of files, crash, high voltage, corrosion, oxidation…...
-
Page 17: Your Device
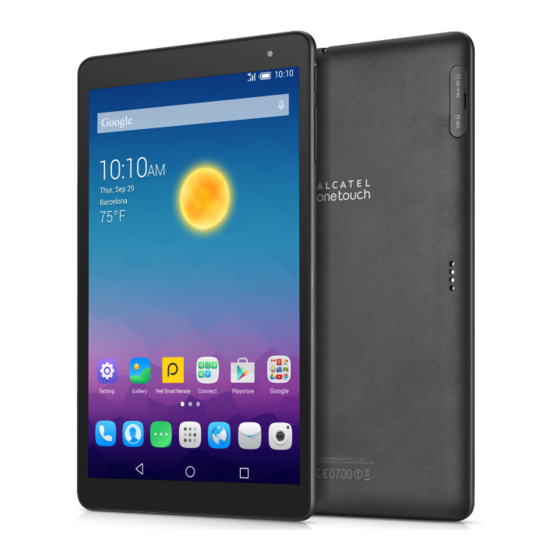
Your device Keys and connectors Front panel IR LED Earphone Interface Front camera Touch screen... -
Page 18: Rear Panel
Rear panel Micro USB Connector/Battery Charge Rear Camera Power Key SIM Card and Volume Micro SD Card Up/Down Keyboard Connector Loudspeaker... -
Page 19: Getting Started
Getting started 1.2.1 Setup Inserting the SIM Card and Micro SD Card Before inserting/removing the SIM card or microSD card, you should ensure the tablet is off, to protect it from corruption or damage. In addition, frequently removing or inserting the SIM card or SD card may cause the tablet to restart. -
Page 20: Power On Your Tablet
This device can be charged through USB computer connection, though more slowly. 1.2.2 Power on your tablet Hold down the Power key until the tablet powers on, unlock your tablet (Swipe, Pattern, PIN, Password, and None) if necessary and confirm. The Home screen is displayed. If you do not know your PIN code or if you have forgotten it, contact your network operator. -
Page 21: Home Screen
Home screen You can bring all your favourite icons (apps, shortcuts, folders and widgets) to your Home screen for quick access. Touch the Home key to switch to Home screen. Status bar Favourite apps All apps Back key Recent apps key Home key Back key • Touch to go back to the previous screen, or to close a dialog box,... - Page 22 Status bar • View status or notification indicators. Favourite apps • Touch an app to launch it. • Touch and hold to move or delete the app icon. All apps • Touch to see all apps in your tablet. The Home screen extends on either side of the screen to allow more space for adding apps, shortcuts etc.
- Page 23 Slide/Swipe Slide the screen to scroll up and down the apps, images, web pages… at your convenience. Flick Similar to swiping, but flicking makes it move more quickly. Pinch/Spread Place your fingers of one hand on the screen surface and draw them apart or together to scale an element on the screen.
-
Page 24: Notification Panel
1.3.2 Status bar From status bar, you can view both tablet status on the right side and notification information on the left side. Touch and drag down the Status bar to open the Quick settings panel or the Notification panel. Touch and drag up to close it. - Page 25 1.3.3 Search bar The tablet provides a Search function which can be used to locate information within apps, the tablet or the web. Search by text • Touch Search bar from the Home screen. • Enter the text/phrase you want to search for. • Touch on the keyboard if you want to search on the web.
- Page 26 1.3.4 Lock/Unlock your screen To protect your tablet and privacy, you can lock the tablet screen by choosing swipe or creating a pattern, PIN, or password. To create a screen unlock pattern (refer to section "Screen lock" for detailed settings) • Drag down the Status bar and open the Quick settings panel then touch the settings icon to enter Settings, then touch...
- Page 27 To unlock tablet screen Press the power key once to light up the screen, draw the unlock pattern you have created or enter the PIN or password to unlock the screen. If you have chosen Swipe as the screen lock, touch the Lock icon with your finger and swipe up to unlock the screen.
-
Page 28: Volume Adjustment
the icon on the left or right edge of the screen to drag the item to another Home screen. Remove Touch and hold the item to be removed to activate the Move mode, drag the item up to the Remove icon and release after the item turns red. -
Page 29: Text Input
Text input Using Onscreen Keyboard Onscreen Keyboard settings from the Home screen, select Settings > Language Touch & input, and touch Current Keyboard. A series of settings are available for your selection. SwiftKey Touch once to turn on the "Abc" mode and twice to turn on the "ABC"... -
Page 30: Text Editing
Text editing You can edit the text you have entered. • Touch and hold or double-tap within the text you would like to edit. • Drag the sliders to select more or less text. • Upon the selection of some text, the following options appear: selecting all , cutting , copying... - Page 31 You can also insert new text. • Touch a blank area to enter text. Alternatively, touch in the middle of some text until the cursor appears with a slider. Then drag the slider to a desired position to enter text. • If you have cut or copied some text, selecting new text will make the PASTE icon appear.
-
Page 32: Contacts
Contacts The Contacts app enables quick and easy access to the contacts you want to reach. You can view and create contacts on your tablet and synchronise these with your Gmail contacts or other apps. Understand your contacts Touch to search in your contacts. -
Page 33: Add A Contact
Touch to display contacts list option menu. The following actions are enabled: Contacts to display Choose contacts to display. Import/export Import or export contacts between the tablet, SIM card, and microSD card. Accounts Manage the synchronisation settings for different accounts. Settings Set the modes of displaying contacts. -
Page 34: Manage Contact Groups
You are required to enter the contact name and other contact information. By scrolling up and down the screen, you can move from one field to another easily. If you want to add more information, touch ADD ANOTHER FIELD to add a new category. When you finish adding, touch to save. -
Page 35: Edit Your Contacts
Edit your contacts To edit contact information, select a contact, then touch on top of the screen, When you finish editing, touch Delete a contact To delete a contact, touch > Delete, select some unwanted contacts, and touch Deleted contacts will be removed from other apps the next time you synchronise your tablet. -
Page 36: Accounts
Accounts Contacts, data or other information can be synchronised from multiple accounts, depending on the apps installed on your tablet. To add an account, drag down the status bar to open the quick settings panel and touch > Accounts > Add account. You are required to select the kind of account you are adding, like Google, Email, etc. -
Page 37: Gmail & Email
Gmail & Email Gmail As Google's web-based email service, Gmail is configured when you first set up your tablet. Gmail on your tablet can be automatically synchronised with your Gmail account on the web. Unlike other kinds of email accounts, each message and its replies in Gmail are grouped in your inbox as a single conversation;... - Page 38 touch the new email to view it. Or you can also access the Gmail Inbox label and touch the new mail to read it. You can search for an email by sender, receiver, subject, etc. • Touch the icon from Inbox screen. • Enter the keywords you want to search for in the searching box and confirm.
-
Page 39: General Settings
Gmail settings and select Settings in Inbox To manage Gmail settings, touch screen. General settings • Gmail default Touch to select the Delete or Archive action. action • Swipe actions Mark the checkbox to define the swipe action. • Sender image Mark the checkbox to show beside name in conversation list. -
Page 40: Email
• Inbox categories Touch to show/hide inbox categories in the Inbox screen. • Notifications Select to activate notifications for new arriving emails. • Inbox sound Touch to set Sound, Vibrate and Notify once. • Signature To add a signature text to the end of each mail you send. -
Page 41: Add Account
email account settings screen to enter settings manually. Or you can touch MANUAL SETUP to directly enter the incoming and outgoing settings for the email account you are setting up. • Enter the account name and display name in outgoing emails. >... -
Page 42: Calendar & Time
Calendar & Time Calendar The Calendar app can be used to keep track of important meetings, appointments, etc. 5.1.1 Multimode view You can display the Calendar in Day, Week, Month, or Agenda view. • Touch the upper left corner of the screen to change your Calendar view. - Page 43 5.1.4 Event reminder If a reminder is set for an event, the upcoming event icon will appear on Status bar as a notification when the reminder time arrives. Touch and drag down the status bar to open the notification panel, touch event name to view Calendar notification list.
-
Page 44: Clock
Clock The Time app includes four subsidiary apps: Alarm, World clock, Countdown and Timer. 5.2.1 Set an alarm On the Clock screen, touch to enter the Alarm screen, and touch to add a new alarm. Set hour and minute on the clock, and touch OK to confirm. -
Page 45: Getting Connected
Getting connected Connect to the Internet 6.1.1 Wi-Fi Using Wi-Fi, you can connect to the Internet when your tablet is within range of a wireless network. Turn Wi-Fi on and connect to a wireless network • On the quick settings panel, touch >... -
Page 46: Browser
information. • Touch CONNECT. When successfully connected, your tablet will be connected automatically the next time you are within range of this network. Forget a Wi-Fi network The following steps prevent automatic connections to networks which you no longer wish to use. • Turn on Wi-Fi, if it’s not already on. -
Page 47: View Web Pages
6.2.1 View web pages When opening a website, you can navigate on web pages by sliding your finger on the screen in any direction to locate the information you want to view. Zoom in/out on a web page Spread or pinch your fingers on the screen to zoom in or out. Find text on a web page • On the Browser screen, touch >... -
Page 48: Other Options
Other options: Homepage Get back to the home page you set. Refresh Refresh the current page. Stop Stop the current page. Forward Go to the next page. Back Go to the previous page. New tab Open a new tab. incognito Open a new tab of which the browsing records will not be retained. -
Page 49: View Browser History
6.2.2 Manage links, history and downloads Manage a link Touch the link to open the web page. Touch and hold the link to open options for further operation, like Open in new tab, Save link, Copy link URL, etc. View Browser history from Browser screen, and then select History Touch the icon to view the history page. -
Page 50: Connect To Bluetooth Devices
To edit a bookmark, perform the following: • Touch the icon to enter the Bookmarks screen. • Touch and hold the bookmark you want to edit. • Touch Edit bookmark and input your changes. • When you finish editing, touch OK to confirm. Touch and hold a bookmark in the bookmark list to view these additional options: Add shortcut to... -
Page 51: Connect To A Computer
To make your tablet more recognisable, you can change your tablet name which is visible to others. > Rename this device. • Touch • Enter a name, and touch RENAME to confirm. Pair your tablet with a Bluetooth device To exchange data with another device, you need to turn Bluetooth on and pair your tablet with the Bluetooth device with which you want to exchange data. -
Page 52: Share Your Tablet's Internet
For the operating system Windows XP or lower, you should download and install Windows Media Player 11 on your computer from http://windows.microsoft.com. To locate the data you have transferred or downloaded in the internal storage, touch File Manager, all data you have downloaded is stored in File Manager, where you can view media files (videos, photos, music and others), rename files, install apps on your tablet, etc. - Page 53 • In the screen that opens, follow the instructions from your network administrator to configure each component of the VPN settings. • Touch SAVE. The VPN is added to the list on the VPN settings screen. Before adding a VPN, you should set a lock screen pattern, PIN code or password for your tablet.
-
Page 54: Play Store
Play Store Play Store is an online software store, where you can download and install apps and games to your tablet. , and then select Help & After the app is launched, touch feedback to enter Play Store help page for more information on this function. -
Page 55: Download And Install
On Play Store screen, touch Shop apps to select a category. Within each category you can select to view items sorted by Top free, Top new free, Trending, etc. Touch Back key to return to the previous screen. Download and install To download &... - Page 56 • Touch the app you want to buy. • Touch the price on the upper-right part of the screen to preview the functions and data the app can access on your tablet if you install it. • Touch CONTINUE to confirm. • When making your first purchase, you are required to input your credit card information and to log in to Google payment and billing service.
-
Page 57: Manage Your Downloads
Manage your downloads After you have downloaded and installed an app, the following further operations are available for your selection. View On Google Play Store screen, touch and select My apps. Uninstall and select My apps. Touch On Google Play Store screen, touch the app you want to uninstall to enter the details screen, touch UNINSTALL, and finally touch OK to confirm. - Page 58 Reviews Open the details screen for an app, touch the stars under Rate this app to award and input comments, and touch OK to confirm. Flag You can report an inappropriate app to Google Play Store by flagging it. Open the details screen for the app, scroll to the bottom, touch Flag as inappropriate, enter the reason, and finally touch Submit.
-
Page 59: Multimedia Apps
Multimedia apps Camera Your tablet is fitted with a Camera for taking photos and shooting videos. Touch to show settings Touch to switch between front/rear camera Pinch two or Swipe left to view more fingers pictures or videos together or you have taken. -
Page 60: Photo Settings
Further operations when viewing a photo/video you have taken • Touch to share the photo or video you have taken, and touch to edit the photo. • Touch the photo icon to access Gallery. 8.1.1 Settings in framing mode Before taking a photo/shooting a video, touch the icon to adjust a number of settings in framing mode. -
Page 61: Video Settings
Advanced Access the advanced options for taking a photo. Video settings Video quality Set the quality of the video shot. Sound recording Set whether to record sound while shooting the video. Limit for MMS Limit the size of a video to be attached in an MMS message. -
Page 62: Gallery
Gallery Gallery acts as a media player for you to view photos and play back videos. In addition, a set of further operations to pictures and videos are available for your choice. Touch to select categories, such as Albums and Locations. - Page 63 After the edit, you can perform the following: • Touch SAVE to save the modified picture. • Touch to undo the previous modification. • Touch to redo the previous modification. Batch operation Gallery provides a multi-select function, so that you can work with pictures/videos in batches.
-
Page 64: Youtube
YouTube YouTube is an online video-sharing service where the user can download, share and view videos. It supports a streaming function that allows you to start watching videos almost as soon as they begin downloading from the Internet. As an online video service, your tablet must have a network connection to access YouTube. -
Page 65: Videos
8.3.1 Watch videos Touch a video to play it. In the Playing screen, you can view information and video comments, and also browse links to related videos. You can also rate, share, label as favourite, and create a new playlist from this screen. To exit the video playing screen, touch Back key to return to the video list. -
Page 66: Maps
Maps Get My Location 9.1.1 Choose a data source to decide My Location Drag down the status bar to open quick settings panel and touch > Location. Touch Mode > Device only or High accuracy to set GPS as My Location data source. -
Page 67: Search For A Location
To zoom in and out on a map, pinch or spread your fingers, or you can also zoom in by double-tapping a location on screen. To clear the map history, go to Settings, select Maps history, and then touch Search for a location While viewing a map, touch the search box, enter an address, a city or a local business, and confirm. -
Page 68: Star A Location
Star a location Just like bookmarking a web address on the Internet, you can star any position on the map for later use. 9.3.1 How to save a location Touch a location on a map. On the details screen, touch the blue star in the middle of the screen to save the location, or touch a gold star to cancel saving. -
Page 69: Get Driving, Public Transportation Or Walking Directions
Get driving, public transportation or walking directions 9.4.1 Get suggested routes for your trip Touch icon from Maps screen. • Touch the entering bar to edit your start point by one of the following methods: entering an address, using My Location, selecting a start point on a map, selecting a starred item, selecting an address from your contacts or using search history. -
Page 70: Arrangement Of Layers
9.4.3 Search for locations along your route Please refer to "9.2 Search for a location" for detailed information. Arrangement of Layers Layers allow you to view locations and additional information overlaid on the map. You can add multiple layers or remove only certain layers to control exactly what information you want visible on the map at one time. -
Page 71: Others
10 Others 10.1 Calculator With Calculator, you can solve many mathematical problems. To access this function, touch from Home screen and then touch Enter a number and the arithmetic operation to be performed, enter the second number, then touch "=" to display the result. Touch DEL to delete digits one by one, touch and hold DEL to delete all at one time. -
Page 72: Sound Recorder
10.3 Sound Recorder To access this function, touch from Home screen and then touch Sound Recorder allows you to record voice/sound for seconds/ hours. 10.4 Other apps The previous apps in this section are preinstalled on your tablet. To read a brief introduction of the preinstalled 3rd party apps, please refer to the leaflet provided with the tablet. -
Page 73: Settings
11 Settings To access this function, touch from Home screen and touch to access Settings. 11.1 Wireless & networks 11.1.1 Wi-Fi Using Wi-Fi you can now surf the Internet whenever you are in range of a wireless network. The only thing you have to do is to enter the Wi-Fi screen and configure an access point to connect your tablet to the wireless network. -
Page 74: Mobile Networks
11.1.5 Default SMS app In this section you can set the Hangouts, Messaging, or Smart Suite as your default SMS app. 11.1.6 Tethering & portable hotspot You can tether your computer with a USB cable or via Bluetooth connection, so that you can share your device’s Internet connection with your computer. -
Page 75: Device
11.1.9 Emergency broadcasts This function allows you to set the display of alerts against cases, such as threats to life and property, child abduction, earthquakes, and tsunamis. 11.2 Device 11.2.1 Sound & notification Use the Sound & notification settings to configure volume, ringtones, and notifications for different events and environments. -
Page 76: Personal
11.2.3 Storage Use these settings to monitor the total and available space on your tablet and on your microSD card. If a warning message comes up saying that tablet memory is limited, you are required to free up space by deleting some unwanted apps, downloaded files, etc. -
Page 77: Encrypt Tablet
11.3.2 Security Screen lock You can use None and Swipe to directly use your tablet or set Pattern, PIN, and Password for screen unlock before the use, which prevents unauthorised access to your tablet. Palm and Tap After this function is enabled, you can place your palm over the tablet screen to lock the screen. -
Page 78: Trusted Credentials
trusted sources, such as Google Play Store. Storage type Touch to choose a storage type. Trusted credentials Touch to display trusted CA certificates. Install from SD card or Internal Storage Touch to install encrypted certificates from the microSD card or Internal Storage. -
Page 79: Personal Dictionary
11.3.4 Language & input Use the Language & input settings to select the language for the text on your tablet and to configure the onscreen keyboard. You can also configure voice input settings and the pointer speed. Language Touch to select the language and the region you want. Spell checker Turn on the switch to enable the system to show suggested words. - Page 80 • Double-space full stop Turn on the switch to enable double-tap on spacebar to insert a full stop followed by a space. • Sound on keypress Turn on the switch to play a brief sound each time you touch a key on the onscreen keyboard.
-
Page 81: Backup And Reset
• Advanced settings Touch to view more advanced settings for Android keyboard, such as Key pop-up dismiss delay and Keypress sound volume. Text-to-speech output • Preferred engine Touch to choose a preferred text-to-speech engine. Touch the settings icon to show more choices for each engine. • Speech rate Touch to open a dialog where you can specify how quickly you want the synthesizer to speak. -
Page 82: Factory Data Reset
backing up your settings, and any existing backups will be deleted from Google Servers. Backup account Touch to set your backup account. Automatic restore Turn on the switch to restore your backed up settings or other data when you reinstall an app. Factory data reset Tablet reset will erase all of your personal data from internal tablet storage, including information about your Google Account, any other... -
Page 83: System
11.4 System 11.4.1 Date & time Use Date & Time settings to customise your preferences for how date and time are displayed. Automatic date & time Mark the checkbox to use network-provided time. Automatic time zone Mark the checkbox to use network-provided time zone or unmark to set all values manually. -
Page 84: Large Text
11.4.2 Accessibility You use the Accessibility settings to configure any accessibility plug- ins you have installed on your tablet. TalkBack Touch to activate or deactivate the TalkBack function. Captions Touch to set the caption type. Magnification gestures Touch to activate or deactivate the zoom in/out function by triple- tapping the screen. -
Page 85: Developer Options
11.4.3 Printing Cloud Print Touch to turn on or off the cloud print function. 11.4.4 Developer options Note: To access this function, touch Settings > About tablet, then touch Build number 7 times. Now Development is available. The Developer options screen contains settings that are useful for developing Android apps. -
Page 86: Allow Mock Locations
Revoke USB debugging authorizations Touch to revoke access to USB debugging from all computers you have previously authorised. Bug report shortcut Mark the checkbox to include an option in power menu for submitting a bug report. Allow mock locations Mark the checkbox to permit a development tool on a computer to control where the tablet believes it is located, rather than using the tablet’s own internal tools for this purpose. - Page 87 Show layout bounds Mark the checkbox to show clip bounds, margins, etc. Force RTL layout direction Mark the checkbox to force screen layout direction to RTL for all locales. Window animation scale Touch to adjust the animation scale for your window. Transition animation scale Touch to adjust the animation scale while performing transition.
-
Page 88: About Tablet
Strict mode enabled Mark the checkbox so that the screen will flash when apps do long operations on the main thread. Show CPU usage Mark the checkbox to show current CPU usage. Profile GPU rendering Turn on or off the Profile GPU rendering function. Enable OpenGL traces Touch to enable OpenGL traces. -
Page 89: Making The Most Of Your Tablet
Accessories that come with your tablet include the following: 1. Charger 2. USB cable To maximise performance and prevent potential risks, you are advised to use only the accessories in your box with your ALCATEL ONETOUCH tablet. -
Page 90: Troubleshooting
14 Troubleshooting Before contacting the service centre, you are advised to follow the instructions below: • You are advised to fully charge the battery for optimal operation. • Avoid storing large amounts of data in your tablet as this may affect its performance. • Use Factory data reset and the upgrade tool to perform tablet formatting or software upgrading. - Page 91 tablet, and make sure the Power key is not mis-contacted due to unlocked screen. • Check the battery charge level. My tablet cannot charge properly • Make sure that your battery is not completely discharged; if the battery power is empty for a long time, it may take around 20 minutes to display the battery charger indicator on the screen. • Make sure charging is carried out under normal conditions (0°C to +40°C).
- Page 92 Invalid SIM card • Make sure the SIM card has been correctly inserted. • Make sure the chip on your SIM card is not damaged or scratched. • Make sure the service of your SIM card is available. I cannot find my contacts • Make sure your SIM card is not broken. • Make sure your SIM card is inserted properly. • Import all contacts stored in SIM card to tablet. I am unable to use the features described in the manual • Check with your operator to make sure that your subscription includes this service.
- Page 93 • Contact your network operator to obtain the PUK code (Personal Unblocking Key). I am unable to connect my tablet to my computer • Install ALCATEL ONETOUCH Centre. • Check that your USB driver is installed properly. • Open the Notification panel to check if the Android Manager Agent has been activated.
- Page 94 other users (see “6.3 Connect to Bluetooth devices”). • Make sure that the target device is within Bluetooth detection range of your tablet. How to make your battery last longer • Make sure you follow the complete charge time (minimum 2.5 hours).
- Page 95 ALCATEL is a trademark of Alcatel-Lucent and is used under license by TCL Communication Ltd.. © Copyright 2015 TCL Communication Ltd. All rights reserved TCL Communication Ltd. reserves the right to alter material or technical specification without prior notice.
Need help?
Do you have a question about the One Touch Pop 10 P360X and is the answer not in the manual?
Questions and answers