
Subscribe to Our Youtube Channel
Related Manuals for Crow PowerWave-16


Summary of Contents for Crow PowerWave-16
- Page 1 ELECTRONIC ENGINEERING LTD. PowerWave-16 16 zone Control panel Communicator Users’ Operating and Programming Guide Version 6.31 / 6.32 Covers Versions 6.20 and Above P/N 7121240 Rev. B N.A 10 December 2003...
-
Page 2: Table Of Contents
Contents Introduction .....................4 Meet the Crow Alarm Control System............4 Typical Alarm System Configuration ............4 Keypad Description ..................5 Function Keys ....................5 Alphanumeric Keys ..................5 Audible Signals ....................6 Indicators......................6 Zone and Status indicators LEDs 1- 16 ............6 Partitions indicators LEDs A, B ,C ............. - Page 3 How to Display Events from Memory............12 How to Control Outputs and Devices............14 How to Get into to User Program/Client Mode .........14 How to Change or Add Codes...............15 How to Change Master Code ................15 How to Add or Change User Code ...............15 How to Delete User Code ................16 How to Add or Change Telephone Numbers..........16 How to set Time and Date................16...
-
Page 4: Introduction
Introduction Meet the Crow Alarm Control System Thank you for choosing to protect your premises with a PowerWave-16 (PW16) of Crow Electronic Engineering Ltd. Power Wave of Crow Electronic Engineering Ltd. is a highly advanced, multifunction alarm control system, designed to flawlessly manage your security system at home or at business, protects you against burglary and supports the operation of electronic devices. -
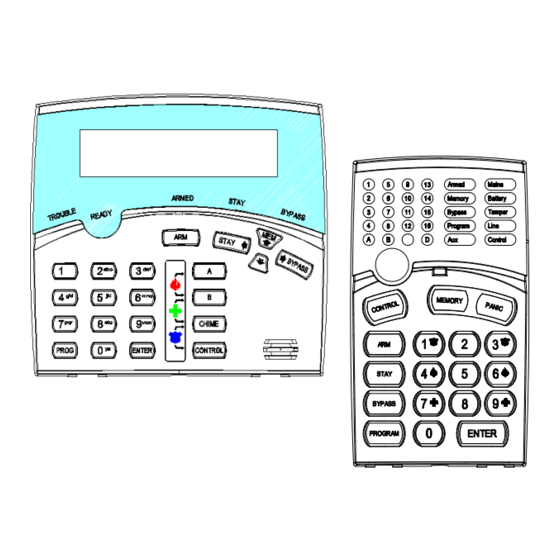
Page 5: Keypad Description
Keypad Description The LED Keypad shows all the information required to operate the system. The User communicates with the alarm system via the keypad. The Keypad displays continuous information about the status of the alarm system, and enables the User to operate the system in different modes, change settings and program Users' access codes. -
Page 6: Audible Signals
Audible Signals The keypad emits signals (beeps) in response to User activities. These signals are listed in Table. Table: List of Audible Signals Sound Sequence Description Short beep Once only A key in the keypad has been pressed 3 short beeps Once only Operation carried out successfully Long beep... - Page 7 Function Keys Description Notes Arm Stay Initiates partial Only if enabled by C O D E STAY alarm when the installer user is home ENTER Arm Stay Initiates partial STAY alarm when the user is home Disarm Stay Disarms the C O D E ENTER system...
-
Page 8: Operation
Operation How to Arm the System before Exit Preparing the System for Arming • Verify that all zone indicators are off, when all zones are closed (all doors, exits and windows are closed and motion in the protected area is restricted or bypassed), the system is ready to be armed. -
Page 9: How To Arm The System When Staying Home
How to Arm the System when Staying Home Arming the System in Stay Mode • This type of arming is used when people are present within the protected area. At nighttime, when the family is about to retire, perimeter zones are protected, but not the interior zones. -
Page 10: How To Bypass Zones
How to Bypass Zones Bypass any zone that cannot be closed. You can bypass selected zones prior to arming. It is also used to temporarily exclude a faulty zone from service, which requires repair. To bypass a selected zone, press <BYPASS>, Bypass indicator lights up to indicate that the system is in bypass mode. -
Page 11: How To Use Chime (If Enable By Installer)
How to use Chime ( If enable by Installer) A Chime (Day zone) is a detector that can be part armed while you are at home but working in another part of the building. It can be programmed to operate a buzzer or light to let you know you have a visitor. -
Page 12: How To Read Trouble Messages
How to Read Trouble Messages Any failure or abnormal events that may occur are indicated by trouble messages, and the Trouble indicator is lit. Press <MEMORY> to read out messages and other events stored in memory. How to Display Events from Memory The system memory stores the last events. - Page 13 WIRELESS ZONE LOW Wireless Zone 1-16 BATTERY Flashing BATTERY LED's 1-16 On Steady KEYFOB LOW BATTERY Wireless Keyfob User BATTERY Flashing 1-20 LED's 1-16 On Steady PANIC BUTTON (or Keypad Panic LINE Flashing BUTTONS 1&3 PRESSED At keypad # LED's 1-8 Flashing TOGETHER) FIRE ALARM (BUTTONS 4&6...
-
Page 14: How To Control Outputs And Devices
FAILURE TO GET A KISSOFF Panel Dialler LINE On Steady LED2 On Steady WALKTEST MODE Manual walk-test MAINS On Steady mode BATTERY On Steady LINE On Steady LED’s 1-16 On Steady How to Control Outputs and Devices The keypad enables control of external devices, such as an air-conditioner or heater. To activate or halt a device, press <CONTROL>... -
Page 15: How To Change Or Add Codes
How to Change or Add Codes About Master code and User code The factory default master code (123) is intended as a preliminary control of the alarm system. After PowerWave is installed and put into service, the code can be changed to any code known to the Master user. -
Page 16: How To Delete User Code
How to Delete User Code In client mode, press <PROGRAM> and the User number (2 to 50) you intend to delete, press <ENTER>. The code will be flashed back to you. Press <BYPASS> to delete User code. Press <ENTER> to save the change. Press <PROG>... -
Page 17: How To Operate The Access Control Output
How to operate the access control output If the alarm system has been set up to allow control of an electric door lock, you can activate the door release function as follows; Press <CONTROL> or Press <CONTROL> enter CODE then <ENTER> The Control LED will lights up while the lock is active and turn off as soon as power is removed from the lock. - Page 18 How Remote Telephone control works Another powerful feature available from your alarm is Telephone Control. This feature is a remote control facility which allows valid users to access the panel via a standard touch tone telephone and check or change the Arm/Disarm status of each of the areas, operate each of the eight outputs or turn on an optional Microphone.
- Page 19 remote telephone (Note; For output control you must enter in the 4 digit code e.g. 4321 followed by the output number you wish to control, in this case 5). At any stage, if you enter in an incorrect code you can press the “#” button on the remote telephone to clear all code entries and then start again.
-
Page 20: Warranty
There are no warranties, expressed or implied, of merchantability or fitness for a particular purpose or otherwise, which extend beyond the description on the face hereof. In no case shall Crow be liable to anyone for any consequential or incidental damages for breach of this or any other warranty, expressed or implied, or upon any other basis of liability whatsoever, even if the loss or damage is caused by Crow’s... - Page 21 Use the following form to record your changes and customisations. User Output Zone Name Device Zone Name Designation Additional User...
- Page 22 COMMUNICATION OPTIONS: Monitored o Domestic o Speech o SERVICING: Yes o No o Can your system be serviced by another technician? If yes, Installer Code ____________ INSTALLATION COMPANY DETAILS: Company ____________________________________________________ Technician ____________________________ Phone ________________________ Installation Date _______________ SERVICING NOTES:...
Need help?
Do you have a question about the PowerWave-16 and is the answer not in the manual?
Questions and answers