
Related Manuals for 3Com 16 Plus


Summary of Contents for 3Com 16 Plus
- Page 1 OfficeConnect ® Dual Speed Switch 5 plus (3C16790) Dual Speed Switch 8 plus (3C16791) Dual Speed Switch 16 plus (3C16792) User Guide...
- Page 2 3Com Technologies. 3Com Technologies reserves the right to revise this documentation and to make changes in content from time to time without obligation on the part of 3Com Technologies to provide notification of such revision or change.
-
Page 3: Table Of Contents
Introduction 4 Creating your Network 5 Dual Speed Switch 5 plus—Front 5 Dual Speed Switch 8 plus—Front 6 Dual Speed Switch 16 plus—Front 7 Dual Speed Switch 16 plus—Rear 8 How the Switch Can Be Used 9 Switching 9 Connecting 10BASE-T and 100BASE-TX Networks 10... -
Page 4: Introduction
This guide will use the term 'Switch' when referring to the Dual Speed Switch 5 plus, Switch 8 plus or Switch 16 plus. The Switch is ideal for use with other OfficeConnect products, as shown in Figure 1. It is compact and attractively designed for desktop use. -
Page 5: Creating Your Network
REATING YOUR ETWORK Dual Speed Switch 5 plus—Front... -
Page 6: Dual Speed Switch 8 Plus-Front
Dual Speed Switch 8 plus—Front... -
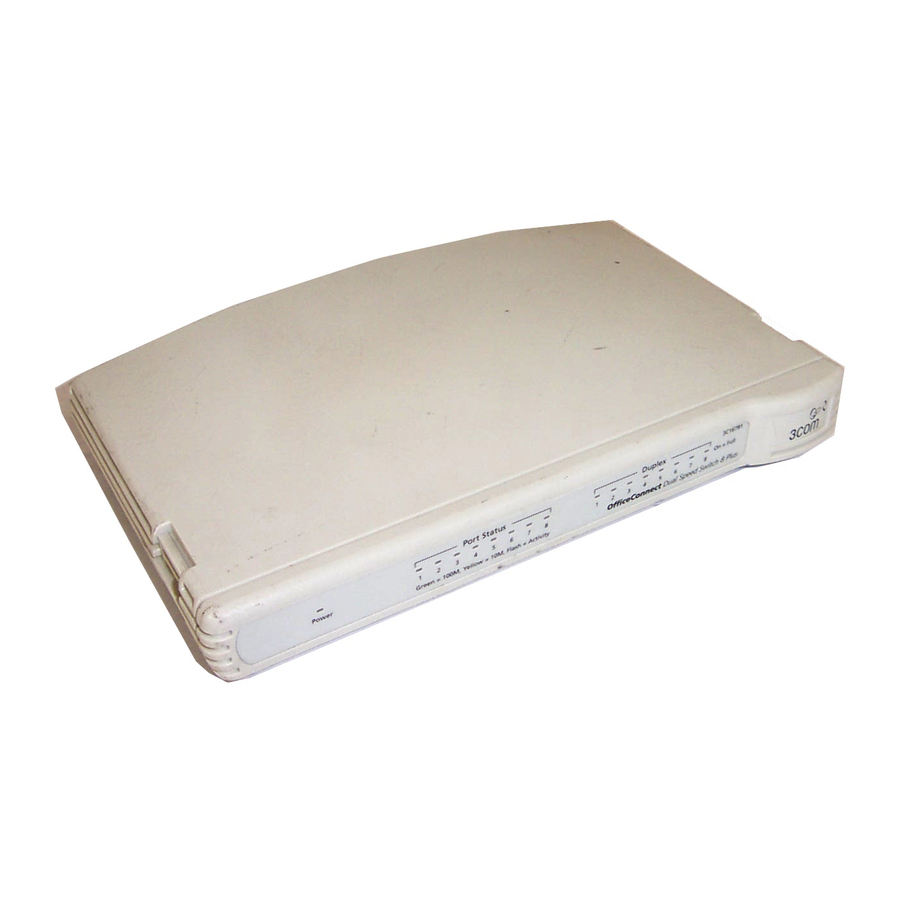
Page 7: Dual Speed Switch 16 Plus-Front
Dual Speed Switch 16 plus—Front... -
Page 8: Dual Speed Switch 16 Plus-Rear
10/100BASE-TX ports Use suitable TP cable with RJ-45 connectors. You can connect the OfficeConnect Switch to any workstation or OfficeConnect hub that has a 10BASE-T, 100BASE- TX or 10/100BASE-TX port. Each port is capable of auto-negotiating for 10 Mbps or 100 Mbps operation. All ports have an automatic MDI / MDIX feature, which means either a 'straight through' or 'crossover' UTP cable can be used to connect to any port. -
Page 9: How The Switch Can Be Used
(regardless of the destination of the information). This can result in a lot of unnecessary traffic that can slow the network down. The Switch solves this problem because it ‘listens’ to the network and automatically learns what workstations can be reached through its ports. -
Page 10: Connecting 10Base-T And 100Base-Tx Networks
The 10/100 ports can each be connected to either a 10BASE-T or 100BASE-TX network. If you have both types of network, you can join them together using the Switch allowing all your workstations to communicate. Alternatively, if you use 10BASE-T and want to improve... -
Page 11: Stacking The Units Together
The four self-adhesive rubber feet prevent your switch from moving around on your desk. Only stick the feet to the marked areas at each corner of the underside of your switch if you intend to place the unit directly on top of the desk. -
Page 12: Positioning Your Switch
150mm (5.9in.) apart for Switch 5 plus and Switch 8 plus, or 142mm (5.6in.) apart for Switch 16 plus. Use the guide on page 30 and 31 to mark the position of the holes. Fix the screws into the wall, leaving their heads 3mm (0.12in.) clear of the wall surface. -
Page 13: Connecting Workstations And Other Equipment To Your Switch
To disconnect the cable, push the connector’s latch in and remove it. When a TP cable is connected to the Switch at one end and a workstation other equipment at other and both unit are powered, the Switch will automtically detect whether a ’straight ’... -
Page 14: Checking Unit Connections
When you have connected all your units, power on the units and the Switch. The Port Status LEDs for the ports you have used on both the units and the Switch should be on. If they are not, check your connections. -
Page 15: Problem Solving
Switch back up. If the Alert LED is continuously lit it can mean there is a problem with your Switch. The 5, 8 and 16 port Switches will also turn the Alert LED on if there is a high level of broadcast traffic or the Switch detects a network loop. - Page 16 Network loop — Examine your connections and remove the loop. Each piece of equipment needs only one connection to your Switch. Broadcast frames — Some pieces of network equipment operate by sending out broadcast frames regularly. Please refer to the documentation that accompanies the piece of...
-
Page 17: Networking Terminology
ETWORKING ERMINOLOGY A Network is a collection of workstations (for example, IBM-compatible PCs) and other equipment (for example, printers), connected for the purpose of exchanging information or sharing resources. Networks vary in size, some are within a single room, others span continents. A Local Area Network (LAN) is a network, usually in an office, that spans no more than a single site. - Page 18 TP cable, ie if the TP cable is a 'straight through' wired cable or a 'crossover' wired cable. The automatic MDI / MDIX feature within the Switch will detect and compensate accordingly.
-
Page 19: Dimensions And Standards
IMENSIONS AND TANDARDS Dimensions and Operating Conditions Standards Functional: ISO 8802/3 IEEE 802.3, 802.3u Safety: UL 1950, EN 60950 CSA 22.2 #950, IEC60950 EMC: EN 55022 Class B EN 55024 FCC Part 15 Class B* ICES-003 Class B VCCI Class B CNS 13438 Class A Environmental: EN 60068 (IEC 68) -
Page 20: Environmental Statements
NVIRONMENTAL TATEMENTS It is the policy of 3Com Corporation to be environmentally-friendly in all operations. To uphold our policy, we are committed to: Establishing environmental performance standards that comply with national legislation and regulations. Conserving energy, materials and natural resources in all operations. -
Page 21: Important Safety Information
SELV conditions. NFORMATION There are no user-replaceable fuses or user-serviceable parts inside the Switch. If you have a physical problem with the unit that cannot be solved with problem solving actions in this guide, contact your supplier. -
Page 22: Wichtige Sicherheitshinweise
Es sind keine von dem Benutzer zu ersetzende oder zu wartende Teile in dem Gerät vorhanden. Wenn Sie ein Problem mit dem Switch haben, das nicht mittels der Fehleranalyse in dieser Anleitung behoben werden kann, setzen Sie sich mit Ihrem Lieferanten in Verbindung. -
Page 23: Consignes Importantes De Sécurité
ONSIGNES IMPORTANTES DE SÉCURITÉ AVERTISSEMENT: Les avertissements présentent des consignes que vous devez respecter pour garantir votre sécurité personnelle. Vous devez respecter attentivement toutes les consignes. Nous vous demandons de lire attentivement les consignes suivantes de sécurité avant d’installer ou de retirer l’appareil: Faites très attention lors de l'installation et de la dépose du groupe. -
Page 24: Online Technical Services
3Com Corporation World Wide Web site. Online Technical Services 3Com offers worldwide product support 24 hours a day, 7 days a week, through the following online systems: World Wide Web site. 3Com Knowledgebase Web Services. -
Page 25: Support From Your Network Supplier
If you are unable to contact your network supplier, see the following section on how to contact 3Com. Support from 3Com If you are unable to obtain assistance from the 3Com online technical resources or from your network supplier, 3Com offers technical telephone support services. To find out more... - Page 26 Here is a list of worldwide technical telephone support num- bers. These numbers are correct at the time of publication. Refer to the 3Com Web site for updated information. Country Telephone Number Asia, Pacific Rim Australia 1 800 678 515...
-
Page 27: Returning Products For Repair
Returning Products for Repair Before you send a product directly to 3Com for repair, you must first obtain a Return Material Authorization (RMA) number. Products sent to 3Com without authorization numbers will be returned to the sender unopened, at the sender’s expense. - Page 28 (48) hours of installation but no later than thirty (30) days after the date of purchase, and this is verified by 3Com, it will be considered dead- or defective-on-arrival (DOA) and a replacement shall be provided by advance replacement.
-
Page 29: 3Com Corporation Limited Warranty
REMEDY FOR BREACH OF THAT WARRANTY SHALL BE REPAIR, REPLACEMENT, OR REFUND OF THE PURCHASE PRICE PAID, AT 3COM'S OPTION. TO THE FULL EXTENT ALLOWED BY LAW, THE FOREGOING WARRANTIES AND REMEDIES ARE EXCLUSIVE AND ARE IN LIEU OF ALL... -
Page 30: Regulatory Notices
EGULATORY OTICES FCC S TATEMENT This equipment has been tested and found to comply with the limits for a Class B digital device, pursuant to Part 15 of the FCC Rules, and the Canadian Department of Communications Equipment Standards entitled, “Digital Apparatus,” ICES-003. These limits are designed to provide reasonable protection against harmful interference in a residential installation. - Page 32 Part No. DUA1679-0AAA03 Published July 2001...
Need help?
Do you have a question about the 16 Plus and is the answer not in the manual?
Questions and answers