Table of Contents
Advertisement
Available languages
Available languages
Quick Links
MODEL/MODÈLE
MODEL/MODÈLE
MODELO
MODELO
DIGITAL STAINLESS STEEL ELECTRIC KETTLE
READ ALL INSTRUCTIONS BEFORE USING THIS APPLIANCE
BOUILLOIRE ELECTRIQUE NUMERIQUE EN ACIER INOXYDABLE
LIRE TOUTES LES INSTRUCTIONS AVANT D ' UTILISER CET APPAREI
PAVA ELÉCTRICA DE ACERO INOXIDABLE DIGITAL
LEA TODAS LAS INSTRUCCIONES ANTES DE USAR ESTE APARATO
JARRA ELÉTRICA DIGITAL EM AÇO INOXIDÁVEL
LEIA TODAS AS INSTRUÇÕES ANTES DE USAR ESTE APARELHO
BVSTKT5970
BVSTKT5970
Instruction Manual
Manuel d'Instructions
Manual de Instrucciones
Manual de Instruções
Advertisement
Table of Contents

Subscribe to Our Youtube Channel
Related Manuals for Oster BVSTKT5970


Summary of Contents for Oster BVSTKT5970
- Page 1 MODEL/MODÈLE MODEL/MODÈLE BVSTKT5970 BVSTKT5970 MODELO MODELO Instruction Manual DIGITAL STAINLESS STEEL ELECTRIC KETTLE READ ALL INSTRUCTIONS BEFORE USING THIS APPLIANCE Manuel d’Instructions BOUILLOIRE ELECTRIQUE NUMERIQUE EN ACIER INOXYDABLE LIRE TOUTES LES INSTRUCTIONS AVANT D ’ UTILISER CET APPAREI Manual de Instrucciones PAVA ELÉCTRICA DE ACERO INOXIDABLE DIGITAL...
-
Page 2: Important Safeguards
5. DO NOT operate any appliance with a damaged cord or plug or after the appliance malfunctions, or has been damaged in any manner. Take the appliance to the nearest Authorized Oster Service Center for examination, repair or adjustment. ®... -
Page 3: Special Cord Set Instructions
SPECIAL CORD SET INSTRUCTIONS (For 120 & 127 volts with two flat pins only) To reduce the risk of electrical shock, this appliance has a polarized plug (one blade is wider than the other). This plug fits a polarized outlet only one way. This is a safety feature intended to help reduce the risk of electrical shock. -
Page 4: Product Diagram
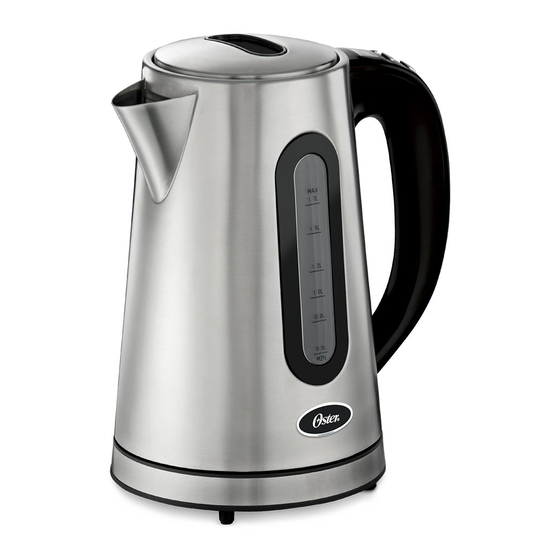
PRODUCT DIAGRAM 1. Lid release button 8. Function button 2. Kettle lid 9. Start/Stop button 3. Spout 10. Water window 4. Handle 11. Power base 5. Stainless steel body 12. Cord storage (under power base) 6. Digital display 7. Increase and decrease temperature control buttons English - 3... -
Page 5: Before The First Use
BEFORE THE FIRST USE 1. Wash the inside of the kettle and lid with mild detergent and water. Rinse each thoroughly. Do not immerse the kettle or power base in water or any other liquid. These items are not dishwasher safe. 2. - Page 6 3. Press the start/stop button “ ” to start the heating process. The water will heat to the ideal maté temperature of 75º C and then keep it warm at that temperature. The unit will switch on and off to maintain the water at 75º C for up to 30 minutes and then it will automatically shut off.
- Page 7 BOIL/ HEAT WATER USING KEEP WARM FUNCTION You should use this function if you wish to boil or heat water and then keep it warm for up to 30 minutes. 1. Plug the electric cord into the appropriate electrical outlet. 2.
-
Page 8: If The Kettle Does Boil Dry
Press the function button “ ” to select the keep warm icon and then select the desired keep warm temperature, ranging from 40º C to 90º C in intervals of 5 degrees, using the increase and decrease buttons “ +/- ” (see figure 7). figure 7 Press the start/stop button“... -
Page 9: Filter Removal/Cleaning/Refitting
FILTER REMOVAL/CLEANING/REFITTING Important: The kettle must be switched off, disconnected from the power outlet and allowed to cool down completely prior to removing or refitting the filter. Do not use excessive force, as this might damage the filter or the lid. 1. -
Page 10: Consignes Importantes
CONSIGNES IMPORTANTES When using electrical appliances, basic safety precautions should always be followed to reL’utilisation de tout appareil électroménager exige certaines précautions fondamentales pour réduire les risques d’incendies, de choc électrique ou de blessures corporelles, y compris les suivantes: LISEz ATTENTIVEMENT LES INSTRUCTIONS AVANT D’UTILISER LA BOUILLOIRE. 2. - Page 11 INSTRUCTIONS QUANT AU CORDON (Seulement pour appareils de 120 & 127 V avec deux fiches plates) Cet appareil possède une fiche polarisée (une lame est plus large que l’autre) afin de vous protéger contre le risque d’électrocution. Cette fiche ne s’adapte que d’une seule façon à...
-
Page 12: Schéma Des Pièces
SC HÉM A D E S P I è C E S 1. Bouton d’ouverture du couvercle 8. Boutons de fonction 2. Couvercle de la bouilloire 9. Bouton Marche/Arrêt 3. Bec 10. Voyant de niveau d’eau 4. Poignée 11. Socle 5. - Page 13 NETTOYAGE AVANT LA TOUTE PREMIèRE UTILISATION 1. Lavez l’intérieur de la verseuse et du couvercle avec un détergent doux et de l’eau. Rincez-les à fond. Ne plongez pas la verseuse ou le socle chauffant dans l’eau ou dans tout autre liquide. Ils ne sont pas lavables au lave-vaisselle. 2.
- Page 14 3. Appuyer sur le bouton marche/arrêt “ ” pour commencer à faire chauffer. L’eau sera chauffée à la température idéale pour le maté de 75° C puis sera gardée à cette température. L’appareil se mettra en route et s’arrêtera pour maintenir l’eau à 75° C pendant un maximum de 30 minutes puis s’arrêtera automatiquement.
- Page 15 FAIRE BOUILLIR/CHAUFFER DE L’EAU AVEC LA FONCTION GARDER AU CHAUD. Il faut utiliser cette fonction si on désire faire bouillir ou chauffer de l’eau et la garder chaude jusqu’à 30 minutes. 1. Brancher le cordon électrique dans une prise électrique adéquate. 2.
- Page 16 Appuyer sur le bouton de fonction “ ” pour choisir l’icône garder chaud puis choisir la température à laquelle on désire garder l’eau, allant de 40°C à 90° C à intervalles de 5 degrés, utilisant les boutons haut et bas “ +/- ” (figure 7). figure 7 Appuyer sur le bouton marche/arrêt “...
- Page 17 RETRAIT, NETTOYAGE ET REMISE EN PLACE DU FILTRE Important: Réglez la bouilloire à l’arrêt, débranchez-la et laissez-la refroidir complète- ment avant de retirer le filtre ou de le replacer. N’usez pas de force, vous pourriez abîmer le filtre ou le couvercle. 1.
-
Page 18: Precauciones Importantes
5. NO utilice un electrodoméstico que tenga un cable o un enchufe dañado, ni después de que el artefacto haya presentado fallas, o haya sufrido cualquier otro daño. Lleve el artefacto al Centro de Servicio Autorizado Oster más cercano para su ®... - Page 19 INSTRUCCIONES ESPECIALES PARA EL CABLE (Únicamente para productos de 120 y 127 voltios con dos clavijas planas) Para reducir el riesgo de choque eléctrico, este artefacto tiene un enchufe polarizado (una clavija es más ancha que la otra). Este enchufe calza en un tomacorriente polarizado sólo de una manera;...
-
Page 20: D I A Gra M A Del P R O D U C T O
D I A GRA M A DEL P R O D U C T O 1. Botón para soltar la tapa 8. Selector de función 2. Tapa de la pava 9. Botón de inicio/pausa 3. Boquilla 10. Ventanilla para medir el nivel 4. -
Page 21: Antes De Usar Por Primera Vez
ANTES DE USAR POR PRIMERA VEZ 1. Lave el interior la pava y la tapa con detergente suave y agua. Enjuague bien todas las piezas. No sumerja la pava ni la base de alimentación en agua ni en ningún otro líquido. - Page 22 3. Para comenzar el proceso de calentamiento oprima el botón para iniciar/detener “ ”. El agua se calentará hasta alcanzar la temperatura ideal para cebar mate, 75º C, y luego se mantendrá caliente a esa temperatura. La unidad se encenderá y se apagará...
- Page 23 CÓMO HERVIR/CALENTAR AGUA UTILIzANDO LA FUNCIÓN DE MANTENER CALIENTE Deberá usar esta función si desea hervir o calentar agua y posteriormente mantenerla caliente durante un máximo de 30 minutos. 1. Enchufe el cable de alimentación en el tomacorriente correspondiente. 2. Elija una de las siguientes opciones dependiendo de si desea hervir o calentar el agua: Para hervir agua utilizando la funcíon de mantener caliente Asegúrese de que en la pantalla aparezca el icono de la pava.
- Page 24 Oprima el botón de función “ ” para seleccionar el icono de mantener caliente y a continuación elija la temperatura de mantener caliente deseada, desde 40º C hasta 90º C, en intervalos de 5 grados, utilizando los botones para aumentar o disminuir la temperatura “...
-
Page 25: Mantenimiento Y Limpieza
CóMO SACAR EL FILTRO, LIMPIARLO Y VOLVER A COLOCARLO Importante: El hervidor debe estar apagado, desconectado del tomacorriente y totalmente frío antes de poder sacar o colocar nuevamente el filtro. No emplee demasiada fuerza ya que esto podría dañar el filtro o la tapa. 1. -
Page 26: Precauções Importantes
5. NÃO use um eletrodoméstico se o mesmo estiver com um fio ou plugue danificados, nem após ter apresentado falhas, ou ter sido danificado de qualquer maneira. Leve o aparelho ao Centro de Serviço Autorizado Oster mais próximo para ser ®... - Page 27 INSTRUÇÕES ESPECIAIS PARA O FIO (Somente para produtos de 120 & 127 volts com dois pinos planos) Para reduzir o risco de choque elétrico, este aparelho possui um plugue polarizado (uma das lâminas é mais larga do que a outra), encaixando-se em uma tomada polarizada de uma única forma.
-
Page 28: Di A Gra M A D O P Ro D U To
DI A GRA M A D O P RO D U TO 1. Botão para abrir a tampa 8. Botão seletor da função 2. Tampa 9. Botão para ligar/desligar 3. Bico 10. Janela para medir o nível da água 4. Alça 11. -
Page 29: Instruções Para O Uso
ANTES DE USAR PELA PRIMEIRA VEZ 1. Lave o interior da jarra e da tampa com detergente suave e água. Enxágüe bem todas as peças. A jarra elétrica e a base não dever ser submergidas na água ou outros líquidos. Essas peças também não podem ser lavadas na lava-louças. 2. - Page 30 3. Para começar a esquentar a água, pressione o botão para ligar/desligar “ .” A água esquentará até alcançar a temperatura ideal para mate, que é de 75º C e se manterá nessa temperatura por no máximo 30 minutos e em seguida desligará automaticamente.
- Page 31 COMO FERVER/ESQUENTAR ÁGUA USANDO A FUNÇÃO PARA MANTER QUENTE Esta função deve ser usada quando desejar ferver ou esquentar água e em seguia mantê-la quente por um período de até 30 minutos. 1. Ligue o fio na tomada adequada. 2. Escolha uma das seguintes opções para ferver ou esquentar a água: Para ferver a água usando a função para manter quente Certifique-se de que no painel digital o ícone da chaleira esteja selecionado.
- Page 32 Pressione o botão “ ” para selecionar o ícone para manter quente e em seguida selecione a temperatura desejada de aquecimento/manter quente, entre 40º C e 90º C, em intervalos de 5 graus, usando os botões para aumentar ou diminuir a temperatura “...
-
Page 33: Manutenção E Limpeza
COMO RETIRAR O FILTRO, LIMPÁ-LO E COLOCÁ-LO DE VOLTA Importante: A jarra elétrica deve estar desligada, desconectada da tomada e totalmente fria antes que o filtro seja retirado ou colocado de volta. Não aplique muita força, pois isso poderá danificar o filtro ou a tampa. 1. - Page 34 © 2010 Sunbeam Products, Inc. Todos os direitos reservados. Distribuído pela Sunbeam Latin America, LLC, 5200 Blue Lagoon Drive, Suite 470, Miami, FL 33126. Garantia limitada de um ano – para maiores detalhes, consulte o certificado. www.oster.com Printed in China Imprimè en Chine...
Need help?
Do you have a question about the BVSTKT5970 and is the answer not in the manual?
Questions and answers