
Subscribe to Our Youtube Channel
Related Manuals for Yard Works 60-3845-8


Summary of Contents for Yard Works 60-3845-8
- Page 1 60-3845-8 Electric Blower/Vacwith Bag & Leaf Collection System Owner's Manual TOLL-FREE HELPLINE: 1 866 523-5218 WARNING WARNING Read all safety rules and instructions carefully before operating this tool.
-
Page 2: Table Of Contents
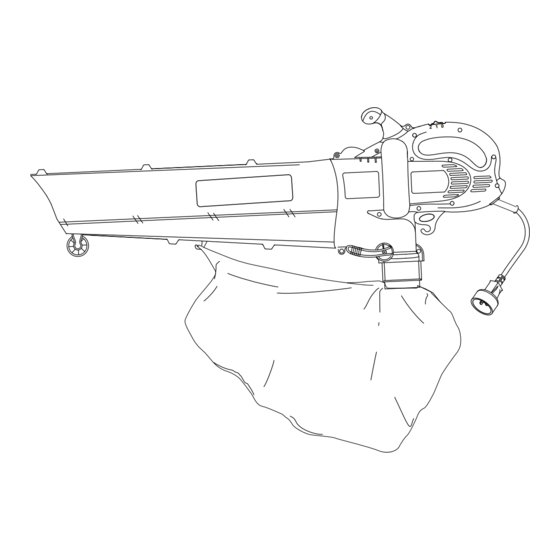
TABLE OF CONTENTS I. Rules for Safe Operation ............................4-8 Safety Symbols and International Symbols ....................7 Diagram and Location of Parts........................8 II. Assembly Instructions............................9-14 Attaching and Removing the Blower/Vac Tube ..................9-10 Attaching and Removing the Snap-on Bag ....................11-12 Installing the Leaf Collection Kit ........................13 Installing the Shoulder Harness ........................14 III. - Page 3 CONTENTS OF THE CARTON This carton includes: • Electric Blower/Vac • Metal clamp • Blower/Vac Tube • 5´ (1.5 m) hose • Shoulder Strap • 54 L collection bag • Snap-on Bag • Owner’s Manual Read the Owner's Manual carefully and understand it thoroughly before using the Blower/Vac. Inspect all parts in order to verify that nothing is missing or damaged.
-
Page 4: Rules For Safe Operation
RULES FOR SAFE OPERATION The purpose of safety symbols is to indicate possible dangers. The safety symbols and their explanations require careful attention and understanding. Safety warnings do not eliminate any danger by themselves. The instructions or warnings that they convey are not a substitute for proper accident prevention measures. SAFETY ALERT SYMBOL: Indicates danger, warning, or caution. - Page 5 RULES FOR SAFE OPERATION WARNING: In order to reduce the risk of electric shock, use only cords of type SW-A, SOW-A, STW-A, STOW-A, SJW-A, SJOW-A, SJTW-W, or SJTOW-A. MINIMUM WIRE SIZE FOR EXTENSION CORDS 120 V APPLIANCES USING 0-12 AMPS 25’...
- Page 6 RULES FOR SAFE OPERATION Do not force the Blower/Vac. It will do the job better and with less likelihood of injury when it is used at the rate that it • was designed to work at. Do not use the Blower/Vac without the Blower/Vac tube and snap-on bag attached. •...
-
Page 7: Safety Symbols And International Symbols
RULES FOR SAFE OPERATION SAFETY SYMBOLS AND INTERNATIONAL SYMBOLS This Owner's Manual describes safety symbols, international symbols, and diagrams that may appear on the Blower/Vac. Read the Owner's Manual carefully in order to understand the safety rules, the assembly, operating, and maintenance instructions, and the repair information. -
Page 8: Diagram And Location Of Parts
RULES FOR SAFE OPERATION DIAGRAM AND LOCATION OF PARTS Power/Speed Switch APPLICATION As a blower : Cleaning yards, garages, driveways, porches, • Shoulder Harness patios, and around walls, fences, etc. As a vacuum: Latch Support Picking up leaves and other light debris •... -
Page 9: Assembly Instructions
ASSEMBLY INSTRUCTIONS ATTACHING AND REMOVING THE BLOWER/VAC TUBE WARNING: In order to avoid serious personal injury, the Blower/Vac tube and the vacuum bag must be used when operating this Blower/Vac. Attaching the Blower/Vac tube NOTE: The blower/vacuum tube comes disassembled from the Blower/Vac. It must be installed in order to ensure safe and easy operation. - Page 10 ASSEMBLY INSTRUCTIONS Removing the Blower/Vac tube NOTE: It may be necessary to remove the Blower/Vac tube in order to clear a blocked tube or impeller. WARNING: In order to avoid serious personal injury, verify that the power switch is in the OFF position, that the Blower/Vac is unplugged, and position, that the Blower/Vac is unplugged, and that the impellers have stopped before attaching or removing the tubes.
-
Page 11: Attaching And Removing The Snap-On Bag
ASSEMBLY INSTRUCTIONS ATTACHING AND REMOVING THE SNAP-ON BAG Attaching the Snap-on Bag Attach the vacuum bag to the snap-on bag hook on the Blower/Vac tube (Fig. 3). Slide the snap-on bag tube over the debris exhaust tube on the housing. Push the tube until the latching tabs on both sides click into place, securing the bag to the Blower/Vac (Fig. - Page 12 ASSEMBLY INSTRUCTIONS ATTACHING AND REMOVING THE SNAP-ON BAG Removing the Snap-on Bag Press the latching tabs on both sides of the bag tube, and pull the bag down away from the Blower/Vac (Fig. 5). Detach the vacuum bag from the vacuum bag hook. Latching Tabs Blow PRESS IN...
-
Page 13: Installing The Leaf Collection Kit
ASSEMBLY INSTRUCTIONS INSTALLING THE LEAF COLLECTION KIT Slide the hose tube over the debris exhaust tube on the housing (Fig. 6). Push the tube until the latching tabs on both sides click into place (Fig. 7). Insert the nozzle 10” (25.4 cm) into the bag opening-pinch and fold excess paper around the hose (Fig. 8). Pinch to open the metal bag fastening clamp and slip the clamp 3”... -
Page 14: Installing The Shoulder Harness
ASSEMBLY INSTRUCTIONS INSTALLING THE SHOULDER HARNESS Push the strap through the centre of the buckle. Pull the strap over the crossbar and down through the slot in the buckle (Fig. 10). Snap the clip onto the support fitting (Fig. 11). While standing in the operating position, adjust the length of the strap to fit the size of the operator. -
Page 15: Operating Instructions
OPERATING INSTRUCTIONS CONNECTING THE POWER CORD Use a minimum 25’ (7.6 m.) long 16 gauge outdoor electrical cord when operating this Blower/Vac. See the table below for information concerning extension cords. MINIMUM WIRE SIZE FOR EXTENSION CORDS 120 V APPLIANCES USING 0-12 AMPS Cord length 25’... -
Page 16: Starting/Stopping Instructions
OPERATING INSTRUCTIONS STARTING/STOPPING INSTRUCTIONS This Blower/Vac is equipped with a three-way power switch (OFF/LOW/HIGH) (Fig. 17): • Slide the switch to the (0) position in order to turn the Blower/Vac OFF. • Slide the switch to the (1) position for LOW speed. •... -
Page 17: Holding The Blower/Vac
OPERATING INSTRUCTIONS HOLDING THE BLOWER/VAC Stand in the operating position before turning the Blower/Vac on. Verify the following: The operator is wearing proper clothing, including boots, safety glasses or goggles, ear/hearing protection, gloves, long • pants, and long sleeves. If the conditions are dusty, the operator is wearing a dust mask or face mask. •... -
Page 18: Using The Tool As A Blower
OPERATING INSTRUCTIONS USING THE TOOL AS A BLOWER Converting to a Blower 1. Place the shoulder harness over the head and on the shoulder, and adjust it if necessary. Refer to the section entitled Installing the Shoulder Harness. 2. Start the Blower/Vac. See the section entitled Starting/Stopping Instructions. 3. -
Page 19: Using The Tool As A Vacuum
OPERATING INSTRUCTIONS USING THE TOOL AS A VACUUM Converting to a Vacuum 1. Place the shoulder harness over the head and on the shoulder, and adjust it if necessary. Refer to the section entitled Installing the Shoulder Harness. 2. Start the Blower/Vac. See the section entitled Starting/Stopping Instructions. 3. -
Page 20: Clearing A Blocked Tube/Impeller
OPERATING INSTRUCTIONS CLEARING A BLOCKED TUBE / IMPELLER WARNING: In order to avoid serious personal injury, verify that the Blower/Vac is turned off and unplugged before clearing the impeller. WARNING: In order to avoid serious personal injury, always wear gloves to protect the hands from the impeller blades. -
Page 21: Maintenance And Repair Instructions
MAINTENANCE AND REPAIR INSTRUCTIONS SERVICING DOUBLE INSULATED TOOLS This tool is double-insulated, which means that two systems of insulation are provided instead of grounding. There is no grounding provided, and no means of ground-ing should be added to this tool. Extreme care and knowledge of the system is required when servicing a double-insulated tool. -
Page 22: Troubleshooting
TROUBLESHOOTING THE BLOWER/VAC WILL NOT BLOW OR VACUUM C A U S E A C T I O N The bag is full Empty the bag, as described in the section entitled Emptying the Snap-on Bag The tube is blocked Clear the blockage as described in the section entitled Clearing a Blocked Tube/ Impeller The impeller is blocked... -
Page 23: Warranty
WARRANTY For TWO YEARS from the date of purchase within Canada, YARDWORKS® CANADA will, at its option, repair or replace for the original purchaser, free or charge, any part or parts that are found to be defective in material or workmanship. •... -
Page 24: Parts List
PARTS LIST 60-3845-8 ELECTRIC BLOWER/VAC WITH BAG AND LEAF COLLECTION KIT Biodegradable... - Page 25 PARTS LIST Item Description Item 3130128-2 Housing assy. 3220850 3220505 Tapping screw ST4x16-F 3290106 3630128 Trigger switch 3410928 3410528 Switch lever 3490128-1 3410328-1 3410302 Wire strain plate 3410428-1 3420102 Sheath 3410828 3640128-1 Power cord 3220505 3420106 Rubber support 3610128-1 Motor 3490228 3320128 Axis sheath...
Need help?
Do you have a question about the 60-3845-8 and is the answer not in the manual?
Questions and answers