Table of Contents
Advertisement
Quick Links
Advertisement
Table of Contents

Subscribe to Our Youtube Channel
Related Manuals for AU IS03


Summary of Contents for AU IS03
-
Page 2: Preface
• The au phone is a digital cell phone and can maintain a high call Basic Manual (this PDF manual) describes basic operations of major functions of the IS03. -
Page 3: Table Of Contents
Removing microSD Memory Card ......11 Cautions for Using the Camera......40 History) ..............27 Security Code and PIN Code........ 11 IS03 Position for Taking a Photo ......40 Turning On Manner Mode ........28 Security Code and Passwords ......11 Taking a Photo ............41 Turning On the Answering Memo......28... - Page 4 Configuring the Overseas Settings .......50 Making a Call at Your Travel Destination ....51 Receiving a Call at Your Travel Destination ..51 Inquiry methods ............52 In Case of Loss of Your IS03 Setting Conditions for Activating the Remote Lock ................53 Appendix/Index...
-
Page 5: Introduction Checking The Contents Of The Box
In this manual, the key illustrations are simplified as shown below. Warranty Battery pack (Japanese) ■ Note on Screenshots IS03 The screenshots in this manual are simplified and may look different microSD memory card from the actual screens. (2 GB) (Sample) Cell Phone Etiquette •... - Page 6 ■ Be considerate of where you use the cell phone and how loudly you talk. Do not make calls in theaters, museums, libraries, and other similar places. Turn power off or turn on manner mode so as not to disturb others around you by ring tones.
-
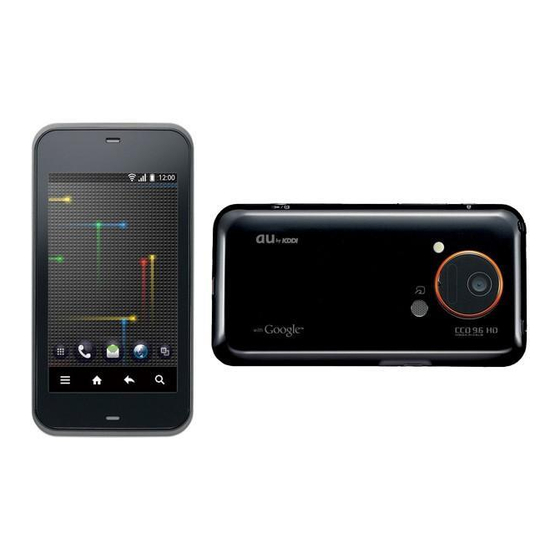
Page 7: Getting Ready Names And Functions Of Parts
Hold it down on the unlock screen to turn on the picture light. B External connection jack Use it to connect the IS03 to the microUSB-18 pin (charger) conversion cable or the microUSB-USB conversion cable. C External connection jack cover... -
Page 8: Charging The Battery Pack
Charging the Battery Pack The battery pack is not fully charged at the time of purchase. Charge the battery pack when you use the IS03 for the first time or the battery level becomes low. Charging is finished when the red charging/ incoming indicator goes out. -
Page 9: Turning The Power On/Off
Charging time takes approximately 150 minutes. • Charging is available by connecting the IS03 to a PC with the microUSB-USB conversion cable. From the Main Menu, select Settings Connect the specified AC adapter (sold separately) to [Select USB connection [Mark USB battery charge to enable the setting. -
Page 10: Turning The Power Off
Walk), etc. ■ Setting Up E-Mail • Set up e-mail to use e-mail (xxx@ezweb.ne.jp). * E-mail setup is unnecessary if you have switched your au phone to the IS03. ® ■ Setting Up Wi-Fi • Set up Wi-Fi to use Wi-Fi connection. -
Page 11: Adjusting The Touch Panel
Removing the Battery Pack To adjust the touch panel, perform the steps with the finger you When removing the battery pack, turn off the IS03. normally use in a position allowing for ease of operation. Remove the battery pack cover. -
Page 12: Attaching The Battery Pack
Inserting a microSD memory card forcefully into the slot could result in • Before attaching the battery pack, make sure that the au IC-Card is inserted failure to remove the microSD memory card, or damage to the microSD properly. -
Page 13: Removing Microsd Memory Card
Security Code and Passwords and battery pack. You have to use each security code for using the IS03. You can use a security code and other passwords described below. Take care not to Slowly push the microSD memory card toward the forget your security code and passwords, because they are required slot until it clicks. -
Page 14: Removing Au Ic-Card
• Note the following not to cause malfunction or damage when you insert or remove the au IC-Card. • Do not touch the IC (metal surface) part of the au IC-Card or the IC card jack part of the IS03. -
Page 15: Learning The Basics
Operating the Touch Panel While two of your fingers are While your finger is gently The display of the IS03 is a touch panel. You can operate the IS03 by touching the screen, move the touching the screen, trace it to directly touching the screen. -
Page 16: Operation While Using Functions
■ Context Menu Operation While Using Functions The context menu is displayed by long-touching an item or a display where the menu is available. Selecting an Item • When the context menu is displayed, you can close it by tapping Select a displayed item or icon by tapping the screen directly. -
Page 17: Viewing The Desktop
Using Status Bar The status bar is on the top of the screen of the IS03. The notification indicators to notify you of a missed call, a new mail message, or a running operation are displayed on the left side of the status bar, while the status indicators to show the status of the IS03 are on the right side. - Page 18 Sending and Receiving/ Data communication off setting Finished installing In roaming VPN connection Connected to VPN au IC-Card not inserted Unconnected to VPN Character type Update available Major Update available Indicators collected Manner mode status • When the same type of notifications exist, the number of them is displayed Normal Manner on the lower right of the indicator.
-
Page 19: Using Notification/Status Panel
A Notification area 《Switching desktop screens》 You can view the status of the IS03 and contents of • When you slide or flick the desktop to the right and left, the indicator notifications. You can tap to activate a corresponding displayed on the top of the screen shows the current display application depending on the information. -
Page 20: Moving Icons On The Desktop
• You can switch the desktop by dragging an icon to the right or left edge of the desktop. If you drag it to at the right or left edge of the desktop, a • The IS03 is compatible with the Droidget in addition to the Android standard new desktop is added. widget. -
Page 21: Viewing The Display (Sub Area)
When Pedometer On is enabled, you can switch the display (sub area) Silent Manner each time you press b. • While the display (main area) of the IS03 is displayed, it is used for • After a certain time passes in the pedometer display, it is automatically touch keys. - Page 22 Notepad Create memos. current location and display Dictionary Search for information in the them on the Google Maps. built-in dictionary of the IS03 or Skype Make a call or send and receive dictionaries on the Internet. messages using Skype. Compass...
-
Page 23: Switching Orientation
Documents To Display Microsoft Office • Operate the IS03 in the upright position. The screen display may not be documents. changed if the IS03 is laid in parallel to the ground. Latitude Use Google Maps to check the •... -
Page 24: Character Input
On the IS03, you can select “iWnn IME - SH edition” or “Android entered. The relational prediction candidates list is displayed when keyboard” as an entry method. The following shows the operations of an entry is selected from the prediction candidates list. -
Page 25: Switching Character Entry Modes
Switching Software Keyboards • The display is changed depending on the application or entering The IS03 has two types of the software keyboard, which can be item. switched: “12 Key” and “QWERTY”. -
Page 26: Correcting Characters
■ Number ■ Undo Function Switch the character entry mode to Full-width numeric or Half-width When the software keyboard is “12 Key”, you can return the numeric, and tap the assigned key to enter a character. determined characters to undetermined state by tapping When the software keyboard is “QWERTY”, you can switch the symbols to enter by tapping the shift key. -
Page 27: Switching Input Software
Switching Input Software Long-touch the character entry area [Select Input Method. Android Selected mainly to enter alphanumerics. • Japanese entry is impossible. keyboard iWnn IME - Selected mainly to enter hiragana, kanji, or SH edition katakana. -
Page 28: Phone
• 118 (Emergency call to Regional Coast Guard Headquarters)★ • Maritime telephone * The numbers added ★ are emergency call numbers. IS03 notifies your present location to the emergency call destination with a signal from a base station when you call to police, fire institution, or Regional Coast Guard Headquarters. -
Page 29: Answering A Call
Select Call. Select Answer while the call is on hold. • The IS03 can store up to 20 entries in each of the incoming and outgoing The hold state is released and the call is connected. histories. If the history exceeds 20 entries, it is automatically deleted in the order from the oldest entry. -
Page 30: Turning On Manner Mode
• Hold down f [Select Manner mode to enable/disable manner mode. • Even in manner mode, the IS03 still emits a shutter sound, start/end tone when you record a movie with Camera or recording start/stop tone of Voice Recorder. -
Page 31: Playing A Message In Answering Memo
Playing a Message in Answering Memo From the Main Menu, select Settings [Select Call settings [Select Call/Message [Select Answering Memo List. The answering memo list screen is displayed. Select the message to be played. The message is played. Stop Stop playing the Answering memo. On/Off Protect/Unprotect the message not to be automatically deleted. -
Page 32: Address Book
Google with the address book of IS03. (Even when you synchronize an From the Main Menu, select Address Book. account other than Google, register your Google account first.) From the Main Menu, select Address Book. - Page 33 Sending a Mail Message to the Saved Mail Address Long-touch the desired mail address on the address book detail screen. Send email You can create a mail message by using the selected mail address and selecting an application. Make default Set the mail address for usual use.
-
Page 34: Using E-Mail/C-Mail
For using overseas, high charges Select the subject entry field [Enter a subject. can be incurred. For details, refer to the au comprehensive catalogue or au homepage. Select the message entry field [Enter a message. -
Page 35: Receiving E-Mail/C-Mail Messages
Select/Set the address. Receiving E-mail/C-mail Messages Address Enter a phone number by selecting an entry A mail message is received. Book from the address book. When a mail message is received, appears on the status bar, and Send/ Enter a phone number by selecting an entry the mail ring tone sounds. -
Page 36: Setting Mail Filters
詳細設定 一括指定受信 Receives or rejects all Setting Mail Filters (Advanced (Collective mail messages from the Mail filters have functions to receive and reject specific e-mail Settings) Receive Setting) Internet or cell phones. messages and to reject e-mail messages spoofing cell phones or PHSs. Rejects mail messages なりすまし規制... -
Page 37: Rejecting Spam C-Mail Messages
詳細設定 指定受信リスト設 Avoids the mail block • If the security code is incorrectly entered three times consecutively during a (Advanced 定 (なりすまし ・ 転 due to single day, the mail filter setting operation will be disabled until the next day. なりすまし規制... -
Page 38: Using Pc-Mail
Use advance. address book, Quote Send/Receive • To use au one mail in PC-mail, acquiring au one mail account, History, and Direct entry. Select enabling IMAP setting (default), setting mail password are required Secrecy [Enter Lock No. [Select in advance. -
Page 39: Sending Pc-Mail Messages
Setting Guide (Japanese). • From the Main Menu, select Settings [Select Accounts & sync to Select the message entry field [Enter the message. synchronize Gmail saved in the server with one saved in IS03. Select Send. From the Main Menu, select Gmail. -
Page 40: Receiving Gmail
Select the subject entry field [Enter the subject. Select the message entry field [Enter the message. Select Send. Receiving Gmail Gmail is received. When Gmail is received, appears on the status bar, and the mail ring tone sounds. Tap the status bar. The notification/status panel is displayed. -
Page 41: Viewing Sites With Browser
From the Quick Menu, select (Browser). [Select Bookmarks/History. The au one homepage for Android is displayed by default. The following shows the au one homepage for PC displayed by The bookmarks/history screen is displayed. tapping PC 版 (PC edition) on the bottom of the screen. -
Page 42: Using The Camera
• If you use the IS03 camera in a wrongful manner, you may be subject to punishment according to laws of the national and local governments. -
Page 43: Taking A Photo
• If you operate nothing in the photo monitor screen for approximately three • If the temperature of the IS03 rises, the video camera may not be used. minutes, camera is terminated. • When you get an incoming call while recording, the recording is terminated AF lock and the incoming call screen is displayed. -
Page 44: Using Gallery
■ Operations in the one image display screen Using Gallery Slide the image to the left/right: Moves to the left/right (Switch to the In the Gallery, you can share the images and the movies saved in the previous/next image when you slide it more than half of the image). microSD memory card, display them as a list, or edit the images. -
Page 45: Cautions For Using 1Seg
TV (1Seg) Cautions for Using 1Seg Watching TV (1Seg) From the Main Menu, select One-Seg. ■ Cautions for using TV (1Seg) • No communication charges apply for watching TV (1Seg). However, Select One-seg TV. when you use an additional service using packet communication on The 1Seg screen is displayed. -
Page 46: Operations On The 1Seg Screen
Operations on the 1Seg screen Playing TV (1Seg) Sounds as BGM Activate another function by tapping # while watching 1Seg to hear Slide the video image to the left/right: Switches channels. Tap the video image: Shows/Hides the program information. TV (1Seg) sounds as BGM. appears on the status bar while the Long touch the video image: Displays the channel list. -
Page 47: File Management
Handling Precautions ○: Confirmed operation −: Unconfirmed operation or not for sale • Do not remove the battery pack and do not turn off the IS03 and As of October 2010 other equipment while reading, writing, playing, saving or moving/ * Operation is confirmed for microSD memory cards that are sold as of October 2010. -
Page 48: Using Contents Manager
• To have the microSD memory card recognized after having unmounted it, Delete Selected Delete data. turn the IS03 off and on again with the microSD memory card inserted. Select data [Select Enter [Select Yes. • While saving data on a microSD memory card, you cannot unmount the •... -
Page 49: Applications Using Au One Market
Note that repair charges may apply even during the warranty period. The contents of the menu you select are displayed. • au shall not be liable for any disadvantages to you or a third party caused B Menu area by the applications you installed. -
Page 50: Managing Applications
Managing Applications Set to delete data, clear cache, or stop installed applications forcefully. From the Main Menu, select Settings [Select Applications [Select Manage applications. The installed applications list is displayed. Select an application. The detailed application information is displayed. Select the operation to perform. Follow the on-screen instructions to perform it. -
Page 51: Settings Of Is03 Checking Your Profile
The profile screen is displayed. wallpapers or Wallpaper gallery, select the image from the preset • If au IC-Card is not inserted or different au IC-Card is inserted, auIC wallpapers. Card(UIM) error. appears for checking your profile. Select OK to display the Select the data. -
Page 52: Global Function
• Be aware that service may be unavailable in some areas if you do not • If the au IC-Card inserted into the IS03 is stolen or lost, the card may update the PRL. be inserted into another mobile phone (including GSM mobile phone ■... -
Page 53: Making A Call At Your Travel Destination
Enter a phone number. Making a Call at Your Travel Destination The method for making calls varies depending on where you are ■ Making a Call to Another Country (Including Japan) calling. from Your Travel Destination Travel destination Number You can make a call to Japan or another country from your travel U.S. -
Page 54: Inquiry Methods
Brazil 0021-800-00777113 the travel destination since the call is made through Japan. Oceania Hawaii 1-877-532-6223 Example: To have a call made to your IS03 “090-1234-XXXX” from the Saipan 1-866-333-7129 U.S. while you are overseas New Zealand 00-800-00777113 Enter an international access code, Japan country Available hours: 24 hours a day (toll free) code and IS03 phone number [Select Call. -
Page 55: Setting Conditions For Activating The Remote Lock
• The Remote lock cannot be activated when the IS03 is turned off or out of From the Main Menu, select Settings service area, or Offline mode is set to ON. If your IS03 is in a location where an adequate signal cannot be received, the Remote lock may not be activated. -
Page 56: Appendix/Index Troubleshooting
Is an au IC-Card inserted? P.12 Is Brightness of Sound & display set to dark? Display is dark. (out of range Is the IS03 out of the service area or in a P.16 – Increase the brightness. location where the signal is weak? indicator) appears. - Page 57 Is the microSD memory card unmounted? P.46 Cannot operate the Is there enough power left in the battery P.6, pack? P.40 camera. Has the IS03 become too warm? P.41 For more detailed information, visit the following au troubleshooting sites on the au homepage. http://www.kddi.com/customer/service/au/trouble/kosho/ index.html...
- Page 58 Reading received mail.....33 au IC-Card ........6 Cautions for using ....40 List Players ......46 Receiving .........33 au one Market ....... 47 Position........40 Menu operation ....... 46 Send/Receive history ....32 Taking a photo ......41 microSD/phone space..... 46 Sending........32...
- Page 59 Mobile networks Roaming settings.....50 Receiver .......... 5 Setting for overseas use..50 Gmail ..........37 Mouthpiece........5 Removing au IC-Card ....12 Video Camera ....... 41 Reset button ......6, 49 Forwarding ......38 Cautions for using ....40 Receiving ........ 38 Position ........
- Page 60 November 2010 Edition...
Need help?
Do you have a question about the IS03 and is the answer not in the manual?
Questions and answers