
Related Manuals for Hama 00123139 RC 610


Summary of Contents for Hama 00123139 RC 610
- Page 1 123139 Radio Controlled Clock RC 610 Funkwecker Operating Instructions Bedienungsanleitung Mode d‘emploi Instrucciones de uso Руководство по эксплуатации Instrukcja obsługi Manual de instruções...
- Page 2 I Le istruzioni per l’uso complete nella propria lingua si possono scaricare dal sito www.hama.com, immettendo il numero articolo. N De volledige BDI in uw landstaal zijn onder invoer van het artikelnummer op www.hama.com als download ter beschikking.
- Page 3 SIZE AAA/UM4 SIZE AAA/UM4...
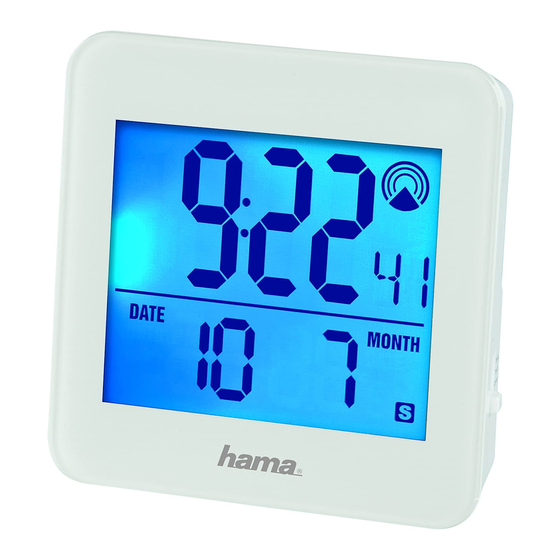
- Page 4 Month indicator Thank you for choosing a Hama product. Take your time and read the following instructions and information completely. Please keep these instructions in a safe place for future reference. If you sell the device, please pass these operating...
- Page 5 1. Explanation of Warning Symbols and notes Warning This symbol is used to indicate safety instructions or to draw your attention to specific hazards and risks. note This symbol is used to indicate additional information or important notes. 2. Package Contents •...
- Page 6 Warning – Batteries • Immediately remove and dispose of dead batteries from the product. • Only use batteries (or rechargeable batteries) that match the specified type. • Do not mix old and new batteries or batteries of a different type or make. •...
- Page 7 Display Searching for the DCF signal Active Display flashing Successful – signal is being received Display steady (not flashing) Success – weak signal reception Display steady (not flashing) Inactive – no signal reception No display note – Time settings • If, during initial setup of the device, no DCF radio signal is received within the first few minutes, the search is aborted.
- Page 8 5.2. Manually setting the date/time Time • Move the slide switch (5) to the TIME SET position to manually set the time (1). • Press the ▲ button (6) or the button (7) to set the hours and minutes of the time. •...
- Page 9 • Press and hold the ▲ button (6) for 3 seconds to switch the display between local and time zone-shifted time ( Selecting 12 or 24-hour format • Repeatedly press the ▲ button (6) to switch between 12 and 24-hour time format (1/2). Displaying seconds/weekday •...
- Page 10 Make sure that water does not get into the product. 7. Warranty Disclaimer Hama GmbH & Co. KG assumes no liability and provides no warranty for damage resulting from improper installation/mounting, improper use of the product or from failure to observe the operating instructions and/or safety notes.
- Page 11 11. Declaration of Conformity Hama GmbH & Co. KG hereby declares that this device is in compliance with the basic requirements and other relevant regulations of the 1999/5/EC guideline. You will find the declaration of conformity with R&TTE directive 99/5/EC on the internet at www.hama.com.
- Page 12 Monat Batteriestandanzeige Vielen Dank, dass Sie sich für ein Hama Produkt entschieden haben! Nehmen Sie sich Zeit und lesen Sie die folgenden Anweisungen und Hinweise zunächst ganz durch. Bewahren Sie diese Bedienungsanleitung anschließend an einem sicheren Ort auf, um bei Bedarf darin nachschlagen zu können.
- Page 13 1. Erklärung von Warnsymbolen und Hinweisen Warnung Wird verwendet, um Sicherheitshinweise zu kennzeichnen oder um Aufmerksamkeit auf besondere Gefahren und Risiken zu lenken. Hinweis Wird verwendet, um zusätzlich Informationen oder wichtige Hinweise zu kennzeichnen. 2. Packungsinhalt • Funkwecker RC 610 •...
- Page 14 Warnung – Batterien • Entfernen und entsorgen Sie verbrauchte Batterien unverzüglich aus dem Produkt. • Verwenden Sie ausschließlich Akkus (oder Batterien), die dem angegebenen Typ entsprechen. • Mischen Sie alte und neue Batterien nicht, sowie Batterien unterschiedlichen Typs oder Herstellers. •...
- Page 15 5.1. automatische Einstellung Datum/ Uhrzeit nach DCF-Signal • Nach dem Einlegen der Batterie wird das Display eingeschaltet, es ertönt ein akustisches Signal und der Wecker beginnt automatisch die Suche nach einem DCF-Funksignal. Während des Suchvorgangs blinkt das Funksymbol. Dieser Vorgang kann 3 bis 5 Minuten dauern. •...
- Page 16 Hinweis – Sommerzeit Die Uhrzeit stellt sich automatisch auf die Sommerzeit um. Solange die Sommerzeit aktiv ist, wird auf dem Display angezeigt. 5.2. Manuelle Einstellung Datum/ Uhrzeit Uhrzeit • Schieben Sie den -Schiebeschalter (5) auf die Position TIME SET, um die manuelle Einstellung der Uhrzeit (1) vorzunehmen.
- Page 17 Einstellung Zeitzone Hinweis – Zeitzone • Das DCF-Signal kann weitläufig empfangen werden, entspricht jedoch immer der MEZ, die in Deutschland gilt. Beachten Sie daher, dass Sie in Ländern mit anderer Zeitzone die Zeitverschiebung beachten. • Befinden Sie sich in Moskau, ist es dort bereits 3 Stunden später als in Deutschland. Stellen Sie daher bei der Zeitzone +3 ein.
- Page 18 Einstellung Weckzeit • Schieben Sie den -Schiebeschalter (5) auf die Position aLaRM SET, um die manuelle Einstellung der Weckzeit (2) vorzunehmen. • Drücken Sie die ▲-Taste (6) oder die -Taste (7), um die Stunden und Minuten der Weckzeit einzustellen. • Schieben Sie den -Schiebeschalter (5) auf die Position , um die Einstellungen zu speichern und in den Normalmodus zurückzukehren.
- Page 19 Reiniger. Achten Sie darauf, dass kein Wasser in das Produkt eindringt. 7. Haftungsausschluss Die Hama GmbH & Co. KG übernimmt keinerlei Haftung oder Gewährleistung für Schäden, die aus unsachgemäßer Installation, Montage und unsachgemäßem Gebrauch des Produktes oder einer Nichtbeachtung der Bedienungsanleitung und/oder der Sicherheitshinweise resultieren.
- Page 20 11. Konformitätserklärung Hiermit erklärt Hama GmbH & Co. KG, dass sich dieses Gerät in Übereinstimmung mit den grundlegenden Anforderungen und den übrigen einschlägigen Bestimmungen der Richtlinie 1999/5/EG befindet. Die Konformitäts-erklärung nach der R&TTE Richtlinie 99/5/ EG finden Sie unter www.hama.com.
- Page 21 F Mode d‘emploi Éléments de commande et d'affichage 1. Heure 2. Heure de réveil / Date 3. Capteur de mouvement 4. Bouton aLaRM on/oFF 5. = Activation / Désactivation du réveil Sélecteur = Commutation entre le mode normal et les modes de réglage du réveil, de la date et de l’heure 7.
- Page 22 Nous vous remercions d’avoir choisi un produit Hama. Veuillez prendre le temps de lire l‘ensemble des remarques et consignes suivantes. Veuillez conserver ce mode d‘emploi à portée de main afin de pouvoir le consulter en cas de besoin. Transmettez-le au nouveau propriétaire avec l’appareil le cas échéant.
- Page 23 • Tenez les emballages d‘appareils hors de portée des enfants, risque d‘étouffement. • Recyclez les matériaux d’emballage conformément aux prescriptions locales en vigueur. avertissement • Retirez les piles usagées immédiatement du produit pour les recycler. • Utilisez exclusivement des batteries (ou des piles) du type indiqué. •...
- Page 24 • La date et l'heure sont réglées automatiquement dès que l'unité détecte le signal radio. Affichage Recherche du signal horaire DCF Recherche active Affichage clignotant Recherche aboutie – signal en cours de réception Affichage permanent Recherche aboutie – réception du signal faible Affichage permanent Recherche inactive –...
- Page 25 5.2. Réglage manuel de la date / de l'heure Heure • Faites glisser le sélectionneur (5) sur la position TIME SET afin de procéder au réglage manuel de l’heure (1). • Appuyez sur la touche ▲ (6) ou la touche (7) afin de régler les heures et les minutes de l’heure. •...
- Page 26 • Appuyez sur la touche ▲ (6) et maintenez-la enfoncée pendant env. 3 secondes jusqu’à ce que l’icône du fuseau horaire apparaisse. • Faites glisser le sélectionneur (5) sur la position TIME SET afin de procéder au réglage manuel du fuseau horaire. •...
- Page 27 Veillez à ce qu’aucun liquide ne pénètre dans le produit. 7. Exclusion de garantie La société Hama GmbH & Co. KG décline toute responsabilité en cas de dommages provoqués par une installation, un montage ou une utilisation non conformes du produit ou encore provoqués par...
- Page 28 C‘est un acte écologique. 11. Déclaration de conformité La société Hama GmbH & Co. KG certifie que cet appareil est conforme aux exigences de base et aux dispositions de la directive 1999/5/ en vigueur. Vous trouverez la déclaration de conformité à la directive R&TTE 99/5/CE sur www.hama.de.
-
Page 29: E Instrucciones De Uso
E Instrucciones de uso Elementos de manejo e indicadores 1. Hora 2. Hora de alarma/fecha 3. Sensor de movimiento 4. Interruptor aLaRMa on/oFF = Activación/desactivación del despertador 5. Interruptor corredizo = Cambio entre el modo normal y los modos de ajuste del despertador, la fecha y la hora Tecla ▲... - Page 30 Le agradecemos que se haya decidido por un producto de Hama. Tómese tiempo y léase primero las siguientes instrucciones e indicaciones. Después, guarde estas instrucciones de manejo en un lugar seguro para poder consultarlas cuando sea necesario. Si vende el aparato, entregue estas instrucciones de manejo al nuevo propietario.
- Page 31 aviso – Pilas • Retire y deseche de inmediato las pilas gastadas del producto. • Utilice exclusivamente pilas recargables (o pilas) que sean del mismo tipo. • No mezcle pilas viejas y nuevas, ni tampoco pilas de tipos o fabricantes diferentes. •...
- Page 32 Visualización Búsqueda de señal DCF Activa Visualización parpadeante La búsqueda ha finalizado con éxito, se recibe la señal Visualización permanente Correcta – Recepción débil de la señal Visualización permanente Inactiva – No hay recepción de señal Ninguna visualización nota – ajuste de la hora •...
- Page 33 5.2. ajuste manual de fecha/hora Hora • Lleve el interruptor corredizo (5) a la posición TIME SET para llevar a cabo el ajuste manual de la hora (1). • Pulse la tecla ▲ (6) o la tecla (7 para ajustar las horas y los minutos de la hora. •...
- Page 34 • Pulse y mantenga pulsada la tecla ▲ (6) durante aprox. 3 segundos hasta que se visualice el símbolo de zona horaria • Lleve el interruptor corredizo (5) a la posición TIME SET para llevar a cabo el ajuste de la zona horaria.
- Page 35 Asegúrese de que no entre agua en el producto. 7. Exclusión de responsabilidad Hama GmbH & Co KG no se responsabiliza ni concede garantía por los daños que surjan por una instalación, montaje o manejo incorrectos del producto o por la no observación de las instrucciones...
- Page 36 8. Servicio y soporte Si tiene que hacer alguna consulta sobre el producto, diríjase al asesoramiento de productos Hama. Línea directa: +49 9091 502-115 (Alemán/Inglés) Encontrar más información de soporte aquí: www.hama.com 9. Datos técnicos Despertador por radiofrecuencia 3,0 V Alimentación de corriente...
- Page 37 R Руководство по эксплуатации Органы управления и индикации 1. Время 2. Время срабатывания будильника / дата 3. Датчик движения 4. Кнопка aLaRM on/oFF = включение и отключение будильника 5. Ползунковый переключатель = переключение между нормальным режимом работы и режимом настройки будильника, даты...
- Page 38 Благодарим за покупку изделия фирмы Hama. внимательно ознакомьтесь с настоящей инструкцией. Храните инструкцию в надежном месте для справок в будущем. В случае передачи изделия другому лицу приложите и эту инструкцию. 1. Предупредительные пиктограммы и инструкции Внимание Данным значком отмечены инструкции, несоблюдение которых может привести к опасной...
- Page 39 Внимание – Батареи • Израсходованные батареи немедленно удалять из прибора и утилизировать. • Разрешается применять аккумуляторы только указанного типа. • Не применять различные типы или новые и старые батареи вместе. • Соблюдать полярность батарей (+ и -). Несоблюдение полярности может стать причиной взрыва...
- Page 40 Индикация Поиск сигнала DCF Активно Индикация мигает Успешно – сигнал принят Индикация светится постоянно Успешно – слабый прием сигнала Индикация светится постоянно Неактивно – прием сигнала отсутствует нет индикации Примечание – Настройка часов • Если в течение первых минут радиосигнал DCF принять не удается, поиск радиосигнала отключается.
- Page 41 5.2. Настройка даты и времени вручную Время • Установите переключатель (5) в положение TIME SET, чтобы настроить время (1) вручную. • С помощью кнопок ▲ (6) и (7) установите значения часов и минут. • Установите переключатель (5) в положение , чтобы...
- Page 42 • Нажмите и около 3 секунд удерживайте кнопок ▲ (6) , пока не начнет мигать значок часового пояса • Переместите ползунковый переключатель (5) в положение TIME SET, чтобы установить часовой пояс вручную. • С помощью кнопок ▲ (6) и (7) установите часовой пояс с шагом в один час. •...
- Page 43 применять агрессивные чистящие средства. Следите за тем, чтобы в устройство не попала вода. 7. Отказ от гарантийных обязательств Компания Hama GmbH & Co. KG не несет ответственность за ущерб, возникший вследствие неправильного монтажа, подключения и использования изделия не по назначению, а также вследствие несоблюдения инструкции по эксплуатации и техники безопасности.
- Page 44 среды. В соответствии с предписаниями по обращению с батареями, в Германии вышеназванные нормативы действуют для утилизации батарей и аккумуляторов. 11. Декларация производителя Компания Hama GmbH & Co. KG настоящим подтверждает, что данное изделие полностью соответствует основным требованиям, а также предписаниям и положениям нормативов 1999/5/EG. Заявление о соответствии товара нормам...
-
Page 45: I Istruzioni Per L'uso
I Istruzioni per l‘uso Elementi di comando e indicazioni 1. Ora 2. Ora sveglia / data 3. Sensore di movimento 4. Interruttore aLaRM on/oFF = attivazione / disattivazione sveglia 5. Interruttore a cursore = passaggio tra modalità normale e modalità d’impostazione sveglia, data e ora 6. - Page 46 Grazie per avere acquistato un prodotto Hama! Prima della messa in esercizio, leggete attentamente le seguenti istruzioni e avvertenze, quindi conservatele in un luogo sicuro per una eventuale consultazione. In caso di cessione dell‘apparecchio, consegnate anche le presenti istruzioni al nuovo proprietario.
- Page 47 attenzione – Batterie • Rimuovere e smaltire immediatamente le batterie scariche. • Utilizzare unicamente accumulatori (o batterie) conformi al tipo indicato. • Non utilizzare batterie di tipi o costruttori diversi, né mischiare batterie vecchie e nuove. • Attenersi sempre alla corretta polarità (scritte + e -) delle batterie e inserirle di conseguenza. La mancata osservanza comporta la perdita di potenza o il rischio di esplosione delle batterie.
- Page 48 Display Ricerca del segnale DCF Attiva Indicazione lampeggiante Ricerca riuscita – il segnale viene ricevuto Indicazione fissa Ricerca riuscita – ricezione debole del segnale Indicazione fissa Inattiva – nessuna ricezione del segnale Nessuna indicazione avvertenza – Impostazione dell‘ora • La ricerca viene terminata se non si riceve un segnale radio DCF entro i primi minuti durante la prima configurazione.
- Page 49 5.2. Impostazione manuale data/ora • Spingere l’interruttore a cursore (5) in posizione TIME SET, per effettuare l’impostazione manuale dell’ora (1). • Premere il tasto ▲ (6) o il tasto (7) per impostare le ore e i minuti dell’ora. • Spingere l’interruttore a cursore (5) in posizione per salvare le impostazioni e tornare alla modalità...
- Page 50 • Premere e tenere premuto il tasto ▲ (6) per ca. 3 secondi, finché non viene visualizzato il simbolo del fuso orario • Spingere l’interruttore a cursore (5) in posizione TIME SET, per effettuare l’impostazione manuale del fuso orario. • Premere il tasto ▲ (6) o il tasto (7) per impostare il fuso orario con frequenza oraria. •...
- Page 51 Fare attenzione a non fare penetrare acqua nel prodotto. 7. Esclusione di garanzia Hama GmbH & Co.KG non si assume alcuna responsabilità per i danni derivati dal montaggio o l‘utilizzo scorretto del prodotto, nonché dalla mancata osservanza delle istruzioni per l‘uso e/o delle...
- Page 52 11. Dichiarazione di conformità Hama GmbH & Co. KG dichiara che questo apparecchio soddisfa i requisiti fondamentali ed è conforme alle norme vigenti della direttiva 1999/5/CE. La dichiarazione di conformità secondo la direttiva R&TTE 99/5/CE è disponibile sul sito www.hama.com.
-
Page 53: P Instrukcja Obsługi
P Instrukcja obsługi Elementy obsługi i sygnalizacji 1. Godzina 2. Czas budzenia/ data 3. Czujnik ruchu 4. Przycisk aLaRM on/oFF = włączanie / wyłączanie budzika 5. Przełącznik suwakowy = przełączanie między trybem normalnym i trybem ustawiania budzika, daty i godziny Przycisk ▲... - Page 54 Dziękujemy za zakup naszego produktu! Przed pierwszym użyciem należy dokładnie przeczytać instrukcję obsługi. Instrukcję należy przechować, gdyż może być jeszcze potrzebna. 1. objaśnienie symboli ostrzegawczych i wskazówek ostrzeżenie Używane w celu zwrócenia uwagi na szczególne niebezpieczeństwo lub ryzyko. Wskazówki Używane w celu zwrócenia uwagi na szczególnie przydatne informacje. 2.
- Page 55 ostrzeżenie - baterie • Natychmiast usunąć z produktu zużyte baterie i poddać je utylizacji. • Używać wyłącznie akumulatorów (lub baterii) odpowiadających podanemu typowi. • Nie mieszać starych i nowych baterii ani baterii różnych typów lub producentów. • Wkładając baterie, zwrócić koniecznie uwagę na właściwe podłączenie biegunów (znak + i -). Nieprzestrzeganie grozi wyciekiem lub wybuchem baterii.
- Page 56 Wskaźnik Wyszukiwanie sygnału czasowego DCF Aktywne Migający wskaźnik Proces powiódł się – sygnał jest odbierany Stały wskaźnik Proces powiódł się – słaby odbiór sygnału Stały wskaźnik Nieaktywne – sygnał nie jest odbierany Brak wskaźnika Wskazówki – ustawianie czasu • Jeżeli w trakcie pierwszych minut podczas pierwszej konfiguracji nie zostanie odebrany sygnał radiowy DCF, wyszukiwanie zostanie zakończone.
- Page 57 5.2. Ręczne ustawianie daty / godziny Godzina • Przesunąć przełącznik suwakowy (5) na pozycję TIME SET, aby ręcznie ustawić godzinę (1). • Nacisnąć przycisk ▲ (6) lub (7), aby ustawić godzinę i minuty zegara. • Przełącznik suwakowy (5) przesunąć na pozycję , aby zapisać...
- Page 58 • Przesunąć przełącznik suwakowy (5) na pozycję TIME SET, aby ręcznie ustawić strefę czasową. • Nacisnąć przycisk ▲ (6) lub (7), aby ustawić strefę czasową w cyklu jednogodzinnym. • Przesunąć przełącznik suwakowy (5) na pozycję , aby zapisać ustawienia i powrócić do trybu normalnego.
- Page 59 Uważać, aby do wnętrza produktu nie wniknęła woda. 7. Wyłączenie odpowiedzialności Hama GmbH & Co. KG nie udziela gwarancji ani nie odpowiada za szkody wskutek niewłaściwej instalacji, montażu oraz nieprawidłowego stosowania produktu lub nieprzestrzegania instrukcji obsługi i/lub wskazówek bezpieczeństwa.
- Page 60 Segregując odpady pomagasz chronić środowisko! 11. Deklaracja zgodności Hama GmbH & Co. KG oświadcza niniejszym, że urządzenie to spełnia podstawowe wymagania i pozostałe właściwe postanowienia dyrektywy 1999/5/WE. Deklaracja zgodności wg dyrektywy 99/5WE dotyczącej urządzeń radiowych i telekomunikacyjnych...
-
Page 61: O Manual De Instruções
O Manual de instruções Elementos de comando e indicadores 1. Hora 2. Hora de despertar/data 3. Sensor de movimento 4. Interruptor aLaRM on/oFF = Ativação/desativação do despertador 5. Interruptor deslizante = Comutação entre o modo normal e os modos de definição do despertador, da data e da hora 6. - Page 62 Agradecemos que se tenha decidido por este produto Hama! Antes de utilizar o produto, leia completamente estas indicações e informações. Guarde, depois, estas informações num local seguro para consultas futuras. Se transmitir o produto para um novo proprietário, entregue também as instruções de utilização.
- Page 63 aviso • Retire imediatamente pilhas gastas do produto e elimine-as adequadamente. • Utilize exclusivamente baterias (ou pilhas) que correspondam ao tipo indicado. • Não utilize pilhas de diferentes tipos ou fabricantes nem misture pilhas novas e usadas. • Ao colocar as pilhas, tenha em atenção a polaridade correcta (inscrições + e -). A não observação da polaridade correcta poderá...
- Page 64 Indicação Procura do sinal DCF Ativa Indicação intermitente Efetuada com sucesso – o sinal é recebido Indicação permanente Efetuada com sucesso – receção de sinal fraco Indicação permanente Inativa – Nenhuma receção de sinal Sem indicação nota – Definição da hora •...
- Page 65 5.2. Definição manual da data/hora Hora • Desloque o interruptor deslizante (5) para a posição TIME SET, para efetuar a definição manual da hora (1). • Prima o botão ▲ (6) ou o botão (7), para definir as horas e os minutos. •...
- Page 66 Definição do fuso horário nota – Fuso horário • O sinal DCF pode ser recebido numa ampla extensão. No entanto, corresponde sempre à hora da Europa Central, que é válida na Alemanha. Por conseguinte, em países com outro fuso horário, deve ter em atenção a diferença horária. •...
- Page 67 Definição da hora de despertar • Desloque o interruptor deslizante (5) para a posição Alarm set, para efetuar a definição manual da hora de despertar (2). • Prima o botão ▲ (6) ou o botão (7), para definir as horas e os minutos da hora de despertar. •...
- Page 68 8. Contactos e apoio técnico Em caso de dúvidas sobre o produto, contacte o serviço de assistência ao produto da Hama. Linha de apoio ao cliente: +49 9091 502-115 (alemão/inglês) Para mais informações sobre os serviços de apoio ao cliente, visite: www.hama.com 9.
- Page 69 11. Declaração de conformidade A Hama GmbH & Co. KG declara, deste modo, que este aparelho respeita as exigências básicas e restantes requisitos relevantes da directiva 1999/5/CE. Pode consultar a declaração de conformidade, segundo a directiva R&TTE 99/5/CE, em www.hama.com...
- Page 70 Hama GmbH & Co KG 86652 Monheim / Germany www.hama.com All listed brands are trademarks of the corresponding companies. Errors and omissions excepted, and subject to technical changes. Our general terms of delivery and payment are applied.
Need help?
Do you have a question about the 00123139 RC 610 and is the answer not in the manual?
Questions and answers