Table of Contents
Advertisement
Advertisement
Table of Contents

Related Manuals for Impulse PRO


Summary of Contents for Impulse PRO
- Page 1 TREADMILL IMPULSE PRO OWNER’S MANUAL...
-
Page 2: Table Of Contents
Content Page Content Page ------------------------------------------------------------------------------------ Overview Drawing ------------------------------------------------------------------------- 1-1 Computer Console --------------------------------------------------------------------- ------------------------------------------------------------ Wire Rod and Power Switch 1-3 Running Belt and Lateral Incline Base ------------------------------------------------- Caution Important Safety Instructions----------------------------------------------------------------- Power Requirement s-------------------------------------------------------------------------- ISP Slot ------------------------------------------------------------------------------------------ Add Lubricant ---------------------------------------------------------------------------------- ------------------------------------------------------------------------- Level Adjustment ---------------------------------------------------------------- Running Belt Adjustment... -
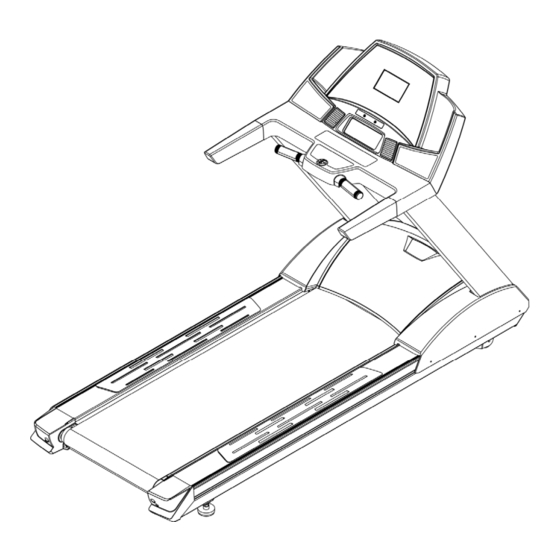
Page 3: Overview Drawing
1. Overview Drawing Beach Mountain AS - 3 - fitness@beach-mountain.no... -
Page 4: Computer Console
1-1 Computer Console Safety Key Please refer to 2‐7 Emergency Stop System for details. Beach Mountain AS - 4 - fitness@beach-mountain.no... -
Page 5: Wire Rod And Power Switch
1-2 Wire Rod and Power Switch Wire Rod Twist the extra power cord round the wire rod. Caution: Don’t carry the treadmill by the wire rod. Pulling it by force will result in distortion. Power Socket Power Switch Circuit Breaker Power Switch Press 1 to switch on; Press 0 to switch off treadmill. Circuit Breaker 10 min. -
Page 6: Running Belt And Lateral Incline Base
1.3 Running Belt and Lateral Incline Base Caution Running Belt Keep hands away from the running belt while the treadmill is running. If services needs to be done near this area, turn the treadmill and unplug the unit first. Caution Lateral Incline Base Keep hands away from the running belt while the treadmill is running. If services needs to be done near this area, turn the treadmill and unplug the unit first. Beach Mountain AS - 6 - fitness@beach-mountain.no... -
Page 7: Important Safety Instructions
2. Caution 2-1 IMPORTANT SAFETY INSTRUCTIONS Danger – To reduce the risk of electric shock: Always unplug this product from the electrical outlet immediately after using and maintenance. Warning – To reduce the risk of burns, fire, electric shock, or physical injury, please read the important safety instructions and product information carefully before starting to use this product. - Page 8 the same outlet or circuit. 11. Before stepping on the treadmill, please stand on the anti-slip pads on either side of the treadmill frame. Step on the treadmill after it begins to run; this will avoid unnecessary initial loads. 12. Before using the treadmill, please examine every part first. 13.
-
Page 9: Power Requirements
Power Requirements This treadmill needs special power supply: Power Voltage(V) Frequency(HZ) Rated Power(W) 50/60 1500W 50/60 1500W 50/60 1500W 240+ 50/60 1500W A dedicated outlet is REQUIRED for this treadmill. The hot, neutral and ground wires must each be routed independently (not looped or tied to other circuits.) This product must be properly grounded to prevent damage from lightning strikes. -
Page 10: Isp Slot
2-3 ISP Slot ISP Slot This slot is for software update. (Should update required, please contact with your dealer) Beach Mountain AS - 10 - fitness@beach-mountain.no... -
Page 11: Add Lubricant
Add Lubricant Use hex wrench to loosen belt, and pull up belt enabling to drop few silicon at deck center then daub it evenly. Then, tighten belt. Lubrication check is required every half month. Maintenance Period Metric / Imperative System Exercise Speed Maintenance Period 6 kph below... -
Page 12: Level Adjustment
Level Adjustment The treadmill will wobble during workout and the incline angles will be affected if it is placed on uneven ground. The level adjustment method is as follows: 1. Turn A counter-clockwise to loosen it 2. Adjust B to the proper height 3. -
Page 13: Running Belt Adjustment
Running Belt Adjustment After installing and leveling the treadmill, check the belt to ensure that it is tracking properly. First, plug the power cord into an appropriate dedicated outlet. Then, turn the treadmill ON. Have one person stand on the anti-slip pads on either side of the treadmill frame. Do not stand on the running belt at this time. -
Page 14: Emergency Stop System
Emergency Stop System This treadmill is equipped with the safety system. The emergency stop is shown on the drawing. Pull down the rope Unplug the safety key to stop the treadmill Caution: Once pull down the safety key that will eventually disconnect from the emergency stop system. -
Page 15: Assembly Instruction
3. Assembly Instructions Read the operation instructions carefully before use, then choose a flat position to assemble. Check the following components after opening the carton box. If there are any parts missing, please contact with the local dealer. 3-1 Pre-Assembly Check List ITEM Description... - Page 16 Optional Accessory The POLAR heart rate chest strap is an optional accessory that can be used with this treadmill. Once the chesk strap is worn, the PULSE window of cosnole will display your heart rate. Hardware Pack Item Description Q’ty Truss Hex Screw M10xP1.5x80 Truss Hex Screw M8xP1.25x70 Nylon Nut M8...
-
Page 17: Assembly Steps
3-2 Assembly Steps Two people are required to finish the assembly steps. CAUTION!! Please follow the assembly steps exactly to avoid injury. Remove motor cover from frame(B), then fix slightly Uprights(C,D) with frame by screw(a). Tighte n screw(e) and then tighten screw(a). Pull out lower control cable inside Upright(D), then put them otor cover back to the frame(B) and tighen with screws. - Page 18 2. Place the Computer Shelf(A) on the assembled Uprights(C,D) of Frame(B) and pull the control wire into the upright to connect it with the computer. Put the computer shelf above the uprights and tighten with Nylon Nuts(b) as shown in the above drawing. Tighten the computer with plastic handle screws(d). Lastly, install the copholders.
- Page 19 3. After finishing the above steps, raise the computer console (A) as the arrow shows and tighten with the plastic handle (d). Beach Mountain AS - 19 - fitness@beach-mountain.no...
-
Page 20: Program Control Settings
4. Program Control Settings Instruction 4-1. This console is equipped with 7” TFT-LCD screen that displays SPEED 、 INCLINE 、 DISTANCE、KCAL、TIME、PACE、BPM and PROGRAM profile. SPEED/INCLINE/DISTANCE: Indicate the value of speed, inclination angle and distance during the workout. KCAL: Indicate calories consumption while workout (kcal) PACE: Time needed to finish 1 km (mile) run BPM: Heart beat per minute (times/min) Beach Mountain AS... - Page 21 Programs profile: Goals mode: This program consists of Time, Distance and Calories goals to select. Programs mode: There are 6 sub-programs to select includes Rolling, Fat burn, Aerobic, Hill run, Hill climb, Hill interval programs. Fitness test mode: This program is a 12 minutes fitness test. HRC mode: This HRC program consists of three changeable heart rate goals 65%, 75%, 85%, and one THR (target heart rate).
- Page 22 lbs).Range: 23~180kg (50~400 lbs). After complete setting, press to return to start/ready status. 2. If you like to use the default settings, directly press to return to start/ready status. The purpose of setting weight is that built-in program calculates calorie burn based on weight, so you are required set your weight when re-start the treadmill or every time plug back the safety key.
-
Page 23: Key Functions
4-2. Key Functions(An effective key creates a sound) : Press this key to start treadmill with the lowest speed of 0.8 kph (0.5 mph) and the incline automatically return to LEVEL 0. : Press this key to stop the treadmill during your workout, and in the same time, to stop counting for all of values. -
Page 24: General Operation And Instructions
: Press this key to confirm setting. : Press this key to decrease the setting value. : Under start/ready status, press this key to select programs. During your workout, press this key to switch screen between racetrack and bar chart. :... - Page 25 2. Under start/ready status, press key, you can choose program profiles includes Goals, Programs, Fitness Test,、HRC, USER and Race. The selected program would be framed in blue, then press key to enter. 3. The guiding texts will be shown on the screen to guide you for the next setting step by step.
-
Page 26: Exercise Program Summaries
4-4 Exercise Program Summaries: MANUAL mode Press key, after 3 sec, treadmill starts to run at the lowest speed of 0.8 kph (0.5 mph). Default (red point) runs counter-clockwise on race track. The bottom left corner of screen shows target laps. Every lap is 0.4km (0.25ml). You can press key to switch screen between race track and bar chart. - Page 27 treadmill stops automatically. Calories Goal: This program serves for weight control. Once goal calories are burned within a certain time, the treadmill stops automatically. 1. Once this program is selected, press key, then you can press key or numerical keys to adjust values. ...
- Page 28 start/ready status. 5. After finish setting values, press key to start the program. During setting, you can also press key to start the program. 6. During workout, you can use speed +- key and incline↑↓key to adjust workout level. There are 8 levels. Fitness Test 1.
- Page 29 RC ( This program can only be run with the use of a Wireless HR chest strap) This program is used to keep your heart rate within a certain zone for optimal training; the program will automatically adjust speed and elevation to keep you within the range you select.
- Page 30 Preset Preset Preset Preset User 1. Once this program is selected, you should press key to change the speed and incline value within 1~32 stages, then press speed +- key and incline↑↓key to adjust the speed and incline (0 – 15 level).While editing, the corresponding screen will flash. You can also press key directly to enter the next value setting or press key to start.
-
Page 31: Error Signal
Pacer Speed=Target Distance/Target Time. Unit: kph (mph) Press to start treadmill, then you can start to race with the computer. When the input value is invalid, you are required reset values in order to run this program. On the race track, you are represented by blue point and the red point represents computer. - Page 32 Beach Mountain AS - 32 - fitness@beach-mountain.no...
- Page 33 Beach Mountain AS - 33 - fitness@beach-mountain.no...
- Page 34 Beach Mountain AS - 34 - fitness@beach-mountain.no...
- Page 35 Beach Mountain AS - 35 - fitness@beach-mountain.no...
- Page 36 Beach Mountain AS - 36 - fitness@beach-mountain.no...
- Page 37 Beach Mountain AS - 37 - fitness@beach-mountain.no...
- Page 38 Beach Mountain AS - 38 - fitness@beach-mountain.no...
- Page 39 Beach Mountain AS - 39 - fitness@beach-mountain.no...
- Page 40 Aerobic Elevation and speed Elevation and speed change change Aerobic RUN Level 1 Elevation (KPH) (MPH) Level 2 Elevation (KPH) (MPH) Level 3 Elevation (KPH) (MPH) Level 4 Elevation (KPH) (MPH) Level 5 Elevation (KPH) (MPH) Level 6 Elevation (KPH) 10.4 10.4 10.4...
-
Page 41: Fat Burn
Fat Burn Elevation and speed Elevation and speed change change Fat Burn Level 1 Elevation (KPH) (MPH) Level 2 Elevation (KPH) (MPH) Level 3 Elevation (KPH) (MPH) Level 4 Elevation (KPH) (MPH) Level 5 Elevation (KPH) (MPH) Level 6 Elevation (KPH) (MPH) Level 7...
Need help?
Do you have a question about the PRO and is the answer not in the manual?
Questions and answers