Table of Contents
Advertisement
Advertisement
Table of Contents

Related Manuals for Airwolf 3D HD2x


Summary of Contents for Airwolf 3D HD2x
-
Page 2: Table Of Contents
VIKI LCD: HOW TO ........10 HOST INTERFACE .......37 RAMBO DRIVER INSTALLATION ..11 QUICKSTART GUIDE .......41 SOFTWARE INSTALLATION: CURA ..16 MATERIALS ..........42 SOFTWARE INSTALLATION: MAINTENANCE ........43 REPETIER HOST ........20 TROUBLESHOOTING ......46 AIRWOLF 3D 5 STEPS TO 3D PRINTING ....22 YOUTUBE CHANNEL SLICING PROCESS ........23... -
Page 3: Introduction
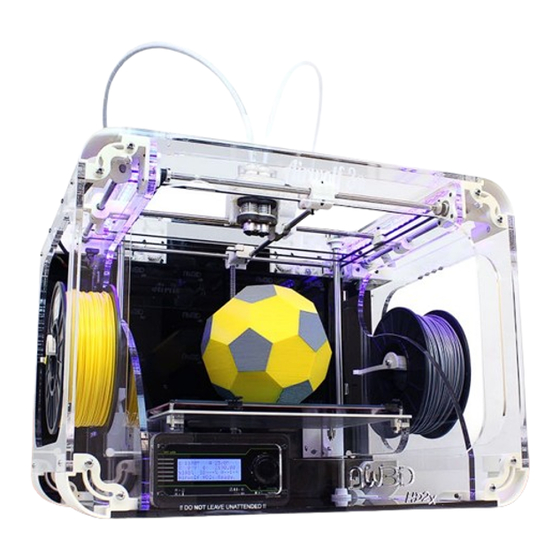
Printing in one material or one color is a thing of the past. Welcome to dual color/dual material printing with the all-new HD2x from Airwolf 3D. The HD2x features a print volume of (11”x8”x12”), and offers layer-to-layer resolution as fine as .06mm (.002”), lightning-fast speeds and a partially enclosed, yet easily accessible proprietary frame design. -
Page 4: Technical Specifications
TECHNICAL SPECIFICATIONS THEORETICAL POSITIONING PRECISION (mm): .02 MODEL: HD2x INPUT FORMAT: Gcode ASSEMBLED: YES SOFTWARE: Marlin Firmware, Repetier Host Print Controller, Cura NUMBER OF PRINTING MATERIALS: 20+ SYSTEM COMPATIBILITY: WINDOWS/MAC BUILD ENVELOPE WxDxH: 11” x 8” x 12” PRINTER SIZE WxDxH: 24” x 18” x 18” (600... -
Page 5: Box Contents
BOX CONTENTS AIRWOLF 3D QUICK START GUIDE SPOOL OF ABS FILAMENT GLASS WITH PET FILM HD2x PRINTER USB DRIVE WITH PRINT MICRO SD CARD WITH HEX WRENCH SET SETTINGS SAMPLE PRINTS... -
Page 6: Parts Directory
PARTS DIRECTORY Y MOTOR GUIDE TUBE X MOTOR Z MOTOR SPOOL LCD SCREEN MINDER USB CONNECTION FILAMENT SPOOL FILAMENT HOLE EXTRUDER MOTOR Z ADJUSTMENT SCREW REAR VIEW TOP VIEW... -
Page 7: How It Works
HOW IT WORKS SPOOL OF FILAMENT The extruder gears and hobbed bolt pull the filament from the spool and feed it into the guide tube. EXTRUDER GEARS AND HOBBED BOLT The extruder gears and hobbed bolt pull the filament from the spool and feed it into the guide tube. -
Page 8: Viki Lcd Screen
VIKI LCD SCREEN Out of all the features the VIKI LCD Screen has, there are four main ones that you will use regularly. They include Auto Home, Preheat ABS, Move Axis and Print from SD. The following page has a layout of all of the features the VIKI has to offer and these four functions are underlined. -
Page 10: Viki Lcd: How To
This will speed up or slow down a print. The rule of thumb is not to go any faster than the Airwolf 3D standard fast settings, and to not go any slower than the Airwolf 3D slow settings. -
Page 11: Rambo Driver Installation
RAMBo DRIVER INSTALLATION WINDOWS 8 Windows 8 by default will not let you install unsigned drivers. This means that a Windows 8 computer will not recognize the RAMBo board unless you follow these steps to start Windows 8 in “Disable Driver Signature Enforcement” mode. SETTINGS BUTTON Move the cursor to the bottom right corner of the screen and select the GEAR icon “Settings. - Page 12 RAMBo DRIVER INSTALLATION ADVANCED STARTUP > RESTART NOW Scroll down and select “Restart Now” under “Advanced Startup. ” TROUBLESHOOT > ADVANCED OPTIONS > STARTUP SETTINGS After selecting “Startup Settings, ” select “Restart. ” RESTART > CHOOSE OPTION 7 The PC will restart. Upon startup, click the “7” key on your keyboard.
- Page 13 (PC ONLY) Only PC computers need the RAMBo driver. Plug the printer into the computer with the USB cable. Insert the Airwolf 3D USB drive (came with the printer) into the computer. In the “Control Panel, ” open “Devices and Printers. ” Under “Unspecified, ” you should see a device labeled “RAMBo.
- Page 14 RAMBo DRIVER INSTALLATION (PC ONLY) A fourth window will appear. Select “Browse my computer for driver software. ” Select the “Browse” button. Browse for the Airwolf USB stick. Select the folder “Rambo Driver” and select “OK. ” The window will close and return to the “search for driver”...
- Page 15 RAMBo DRIVER INSTALLATION (PC ONLY) Another screen may appear and say “Windows can’t verify the publisher of this driver software. ” Select “Install this driver software anyway. ” If installed correctly, this is the screen you should see. Select “Close -> Close, ” and “OK.
-
Page 16: Software Installation: Cura
SOFTWARE INSTALLATION: CURA Introduction to Cura: Cura will be your slicing engine for printing. First it will be set up for single head printing and then set up for dual head printing. Download Cura. Visit http:/ /www.software.ultimaker.com Launch Cura Installer Choose which file types you would like Cura to open by default. - Page 17 Select “Custom..., ” then click “Next. ” Machine Specifications: Fill in data according to the picture then click “Finish. ” Dual Head Machine Specifications: Only follow these steps if setting up the HD2x for dual color / dual material printing. See next page.
-
Page 18: Software Installation
Repeat steps 6-8. Use the exact same settings for the bed dimensions. Give the printer a new name (i.e. HD2x Dual). The “Machine Settings” window will re-open. For the “Extruder Count, ”make sure to select “2. ” This will set up “HD2x Dual” to be a dual head printer. Then click “OK. ”... - Page 19 SOFTWARE INSTALLATION: CURA (DUAL) Go back to the “Machine” drop down and select “Machine settings. ” Make sure that under Extruder 2, the “Offset Y” and “Offset X” are both set to 0. Cura is now ready to prepare dual color / dual material files. You can delete the robot that comes with Cura as default by right clicking the figure and selecting “Delete Object.
-
Page 20: Repetier Host
A new window will now open with the “Connection” tab active. Name the printer. Replace “Default” with a new printer name (i.e. HD2x). While still in the “Connections” tab, also change the Baud Rate to 250,000. Click on the “Printer” tab, then change the “Default Extruder... - Page 21 SOFTWARE INSTALLATION: REPETIER HOST Designate the number of Extruders. Click on the “Extruder” tab, then select “2” under “Number of extruder. ” Change the diameter of “Extruder 1” and “Extruder 2” to .5 mm. Select different colors for the two nozzles Click on the “Printer Shape”...
-
Page 22: Steps To 3D Printing
5 STEPS TO 3D PRINTING Now that we have installed the software, this section will cover the main steps to printing. DESIGN OR DOWNLOAD 3D MODEL: When doing this, Keep in mind the printing orientation and the printing material(s) that you are going to use. PROGRAMS: Sketchup, Solidworks, Rhinoceros, etc. -
Page 23: Slicing Process
SLICING PROCESS SLICING STL 3D MODEL VIEWING GCODE PRINTER 3D MODEL SETTINGS INSTRUCTIONS (.STL) (.INI) (.GCODE) CAD: This is where the 3D STL: The STL file is then GCODE: The GCODE is then model will be designed and then exported into the slicing engine exported. -
Page 24: Guide To 3D Printing
GUIDE TO 3D PRINTING DESIGN OR DOWNLOAD 3D MODEL: There are a couple of websites where 3D models can be downloaded from. Thingiverse is a great place to find STL files to print. Another place to find 3D models is GrabCad. GrabCad has many models for many different CAD programs. There are a couple things to consider when selecting or designing a 3D model. -
Page 25: File Cleanup (Netfabb)
GUIDE TO 3D PRINTING NETFABB: LAYOUT (STL CLEAN UP): Having a clean STL file is crucial to a successful slice and eventually a successful print. Depending on the CAD program used to design the 3D model, and also the complexity of the 3D model, some create the STL file cleaner than others. But just to be safe, it is a good rule of thumb to clean up your STL file. -
Page 26: Slicing
There are three parts to this process; the STL file, the settings, and the GCODE. The slicing engine that is utilized for the HD2x is Cura. It creates GCODE. The time taken to slice an STL file is dependent on the complexity of the geometry, the settings selected and the computing power of your computer. -
Page 27: Cura Interface
GUIDE TO 3D PRINTING USING THE CURA INTERFACE FILE MENU: SETTINGS MENUS: The file menu allows you to import There are 3 main your STL file, save your STL file, import settings, export menus for settings within Cura. These are Basic, settings, and export GCODE. - Page 28 GUIDE TO 3D PRINTING USING THE CURA INTERFACE: TOOLS LOAD: SAVE TOOLPATH: VIEW MODE: The “Load” icon allows This icon This option allows you to load your model without gives you the option of saving GCODE the user to view a 3D model in different having to go into the “File”...
-
Page 29: 4A. Single Head Printing
SINGLE HEAD PRINTING STEP 1: OPEN CURA Open Cura to slice your STL file and select “Machine > HD2x. ” STEP 2: LOAD MODEL FILE “File > Load Model File(s)” to load the STL file on to the bed platform. - Page 30 GUIDE TO 3D PRINTING SINGLE HEAD PRINTING BASIC SETTINGS MENU Layer Height determines the resolution on the Z-axis and will greatly effect the quality of a print. After opening Cura, the Basic Menu will open as Use multiples of 0.020 since we are using a 2mm default.
- Page 31 GUIDE TO 3D PRINTING SINGLE HEAD PRINTING ADVANCED SETTINGS MENU The Nozzle size setting is used to define the diameter of nozzle being used. All HD models The “Advanced” menu is located next to the “Basic” come standard with a 0.5mm nozzle, and it is settings tab.
-
Page 32: 4B. Single Head Printing With Support
GUIDE TO 3D PRINTING SINGLE HEAD PRINTING WITH SUPPORT EXPERT SETTINGS MENU Z-hop is used to allow the nozzles to clear the print when traveling (not extruding material). To open the “Expert Settings” window, go to “Expert” > “Open Expert Settings. ” A Skirt is automatically generated in Cura. -
Page 33: 4C. Dual Head Printing With Support
GUIDE TO 3D PRINTING DUAL HEAD PRINTING WITH SUPPORT STEP 1: OPEN CURA Open Cura to slice your STL files. Make sure you select the machine that was setup as a “dual extruder” machine. Go to “Machine > Machine Settings” to select. STEP 2: LOAD MODEL FILE “File >... -
Page 34: 4D. Dual Head Printing With 2 Colors / Materials
STL file. STEP 1: OPEN CURA DOWNLOAD PRINT Open Cura to slice your STL file and select “Machine > HD2x. ” SETTINGS HERE STEP 2: LOAD MODEL FILE “File >... - Page 35 GUIDE TO 3D PRINTING DUAL HEAD PRINTING WITH 2 COLORS / MATERIALS BASIC SETTINGS MENU 2nd Nozzle Temp: When printing with the dual hot end, only one temperature is needed because of After opening Cura, the Basic Menu will open the configuration of the printer.
- Page 36 GUIDE TO 3D PRINTING DUAL HEAD PRINTING WITH 2 COLORS / MATERIALS Z-hop is used to allow the nozzles to clear the print when EXPERT SETTINGS MENU traveling (not extruding material). To open the “Expert Settings” window, go to “Expert” > “Open Expert Settings. ” Fan Speed: For most dual head prints, the fan max/min should be set to %100.
-
Page 37: Using The Repetier Host Interface
GUIDE TO 3D PRINTING USING THE REPETIER HOST INTERFACE MAIN FUNCTION BUTTONS VIEWING TABS CONNECT/DISCONNECT: Used to 3D VIEW: Used to view and analyze the connect/disconnect the printer to GCODE in 3D the computer TEMPERATURE CURVE: Used to view and LOAD: Used to load the GCODE file analyze the nozzle and bed temperature START PRINT: Used to start the print... - Page 38 GUIDE TO 3D PRINTING USING THE REPETIER HOST INTERFACE PREVIEWING GCODE GCODE PREVIEW TAB 3D GCODE VIEWER CONTROLS: Used GCODE EDITOR: Used to view the GCODE to control the 3D view of the GCODE. in text form Purely used for viewing. This will not ESTIMATED PRINT STATS: Displays the affect the print.
- Page 39 GUIDE TO 3D PRINTING USING THE REPETIER HOST INTERFACE The status bar will show what X, Y, Z Home position. Based on the Used to switch between the printer is doing (preheating, min. limit switches. Extruder 1 and Extruder 2. printing, ETA, etc.) Y-axis home position Motion Conrols for Z axis...
-
Page 40: Quickstart Guide
GUIDE TO 3D PRINTING PRINTING WITH REPETIER HOST INTERFACE STEP 1: OPEN REPETIER HOST Open Repetier Host to view the GCODE. STEP 2: LOAD GCODE FILE “Load” > (GCODE FILE.GCODE) to import the GCODE file. STEP 3: ANALYZING THE GCODE FILE Under the “Preview”... - Page 41 UNBOXING Coat the glass to the edge with a purple Elmer’s glue stick. Lay the glass on the red Remove the printer from the box. heat bed, PET film facing upward. Remove the labled zip ties from the bed Place the binder clips in the 4 corners of the and the twisty ties from belts.
-
Page 42: Materials
MATERIALS 3D PRINTING MATERIALS This chart separates printing materials into temperature ranges and properties. When making new settings, or adjusting the default material settings, make sure to follow this chart. -
Page 43: Maintenance
MAINTENANCE REQUIRED TOOLS: Razor blade(s), a roll of PLA for purging for soft materials, white lithium grease. THESE MAINTENANCE STEPS SHOULD BE CARRIED OUT EVERY 100 PRINTING HOURS 1. PURGING NOZZLE: Ensure the nozzle is at high temperature (260C for ABS, PLA, etc. - Page 44 MAINTENANCE WIRING DIAGRAM Motor : X, Y, Z1, E0, and E1 Limit Switches : All 6 limit switches are used Heaters : Heat 0 is for the extruder (heating element), Heat2Bed is for the heat bed Thermistors : T0 is for reading the extruder temperature, T1 is spliced with T0 to read the extruder temperature, T2 is for reading the heat bed temperature Fans: Fan 0 is for the extruder fan, Fan 1 is for the LED lights...
- Page 45 MAINTENANCE WIRING DIAGRAM...
-
Page 46: Troubleshooting
TROUBLESHOOTING 1: PART IS NOT STICKING TO BED Open Repetier Host to view the GCODE Generally higher temperatures make for better bed adhesion For ABS, Nylon, PC, etc, make sure to use the purple Elmer’s glue stick on the PET film. Adding brims to the first layer of your printer (at zero distance) [especially for PC and nylon] The better the printer is calibrated, the better the first layer is, the better... - Page 47 TROUBLESHOOTING 7: PRINTING LARGE PARTS Use large layer heights(0.200- 0.400mm) Use faster speeds (30 -75mm/s) Use less infill (10 -30%) 8: VIKI Check connectors behind the Viki display Ensure SD card is not above or below the slot 9: FAN IS NOT WORKING Preheat PLA through the VIKI as this will turn on the FAN Contact tech support if the fan does not turn on after engaging Preheat PLA The fan only turns on for certain materials, refer to material settings for specific...
-
Page 48: Airwolf 3D
YOUR DOWNLOADING OF ANY INFORMATION OR MATERIALS FROM THIS WEBSITE. Limitation on Liability. IN NO EVENT SHALL AIRWOLF 3D (AND OUR SUPPLIERS) BE LIABLE TO YOU OR ANY THIRD PARTY FOR ANY LOST PROFIT OR ANY INDIRECT, CONSEQUENTIAL, EXEMPLARY, INCIDENTAL, SPE- CIAL OR PUNITIVE DAMAGES ARISING FROM OR RELATING TO THESE TERMS OF USE, EVEN IF WE HAVE BEEN ADVISED OF THE POSSIBILITY OF SUCH DAMAGES.
Need help?
Do you have a question about the HD2x and is the answer not in the manual?
Questions and answers