Table of Contents
Advertisement
USER MANUAL FOR YOUR VENINI
VDW61S
60 cm Full Height
Freestanding Dishwasher
NOTE
: This User Instruction Manual contains important
information, including safety & installation points, which will
enable you to get the most out of your appliance. Please keep it
in a safe place so that it is easily available for future reference; for
you or any person not familiar with the operation of the appliance.
JW 26/06/13
Advertisement
Table of Contents

Related Manuals for Venini VDW61S


Summary of Contents for Venini VDW61S
-
Page 1: Freestanding Dishwasher
USER MANUAL FOR YOUR VENINI VDW61S 60 cm Full Height Freestanding Dishwasher NOTE : This User Instruction Manual contains important information, including safety & installation points, which will enable you to get the most out of your appliance. Please keep it in a safe place so that it is easily available for future reference;... -
Page 2: Table Of Contents
Contents Environmental note Important safety information 4 – 6 Specifications 7 – 10 Product and aperture dimensions Product specifications Electrical details Description of the appliance Control panel Using your dishwasher 11 - 20 Before first use Filling with rinse aid Setting the rinse aid level Filling with dishwasher detergent 12–13... -
Page 3: Environmental Note
This should be undertaken by a competent person. Disable the door lock to make sure that children cannot get stuck inside the appliance. o The packaging materials that Venini uses are environmentally friendly and can be recycled. o Please discard all packaging material with due regard for the... -
Page 4: Important Safety Information
IMPORTANT SAFETY INFORMATION Your safety is of the utmost importance to Venini. Please make sure that you read this instruction booklet before attempting to install or use the appliance. If you are unsure of any of the information contained in this booklet, please contact the retailer where you purchased your unit. - Page 5 o Care should be taken not to trap the power supply cable underneath the appliance whilst installing it. o No attempt should be made to alter or modify the specifications of this appliance. In daily use o This appliance is only designed to wash normal domestic washloads.
- Page 6 Child Safety o Your dishwasher should only be used by adults. You should not allow children in the area of the machine unsupervised. You should not let them touch the controls or play with the appliance. o It could be possible for a child or pet to gain access to the dishwasher if the door is left open.
-
Page 7: Specifications
Specifications Product dimensions Height: 850 - 875 mm Width: 600 mm Depth: 600 mm Product specifications o 12 Place settings o 6 functions: Normal Intensive Heavy Soak Rapid Rinse o 6 temperatures: 40°C, 49°C, 55°C, 60°C, 65°C, 70°C o Noise level: 52 dB o LED display o Delay start o Anti-leak device... -
Page 8: Electrical Details
Energy efficiency details Energy efficiency class: 3 Star Water Consumption: 4 star Electrical details Rated voltage: 220-240 Vac 50 Hz Supply connection: 10A GPO For future reference please record the following information which can be found on the rating plate and the date of purchase which can be found on your sales invoice. -
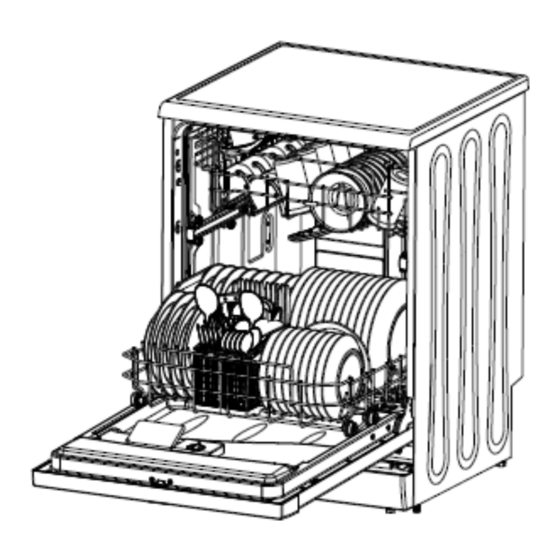
Page 9: Description Of The Appliance
Description of the appliance Upper basket Spray arms Lower basket Filters Detergent dispenser Rinse Aid dispenser Cutlery basket Cup holder... -
Page 10: Control Panel
Control panel ON/OFF button Start/Pause button Delay start button Child lock button 3 in 1 button Child lock indicator 3 in 1 indicator Water inlet malfunction indicator Rinse aid indicator Drying indicator LED display Program selection dial ON/OFF button - Turns the appliance on/off Start/Pause button - Pauses and resumes a wash cycle Delay start button - Delays the start of the wash cycle Child lock button... -
Page 11: Using Your Dishwasher
Using your dishwasher Before first use Filling with rinse aid The rinse aid is released during the final rinse and it helps to prevent water from forming droplets on your dishes. These droplets will lead to spots and streaks being left on items after the wash program has completed. -
Page 12: Setting The Rinse Aid Level
Setting the rinse aid level The amount of rinse aid that the dishwasher requires also depends on the hardness of your water. You should experiment with the rinse aid setting, until you find a level that gives the best results. o On the first wash cycle, we would recommend that the rinse aid level is set to number 4. -
Page 13: Concentrated Detergent
o The section marked 2 in the diagram can have separate detergent placed in it for any wash cycle that has a pre-wash element to it, however this is optional. This must be a liquid or powder detergent, not another detergent tablet. o Shut the detergent dispenser lid so that it clicks shut securely. -
Page 14: Loading The Upper Basket
Loading the upper basket The upper basket is most suited to washing delicate and light dishware, such as glasses, coffee & tea cups, saucers, plates, bowls and shallow pans (that are not heavily soiled). Cups Glasses Saucers o You should position the dishes and cookware in such a way that they are not moved by the spray of water during the wash cycl... -
Page 15: Loading The Lower Basket
Loading the lower basket The lower basket is most suited to washing larger and more heavily soiled items, such as saucepans, saucepan lids and serving dishes. You can also load bowls and a variety of plates into the lower basket. G. -
Page 16: The Cutlery Basket
The cutlery basket Cutlery should be placed inside of the cutlery basket. The cutlery basket should then be placed in the appropriate position in the lower basket. Teaspoons Dessert spoons Soup spoons Forks Knives Serving fork Serving spoon Gravy ladle o For the best washing performance, cutlery should be placed through the slots in the top of the cutlery basket. - Page 17 The following items are NOT suitable for washing inside a dishwasher:- o Cutlery with a handle of mother-of-pearl, wood, horn or china. o Plastic items that are not resistant to heat. o Cutlery that consists of glued parts that are not resistant to heat. o Cutlery items or crockery that are bonded.
-
Page 18: Program Table
Program table o The ECONOMY program is suitable for cleaning a typical load of dirty dishes and is the most efficient in terms of its combined energy and water consumption. Program Program Description Detergent Program Energy Water information of cycle pre/main times* (kWh) -
Page 19: Setting A Wash Program
Setting a wash program Make sure that the before first use section has been followed. o Check whether the appliance needs rinse aid adding to it. o Pull out the top and bottom baskets, then load them in accordance with the loading instructions. o Push the top and bottom baskets fully back into position. -
Page 20: At The End Of A Wash Program
At the end of a wash program o When the wash program is finished a buzzer will sound. o Open the door of the appliance. o Use the ON/OFF button to switch the dishwasher off. o Wait a few minutes before unloading the dishwasher to avoid handling the dishes and utensils while they are still not and more susceptible to breakages. -
Page 21: Saving Energy Using Your Dishwasher
Saving energy using your dishwasher Loading dishes o Refer to the relevant section of this manual for instructions on placing items in the dishwasher for the most efficient cleaning. o Only run the dishwasher when it is full for optimum energy and water usage. -
Page 22: Cleaning And Maintenance
Cleaning and maintenance IMPORTANT: The appliance should be disconnected from your mains supply before commencing any cleaning process. The filter system Your appliance is fitted with three levels of filtering; these are located in the base of the dishwasher for ease of access. Main filter Coarse filter Fine filter... -
Page 23: Cleaning The Spray Arms
2. Pull out the main filter and rinse this under the tap to remove any food debris that is trapped in it. 3. Place filters back their original position. 4. You must turn the coarse filter clockwise to lock it back into position. IMPORTANT: If a glass gets smashed inside of the appliance, you must check there is no glass in the filter before the machine is used ag... -
Page 24: Cleaning The Door
Cleaning the door o To clean the edge around the outside of the door, you should use a soft, damp cloth only. o To prevent water from penetrating the door lock or electrical components, DO NOT use a spray cleaner of any kind. o DO NOT use any abrasive cleaner or scouring pads on the inner or outer surfaces, as they may cause damage to them. - Page 25 Other error codes: ERROR CODE MEANING POSSIBLE CAUSES Door open The door is open when the dishwasher is operating Temperature Temperature sensor malfunction sensor Water leakage Water leakage occurs Heating element Abnormal heating IMPORTANT: If any of the above fault codes appears then you should check the trouble shooting table on pages 26-27 for possible solutions.
-
Page 26: General Troubleshooting
General troubleshooting PROBLEM POSSIBLE WHAT TO DO CAUSES Dishwasher Fuse blown or the Replace the fuse or reset the circuit doesn’t circuit breaker has breaker. Remove any other tripped appliances that are sharing the same circuit with the dishwasher. Power supply is not Make sure that the dishwasher is switched on turned on and that the door is closed... - Page 27 Dishes and Improper program Select a more intense wash program. pans are not clean Improper loading Make sure that the spray arms and the detergent dispenser are not being impeded by large dishes. Spots and Extremely hard Refer to the relevant sections of this filming on water booklet, to ensure that the detergent,...
-
Page 28: Installation
Installation IMPORTANT: THIS INSTALLATION MUST COMPLETED BY A SUITABLY QUALIFIED PERSON. MANUFACTURER ONLY SANCTIONS INSTALLATION GIVEN THIS INSTRUCTION MANUAL. YOU SHOULD DISPOSE OF ALL PACKAGING IN AN ENVIRONMENTALLY FRIENDLY MANNER. Connecting to the mains water supply IMPORTANT: Do not connect the appliance to your mains water supply using an old or an existing water inlet hose. -
Page 29: Connecting To The Water Outlet
Connecting to the water outlet o Secure the drain hose, so that it cannot move whilst the dishwasher is in use. o Place the end of the drain hose in your drain pipe and push it a short way down (max120mm) DO NOT SEAL o IMPORTANT: Do not insert the drain hose too deeply into the pipe, as this may cause siphoning. -
Page 30: Connecting To The Power Supply
Connecting to the power supply o IMPORTANT: The electrical sock et must still be accessible once the appliance is installed. o Consult the rating plate, located on the right hand side of the drop down door BEFORE making the electrical connections. Ensure that the voltage reaching the plug is the sa me as that on the rating... -
Page 31: Levelling The Appliance
evelling the appliance o IMPORTA NT: Your dishwasher must be level for it to operate properly. o Make sure that the dishwasher is supported whilst it is being levelled, otherwise it may tip over. o The feet can be adjusted by hand or by using a spanner. -
Page 32: Contact Details
Thin k Appliances Pty L 416-424 Barry Rd Coolaroo VIC 3048 Sales Telephone 1300 132 824 rvice Telephon 1800 444 357 Website www.thinkappliances.com...
Need help?
Do you have a question about the VDW61S and is the answer not in the manual?
Questions and answers
Where can I buy a new upper arm for this dishwasher?