Table of Contents
Advertisement
Quick Links
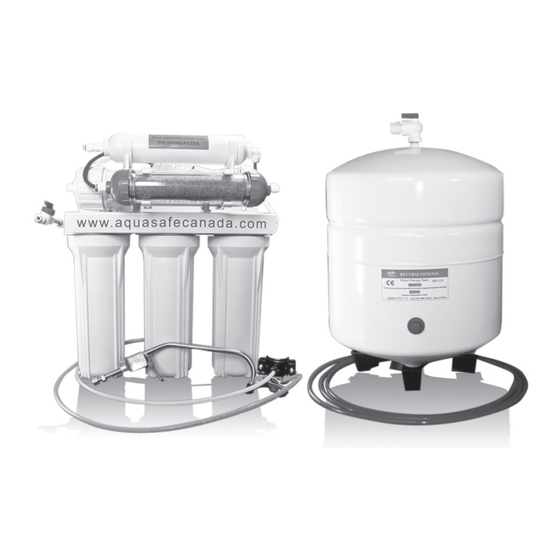
Maximus II Reverse Osmosis System
This Aquasafe Reverse Osmosis System has been specifically
designed as a DIY (Do It Yourself ) unit for easy installation and
maintenace purposes. You will insure a successful installation as
well as reliable operation by carefully reading this manual and
following its operational guidelines.
Your system requires a minimum of 50psi inlet water pressure.
City and municipality water utilities are mandated to provide a
minimum of 50psi however sometimes this is not what results.
If you are on a well system or on city/municipal water supply and
have less than 50psi we highly recommend a fully automatic
booster pump which is found on our websites general parts
and accessories page. We also highly recommend a booster
pump if your water is extremely turbid with ppm counts beyond
600ppm.
www.aquasafecanada.com | sales@aquasafecanada.com | 1-888-942-0226
Installation Instructions for:
Installation Instructions Pre-amble.
Maximus II Reverse Osmosis System COMBO
The installation instruction that follow are extremely detailed.
if a leak is experienced during installation, please see the Leak
Prevention Section on page 16.
ATTENTION:
It is extremely important to change the
filters of your system in order to ensure ultra pure water
is being produced for you and your loved ones, (which
is the whole point to your system) and also to prevent
premature fouling of the TFC Filmtec Reverse Osmosis
Membrane of your system. After your installation is complete,
please read over the Filter Change Schedule section (page
17) and remember to mark on your calendar when your
systems filter changes need to be conducted. Filter changes on
Aquasafe's Reverse Osmosis Systems are both inexpensive and
very easy to do.
Advertisement
Table of Contents

Subscribe to Our Youtube Channel
Related Manuals for Aquasafe Maximus II


Summary of Contents for Aquasafe Maximus II
- Page 1 Maximus II Reverse Osmosis System Maximus II Reverse Osmosis System COMBO Installation Instructions Pre-amble. This Aquasafe Reverse Osmosis System has been specifically The installation instruction that follow are extremely detailed. if a leak is experienced during installation, please see the Leak designed as a DIY (Do It Yourself ) unit for easy installation and Prevention Section on page 16.
-
Page 2: Table Of Contents
Maximus II System Filter Change Instructions ........ -
Page 3: Relax, Take Your Time. You Will Find This Process Easy And Straight Forward
5 Micron Granular Activated Carbon for chemicals Back View 5th Stage Aqua-safe De-Ionization (DI) Cartridge exclusive E-Z Flush for super clean water Flow Restrictor 4th Stage Membrane Housing waste water drain www.aquasafecanada.com | Maximus II Installation Instructions 05/13 | page 1... -
Page 4: Take Everything Out Of The Box
Now, using the large canister wrench from the Large Parts Bag, tighten each of the prefilters with reasonable force in order to seal the filters into place. page 2 | Maximus II Installation Instructions 05/13 | www.aquasafecanada.com... -
Page 5: Inserting The R.o. Membrane
NO cold water flowing from your kitchen sink faucet. If you shut the valve off correctly, there should be no cold water flowing. www.aquasafecanada.com | Maximus II Installation Instructions 05/13 | page 3... -
Page 6: Special Note About Braided Wire Plumbing
The blue “C” clip holds the collet in its proper position while the system is in operation. page 4 | Maximus II Installation Instructions 05/13 | www.aquasafecanada.com... -
Page 7: Piercing The Cold Water Line
4th stage (Reverse Osmosis Membrane) ensuring maximum life span of the Reverse Osmosis Membrane. www.aquasafecanada.com | Maximus II Installation Instructions 05/13 | page 5... -
Page 8: Membrane Feed Water Line Hook-Up (Pre-Filter To R.o. Membrane)
Manual short white Shut-O Valve auto shut-off tube to elbow valve on OUTPUT side NOTE: Back View - hanging of pre- lters bracket not shown for clarity page 6 | Maximus II Installation Instructions 05/13 | www.aquasafecanada.com... -
Page 9: Setting The Flow Restriction Ratios Of Your System
LY until the amount of BRINE water flowing through the E-Z Flush Flow Restrictor is flowing THREE TIMES FASTER than that of the PERMEATE water flow coming out of the RO Membrane. In this way www.aquasafecanada.com | Maximus II Installation Instructions 05/13 | page 7... - Page 10 SHOULD ALWAYS HAVE MORE BRINE WATER FLOW THEN PERMEATE WATER FLOW. For your convenience this system is fully automatic! When you draw water from the Aquasafe faucet, the system will auto-fill its holding tank and then shut off until more water is drawn from the sys- tem where the cycle would then repeat.
-
Page 11: Installing The D.i. Resin Filter
Push the two remaining canister clips (found in the Large Parts Bag) onto the R.O. Membrane housing in preparation for the Final Polishing Filter (Fig 16). You can rotate the D.I. Canister back out of the way to make room. www.aquasafecanada.com | Maximus II Installation Instructions 05/13 | page 9... -
Page 12: Prepare The R.o. Water Holding Tank
Screw the tank top valve found in your Small Parts Bag onto the threads found on top of the R.O Water Holding Tank (Fig. 18). Remember to apply 4-7 wraps of Teflon tape to the thread of the tank itself. page 10 | Maximus II Installation Instructions 05/13 | www.aquasafecanada.com... -
Page 13: Clear The Decks
Do NOT install the drain saddle where you want to put your system or clamp inside the dashed line area. Trap the R.O. Water Holding Tank. It MUST be installed above the trap www.aquasafecanada.com | Maximus II Installation Instructions 05/13 | page 11... -
Page 14: Installing The Faucet
Either have someone hold the faucet or put a wrench on it and secure the wrench to prevent it from turning while you tighten the nut. Be careful not to damage the faucet surface. page 12 | Maximus II Installation Instructions 05/13 | www.aquasafecanada.com... - Page 15 Follow the schematic above. Use the other length of blue tubing that was cut in two pieces during step 10.0 as seen above for your faucet installation. When you have your Aquasafe faucet firmly in place in the chosen location, insert the hose leading from the faucet into the straight male adaptor on the left side of the Polishing Filter.
-
Page 16: Extra Information For The Maximus Ii Combo
Where do I install the PSI Meter from my “COMBO” System? Figure 23 If you have purchased the Maximus II System Combo, your system came The PSI Meter with a PSI Meter as seen in Figure 23. It is not necessary that the PSI Meter be installed onto your system. -
Page 17: How Do I Use The Tds Meter From My "Combo" System
Your case of 21 pre-filters (6 full changes) can be stored in the same state in which they arrived. Each prefilter comes wrapped in protective plastic. Store at room temperature. Shelf life is years. www.aquasafecanada.com | Maximus II Installation Instructions 05/13 | page 15... -
Page 18: Leak Prevention Page
(the non-hardening variety). The key to this method is using a SMALL amount. Do not silicone both ends as you will need to change the resin beads in the future. page 16 | Maximus II Installation Instructions 05/13 | www.aquasafecanada.com... -
Page 19: Maximus Ii System Filter Change Schedule
Stage 4 – When should I change the reverse Osmosis Membrane? The R.O. Membrane is the very heart of your Aquasafe Reverse Osmosis System. The R.O. Membrane is rated for 4000-5000 Gallons of purified water production. A new R.O. Membrane will last for approxi- mately 3-4 years. -
Page 20: Testing To See If Your R.o. Membrane Needs Replacing
Are you unsure when your replaced the R.O Membrane Last? Aquasafe highly recommends you replace your Reverse Osmosis Membrane if you have never changed the R.O. Membrane of your system and your system is more than 3 years old or if you cannot remember the last time you have replaced your R.O. -
Page 21: Stage 5 - When Should I Change The Resin In The D.i. Resin Canister
All Aquasafe D.I. canisters are 100% reusable by way of the removable blue end caps. It can be misleading when trying to observe the color of the resin when the canister is filled with water as the water gives a darkening effect. -
Page 22: Membrane - How To Change The R.o. Membrane Of Your System
The fourth stage of your system is the Reverse Osmosis Membrane (Dow Filmtech Material R.O.) 0.00001 Micron. For your convenience, the Reverse Osmosis Membrane offered by Aquasafe will fit perfectly into any Reverse Osmosis System Aquasafe has offered in the past, currently does offer or will offer in the future. - Page 23 Allow the tank to fill and empty this down the drain via the faucet. Allow the tank to fill one more time and drain this as well. You can now enjoy your purified water once more. This concludes the steps to change the Reverse Osmosis Membrane of your system. www.aquasafecanada.com | Maximus II Installation Instructions 05/13 | page 21...
-
Page 24: Resin Canister - How To Change The D.i. Resin Beads
Reinsert the blue tubing into the elbows on both sides of the D.I. Resin Canister. Turn on the Manual Shut-O Valve and Tank Top Valve to repressurize your system. This concludes the instruction for changing the D.I Resin canister of your Aquasafe Reverse Osmosis System. -
Page 25: Final Polishing Filter - How To Change The Final Polishing Filter
This concludes all filter change instructions for the Maximus II System. Please check on your system every hour after the filter change for the first three to four hours inspecting for any potential small leaks. -
Page 26: Water Systems & Parts Warranty Information
Aquasafe. The structural problem must be made safe Systems to any further liability or obligation than those stated aware to Aquasafe no more then 30 days after delivery of product and on this form. all defective filters must be returned to Aquasafe.
Need help?
Do you have a question about the Maximus II and is the answer not in the manual?
Questions and answers