Table of Contents
Advertisement
Quick Links
Advertisement
Table of Contents

Subscribe to Our Youtube Channel
Related Manuals for TeeJet Matrix Pro 840GS


Summary of Contents for TeeJet Matrix Pro 840GS
- Page 1 MATRIX PRO GS VOYAGER ® 570G U s E R M A N U A L U s E R M A N U A L...
-
Page 2: Home Screen
GettinG Started #1 Turn Power On Press the POWER button to power on the console. #2 Home screen Once the power up sequence has completed, the Home screen will appear with the option to start a new job or continue an existing job. #3 Go To Unit setup 1. -
Page 3: Table Of Contents
Table of Contents CHAPTER 1 - sYsTEM OVERViEw Product Upgrades available ..................................1 SYSteM COMPOnentS Matrix Pro 570GS Console ...................................1 Matrix Pro 840GS Console ...................................2 realView® Camera ......................................2 additional information ....................................2 Power On ..................................2 Power Off ..................................2 Start Up Sequence ..............................2 Recommended Antenna Installation ..........................2... - Page 4 CHAPTER 6 – GUidANCE navigation Screens Options ..................................31 GUidanCe Bar Selectable Information.............................32 Navigation Activity & Boom Status ...........................32 StatUS Bar Status/information Screens ..................................33 naViGatiOn SCreenS Vehicle View ........................................36 field View ........................................37 realView Guidance ..................................... 38 GUidanCe MOdeS www.teejet.com...
- Page 5 Straight aB Guidance ....................................39 Curved aB Guidance ....................................39 Circle Pivot Guidance ....................................39 last Pass Guidance ...................................... 39 nextrow Guidance ..................................... 39 no Guidance ........................................39 GUidelineS Curved lookahead Guideline ................................. 40 Marking a and B Points ..................................... 40 A+ Nudge Feature ..............................41 next Guideline feature ....................................
- Page 6 Droplet Size Chart................................74 Guidance Bar ................................74 Safety Information TeeJet Technologies is not responsible for damage or physical harm caused by failure to adhere to the following safety requirements. As the operator of the vehicle, you are responsible for its safe operation.
-
Page 7: Chapter 1 - System Overview
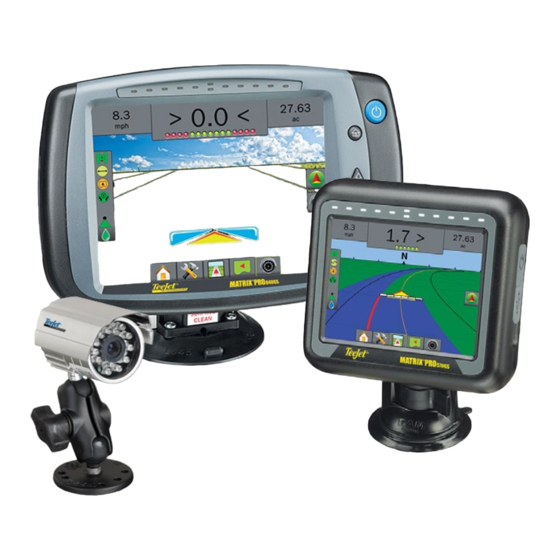
CHAPTER 1 - sYsTEM OVERViEw The Matrix Pro GS allows the management of multiple connected modules plus GPS mapping, Guidance, FieldPilot , BoomPilot and data ® ® collection in a single console using CAN bus technology. This replaces multiple consoles in the cab with one robust system. Product Upgrades Available •... -
Page 8: Matrix Pro 840Gs Console
While occasional splashing of water will not damage the unit, the Matrix Pro 840GS is not designed for direct exposure to rain. Take care not to operate the Matrix Pro GS in wet conditions. -
Page 9: Configurations
The following diagram is reflective of typical Matrix Pro GS configurations. Due to the variety of possible configurations, this should be used for reference purposes only. Figure 1-3: Matrix Pro GS w/VSM & Multiple RealView Cameras, FieldPilot and BoomPilot Matrix Pro 840GS Matrix 78-50187... -
Page 10: Chapter 2 - Introduction
Unit Setup Vehicle View Guidance Field View Guidance RealView Guidance or RealView Camera Full Screen Video View NOTE: RealView Guidance options are only available with a camera installed on the system. Figure 2-1: Bottom Tab Keys > 0.0 < 0.00 www.teejet.com... -
Page 11: Console Screen Colors
Console Screen Colors Simple or Advanced Mode The console is available in six color schemes. From the Unit Setup To change between simple mode and advanced mode, see the Bottom Key, press CONSOLE side tab and enter the configuration chapter under Data Management – Options. Display options. -
Page 12: Warnings And Information Pop-Ups
Select the appropriate option. To close the list without selecting an option, tap anywhere on the screen outside the drop down menu. antenna to Boom (ft) Figure 2-7: Example of Drop Down Menu 14.50 Clear Backward <-- forward www.teejet.com... -
Page 13: Unit Setup Mode Menu Options
– Transfer Import Mode Overlap Delete Delay On/Off Times Job Data Setup Type: TeeJet Implement – Manage Copy • Antenna to Disks Distance Delete • Overlap • Delay On/Off Times ... -
Page 14: Chapter 3 - Jobs / Home Screen
Data->Reports. With Fieldware Link, a user can input client, farm and field data as well as duplicate/edit jobs for reuse of boundaries and guidelines. Client, Farm and Field information can only be inputted using Fieldware Link. Figure 3-2: Advanced Mode Home Screen www.teejet.com... -
Page 15: Simple Mode
SiMPle MOde adVanCed MOde Once the power up sequence has completed, the Home screen will Once the power up sequence has completed, the Home screen will appear with the option to start a new job or continue an existing job. appear with the option to start a new job or continue an existing job. -
Page 16: Chapter 4 - Full Screen Video View
Also available is: ►RealView Camera Snapshot – saves a still photo of the current view on the screen to a USB drive 1. Press REALVIEW CAMERA FULL SCREEN VIDEO VIEW bottom tab Figure 4-1: RealView Camera Full Screen Video View www.teejet.com... -
Page 17: Chapter 5 - System Setup
CHAPTER 5 - sYsTEM sETUP System Setup is used to configure the console, the machine and its implements. Four side tabs access options for Machine/Implement Configuration, Data Management, Console Settings and Tools. OVerView Four side tabs access setup options for: Data Management Machine/Implement Configuration •... -
Page 18: Unavailable Options When Job Is Active
►Sensor – used to establish pressure sensor settings implement delay off time ►Droplet Size Monitor – used to enable/disable and set up ● In Spreader Mode: TeeJet – antenna to disks distance, preset and current tips overlap percentage, implement delay on time, implement... -
Page 19: Implement
Single Section Setup implement Single Section Setup is used when a SmartCable or Section Driver Implement Setup is used to establish the various settings associated Module (SDM) is not on the system. The entire boom or delivery with straight mode, spreader mode or staggered mode. For detailed area is considered to be one section. -
Page 20: Smartcable Or Section Driver Module Setup
►Implement Type – used to select the layout of the sections for the applied product location. ►Symmetric Implement Layout – used to establish if sections are paired and therefore share the same width, offset and length values www.teejet.com... -
Page 21: Lightbar
Lightbar Autosteer Lightbar Setup is used to configure LED Brightness, Display Mode When a Steering Control Module (SCM) is present, Assisted/Auto and LED Spacing. Steering options will be available. For detailed setup instructions, refer to your specific assisted/auto steering installation manual. 1. -
Page 22: Assisted/Auto Steering Unavailable
Configuration screen. Figure 5-13: Tilt Correction Not Detected NOTE: If FieldPilot or UniPilot is being used, a Tilt Gyro Module is built into the system. NOTE: Antenna Height must be entered prior to Tilt Calibration. www.teejet.com... -
Page 23: Gps
Video GPS is used to configure GPS Type, GPS Port and PRN as well as Video Setup is used to set up a single directly connected camera to view GPS status information. For detailed setup instructions, refer or individual cameras while using an Eight (8) Channel or Four (4) to the GPS chapter in this manual. -
Page 24: Sensors
►High Pressure Alarm– used to enter the user determined high pressure point at which the alarm will sound 5. Press RETURN arrow or CONFIGURATION side tab return to the main Configuration screen. www.teejet.com... -
Page 25: Droplet Size Monitor
Figure 5-20: Pressure Sensor Figure 5-21: Droplet Size Monitor droplet size Monitor Droplet Size Monitor Unavailable If a Pressure Sensor Interface Kit is not installed, setup options will When a Pressure Sensor Interface Kit is present, Droplet Size not be available. Monitor is used to enable/disable the Droplet Size Monitor (DSM), preset up to five (5) tips and select the current tip. -
Page 26: Data Management
Figure 5-23: Data Management Options Job Data Unavailable When in simple job mode, job data options will not be available. Figure 5-25: Job Data Unavailable www.teejet.com... -
Page 27: Transfer
Transfer Manage When in advanced job mode, the job data transfer screen When in advanced job mode, the job data manage screen allows allows the transfer of selected jobs to or from a USB drive as the creation of a new empty job and copying of a selected job's well as deleting jobs. -
Page 28: Reports
PDF, SHP or KML file in Data->Reports. With Fieldware Link, a user can input client, farm and field data as well as duplicate/edit jobs for reuse of boundaries and guidelines. Client, Farm and Field information can only be inputted using Fieldware Link. www.teejet.com... -
Page 29: Machine Settings
5. "Changing job modes requires deleting all job data. Do you wish Machine settings to change modes?" Machine Settings is used to transfer profiles for machine Press: settings (delete, import, export) and manage profiles for machine settings (create a new profile, copy or delete a profile, ►Yes –... -
Page 30: Transfer
►Delete Machine Settings – used to delete machine settings Figure 5-33: Machine Settings - Manage from internal storage or USB storage 5. Press RETURN arrow or DATA MANAGEMENT side to return to the main Data Management screen. Figure 5-32: Machine Settings - Transfer www.teejet.com... -
Page 31: Machine Settings Availability
Mode Overlap Delay On/Off Times Implement Setup Type: TeeJet Antenna to Disks Distance Overlap Delay On/Off Times ... -
Page 32: Console
►About – used to display the system software version as well as the software versions of modules connected to the CAN Figure 5-35: Display Options bus and display QR code for direct link to user manuals Figure 5-34: Console Options www.teejet.com... -
Page 33: Cultural
Cultural Audio Volume Culture is used to configure units, language and time zone settings. Audio Volume adjusts the volume level of the audio speaker. 1. Press CONSOLE side tab 1. Press CONSOLE side tab 2. Press 2. Press Cultural Audio Volume 3. -
Page 34: Demo Mode
Console Settings screen. ◄Unit Model Number Figure 5-38: Demo Mode Options ◄Software Version ◄QR Code – direct link to Matrix Pro GS User Manuals page at www.teejet.com ◄Connected Modules Press to save the About information to a USB Drive Save “Saved version information to USB drive”... -
Page 35: Tools
tOOlS The Tool menu allows the operator to do various calculations Figure 5-41: Calculator on a regular calculator or on a unit converter. The unit converter calculates various measurements based on area, length or volume. 1. Press UNIT SETUP bottom tab 2. -
Page 36: Chapter 6 - Guidance
Field View Guidance creates a computer-generated image of the vehicle position and application area from an aerial perspective. Mark A 7.62 Mark A 0.00 RealView Guidance allows live video input to be displayed instead of a computer-generated image. > 0.0 < 7.62 www.teejet.com... -
Page 37: Navigation Screens Options
Icons – to be used on the Matrix Pro 570GS Delete Point – deletes the Marked Point. Buttons – to be used on the Matrix Pro 840GS Cancel Guidance – hides the distance and guidance back to the Marked Point. -
Page 38: Guidance Bar
AB baseline System Pressure – displays the current system pressure (available only when a pressure sensor is on the system) Droplet Size – displays the current tip droplet size (available only when a pressure sensor is on the system) www.teejet.com... -
Page 39: Status Bar
StatUS Bar The Status Bar provides information on GPS status, guidance mode, Assisted/Auto steering status boundary area, assisted/auto steering engagement, tilt correction Green = engaged, actively steering information, implement control status and droplet size information. Yellow = enabled, all conditions have been met to allow for Figure 6-3: Status Bar assisted/auto steering Red = disabled, all conditions have not been met to allow for... - Page 40 1. Press DROPLET/PRESSURE STATUS icon tilt status. 1. Press ASSISTED/AUTO STEERING STATUS icon Mark A Mark A 27.00 10.0 AIXR TeeJet® AIXR11004 tr: 0.1 deg/sec tilt Corre ctions disabled Very Coarse assisted/auto Steering Status: disenga ged Under Minimum Speed...
-
Page 41: Navigation Screens
Figure 6-4: Guidance Screen Options > 0.0 < Navigation and Guidance Options Zoom In/Out Icons are not available on Matrix Pro 840GS or on RealView Guidance screens RealView Options > 0.0 < Home/Job Screen... -
Page 42: Vehicle View
◄Black – boundary line ◄White boxes – active booms • Points – markers for established points Matrix Pro 840GS Console Button Assistance ◄Red Point – Return to Point ◄Blue Point – Mark A • Zoom In/Out & Perspective – the Up/Down buttons ◄Green Point –... -
Page 43: Field View
• Zoom In/Out – adjust the map’s visible area. ◄Orange – active guidance line ◄Black (multiple) – adjacent guidance lines Matrix Pro 840GS Console Button Assistance ◄Black – boundary line • Zoom In/Out – the Up/Down buttons adjust the map’s •... -
Page 44: Realview Guidance
• ◄Horizontal Black Line – adjustable horizon line 10.0 27.00 > 0.0 < To access the RealView screen: 1. Press REALVIEW GUIDANCE tab Figure 6-10: Real View w/ Common Icons Shown 10.0 27.00 > 0.0 < 10.0 27.00 > 0.0 < www.teejet.com... -
Page 45: Guidance Modes
GUidanCe MOdeS straight Ab Guidance Straight AB Guidance provides straight line guidance based on A and B reference points. The original A and B point are used to calculate all other parallel guidelines. NOTE: Offset to adjacent guidelines will be calculated using the guidance width, which is encoded in Unit Setup in the Implement options. -
Page 46: Guidelines
1:12 PM Mark A The pointer will be visible on the navigation screen. Figure 6-11: Curved Lookahead Mark A To remove the Curved Lookahead guideline: 1. Press NAVIGATION AND GUIDANCE OPTIONS tab display navigation options. 2. Select CURVED LOOKAHEAD icon www.teejet.com... -
Page 47: A+ Nudge Feature
A+ Nudge Feature Figure 6-13: Mark B Point The A+ Nudge feature allows the current guideline to be shifted to 1:14 PM Mark B the vehicle’s current location. To adjust the guideline: 1. Press NAVIGATION AND GUIDANCE OPTIONS tab display navigation options. 2. -
Page 48: Next Guideline Feature
To view which guideline is active, press the Guidance Mode icon on > 0.0 < 4:16 PM the Status Bar. Figure 6-18: View Which Guideline is Active > 0.0 < Guidance Pattern: Circle Pivot Guidance Guideline name: Stream edge total number of Guidelines: 4 www.teejet.com... -
Page 49: Nextrow Guidelines
NextRow Guidelines Azimuth degree NextRow Guidance indicates where the next row is located An azimuth is defined as a horizontal angle measured based on the programd guidance width and provides guidance clockwise from a north base line. When using an at user marked row ends to the next adjacent row. -
Page 50: Application Boundary
Note: If a boundary is mapped with some booms folded as described above, it may be necessary to use the A+ NUDGE icon on the guideline over to the correct position for subsequent passes in the field. www.teejet.com... - Page 51 In correspondence to your current location, the IN BOUNDARY icon Figure 6-26: Save Boundary or OUT BOUNDARY icon is displayed on the Status Bar Mark A 4.68 once the boundary is established. Figure 6-29: Finish Boundary – Travel to starting point area bounded = 64.45 ac 5.48 Mark A...
-
Page 52: Return To Point
Delete the Return Point To delete the established return point: 1. Press NAVIGATION AND GUIDANCE OPTIONS tab display navigation options. 2. Press the DELETE POINT icon Delete Point icon is not available while return to point guidance is active. www.teejet.com... -
Page 53: Boompilot
BOOMPilOt single section With Optional Speed/Sense Cable Switch If a SmartCable or Section Driver Module (SDM) is not BoomPilot can be overridden by using an optional Speed/ present, BoomPilot is used to turn all booms on or off. Only Sense Cable Switch. one Boom Section width will be illustrated and the Status NOTE: If the Speed/Sense Cable Switch is in the “on”... -
Page 54: Smartcable Or Section Driver Module
◄All On – Status Bar Icon will change to yellow Matrix Pro GS Boompilot Switch Configuration Rate Controller RC with Internal SDM BoomPilot Spray (ABSC) System Master Boom Switches Master Boom Switches Work Switch Icon Automatic Mode Manual Mode www.teejet.com... -
Page 55: Zoom In/Out
ZOOM in/OUt Pan MOde While in Field View Guidance, the pan mode allows the screen to Vehicle View be positioned manually as desired. The off-center position on the Zoom In/Out & Perspective is used to adjust the vehicle’s view or screen will be retained until the World icon is pressed. -
Page 56: Realview Specific Options
Figure 6-39: Select Split View RealView Guidance options also include guidance over video, a 0.00 > 0.0 < steering angle indicator and camera image capture. Figure 6-37: RealView Options 0.00 > 0.0 < 0.00 > 0.0 < 0.00 > 0.0 < www.teejet.com... -
Page 57: Realview Setup Options
RealView setup Options RealView setup options accesses additional guidance tools including guidance over video and a steering angle indicator. To access RealView options: 1. Press REALVIEW OPTIONS tab to display RealView options 2. Press REALVIEW GUIDANCE OPTIONS icon 3. Select from: ►Guidance Over Video –... -
Page 58: Chapter 7 - Gps
►Alternate PRN – when PRN is not automatic, a second alternate SBAS PRN will provide a second set of GNSS differential correction data 4. Press RETURN arrow or CONFIGURATION side tab return to the main Configuration screen. www.teejet.com... -
Page 59: Gps Type
GPS Type GPS Port GPS Type can be customized to accept GPS source transmissions The COM port can be set to “Internal” to use the internal (D)GPS (if (only uncorrected signals), DGPS source transmissions (only equipped) and transmit out, or “External” to receive external (D)GPS differentially corrected signals) or both types of signals. -
Page 60: Gps Status Information On Guidance Screens
GPS setup screen Indicator Accuracy Service NOTE: If GPS is not available, all entries will be “Invalid” GPS only <3 m Figure 7-4: GPS Status Information WAAS/EGNOS/Beacon <1 m 4 cm Omnistar HP/XP 10 cm Glide/ClearPath <1 m www.teejet.com... -
Page 61: Programming Receiver
When PRN is not automatic, a second alternate SBAS PRN will Program allows direct programming of the GPS receiver through a provide a second set of GNSS differential correction data. command line interface. Only TeeJet support technicians should use this feature. Use at your own risk! 1. Press DOWN arrow to access the list of options. -
Page 62: Chapter 8 - Implement Setup
Figure 8-1: Implement Type - Straight Figure 8-3: Implement Type - Staggered Figure 8-2: Implement Type - Spreader Section Numbers Sections are numbered from left to right while facing in the machine's forward direction. www.teejet.com... -
Page 63: Basic Screen Use
BaSiC SCreen USe Unavailable Options When Job is Active Scrolling Screens When a job is active some setup options are unavailable. See Some screens have more information or options that are visible the Unit Setup Mode Menu Structure Chart for indication of which beyond the current screen. -
Page 64: Single Section Setup
Range is 0 to 10 seconds. 4. Press NEXT PAGE arrow to set up the selected specific implement type's options. www.teejet.com... -
Page 65: Straight Implement Type
4. Press RETURN arrow to return to the Implement screen or CONFIGURATION side tab to return to the main Configuration screen. Figure 8-10: Implement Setup Options in Straight Mode Figure 8-11: Implement Setup Options in TeeJet Spreader Mode 98-05273-ENUS R4... -
Page 66: Oem Spreader Implement Type
►Stop Distance– used to set the stop distance when entering an applied area. Consult spreader manufacturer for value. 4. Press RETURN arrow to return to the Implement screen or CONFIGURATION side tab to return to the main Configuration screen. Figure 8-12: Implement Setup Options in OEM Spreader Mode www.teejet.com... -
Page 67: Smartcable Or Section Driver Module Setup
SMartCaBle Or SeCtiOn driVer MOdUle SetUP SmartCable or Section Driver Module Setup is used when a Figure 8-13: Implement – SmartCable or Section Driver Module SmartCable or Section Driver Module (SDM) is on the system. The boom or delivery area can be entered as up to 15 sections. Each section can vary in width and in spreader mode, can vary in length. -
Page 68: Straight Implement Type
Delay Off Time. If the application turns off too late, increase the Delay Off Time. Range is 0 to 10 seconds. 4. Press RETURN arrow to return to the Implement screen or CONFIGURATION side tab to return to the main Configuration screen. 100% www.teejet.com... -
Page 69: Teejet Spreader Implement Type
►Delay On Time – used to set the time when each section will Figure 8-17: Implement Setup Options in TeeJet Spreader Mode switch on when entering an area that has not been applied. If the application turns on too soon when entering an unapplied area, decrease the Delay On Time. -
Page 70: Oem Spreader Implement Type
Consult spreader manufacturer for values. ►Section Stop Offsets – used to set the offset distance from the leading edge of Section 1 to the trailing edge of each www.teejet.com... -
Page 71: Staggered Implement Type
Staggered Implement Type 1. Select implement type on Implement screen. Staggered 2. Press NEXT PAGE arrow 3. Select from: ►Section 1 Offset Direction – used to establish if Section 1 (the zero-point of the Section Offsets) is located in front of or behind the GPS antenna as the vehicle moves in a forward direction ►Antenna to Section 1 Distance... - Page 72 Figure 8-21: Overlap 100% www.teejet.com...
-
Page 73: Implement Offset Distance Adjustment
iMPleMent OffSet diStanCe adJUStMent Implement offset distance is used to enter the distance from the Figure 8-22: Implement Offset Distance centreline of the machine to the centre of the implement. When on-screen mapping shows no overlap or gap, yet field application produces an overlap or gap consistently to only one side in the direction of travel, an adjustment to the implement offset distance should be calculated and made to the implement offset distance value. -
Page 74: Implement Offset Adjustment
Change to implement offset direction Overlap on the left of pass Decrease distance offset value Increase distance offset value to left and increase distance offset Gap on the right of pass value Figure 8-24: Implement Offset Dstance and Direction www.teejet.com... -
Page 75: Factory Settings & Ranges
0.0 to 164.04 ft Overlap 0.0 m 0.0 to 50.0 m Delay On Time 1.0 sec 0.0 to 10.0 sec TeeJet Spreader Implement Type Delay Off Time 1.0 sec 0.0 to 10.0 sec Description Factory Setting Range TeeJet Spreader Implement Type... - Page 76 0.0 m 0.0 to 50.0 m Overlap Delay On Time 1.0 sec 0.0 to 10.0 sec Delay Off Time 1.0 sec 0.0 to 10.0 sec Section Offsets 0.0 ft -246.1 to 246.1 ft 0.0 m -75.0 to 75.0 m www.teejet.com...
-
Page 77: Chapter 9 - Droplet Size Monitor
CHAPTER 9 - dROPLET sizE MONiTOR Droplet Size Monitor Setup is used to configure and enable the Droplet Size Monitor (DSM). A Pressure Sensor Interface Kit is required to enable the Droplet Size Monitor. The DSM is available on all guidance pages via the status bar. drOPlet SiZe MOnitOr SetUP Pressure sensor When a Pressure Sensor Interface Kit is present, Pressure Sensor... -
Page 78: Droplet Size Monitor
1. Press DOWN arrow to access the list of options. 2. Select: ►Enabled ►Disabled If DSM is set to “Disabled”, all tip capabilities and setup functions will be disabled (options will be grayed out). Figure 9-4: Disabled and Enabled DSM Options www.teejet.com... -
Page 79: Tip Preset
Selected tip will be also visible on the Droplet/Pressure Status Figure 9-5: Preset Tip display from the status bar on the guidance screens. Figure 9-7: Current Tip AITTJ60 AIXR TTJ60 Figure 9-6: Droplet Sizes for Select TeeJet Tips Droplet Size Fine Coarse 98-05273-ENUS R4... -
Page 80: Droplet Size Monitor Operation
►System Pressure – Displays the current system pressure ►Drop Size – Displays the current tip droplet size Mark A 3. Press outside the selection box to return to the guidance screen. Figure 9-9: Guidance Bar Selectable Information AIXR TeeJet® AIXR11004 Speed Mark A Heading... - Page 81 98-05273-ENUS R4...
- Page 82 Unit Specifications Dimensions Matrix Pro 570GS 6.36 x 5.87 x 2.3 in 16.15 x 14.91 x 5.84 cm Matrix Pro 840GS 10.6 x 7.1 x 2.4 in 27.0 x 18.0 x 6.0 cm Weight Matrix Pro 570GS 1.75 lb / 0.794 kg Matrix Pro 840GS 2.35 lb / 1.06 kg...
-
Page 83: Limitation Of Liability
Copyrights © 2013 TeeJet Technologies. All rights reserved. No part of this document or the computer programs described in it may be reproduced, copied, photocopied, translated, or reduced in any form or by any means, electronic or machine readable, recording or otherwise, without prior written consent from TeeJet Technologies. - Page 84 • External GPS receiver or antenna upgrades • Fieldware Link enhanced data organization application ® • Pressure Sensor Kit for Droplet Size Monitor TeeJet Technologies 1801 Business Park Drive Springfield, Illinois 62703 www.teejet.com 98-05273-ENUS R4 English-US © TeeJet Technologies 2013...
Need help?
Do you have a question about the Matrix Pro 840GS and is the answer not in the manual?
Questions and answers