Table of Contents
Advertisement
Advertisement
Table of Contents

Related Manuals for CycleOps Joule 3.0


Summary of Contents for CycleOps Joule 3.0
- Page 1 CycleOps Joule™ 3.0 User Guide Joule 3.0 User Guide page 1 The Leader in Power.
- Page 2 Group, Inc. Trademarks Saris Cycling Group, Inc , Joule 2.0, Joule 3.0, CycleOps, CycleOps logo, PowerTap and the PowerTap logo, are all registered trademarks of Saris Cycling Group, Inc. All other product, brand, or trade names used in this manual may be trademarks or registered trademarks of their respective owners.
-
Page 3: Table Of Contents
Table of Contents: Chapters 1. Starting Out............................5 Compatibility........................6 Installing CycleOps Joule 3.0 ™ On Indoor Cycle..........8 Installing CycleOps Joule 3.0 ™ Using Standard Mount.......9 CycleOps (ANT+) Heart Rate Strap..............11 Charging Battery.......................12 Installing MicroSD Card..................13 2. Navigation............................14 Overview of CycleOps Joule 3.0.................15 3.Data File Management......................16... - Page 4 6. Workouts............................37 Using Workouts......................37 Using Manual Workouts on CycleOps 400 Pro Indoor Cycle.....39 Using Manual Workouts on CycleOps PowerBeam Pro Trainer....41 Using Saved Workouts on CycleOps 400 Pro Indoor Cycle......43 Using Saved Workouts on CycleOps 400 Pro Indoor Cycle......45 Pausing, Saving and/or Deleting a Workout............47...
-
Page 5: Starting Out
Thank you for purchasing CycleOps Joule 3.0, the first cycling computer designed for cyclists who train with power. This user guide is just one of the resources to help you understand all the features Joule 3.0 has to offer. Please visit www.cycleops.com to: •... -
Page 6: Compatibility
Chapter 1: Starting Out Compatibility Joule 3.0 is compatible with any ANT+ compatible power meter, speed sensor, cadence sensor or heart rate strap. For more information on ANT+ compatible devices, please visit www.thisisant. com. Note: Joule 3.0 is not compatible with combination speed/cadence sensors, wired version of PowerTap and non-ANT+ PowerTap models such as the SL 2.4. - Page 7 Installing CycleOps Joule 3.0 Joule 3.0 comes with two different mounts. The indoor cycle mount is designed specifically for use on the CycleOps indoor cycles while the standard mount may be used on any handlebar or stem. Indoor cycle mount Standard mount Joule 3.0 User Guide page 7...
-
Page 8: Installing Cycleops Joule 3.0 On Indoor Cycle
Installing CycleOps Joule 3.0 on Indoor Cycle Joule 3.0 should be installed with the indoor cycle mount if it is being used on an indoor cycle. The indoor cycle mount allows Joule 3.0 to be tilted for optimum viewing angles. -
Page 9: Installing Cycleops Joule 3.0 Using Standard Mount
Press to release 4. Be sure to check Joule 3.0 is 5. To remove Joule 3.0 , press down on the release lever and slide Joule 3.0 secure in mount before riding. back. Note: additional sticky pads may be used if release lever is not acces- sible due to stem length or angle. - Page 10 90 of mount. tom of mount. Apply sticky pad and degrees. tighten zip ties to secure mount. 4. Be sure to check Joule 3.0 is secure in mount before riding. Joule 3.0 User Guide page 10...
-
Page 11: Cycleops (Ant+) Heart Rate Strap
The heart rate strap must be worn to enable the heart rate func- tion. It should be snug enough to stay in place during the ride. NOTE: Joule 3.0 is compatible with any ANT+ compatible heart rate strap. The CycleOps heart rate strap contains a user replaceable CR2032 battery;... -
Page 12: Charging Battery
1. Press in release [HOME] , [MODE] or [INTERVAL] to turn on Joule 3.0. Note: Pressing either [JOYSTICK] will not turn Joule 3.0 on. 2. Plug the mini-USB cable into the mini-USB port on the back of Joule 3.0 and plug the other end into an avail- able USB port on a computer. -
Page 13: Installing Microsd Card
Chapter 1: Starting Out Installing MicroSD Card Joule 3.0 provides 4 MB of onboard memory for storing activities, history and workouts. Activity fi le size increases with ride time but a one hour ride is approximately 150 KB, history fi les are always 1 KB (1,000 history fi les = 1 MB) and workout fi les also increase with workout size but a workout containing 500 segments will be approximately 50 KB. -
Page 14: Navigation
Chapter 1: Starting Out Navigation Overview CycleOps Joule 3.0 There are three buttons and two [JOYSTICK] to navigate Joule 3.0. To help navigate Joule 3.0 display and this user guide note; bold letters will bring special attention to Menu items as they appear on the screen. -
Page 15: Overview Of Cycleops Joule 3.0
Change resistance type Change resistance type Change resistance type [HOME] [HOME] [HOME] Press in and release Press in and release Press in and release Return to dashboard mode Return to dashboard mode Return to dashboard mode Joule 3.0 User Guide page 15... -
Page 16: Data File Management
Reports for calculating averages, maximums and totals it is important to manage them carefully, only saving rides that you want to contribute to these calculations. Because Joule 3.0 acts as a mass storage device, activities and history files may also be viewed from a PC or Mac when con- nected via USB cable. -
Page 17: Pausing, Saving And/Or Deleting A Ride
Pausing, Saving and/or Deleting a Ride A ride may be paused at any time. Joule 3.0 will turn off automatically if paused for longer than the designated sleep time. For more information on how to change sleep time see page 64. - Page 18 Reports. Stop and save resets all data in the dashboard. 1. Hold [MODE] for two seconds to access ride 2. Press [JOYSTICK] up/down to highlight stop paused screen from any mode. and save. Press [JOYSTICK] in and release to select. Joule 3.0 User Guide page 18...
- Page 19 1. Press and hold [MODE] to access ride paused and delete. Press [JOYSTICK] in and release to screen from any mode. select stop and delete. 3. Press [JOYSTICK] in and release to confi rm deletion. Joule 3.0 User Guide page 19...
-
Page 20: Alerts
3.0 functionality. Alerts are located in the title bar. Battery Low: indicating Joule 3.0 battery is low. Need to plug in and charge to computer or AC adapter. If one bar remains on the battery icon, there is approximately a half an hour of use left before Joule 3.0 battery shuts down. -
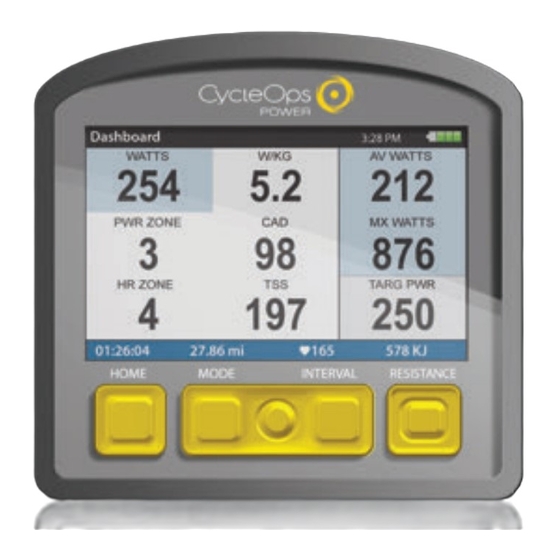
Page 21: Dashboard Mode
Chapter 2: Dashboard Mode Using Dashboard Mode Joule 3.0 has four display modes of operation: dashboard, reports, activities and menu indicated by the title bar. Note: after the mode is displayed in the title bar for five seconds, the time of day will appear. - Page 22 2.Press in and release [JOYSTICK] to rotate metrics 3. Press in and hold [JOYSTICK] to change the from detailed view to dashboard. (Example: watts, metric category displayed in the dashboard. av watts, mx watts). Joule 3.0 User Guide page 22...
-
Page 23: Dashboard Categories
9999 29999 total ascent ft or m vertical ascent current altitude ft or m FT GAIN ALT FT 9999 45.0 29999 kilojoules Ride ride time ride distance MILE 9999 99.99 RIDE TIME HR 99:59:59 Joule 3.0 User Guide page 23... -
Page 24: Intervals
Note: Activities mode shows all intervals completed with the current interval at the top of the list. Average power, heart rate, interval time and distance are displayed for each interval. Intervals are disabled during saved workouts. Joule 3.0 User Guide page 24... -
Page 25: Reports Mode
Chapter 4: Reports Mode Using Reports Mode Joule 3.0 has four display modes of operation: dashboard, reports, activities and menu indicated in the title bar. Note: after the mode is displayed in the title bar for fi ve seconds, the time of day will appear Press and release [MODE] button to change from dashboard mode to report mode. - Page 26 Chapter 4: Reports Mode Using Reports Mode Joule 3.0 provides eight reports for an easy comparison of the current ride and historical aver- ages so information can be seen in context. Each report contains three columns; the fi rst column is the metric label, the second column is the data for a given metric on the current ride, the third column is the average of all rides completed over the selected date range.
-
Page 27: Report Details
Chapter 4: Reports Mode Report Details Joule 3.0 provides eight reports that provide an easy comparison of the ride and historical aver- ages so information can be seen in the context. For more information see Report Defi nitions for an explanation of each metric in reports from pages 31-32. - Page 28 4. Peak Power Report: Full array of peak tifying work completed, including Train- power data for indication of ride in- ingPeaks’ Training Stress Score (TSS) and tensity at key physiological markers of Intensity Factor (IF). current fi tness. Joule 3.0 User Guide page 28...
- Page 29 6. Time in HR Zones Reports: Time spent in physiological relevant power zones in abso- physiological relevant heart rate zones in ab- lute minutes and as a percent of ride time. solute minutes and as percent of ride time. Joule 3.0 User Guide page 29...
- Page 30 Note: climbing related data is only func- counted whenever three consecutive values tional when riding outdoors and is subject above a watt per kilogram threshold are to weather changes. See Technical Specifi - achieved. cations on page 57. Joule 3.0 User Guide page 30...
-
Page 31: Report Definitions
Average speed in miles per hour or kilometers per hour during a ride. AV HR Average heart rate in beats per minute during a ride. Note: For 2 WK, 4 WK rolling averages a time weighted average over the selectable time period is used. Joule 3.0 User Guide page 31... - Page 32 Training Peaks. AV W/KG Average power in watts divided by rider weight in kg during a ride. MX W/KG Maximum power in watts divided by rider weight in kg during a ride. Joule 3.0 User Guide page 32...
- Page 33 5 minutes in a mile run and 35 minutes in a 10 km run, whereas a cyclist might have a personal best or peak sustainable power of 400 watts for 5 minutes and 340 watts for 35 minutes. Joule 3.0 User Guide page 33...
- Page 34 5. A demarcation between aerobic metabolism to a mix of anaerobic and aerobic metabolism. 6. An all out exercise intensity that can be held between 40 minutes to 2 hours depending on the availability of stored carbohydrate or glycogen within the body. Joule 3.0 User Guide page 34...
- Page 35 1. A very short, all out effort that exceeds the power output associated with VO2 max or a person’s max zone. 2. An exercise intensity that is almost entirely dependent on the anaerobic metabolism of stored ATP, Phospha- gens, and carbohydrates. 3. An all out effort lasting 1 second to 2 minutes. Joule 3.0 User Guide page 35...
- Page 36 Once a surge is recorded in a w/kg zone, the w/kg value must drop at least 0.1 w/kg below the minimum zone value before a positive increase in value back into that zone can be considered a new surge. Joule 3.0 User Guide page 36...
-
Page 37: Workouts
Chapter 5: Workouts Using Workouts Joule 3.0 has four display modes of operation: dashboard, reports, activities and menu indicated by the title bar. Note: after the mode is displayed in the title bar for fi ve seconds, the time of day will be displayed. - Page 38 Chapter 5: Workouts Using Workouts Joule 3.0 offers two types of workouts, manual and saved, each managed in the Activities Mode. Manual workouts may only be performed with a CycleOps 400 Pro indoor cycle or PowerBeam Pro trainer. Saved workotus are created using PowerAgent software and transferred to Joule 3.0 Both workout types are helpful for making sure a specific workout plan is followed by displaying the workout in a series of segments with target intenisty and rest indicated.
-
Page 39: Using Manual Workouts On Cycleops 400 Pro Indoor Cycle
2. Press [JOYSTICK] up/down to highlight Workouts. Press [JOYSTICK] in and release to select Workouts. 3. If Joule 3.0 has been paired to the 400 Pro resistance unit a manual workout will be started automatically once the resistance unit is found by Joule 3.0. For more information on pairing and fi nding sensors please refer to page 56. - Page 40 Chapter 5: Workouts Using Manual Workouts with CycleOps 400 Pro Indoor Cycle...continued Gear Ratios Chainring Sprocket Display Gear Diffi culty Hardest Harder Harder Harder Harder Harder Harder Harder Harder Harder Harder Easier Eaiser Easier Easier Easier Easier Easier Easier Easier...
-
Page 41: Using Manual Workouts On Cycleops Powerbeam Pro Trainer
2. Press [JOYSTICK] up/down to highlight Workouts. Press [JOYSTICK] in and release to select Workouts. 3. If Joule 3.0 has been paired to the PowerBeam Pro resistance unit a manual workout will be started automati- cally once the resistance unit is found by Joule 3.0 and speed is detected. For more information on pairing and fi nding sensors please refer to pages 48-54. - Page 42 Chapter 5: Workouts Using Manual Workouts with CycleOps PowerBeam Pro Trainer...continued 6. Press [RESISTANCE JOYSTICK] in and release to change the resistance type from target power to target slope. Slope measures grade steepness of your simulated climb. You can choose a grade between 0 and 10 for the slope.
-
Page 43: Using Saved Workouts On Cycleops 400 Pro Indoor Cycle
3. Press [JOYSTICK] up/down to highlight the desired saved workout. Press [JOYSTICK] in and release to select the desired saved workout. 4. Once the saved workout is selected, Joule 3.0 will display activities mode and the segments associated with the saved workout. The fi rst segment of the workout will begin as soon as pedaling begins. - Page 44 Chapter 5: Workouts Using Saved Workouts with CycleOps 400 Pro Indoor Cycle...continued Slope measures grade steepness of your simulated climb. You can choose a grade between 0 and 25 for the slope. The higher the number, the steeper the slope you’re climbing. While in slope mode, the 400 Pro provides the resistance for the selected slope at whatever speed you’re riding.
-
Page 45: Using Saved Workouts On Cycleops 400 Pro Indoor Cycle
3. Press [JOYSTICK] up/down to highlight the desired saved workout. Press [JOYSTICK] in and release to select the desired saved workout. 4. Once the saved workout is selected, Joule 3.0 will display Activities Mode and the segments associated with the saved workout. The fi rst segment of the workout will begin as soon as pedaling begins. - Page 46 Chapter 5: Workouts Using Saved Workouts with CycleOps PowerBeam Pro Trainer...continued Slope measures grade steepness of your simulated climb. You can choose a grade between 0 and 10 for the slope. The higher the number, the steeper the slope you’re climbing. While in slope mode, the PowerBeam Pro provides the resistance for the selected slope at whatever speed you’re riding.
-
Page 47: Pausing, Saving And/Or Deleting A Workout
2. Press [JOYSTICK] up/down to highlight Pause, Stop and Save or Stop and Delete workout. Press [JOYSTICK] in and release to save changes. Note: there will be a confi rmation screen before deleting a ride. Stop and save will stop the workout and save it to History. Joule 3.0 User Guide page 47... -
Page 48: Sensors
Chapter 6: Sensors Setting Up Power Sensors Joule 3.0 is compatible with many ANT+ sensors, each having a unique code. A sensor is defined as any ANT + compatible power meter, cadence sensor, speed sensor, heart rate strap and Cy- cleOps resistance unit. -
Page 49: Setting Up
Note: multiple sensors can be stored by Joule 3.0 but only one can be active per sensor category at a given time. Joule 3.0 User Guide page 49... - Page 50 8. Press [JOYSTICK] up/down to highlight Manual Zero. Press [JOYSTICK] in and release to perform Manual Zero. Note: when performing a manual zero it is important to make sure there is no pressure on the pedals during the manual zero process. Joule 3.0 User Guide page 50...
- Page 51 9. Once a sensor has been paired and activated Joule 3.0 will automatically find the active sensor whenever it is turned on. Other cadence sensors with different IDs will be ignored. Once the sensor is paired, it can be oper- ated within the same area as other sensors without risk of picking up that signal.
- Page 52 10. Once a sensor has been paired and activated Joule 3.0 will automatically find the active sensor whenever it is turned on. Other speed sensors with different IDs will be ignored. Once the sensor is paired, it can be oper- ated within the same area as other sensors without risk of picking up that signal.
- Page 53 9. Once a sensor has been paired and activated Joule 3.0 will automatically find the active sensor whenever it is turned on. Other heart rate sensors with different IDs will be ignored. Once the sensor is paired, it can be oper- ated within the same area as other sensors without risk of picking up that signal.
- Page 54 9. Once a sensor has been paired and activated Joule 3.0 will automatically find the active sensor whenever it is turned on. Other resistance unit sensors with different IDs will be ignored. Once the sensor is paired, it can be operated within the same area as other sensors without risk of picking up that signal.
-
Page 55: Calibrating Devices
7. Press [JOYSTICK] up/down to highlight Manual Calibration. Press [JOYSTICK] in and release to select Manual Calibration. 8. Joule 3.0 will show the measured power using the current rolling resistance calibration. 9. Pedal at a constant speed to stabilize the resistance. Target 20 mph and press [JOYSTICK] up/down to change the calibration until the displayed power matches the measured power. - Page 56 Chapter 6: Sensors Roll Down Calibration for CycleOps PowerBeam Pro Trainer The CycleOps PowerBeam Pro resistance unit is calibrated at the factory. This enables it to ac- curately measure power using similar technology as a PowerTap. Rolling resistance is calibrated into each individual resistance unit, but can vary depending on tire type, tire pressure, clamping pressure and other conditions.
- Page 57 Chapter 6: Sensors Roll Down Calibration for CycleOps PowerBeam Pro Trainer...continued Menu Menu Roll Down Calibration > Pedal to 18-22 MPH Roll Down > Manual > Reset to Defaults > Hold for (sec): Hold for (sec): Hold f Sensor ID...
- Page 58 3. Press [JOYSTICK] up/down to select the sensor type to be deleted. 4. Press [JOYSTICK] up/down to highlight the sensor to be deleted. 5. Press [JOYSTICK] in and release to select the sensor to be deleted. 6. Press [JOYSTICK] up/down to highlight Delete Sensor. Joule 3.0 User Guide page 58...
-
Page 59: Setup Cycleos Joule ™ 3.0
Setup > Sensors > Main Setting Up Date and Time < Exit Menu Joule 3.0 date and time can be set using PowerAgent software > configure device. Reference PowerAgent user guide. Menu Report Date & Time > Date: ate: Feb 26 2009... - Page 60 Chapter 7: Setting Up CycleOps Joule 3.0 ™ Setting Up Display Joule 3.0 display can be customized for viewing preferences. PowerAgent software may also be used to change settings. 1. Press and release [MODE] until Menu mode is displayed. 2. Press [JOYSTICK] up/down to highlight Setup Joule. Press [JOYSTICK] in and release to select Setup Joule.
- Page 61 Chapter 7: Setting Up CycleOps Joule 3.0 ™ Setting Up Display...continued Menu Displa Display y > Backlight Level: Backlight Time (sec): 10 10 Contrast: > > Zero averaging: > With > Power Avg (sec): > > Cadence Avg (sec): >...
- Page 62 Chapter 7: Setting Up CycleOps Joule 3.0 ™ Setting Up Display...continued Menu Displa Display y > Backlight Level: Backlight Time (sec): 10 10 Contrast: > > Zero averaging: > With > Power Avg (sec): > > Cadence Avg (sec): >...
- Page 63 5. Press [JOYSTICK] up/down to highlight Clear Ride Memory. Press [JOYSTICK] in and release to select Clear Ride Memory. Note: clearing ride memory deletes all activity fi les saved on Joule 3.0, data will be lost and unable to be downloaded as a result. History fi les are not deleted and can only be deleted from a personal computer.
- Page 64 5. Press [JOYSTICK] up/down to highlight Sleep Time. Press [JOYSTICK] in and release to select Sleep Time from 1, 2,3,4 and 5. Note: sleep time designates how long Joule 3.0 stays on after not getting valid data to record, such as after a ride. A longer sleep time will slightly effect battery life. Press [JOYSTICK] in and release to save changes.
- Page 65 2. Press [JOYSTICK} up/down to highlight Setup Joule. Press [JOYSTICK] in and release to select Setup Joule. 3. Press [JOYSTICK] up/down to highlight Joule Data. Press [JOYSTICK] in and release to select Joule Data. 4. Press [JOYSTICK] up/down to view Joule 3.0 fi rmware version. Check for the latest updates through Power- Agent software.
-
Page 66: Setup User
Setting Up User Profi le Setting up a user profi le is important for Joule 3.0 to display the most accurate information. A user profi le can be set up and managed using PowerAgent software. Note: if using Joule 3.0 in group environment, a USB stick will store user information. - Page 67 Rate Zones. Press [JOYSTICK] up/down to highlight and Recovery Zone, Endurance Zone, Threshold Zone, Race Pace Zone and Maximum Zone. Use [JOYSTICK] to set appropriate zone values. Press [JOYSTICK] in and release to save changes. Joule 3.0 User Guide page 67...
-
Page 68: History
7. Press [JOYSTICK] in and release to change the selected data range from 2 weeks, 4 weeks, 8 weeks, 6 months and 12 months. 8. Press [JOYSTICK] left/right to change reports and exit History reports. Note: Rides will be organized and sorted by date, with most current date at top. Joule 3.0 User Guide page 68... -
Page 69: Maximum History
12 months. 6. Press [JOYSTICK] left/right to change reports and exit History reports. Note: Max view is the max values achieved for each report metric over the average on two week, four week, etc. Joule 3.0 User Guide page 69... -
Page 70: Total History
12 months. 6. Press [JOYSTICK] left/right to change reports and exit History reports. Note: Total view is the total values achieved for each report metric over the average on two week, four week, etc. Joule 3.0 User Guide page 70... -
Page 71: Troubleshooting Cycleops Joule 3.0
Chapter 10: Troubleshooting CycleOps Joule 3.0 ™ For most up to date Frequently Asked Questions, visit www.cycleops.com. No display on computer screen · Computer is asleep – Press [MODE] or [INTERVAL] on the computer to wake up the computer. · Computer is too cold- operating temp. is 32 to 110 degrees Fahrenheit Computer display is fully discharged ·... - Page 72 To avoid losing data, never disconnect the USB port while data is being written. To properly dis- connect Joule 3.0 close all appropriate windows. If a drive window is open, close any associated windows before attempting to disconnect your Joule.
-
Page 73: Important Precautions
Do not use sharp things to hit the battery. • O-rings should be inspected and replaced if necessary whenever the battery cover is removed. Use a light coating of grease when re-installing the battery cover on the O-rings. Joule 3.0 User Guide page 73... - Page 74 Chapter 11: Important Precautions USB Stick If Joule 3.0 is being used with multiple users in the home, club or performance training center a multi-user accessory kit is available to allow any off-the-shelf USB stick to store data, user profile and settings.
-
Page 75: Technical Specifications For Cycleops Joule ™ 3.0
Chapter 12: Technical Specifications for CycleOps Joule 3.0 ™ FEATURES: JOULE 3.0 FEATURES: JOULE 3.0 Unit dimensions, WxHxD: 3.5 inches (90mm) wide, 3.4 iches (86.4mm) high, 1.27 inches (32.5mm) deep Normalized Power Display size, WxH: 3.0 inches (76.2mm Temperature diagonal) -
Page 76: Cycleops Joule 3.0 Warranty
Chapter 13: CycleOps Joule 3.0 Warranty CycleOps Joule 3.0 is warranted to the original retail purchaser to be free from defects in materi- als and workmanship. Warranty coverage is valid to the original purchaser only and proof of purchase will be required. -
Page 77: Definition Of Common Training Terms
5. An exercise intensity that can be held as long as the athlete were supplied with an influx of carbohydrate (i.e., allowed to eat). Joule 3.0 User Guide page 77... - Page 78 5. The degree of difficulty. 6. Stress, when measured directly as the actual power output. 7. Strain, when measured as the response to a given power output (e.g., heart rate, perceived exertion, oxygen consumption) 8. The percent of some reference maximal or sub-maximal value. Joule 3.0 User Guide page 78...
- Page 79 4. An exercise intensity that can be held for 1 to 3 hours or as long as there is available stored carbohydrate or glycogen. Joule 3.0 User Guide page 79...
- Page 80 (i.e., an exercise intensity that elicits VO2 max). 5. An all out or maximal effort that can be held between 2 to 8 minutes or an average of 4 minutes. Joule 3.0 User Guide page 80...
- Page 81 16 to 18 or “very hard” to “very very hard.” 4. An exercise intensity dependent primarily on the aerobic and anaerobic metabolism of carbohydrate. 5. An all out exercise intensity that can be held between 10 minutes to 30 minutes. Joule 3.0 User Guide page 81...
- Page 82 5. An exercise intensity that can be held for an indefinite time frame. Relative Intensity 1. The intensity represented as a percentage of some maximal or sub-maximal reference value. For example, 300 watts would be 80% of VO2 max power or 100% of LT power. Joule 3.0 User Guide page 82...
- Page 83 Torque 1. A force applied through a turning axis at a point some distance away from that axis. 2. A turning or twisting force. 3. Force x Distance. 4. Power divided by angular velocity. Joule 3.0 User Guide page 83...
- Page 84 1. The total amount of work in Kjoules calculated by estimating the average power output from a rider’s perceived exertion rather than the actual power. 2. An estimate of the total work or energy released that is based on the rider’s rating of perceived exertion. Joule 3.0 User Guide page 84 Part Number:19382...
Need help?
Do you have a question about the Joule 3.0 and is the answer not in the manual?
Questions and answers