Table of Contents
Advertisement
Available languages
Available languages
Advertisement
Table of Contents

Related Manuals for Thrustmaster T300


Summary of Contents for Thrustmaster T300
- Page 1 Europe, Middle East Latin America/ América Latina ENGLISH FRANÇAIS ENGLISH DEUTSCH ESPAÑOL NEDERLANDS PORTUGUÊS ITALIANO Asia Paci c ESPAÑOL 日本語 PORTUGUÊS 한국어 ENGLISH ΕΛΛΗΝΙΚΑ 简体中文 TÜRKÇE ENGLISH POLSKI 繁體中文 ENGLISH North America/ Norteamérica ENGLISH FRANÇAIS ESPAÑOL...
- Page 2 User Manual WARNING: To ensure that your T300 racing wheel functions correctly with games, you may be required to install the game’s automatic updates (available when your system is connected to the Internet). 1/26...
-
Page 3: Technical Features
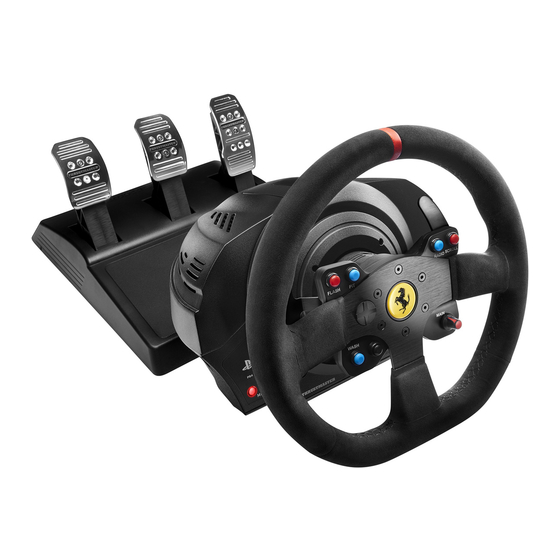
TECHNICAL FEATURES 1 T300 RS base 7 SELECT/START buttons on PS3™ and 2 Ferrari 599XX EVO Wheel SHARE/OPTIONS on PS4™ 3 2 sequential paddle shifters (up & down) 8 PS button 4 Directional buttons 9 Large threaded hole (for attachment system 5 Built-in USB sliding switch for PS4™/PS3™... -
Page 4: Plugging The Racing Wheel Into An Electrical Outlet: Please Read Before Proceeding
PLUGGING THE RACING WHEEL INTO AN ELECTRICAL OUTLET: PLEASE READ BEFORE PROCEEDING! Your racing wheel’s power supply varies according to the country where you purchased your device. The power supply can be: Internal, with: * a power supply unit located directly inside the racing wheel’s base, with a type A connector. - Page 5 * Do not let any dust build up on the air vents. For safety reasons, never use the pedal set with bare feet or while wearing only socks on your feet. THRUSTMASTER DISCLAIMS ALL RESPONSIBILITY IN THE EVENT OF ®...
- Page 6 Warning – Injuries due to force feedback and repeated movements (continued) * If the symptoms or pain indicated persist when you start playing again, stop playing and consult your doctor. * Keep out of children’s reach. * During gameplay, always leave both hands correctly positioned on the wheel without completely letting go.
- Page 7 To display the firmware version that your racing wheel is currently using and update it if required: on PC, visit http://ts.thrustmaster.com. In the Updates and Downloads section, click PlayStation Wheels / T300 RS, then select Driver/Firmware and follow the instructions describing the download and installation procedure. Important note: On PC, the USB sliding switch (5) on the racing wheel’s base must always be set to the PS3™...
- Page 8 Once you have installed the wheel, rotate it 180° (when facing the wheel, the Ferrari® logo should be upside down) to access the small attachment screw located on the ring of the Thrustmaster Quick Release (12) device. Use a large Phillips screwdriver to tighten the small attachment screw (do not use excessive force), turning it clockwise.
- Page 9 ATTACHING THE RACING WHEEL Attaching the racing wheel to a table or a desktop 1. Place the racing wheel on a table or any other horizontal, flat and stable surface. 2. Insert the fastening screw (11) in the attachment system (10), then tighten the device by turning the screw anticlockwise, so that it feeds into the large threaded hole (9) located beneath the racing wheel, until the wheel is perfectly stable.
-
Page 10: Attachment / Removal
ATTACHMENT / DIRECTION REMOVAL To tighten: Turn the screw anticlockwise To release: Turn the screw clockwise 9/26... - Page 11 Attaching the racing wheel’s base to a cockpit 1. Place the racing wheel’s base on the cockpit shelf. 2. Drive two M6 screws (not included) through the cockpit shelf, then feed them into the two small screw threads located on the underside of the racing wheel. Important: The length of the two M6 screws must not exceed the thickness of the shelf + 12 mm;...
- Page 12 * Don't forget to press the racing wheel’s PS button (8) in order to be able to use the wheel. * The wheel is recognised in most games as a T300 RS wheel. * The wheel is functional in compatible games and in system menus.
-
Page 13: Setting Up The Racing Wheel For Pc
USB plug to your computer and complete the installation. 3. Once the installation is complete, click Finish and restart your computer. 4. Select Start / All Programs / Thrustmaster / FFB Racing Wheel / Control Panel to open the Game Controllers window. - Page 14 PC MAPPING 13/26...
-
Page 15: Automatic Racing Wheel And Pedal Set Calibration
AUTOMATIC RACING WHEEL AND PEDAL SET CALIBRATION The wheel automatically self-calibrates when you plug the racing wheel into an electrical outlet and connect the racing wheel’s USB connector to the system. During this phase, the racing wheel will rotate quickly towards the left and the right, covering a 900 degree angle, before stopping at the centre. - Page 16 NORMAL SWAPPED AROUND GREEN Other information regarding the MODE button To learn more about the MODE button and indicator light, please visit http://ts.thrustmaster.com. In the Updates and Downloads section, click PlayStation / Wheels / T300 RS, then select Manual/Help file.
- Page 17 16/26...
- Page 18 TECHNICAL FEATURES 1 Metal support for conical stop 4 2.5 mm Allen key (included) 5 Position adjustment nut for conical stop (not installed by default) 2 Conical stop 3 Attachment screw for metal support 6 Pedal arm 8 Metal pedal head 7 Plastic head support 17/26...
- Page 19 For safety reasons, never use the pedal set with bare feet or while wearing only socks on your feet. THRUSTMASTER® DISCLAIMS ALL RESPONSIBILITY IN THE EVENT OF INJURY RESULTING FROM USE OF THE PEDAL SET WITHOUT SHOES. Warning – Pedal set pinching hazard during gaming sessions * Keep the pedal set out of the reach of children.
- Page 20 AUTOMATIC CALIBRATION OF PEDALS IMPORTANT: - Never connect or disconnect the pedal set from the base of the wheel when the wheel is connected to the PS3™ or PS4™, or during gaming sessions, to avoid calibration problems. = Always connect the pedal set to the wheel before connecting the wheel to the PS3™ or PS4™. - Once the wheel has self-calibrated and the game has started, the pedals automatically calibrate themselves after being pressed a few times.
- Page 21 ADJUSTING THE PEDAL SET Each of the three pedals includes: - A metal head (8) with multiple perforations (nine for the accelerator – six for the brake – six for the clutch). - A plastic head support (7) (placed between the head and the arm) with four perforations. - A pedal arm (6) with two perforations.
- Page 22 Adjusting the SPACING of the three pedals - Using the included 2.5 mm Allen key (4), unscrew the two screws holding the metal head (8) and its support (7) in place. - Select your preferred position (to the left, centered, or to the right), then replace and re-tighten the screws so that the metal head (8) and its support (7) are held firmly in place.
- Page 23 Installing the conical stop (“CONICAL RUBBER BRAKE” mod) This modification (or “mod”) is not essential, and is not installed by default. This means that the brake pedal functions perfectly even if the mod is not installed. This mod lets you experience a different feeling and resistance when braking. It’s up to you whether or not to install it, depending on your own preferences.
- Page 24 - Using the included 2.5 mm Allen key (4), attach the unit using the attachment screw (3) and the small central screw thread located on the underside of the pedal set. The “CONICAL RUBBER BRAKE” mod is now installed! Adjusting the brake pedal’s RANGE of travel and STRENGTH of resistance By slightly unscrewing the nut (5), you can further strengthen the resistance of the brake pedal by moving the conical stop (2) closer to the back of the pedal’s arm (if necessary, use a 14 mm wrench or pliers to re-tighten the nut and maintain the selected position).
-
Page 25: Consumer Warranty Information
Thrustmaster product according to applicable laws of the country in which the consumer was domiciled on the date of purchase of the Thrustmaster product (if no such action exists in the corresponding country, then the warranty period shall be one (1) year from the original date of purchase of the Thrustmaster product). - Page 26 During the warranty period, Guillemot shall not provide, in principle, any spare parts, as Technical Support is the only party authorized to open and/or recondition any Thrustmaster product (with the exception of any reconditioning procedures which Technical Support may request that the consumer carry out, by way of written instructions –...
- Page 27 COPYRIGHT © 2015 Guillemot Corporation S.A. All rights reserved. Thrustmaster® is a registered trademark of Guillemot Corporation S.A. Licensed for sale in Europe, Africa, Middle East, Russia, India and Oceania. For use exclusively with PlayStation 3 and PlayStation ® ®...
- Page 28 Manuel de l’utilisateur ATTENTION : Pour que le volant T300 fonctionne correctement avec les jeux il peut être nécessaire d’installer les mises à jour automatiques de ces jeux (disponibles lorsque votre console est connectée à Internet). 1/26...
-
Page 29: Caracteristiques Techniques
CARACTERISTIQUES TECHNIQUES 1 Base T300 RS 7 Boutons SELECT/START sur PS3™ 2 Roue Ferrari 599XX EVO et SHARE/OPTIONS sur PS4™ 3 2 leviers séquentiels de changement de 8 Bouton PS vitesse (up & down) 9 Gros pas de vis (pour le système de... -
Page 30: Relier Le Volant Au Secteur = A Lire Imperativement
RELIER LE VOLANT AU SECTEUR = A LIRE IMPERATIVEMENT En fonction du pays où vous avez acheté votre volant, l’alimentation secteur de votre volant diffère. Elle est : Soit interne avec : * Boitier d’alimentation directement dans la base du volant avec connecteur type A * Câble d’alimentation secteur 220-240V. - Page 31 * Ne laissez pas la poussière s’accumuler sur les grilles d’aération. Pour des raisons de sécurité, ne jouez pas pieds nus ou en chaussettes lorsque vous utilisez le pédalier. THRUSTMASTER DECLINE TOUTE RESPONSABILITE EN CAS DE ® BLESSURE SUITE A UNE UTILISATION DU PEDALIER SANS CHAUSSURES.
- Page 32 Avertissement – Blessures dues au retour de force et aux mouvements répétitifs (suite) * Si les symptômes ou les douleurs indiqués ci-dessus persistent lorsque vous reprenez le jeu, arrêtez de jouer et consultez votre médecin. * Laissez hors de portée des enfants. * Lors des phases de jeu, laissez toujours vos deux mains correctement positionnées sur le volant sans jamais le lâcher complètement.
- Page 33 Pour afficher la version de firmware de votre volant et le mettre à jour si nécessaire : sur PC, allez sur http://ts.thrustmaster.com, dans la section Mise à jour et téléchargement, cliquez sur PlayStation / Volant / T300 RS puis Pilote/Firmware et suivez les instructions et la procédure de téléchargement et d’installation.
- Page 34 Lorsque la roue est installée, tournez-la de 180° (vu de face, le Logo Ferrari® doit être à l’envers) afin d’accéder à la petite vis de fixation située sur la bague du Thrustmaster Quick Release (12). A l’aide d’un gros tournevis cruciforme, vissez sans forcer la petite vis de fixation dans le sens des aiguilles d’une montre.
- Page 35 FIXATION DU VOLANT Fixer le volant sur une table ou un bureau 1. Placez le volant sur une table ou autre surface plane. 2. Placez la vis de serrage (11) dans le système de fixation (10), puis vissez l’ensemble (dans le sens inverse des aiguilles d’une montre) dans le gros pas de vis (9) situé...
-
Page 36: Montage / Demontage
MONTAGE / SENS DEMONTAGE Pour serrer : Vissez dans le sens inverse des aiguilles d’une montre Pour desserrer : Dévissez dans le sens des aiguilles d’une montre 9/26... - Page 37 Fixer la base du volant sur un cockpit 1. Placez la base du volant sur la tablette du cockpit 2. Vissez 2 vis M6 (non fournies) dans la tablette du cockpit et dans les 2 petits pas de vis situés sous le volant.
- Page 38 * N’oubliez pas d’appuyer sur bouton PS (8) du volant pour que celui-ci soit fonctionnel. * Le volant est reconnu dans la plupart des jeux comme un volant T300 RS. * Le volant est fonctionnel dans les jeux compatibles et dans les menus du système.
-
Page 39: Installation Sur Pc
1. Allez sur http://ts.thrustmaster.com pour télécharger les pilotes et le logiciel Force Feedback pour PC. Dans la section Mise à jour et téléchargement, cliquez sur PC / Volants / T300 RS, puis Pilotes. 2. Une fois le téléchargement terminé, lancez l’installation, puis suivez les instructions affichées à l’écran pour brancher le connecteur USB du volant sur votre PC et pour terminer l’installation. - Page 40 MAPPING PC 13/26...
-
Page 41: Calibrage Automatique Du Volant Et Des Pedales
CALIBRAGE AUTOMATIQUE DU VOLANT ET DES PEDALES La roue du volant s’autocalibre de manière automatique une fois le volant relié au secteur et le connecteur USB connecté. Cette opération entraîne des mouvements rapides du volant de gauche à droite sur 900° avant de s’immobiliser au centre. - Page 42 Volant / T300 RS puis Manuel / Fichier Aide. AIDES & FAQ DIVERSES (non notifiées dans ce manuel) Allez sur http://ts.thrustmaster.com. Dans la section Mise à jour et téléchargement, cliquez sur PlayStation / Volant / T300 RS puis Manuel / Fichier Aide.
- Page 43 16/26...
- Page 44 CARACTERISTIQUES TECHNIQUES 1 Support métallique pour la butée conique Clé Allen 2,5 mm fournie Ecrou de réglage de position de la butée (non installée par défaut) 2 Butée conique conique 3 Vis de fixation du support métallique Bras de pédale Tête métallique de pédale Support de tête plastique 17/26...
- Page 45 Avant d’utiliser ce produit, lisez attentivement cette documentation et conservez-la pour pouvoir la consulter ultérieurement. Pour des raisons de sécurité, ne jouez pas pieds nus ou en chaussettes lorsque vous utilisez le pédalier. THRUSTMASTER DECLINE TOUTE RESPONSABILITE EN CAS DE ® BLESSURE SUITE A UNE UTILISATION DU PEDALIER SANS CHAUSSURES.
- Page 46 CALIBRAGE AUTOMATIQUE DES PEDALES IMPORTANT : - Ne branchez ou débranchez jamais le pédalier de la base du volant lorsque celui-ci est connecté à la PS3™ ou la PS4™, ou en cours de jeu, pour ne pas fausser la calibration. = Branchez toujours le pédalier avant de relier le volant à...
- Page 47 REGLAGES DU PEDALIER Chacune des 3 pédales comprend : - Une tête métallique (8) avec plusieurs perforations (9 pour l’accélérateur – 6 pour le frein – 6 pour l’embrayage). - Un support de tête plastique (7) (placé entre la tête et le bras) avec 4 perforations. - Un bras de pédale (6) avec 2 perforations.
- Page 48 Ajuster l’ECARTEMEMENT des 3 pédales - A l’aide de la clé Allen 2,5 mm fournie (4), dévissez les 2 vis maintenant la tête métallique (8) et son support (7). - Choisissez ensuite votre position (à gauche, au centre ou à droite), puis revissez le tout. Exemples ici avec la pédale de frein : Position à...
- Page 49 Installer la butée conique (MOD « CONICAL RUBBER BRAKE ») Ce MOD n’est pas obligatoire et n’est pas installé par défaut. Cela signifie que la pédale de frein fonctionne parfaitement même si le MOD n’est pas installé. Ce MOD permet d’apporter un feeling et une résistance différents lors des freinages. Il appartiendra à...
- Page 50 - A l’aide de la clé Allen 2,5 mm fournie (4), fixez l’ensemble en utilisant la vis de fixation (3) et le petit pas de vis central situé sous le pédalier. Le MOD « CONICAL RUBBER BRAKE » est désormais installé ! Ajuster la COURSE de débattement et la FORCE de résistance de la pédale de frein En dévissant légèrement l’écrou (5), vous pouvez également durcir davantage la résistance de la...
-
Page 51: Informations Relatives A La Garantie Aux Consommateurs
Thrustmaster selon la législation en vigueur dans le pays où le consommateur avait son domicile lors de l’achat du produit Thrustmaster (si une telle action en conformité n’existe pas dans ce pays alors la période de garantie est de un (1) an à compter de la date d’achat d’origine du produit Thrustmaster). -
Page 52: Support Technique
échéant, la ou les pièces détachées nécessaires). Compte tenu de ses cycles d'innovation et pour préserver ses savoir-faire et secrets, Guillemot ne fournira, en principe, ni notice de remise en état, ni pièce détachée pour tout produit Thrustmaster dont la période de garantie est expirée. -
Page 53: Recommandation Relative A La Protection De L'environnement
COPYRIGHT © 2015 Guillemot Corporation S.A. Tous droits réservés. Thrustmaster® est une marque déposée de Guillemot Corporation S.A. Licence accordée pour la vente en Europe, Afrique, Moyen-Orient, Inde, Russie et Océanie. A utiliser exclusivement avec PlayStation®3 et PlayStation®4. “ ”, “PlayStation”, “... - Page 54 Benutzerhandbuch ACHTUNG! Um sicher zu stellen, daß Ihr T300 Rennlenker mit Spielen korrekt funktioniert, ist es eventuell erforderlich die automatischen Aktualisierungen für das Spiel zu installieren. (Verfügbar, wenn Ihr System mit dem Internet verbunden ist.) 1/26...
-
Page 55: Technische Spezifikationen
TECHNISCHE SPEZIFIKATIONEN 1 T300 RS Basis 7 SELECT/START Buttons auf PS3™ und 2 Ferrari 599XX EVO Lenkkranz SHARE/OPTIONS auf PS4™ 3 2 sequenzielle Schaltwippen (Hoch & Runter) 8 PS-Button 4 Multidirektionales D-Pad 9 Großes Schraubgewinde (für Befestigungs- 5 Eingebauter USB Schiebeschalter für... - Page 56 ANSCHLUSS DES RENNLENKERS AN DAS STROMNETZ: BITTE SORGFÄLTIG LESEN! Der Stromanschluss ihres Rennlenkers variiert je nach Land in dem Sie ihr Gerät erworben haben. Der Stromanschluss kann folgendermaßen sein: Intern mit: * einer Netzstromanschluss-Buchse in der Lenkerbasis vom Typ A * und einem 220-240V Stromkabel = ausschließlich nur mit 220-240V Netzspannung zu verwenden.
- Page 57 * Vermeiden Sie auf jeden Fall Staubbildung an den Lüftungsschlitzen. Benutzen Sie aus Sicherheitsgründen das Pedalset niemals barfuß oder in Socken. THRUSTMASTER ® ÜBERNIMMT KEINERLEI HAFTUNG BEI VERLETZUNGEN DURCH EINSATZ DES PEDALSETS OHNE SCHUHE. Warnung - Verletzungen durch Force Feedback und wiederholte Bewegungen Spielen mit einem Force-Feedback-Lenkrad kann Muskel- oder Gelenkschmerzen verursachen.
- Page 58 Achtung – Verletzungen durch Force Feedback und wiederholte Bewegungen (Fortsetzung) * Wenn Sie wieder zu spielen beginnen und die oben beschriebenen Symptome oder Schmerzen weiterbestehen, unterbrechen Sie das Spiel und konsultieren Sie Ihren Arzt. * Außerhalb der Reichweite von Kindern aufbewahren. * Lassen Sie immer beide Hände während des Spielens am Lenkrad positioniert, ohne dieses völlig loszulassen.
- Page 59 Firmware aktualisiert werden. Um die aktuelle Version der Firmware Ihres Rennlenkers anzuzeigen und ob eine Aktualisierung eventuell verfügbar ist, rufen Sie auf Ihrem PC die Website http://ts.thrustmaster.com. auf. In der Sektion Updates und Downloads klicken Sie bitte auf PlayStation / Wheels / T300 RS. Wählen ...
- Page 60 Basisanschluss (1): Pfeil zeigt nach oben Rennlenkeranschluss (2): Pfeil zeigt nach oben Sind die Anschlüsse korrekt positioniert, drehen Sie einfach den Thrustmaster Quick Release (12) Ring des Gerätes entgegen dem Uhrzeigersinn, während Sie den Rennlenker (2) in Position halten. Drehen Sie dann den Ring, soweit Sie können. Um dies zu bewerkstelligen, halten Sie den Ring in Position und drehen den Rennlenker im Uhrzeigersinn.
- Page 61 BEFESTIGEN DES RENNLENKERS Befestigen Sie den Rennlenker auf einem Tisch oder Schreibtisch 1. Plazieren Sie den Lenker auf einem Tisch oder einer anderen waagerechten, ebenen und stabilen Oberfläche. 2. Stecken Sie die Befestigungsschraube (11) in das Befestigungssystem (10). Ziehen Sie dann die Schraube entgegen dem Uhrzeigersinn im Schraubgewinde (9) unterhalb des Geräts, bis der Lenker sicher und perfekt stabil auf der Oberfläche montiert ist.
- Page 62 MONTAGE / RICHTUNG ABMONTIEREN Montieren: Drehen der Schraube entgegen dem Uhrzeigersinn Abmontieren: Drehen der Schraube im Uhrzeigersinn 9/26...
- Page 63 Montage der Basis des Rennlenkers in einem Cockpit 1. Plazieren Sie die Basis des Rennlenkers auf der Cockpit-Ablage. 2. Drehen Sie zwei M6 Schrauben (nicht enthalten) durch die Cockpit-Ablage und führen diese in die beiden kleinen Schraubgewinde unterhalb des Rennlenkers ein. Achtung: Die Länge der beiden M6 Schrauben sollte die Dicke der Ablage plus zusätzlich 12 mm nicht überschreiten.
- Page 64 * Vergessen Sie nicht den PS-Button (8) des Lenkers zu drücken, um diesen nutzen zu können. * Der Lenker wird in den meisten Spielen als T300 RS Lenker erkannt. * Der Lenker funktioniert in kompatiblen Spielen und in den Konsolenmenüs.
- Page 65 PS3™-Position gestellt sein. 1. Gehen Sie auf http://ts.thrustmaster.com zum Herunterladen der Treiber und der Force Feedback Software für PC. Dazu klicken Sie in der Sektion Updates und Downloads auf PC / Wheels / T300 RS und wählen dann Treiber aus.
- Page 66 BELEGUNG (MAPPING) AUF DEM PC 13/26...
-
Page 67: Automatische Rennlenker- Und Pedalset-Kalibrierung
AUTOMATISCHE RENNLENKER- UND PEDALSET-KALIBRIERUNG Der Rennlenker kalibriert sich automatisch selbst beim Anschluss desselben an die Stromversorgung und den USB-Anschluss an der Konsole. Während dieser Phase dreht sich der Lenkkranz schnell nach rechts und links und deckt dabei einen Rotationswinkel von 900° ab. Danach stoppt der Lenkkranz in der mittigen Position. WARNUNG: Berühren Sie den Rennlenker niemals während der Kalibrierungsphase (Dies kann zu Kalibrierungsfehlern und/oder Verletzungen führen.) - Page 68 / Wheels / T300 RS und wählen dann Manual/Help file. HILFE UND HÄUFIG GESTELLTE FRAGEN (in diesem Handbuch nicht enthalten) Gehen Sie bitte auf http://ts.thrustmaster.com. In der Sektion Updates und Downloads klicken Sie bitte auf PlayStation / Wheels / T300 RS und gehen dann auf Manual/Help file. ...
- Page 69 16/26...
-
Page 70: Technische Merkmale
TECHNISCHE MERKMALE 1 Metallhalterung für den konischen Stop 4 2.5 mm Inbusschlüssel (inklusive) 5 Positions-Stellmutter für konischen Stop (standardmäßig nicht montiert) 2 Konischer Stop 3 Befestigungsschraube für Metallträger 6 Pedalstange 8 Pedalkopf aus Metall 7 Plastik-Halterung 17/26... - Page 71 Sie später etwas nachlesen müssen. Benutzen Sie das Pedalset aus Sicherheitsgründen niemals barfuß oder wenn Sie nur Socken tragen. THRUSTMASTER® LEHNT JEDWEDE HAFTUNG IM FALLE EINER VERLETZUNG DURCH DAS PEDALSET DURCH NUTZUNG DESSELBEN OHNE SCHUHWERK AB.
- Page 72 AUTOMATISCHE KALIBRIERUNG DER PEDALE WICHTIG: - Trennen oder verbinden Sie das Pedalset niemals von/mit der Basis, wenn diese an die PS3™ oder die PS4™ angeschlossen ist oder während des Spielverlaufs, um Kalibrierungsprobleme zu vermeiden. = Schließen Sie das Pedalset immer an das Lenkrad an, bevor dieses mit einer PS3™ oder einer PS4™...
- Page 73 ANPASSEN DES PEDALSETS Jedes der drei Pedale umfaßt: - Einen Metallkopf (8) mit mehreren Bohrungen (neun für das Gas – sechs für die Bremse – sechs für die Kupplung). - Eine Plastik-Halterung (7) mit vier Bohrungen, die zwischen dem Kopf und der Stange plaziert wird.
- Page 74 Anpassen des ZWISCHENRAUMES der drei Pedale - Benutzen Sie den beigelegten 2,5 mm Inbusschlüssel (4), um die beiden Schrauben, die den Pedalkopf aus Metall (8) und dessen Plastik-Halterung (7) halten, loszuschrauben. - Wählen Sie Ihre bevorzugte Position (mehr links, in der Mitte oder mehr nach rechts) und setzen dann die Schrauben wieder ein.
- Page 75 Montage des konischen Stops (“CONICAL RUBBER BRAKE” Mod) Die Modifizierung (oder “Mod”) ist nicht unbedingt erforderlich und ist standardmäßig nicht montiert. Das bedeutet, daß die Bremse auch ohne diese Mod bestens funktioniert. Diese Mod verschafft Ihnen ein anderes Gefühl und einen anderen Widerstand beim Bremsen. Es liegt bei Ihnen, diese nach Ihrem Belieben zu montieren.
- Page 76 - Benutzen Sie den beigefügten 2.5 mm Inbusschlüssel (4), um die Einheit mittels der Befestigungsschraube (3) und dem kleinen Schraubgewinde an der Unterseite des Pedalsets zu montieren. Die “CONICAL RUBBER BRAKE” Mod ist nun montiert! Anpassen des HUBS und der STÄRKE des Widerstands der Bremse Durch leichtes Losdrehen der Mutter (5) können Sie den Bremswiderstand verstärken, indem Sie den konischen Stop (2) näher an die Rückseite der Bremspedalstange herausdrehen (falls nötig, verwenden Sie einen 14-mm-Maulschlüssel oder eine Zange, um die Mutter in der gewählten...
- Page 77 Mängeln in Material und Verarbeitung für eine Gewährleistungsfrist ist, die mit der Frist für eine Mängelrüge bezüglich des Produktes übereinstimmt. In den Ländern der Europäischen Union entspricht diese einem Zeitraum von zwei (2) Jahren ab Kaufdatum des Thrustmaster Produktes. In anderen Ländern entspricht die Gewährleistungsfrist der zeitlichen Begrenzung für eine Mängelrüge bezüglich des Thrustmaster Produktes in Übereinstimmung mit anwendbarem Recht des Landes, in...
-
Page 78: Technischer Support
Während der Garantiezeit bietet Guillemot grundsätzlich keine Ersatzteile an, da der technische Kundendienst der einzige autorisierte Partner zum Öffnen und/oder Instandsetzen jedweden Thrustmaster-Produkts ist (mit Ausnahme von irgendwelchen Instandsetzungsprozeduren, die der Kunde nach Maßgabe des technischen Kundendienstes und durch schriftliche Instruktionen sowie der Zurverfügungstellung des/der eventuell erforderlichen Ersatzteil(s)(e) selbst in der Lage ist... - Page 79 COPYRIGHT © 2015 Guillemot Corporation S.A. Alle Rechte vorbehalten. Thrustmaster® ist eine eingetragene Marke von Guillemot Corporation S.A. Für den Verkauf in Europa, Afrika, dem Nahen Osten, Russland, Indien und Ozeanien lizenziert. Zur exklusiven Nutzung mit PlayStation 3 und PlayStation ®...
- Page 80 Handleiding WAARSCHUWING: Om er zeker van te zijn dat het T300-racestuur correct werkt met games, moet u mogelijk de automatische updates voor de games installeren (beschikbaar wanneer het systeem met internet is verbonden). 1/26...
-
Page 81: Technische Specificaties
TECHNISCHE SPECIFICATIES 1 T300 RS-voet 7 SELECT/START-knoppen op de PS3™ en 2 Ferrari 599XX EVO-stuur SHARE/OPTIONS-knoppen op de PS4™ 3 2 sequentiële schakelflippers (Up & Down) 8 PS-knop 4 Multidirectionele D-Pad 9 Groot schroefgat (voor 5 Ingebouwde USB-schuifschakelaar voor bevestigingssysteem en -schroef) 10 Bevestigingssysteem PS4™/PS3™... -
Page 82: Het Racestuur Aansluiten Op Een Stopcontact: Lees Dit Voordat U Verder Gaat
HET RACESTUUR AANSLUITEN OP EEN STOPCONTACT: LEES DIT VOORDAT U VERDER GAAT! Het land waarin het racestuur is aangeschaft, is bepalend voor het soort netvoeding dat het stuur gebruikt. Mogelijke soorten netvoeding: Intern, met: * een voedingseenheid gemonteerd in de voet van het racestuur met een connector van het type A. - Page 83 * Zorg dat de ventilatieopeningen stofvrij blijven. Om veiligheidsredenen mogen de pedalen nooit met blote voeten worden bediend of met alleen sokken aan. THRUSTMASTER WIJST ELKE VERANTWOORDELIJKHEID AF IN GEVAL ® VAN LETSEL ALS GEVOLG VAN HET GEBRUIK VAN DE PEDAALSET ZONDER SCHOENEN AAN.
- Page 84 – Waarschuwing Mogelijk letsel ten gevolge van Force Feedback en repetitieve bewegingen (vervolg) * Stop al het gamen als de hierboven beschreven symptomen van pijn of ongemak blijven aanhouden tijdens het gamen en raadpleeg een huisarts. * Houd het stuur, de voet en de pedaalset buiten het bereik van kinderen. * Houd tijdens het gamen altijd twee handen aan het stuur op de juiste stand en laat het stuur nooit helemaal los.
- Page 85 Om de huidige versie van de firmware van het racestuur weer te geven en deze bij te werken indien gewenst: ga op een pc naar http://ts.thrustmaster.com. Klik in de sectie Updates and Downloads op PlayStation / Wheels / T300 RS, selecteer Driver/Firmware en volg de instructies voor het ...
- Page 86 Connector op stuur (2): pijl die omhoog wijst Draai zodra de connectoren correct zijn gepositioneerd de ring van de Thrustmaster Quick Release (12) op zijn plaats tegen de wijzers van de klok in terwijl u het racestuur vasthoudt (2) .
- Page 87 HET RACESTUUR BEVESTIGEN Het racestuur op een tafel of werkblad bevestigen 1. Plaats het racestuur op een tafel of een ander horizontaal, vlak en stabiel oppervlak. 2. Plaats de bevestigingsschroef (11) in het bevestigingssysteem (10) en draai de schroef aan (tegen de klok in) zodat deze vast komt te zitten in het schroefgat (9) onder het racestuur en het stuur volledig stabiel is.
- Page 88 BEVESTIGEN / RICHTING VERWIJDEREN Vastdraaien: Draai de schroef linksom vast (tegen de wijzers van de klok in). Losdraaien: Draai de schroef rechtsom los (met de wijzers van de klok mee). 9/26...
- Page 89 De voet van het racestuur aan een cockpit bevestigen 1. Plaats de voet van het racestuur op het cockpitpaneel. 2. Draai twee M6-schroeven (niet meegeleverd) door het cockpitpaneel en in de twee kleine schroefgaten aan de onderkant van het racestuur. Belangrijk: de M6-schroeven mogen niet langer zijn dan de dikte van het paneel + 12 mm.
- Page 90 * Vergeet niet op de PS-knop (8) op het stuur te drukken om het stuur te kunnen gebruiken. * Het stuur wordt in de meeste games herkend als een T300 RS-stuur. * Het stuur werkt in compatibele games en in consolemenu's.
-
Page 91: Het Racestuur Installeren Op Uw Pc
1. Ga naar http://ts.thrustmaster.com en download de drivers en de Force Feedback software voor de pc. Klik in de sectie Updates and Downloads op PC / Wheels / T300 RS en selecteer Drivers. 2. Start de installatie nadat de download is voltooid en volg de instructies op het scherm om de USB- stekker van het stuur aan te sluiten op uw computer en de installatie te voltooien. - Page 92 MAPPING OP PC 13/26...
- Page 93 HET RACESTUUR EN DE PEDAALSET AUTOMATISCH KALIBREREN Het stuur kalibreert zichzelf automatisch wanneer u het stuur op een stopcontact aansluit en de USB- connector van het stuur op de console aansluit. Tijdens deze kalibratie zal het stuur snel 900 graden linksom en rechtsom draaien voordat het stopt in de middenstand.
- Page 94 ROOD VERWISSELD GROEN Meer functies van de MODE-knop Meer informatie over de MODE-knop en de indicator vindt u op http://ts.thrustmaster.com. Klik in de sectie Updates and Downloads op PlayStation / Wheels / T300 RS en selecteer Manual/Help file. HELPBESTANDEN EN FAQS (NIET OPGENOMEN IN DEZE HANDLEIDING) Ga naar http://ts.thrustmaster.com, klik in de sectie Updates and Downloads op PlayStation...
- Page 95 16/26...
-
Page 96: Technische Kenmerken
TECHNISCHE KENMERKEN 1 Metalen steun voor conische begrenzer 4 2,5 mm inbussleutel (meegeleverd) 5 Afstelmoer voor conische begrenzer (niet geïnstalleerd bij levering) 2 Conische begrenzer 3 Bevestigingsbout voor metalen steun 6 Pedaalarm 8 Metalen pedaal 7 Kunststof pedaalsteun 17/26... - Page 97 Voor uw en andermans veiligheid mag de pedaalset nooit worden gebruikt op blote voeten of met alleen sokken aan. THRUSTMASTER® WIJST ELKE VERANTWOORDELIJKHEID AF IN GEVAL VAN LETSEL ALS GEVOLG VAN HET GEBRUIK VAN DE PEDAALSET ZONDER SCHOENEN AAN.
- Page 98 AUTOMATISCHE KALIBRATIE VAN PEDALEN BELANGRIJK: - Om kalibratieproblemen te vermijden, mag u de pedaalset nooit aansluiten op of loskoppelen van de voet van het stuur wanneer het stuur is verbonden met de PS3™ of de PS4™ getrennt, of tijdens het gamen. = Sluit de pedaalset altijd eerst aan op het stuur voordat u het stuur aansluit op de PS3™...
- Page 99 DE PEDAALSET VERSTELLEN Elk van de drie pedalen bestaat uit: - Een metalen pedaal (8) met een aantal gaatjes (negen voor het gaspedaal, zes voor het rempedaal en zes voor het koppelingspedaal). - Een kunststof tussenstuk (7) (wordt geplaatst tussen het pedaal en de arm van het pedaal) met vier gaatjes.
- Page 100 De RUIMTE TUSSEN twee pedalen afstellen - Draai met behulp van de meegeleverde 2,5 mm inbussleutel (4) de twee boutjes los waarmee het pedaal (8) en de steun (7) vast zitten. - Kies de gewenste pedaalstand (naar links, in het midden of naar rechts) en zet de twee boutjes weer vast waarmee het pedaal (8) en de steun (7) vast zitten.
- Page 101 De conische begrenzer monteren (“CONICAL RUBBER BRAKE” mod) Deze modificatie (of “mod”) is niet noodzakelijk en is af fabriek niet gemonteerd. Dit betekent dat het rempedaal ook perfect functioneert als deze mod niet is gemonteerd. Als u deze mod wel monteert, krijgt u een ander gevoel in het rempedaal. Het wel of niet monteren van deze begrenzer is dus een kwestie van voorkeur.
- Page 102 - Gebruik de meegeleverde 2,5 mm inbussleutel (4) om de unit te monteren met het bevestigingsboutje (3) en de kleine centrale schroefdraad onderop de pedaalset. De “CONICAL RUBBER BRAKE” mod is nu gemonteerd De SLAG en WEERSTAND van het rempedaal afstellen Als u meer weerstand in het rempedaal wilt, draait u de moer (5) iets los en plaatst u de begrenzer (2) iets dichter bij het rempedaal (gebruik indien nodig een 14 mm steek- of ringsleutel, of een tang om de moer opnieuw vast te draaien en de gewenste stand te fixeren).
- Page 103 Europese Unie komt dit overeen met een periode van twee (2) jaar vanaf het moment van levering van het Thrustmaster-product. In andere landen komt de garantieperiode overeen met de tijd maximaal vereist om een restitutie/vervanging voor dit Thrustmaster-product te claimen zoals wettelijk is vastgelegd in het land waarin de koper woonachtig was op de datum van aankoop van het Thrustmaster-product.
-
Page 104: Technische Ondersteuning
Aanvullende garantiebepalingen Gedurende de garantieperiode zal Guillemot in principe nooit reserveonderdelen leveren omdat Technical Support de enige partij is die bevoegd is een Thrustmaster-product te openen en/of te herstellen (met uitzondering van een herstelprocedure die de klant door Technical Support gevraagd wordt uit te voeren met behulp van schriftelijke instructies –... -
Page 105: Aanbevelingen Voor De Bescherming Van Het Milieu
COPYRIGHT © 2015 Guillemot Corporation S.A. Alle rechten voorbehouden. Thrustmaster® is een geregistreerd handelsmerk van Guillemot Corporation S.A. Gelicentieerd voor verkoop in Europa, Afrika, Midden-Oosten, Rusland, India en Oceanië. Voor exclusief gebruik met PlayStation 3 en PlayStation ® ® Ferrari® is een geregistreerd handelsmerk van Ferrari Idea S.p.A. - Page 106 Manuale d'uso ATTENZIONE: Per far sì che il tuo T300 funzioni correttamente con i giochi, potrebbe rendersi necessario installare gli aggiornamenti automatici dei giochi (disponibili nel momento in cui il tuo sistema viene collegato a internet). 1/26...
-
Page 107: Caratteristiche Tecniche
CARATTERISTICHE TECNICHE 1 Base T300 RS 7 Pulsanti SELECT/START su PS3™ e 2 Volante Ferrari 599XX EVO SHARE/OPTIONS su PS4™ 3 2 leve del cambio sequenziali (Up e Down) 8 Pulsante PS 4 D-Pad multidirezionale 9 Ampio foro filettato (per sistema di 5 Selettore USB integrato per PS4™/PS3™... -
Page 108: Collegare Il Volante A Una Presa Di Corrente: Si Prega Di Leggere Attentamente Prima Di Procedere
COLLEGARE IL VOLANTE A UNA PRESA DI CORRENTE: SI PREGA DI LEGGERE ATTENTAMENTE PRIMA DI PROCEDERE! L'alimentatore del tuo volante varia a seconda della nazione in cui hai acquistato la tua periferica. L'alimentazione potrebbe essere: Interna, con: * Un alimentatore collocato direttamente nella base del volante, con un connettore tipo A * Un cavo di alimentazione da 220-240V = compatibile solo con correnti elettriche a 220-240V. - Page 109 * Non lasciare che la polvere penetri nella prese d'aria. Per motivi di sicurezza, non utilizzare mai la pedaliera a piedi nudi o indossando solamente i calzini. THRUSTMASTER DECLINA OGNI RESPONSABILITÀ IN CASO DI INFORTUNI ® DERIVANTI DALL'USO DELLA PEDALIERA SENZA SCARPE.
- Page 110 Attenzione – Infortuni derivanti dal force feedback e dai movimenti ripetuti (seguito) * Qualora i sintomi o il dolore sopradescritti dovessero persistere anche quando ricominci a giocare, smetti di giocare e consulta il tuo medico. * Tenere lontano dalla portata dei bambini. * Nei giochi, mantieni sempre le mani sul volante in posizione corretta, senza mai lasciarlo andare completamente.
- Page 111 Per visualizzare la versione del firmware attualmente presente nel tuo volante e, se necessario, aggiornarla: su PC, collegati al sito http://ts.thrustmaster.com. Nella sezione Updates and Downloads, clicca su PlayStation / Volanti / T300 RS, quindi scegli Driver/Firmware e segui le istruzioni sulla procedura di download e installazione.
- Page 112 Dopo aver correttamente posizionato i connettori, non devi far altro che ruotare in senso antiorario l'anello del sistema Thrustmaster Quick Release (12), tenendo il volante (2) fermo in posizione. Dopodiché, stringi l'anello più a fondo che puoi; per far questo, tieni l'anello in posizione e ruota il volante in senso orario.
- Page 113 FISSARE IL VOLANTE Fissare il volante a un tavolo o a una scrivania 1. Colloca il volante su un tavolo o su qualsiasi altra superficie piana, orizzontale e stabile. 2. Inserisci la vite di fissaggio (11) nel sistema di aggancio (10), dopodiché blocca la periferica ruotando la vite in senso antiorario, in modo tale che questa penetri nell'ampio foro filettato (9) presente nella parte inferiore del volante, finché...
- Page 114 AGGANCIO / DIREZIONE RIMOZIONE Per stringere: Gira la vite in senso antiorario Per allentare: Gira la vite in senso orario 9/26...
- Page 115 Agganciare la base del volante ad un abitacolo 1. Colloca la base del volante sul piano dell'abitacolo. 2. Fai passare due viti tipo M6 (non incluse) attraverso il piano dell'abitacolo, quindi avvitale nei due fori per le viti presenti nella parte posteriore del volante. Importante: la lunghezza delle due viti tipo M6 non dovrà...
- Page 116 * Per poter utilizzare il volante, ricordati di premere il pulsante PS del volante (8). * Nella maggior parte dei giochi, il volante verrà riconosciuto come un volante T300 RS. * Il volante funziona con i giochi compatibili e nei menu della console.
-
Page 117: Configurazione Del Volante Per Pc
USB del tuo volante e completare l'installazione. 3. Una volta completata l'installazione, clicca su Fine e riavvia il tuo computer. 4. Seleziona Start / Tutti i programmi / Thrustmaster / FFB Racing Wheel / Pannello di Controllo per aprire la finestra Controller di Gioco. - Page 118 MAPPATURA PC 13/26...
-
Page 119: Calibrazione Automatica Della Pedaliera
CALIBRAZIONE AUTOMATICA DI VOLANTE E PEDALIERA Il volante si calibra automaticamente nel momento in cui colleghi il volante alla rete elettrica e inserisci nella console il connettore USB del volante. Durante questa fase, il volante si muoverà rapidamente a destra e a sinistra, coprendo un angolo di 900 gradi, prima di fermarsi in posizione centrale. - Page 120 ROSSO SCAMBIATI VERDE Altri consigli per il pulsante MODE Per saperne di più sul pulsante e sul led MODE, consulta il sito http://ts.thrustmaster.com; nella sezione Updates and downloads, clicca su PlayStation / Wheels / T300 RS, quindi scegli Manual/Help file.
- Page 121 16/26...
- Page 122 CARATTERISTICHE TECNICHE 1 Supporto metallico per blocco conico 4 Chiave Allen da 2,5 mm (inclusa) 5 Dado di regolazione della posizione del (non preventivamente installato) 2 Blocco conico blocco conico 3 Vite di fissaggio per supporto metallico 6 Asta del pedale 8 Copri-pedale in metallo 7 Supporto copri-pedale in plastica 17/26...
- Page 123 Per ragioni di sicurezza, non utilizzare mai la pedaliera a piedi nudi o indossando unicamente dei calzini. THRUSTMASTER® DECLINA OGNI RESPONSABILITÀ IN CASO DI INFORTUNIO DERIVANTE DALL’USO DELLA PEDALIERA SENZA SCARPE. Attenzione – Rischio di schiacciamento durante le sessioni di gioco con la pedaliera * Mantieni la pedaliera fuori dalla portata dei bambini.
- Page 124 CALIBRAZIONE AUTOMATICA DEI PEDALI IMPORTANTE: - Per evitare problemi di calibrazione, non collegare o scollegare mai la base del volante quando questo è collegato alla PS3™ o alla PS4™, oppure durante le sessioni di gioco. = Prima di collegare il volante alla PS3™ o alla PS4™, collega sempre la pedaliera al volante. - Dopo che il volante si sarà...
- Page 125 REGOLAZIONE DELLA PEDALIERA Ognuno dei tre pedali è dotato di: - Copri-pedale in metallo (8) multi-perforato (nove per l’acceleratore – sei per il freno – sei per la frizione). - Un supporto copri-pedale in plastica (7) (posizionato tra la testa e l’asta del pedale) con quattro perforazioni.
- Page 126 Regolare la DISTANZA fra i tre pedali - Utilizzando l’acclusa chiave Allen da 2,5 mm (4), svita le due viti di fissaggio del copri-pedale in metallo (8) e del relativo supporto (7). - Seleziona la tua posizione preferita (a sinistra, al centro, a destra), dopodiché reinserisci e stringi nuovamente le viti, in modo tale che il copri-pedale in metallo (8) e il relativo supporto (7) siano saldamente fissati.
- Page 127 Installare in blocco conico (“CONICAL RUBBER BRAKE” mod) Questa modifica (o “mod”) non è essenziale e non risulta preventivamente installata. Ciò significa che il pedale del freno funziona perfettamente anche a mod non installato. Questo mod ti permette di sperimentare differenti sensazioni e resistenze durante le frenate. Sta a te scegliere se installarlo o meno, a seconda delle tue preferenze.
- Page 128 - Utilizzando l’acclusa chiave Allen da 2,5 mm (4), aggancia l’unità stringendo la vite di fissaggio (3) nel piccolo foro centrale filettato, presente nella parte inferiore della pedaliera. Il mod “CONICAL RUBBER BRAKE” è ora installato! Regolazione dell’AMPIEZZA della corsa e della FORZA resistente del pedale del freno Svitando leggermente il dado (5), puoi aumentare ulteriormente la resistenza del pedale del freno, avvicinando il blocco conico (2) alla parte posteriore dell’asta del pedale (se necessario, per...
- Page 129 35571 Chantepie, Francia (d’ora in avanti “Guillemot”) garantisce al consumatore che il presente prodotto Thrustmaster sarà privo di difetti relativi ai materiali e alla fabbricazione, per un periodo di garanzia corrispondente al limite temporale stabilito per la presentazione di un reclamo riguardante la conformità...
-
Page 130: Assistenza Tecnica
Considerando i propri cicli di innovazione e per proteggere il proprio know-how e i propri segreti commerciali, in linea di principio, Guillemot non fornirà alcuna notifica o parte di ricambio finalizzata alla rimessa in attività di un qualunque prodotto Thrustmaster il cui periodo di garanzia risultasse scaduto. -
Page 131: Raccomandazioni Sulla Tutela Dell'ambiente
COPYRIGHT © 2015 Guillemot Corporation S.A. Tutti i diritti riservati. Thrustmaster® è un marchio registrato da Guillemot Corporation S.A. Con licenza di vendita in Europa, Africa, Medio Oriente, Russia, India e Oceania. Utilizzabile esclusivamente con PlayStation 3 e PlayStation ®... - Page 132 Manual del usuario ADVERTENCIA: Para asegurarte de que tu volante de carreras T300 funcione correctamente con juegos, puede que tengas que instalar las actualizaciones automáticas de los juegos (disponibles cuando tu sistema está conectado a Internet). 1/26...
-
Page 133: Características Técnicas
CARACTERÍSTICAS TÉCNICAS 1 Base de T300 RS 7 Botones SELECT/START en PS3™ y 2 Volante Ferrari 599XX EVO SHARE/OPTIONS en PS4™ 3 2 levas de cambio secuenciales (Up y Down) 8 Botón PS 4 D-Pad multidireccional 9 Agujero roscado grande (para sistema de 5 Interruptor deslizante USB integrado para fijación y tornillo de apriete) - Page 134 ¡CONEXIÓN DEL VOLANTE DE CARRERAS A UN ENCHUFE ELÉCTRICO: LEER ANTES DE CONTINUAR! La fuente de alimentación del volante de carreras varía en función del país en el que hayas comprado el dispositivo. La fuente de alimentación puede ser: Interna, con: * Una unidad de fuente de alimentación situada directamente en el interior de la base del volante de carreras, con un conector de tipo A.
- Page 135 * No dejes que se acumule polvo en las rejillas de ventilación. Por razones de seguridad, no uses nunca los pedales con los pies descalzos o únicamente con calcetines en los pies. THRUSTMASTER DECLINA TODA RESPONSABILIDAD EN CASO DE ®...
- Page 136 Advertencia – Lesiones debidas a Force Feedback y los movimientos repetitivos (continuación) * Si los síntomas o el dolor indicados anteriormente persisten cuando vuelves a jugar, deja de hacerlo y consulta al médico. * Mantén el volante fuera del alcance de los niños. * Durante el juego, mantén siempre ambas manos colocadas correctamente en el volante sin dejarlas completamente caídas.
- Page 137 Para mostrar la versión de firmware que está usando actualmente tu volante de carreras y actualizarla si es necesario: en PC, visita http://ts.thrustmaster.com. En la sección Updates and Downloads, haz clic en PlayStation / Wheels / T300 RS y, a continuación, selecciona Driver/Firmware y sigue ...
- Page 138 Conector del volante de carreras (2): Flecha apuntando hacia arriba Una vez que los conectores estén colocados correctamente, simplemente gira el anillo del dispositivo Thrustmaster Quick Release (12) hacia la izquierda, mientras sostienes el volante de carreras (2) en su posición.
- Page 139 FIJACIÓN DEL VOLANTE DE CARRERAS Fijación del volante de carreras a una mesa o un escritorio 1. Coloca el volante de carreras en una mesa o en otra superficie horizontal, plana y estable. 2. Inserta el tornillo de sujeción (11) en el sistema de fijación (10) y, a continuación, aprieta el dispositivo girando el tornillo a la izquierda, para que entre en el agujero roscado grande (9) situado debajo del volante de carreras, hasta que el volante esté...
- Page 140 COLOCACIÓN / INDICACIÓN RETIRADA Para apretar: Gira el tornillo hacia la izquierda Para aflojar: Gira el tornillo hacia la derecha 9/26...
- Page 141 Fijación de la base del volante de carreras a una cabina 1. Coloca la base del volante de carreras en el estante de la cabina. 2. Pasa dos tornillos M6 (no incluidos) a través del estante de la cabina e insértalos en los dos agujeros roscados pequeños situados en la cara inferior del volante de carreras.
- Page 142 * No olvides pulsar el botón PS del volante de carreras (8) para poder usar el volante. * El volante se reconoce en la mayoría de los juegos como un volante T300 RS. * El volante está operativo en los juegos compatibles y en los menús de la consola.
-
Page 143: Configuración Del Volante De Carreras Para Pc
PS3™. 1. Dirígete a http://ts.thrustmaster.com para descargar los controladores y el software de Force Feedback para PC. En la sección Updates and Downloads, haz clic en PC / Wheels / T300 RS y, a continuación, selecciona Drivers. - Page 144 ASIGNACIÓN EN PC 13/26...
-
Page 145: Calibración Automática De Los Pedales
CALIBRACIÓN AUTOMÁTICA DEL VOLANTE Y DE LOS PEDALES El volante de carreras se calibra solo automáticamente cuando enchufas el volante de carreras a la red eléctrica y conectas el conector USB del volante de carreras a la consola. Durante esta fase, el volante de carreras girará rápidamente hacia la izquierda y la derecha, cubriendo un ángulo de 90 grados, antes de detenerse en el centro. - Page 146 BOTÓN MODE Y LUZ INDICADORA (6) Botón MODE de los pedales El T300 es compatible con los pedales de Thrustmaster que incluyan 3 pedales que te permitirán intercambiar electrónicamente los pedales del acelerador y el embrague. Para ello, simplemente pulsa el botón MODE (6) durante 2 segundos.
- Page 147 16/26...
-
Page 148: Características Técnicas
CARACTERÍSTICAS TÉCNICAS 1 Soporte metálico para tope cónico 3 Tornillo de sujeción de soporte metálico 4 Llave Allen de 2,5 mm (incluida) (no está instalado de forma 5 Tuerca de ajuste de posición para tope predeterminada) 2 Tope cónico cónico 6 Brazo del pedal 8 Cabeza del pedal metálica 7 Soporte de cabeza de plástico... - Page 149 Por motivos de seguridad, no utilizar nunca los pedales con los pies desnudos o únicamente con calcetines en los pies. THRUSTMASTER® DECLINA TODA RESPONSABILIDAD EN CASO DE LESIONES PRODUCTO DEL USO DE LOS PEDALES SIN CALZADO. Advertencia – Peligro de pillarse con los pedales durante las sesiones de juego * Mantén los pedales fuera del alcance de los niños.
- Page 150 CALIBRACIÓN AUTOMÁTICA DE LOS PEDALES IMPORTANTE: - No conectes ni desconectes nunca los pedales de la base del volante cuando el volante esté conectado a la PS3™ o a la PS4™, ni durante las sesiones de juego, para evitar problemas de calibración.
- Page 151 AJUSTE DE LOS PEDALES Cada uno de los tres pedales incluye: - Una cabeza metálica (8) con varias perforaciones (nueve para el acelerador, seis para el freno y seis para el embrague). - Un soporte de cabeza de plástico (7) (situado entre la cabeza y el brazo) con cuatro perforaciones.
- Page 152 Ajuste del ESPACIADO de los tres pedales - Con la llave Allen de 2,5 mm incluida (4), desatornilla los dos tornillos que sujetan la cabeza metálica (8) y su soporte (7) en su sitio. - Selecciona la posición que prefieras (a la izquierda, centrada o a la derecha) y, a continuación, vuelve a colocar y apretar los tornillos de forma que la cabeza metálica (8) y su soporte (7) queden sujetos firmemente en su sitio.
- Page 153 Instalación del tope cónico (mod “CONICAL RUBBER BRAKE”) Esta modificación (o “mod”) no es esencial y no se instala de forma predeterminada. Esto significa que el pedal del freno funciona perfectamente aunque no esté instalado el mod. Este mod te permite experimentar una resistencia y sensación diferentes al frenar. Depende de ti instalarlo o no, en función de tus preferencias.
- Page 154 - Con la llave Allen de 2,5 mm incluida (4), fija la unidad con el tornillo de sujeción (3) y la rosca de tornillo central pequeña situada en la cara inferior de los pedales. ¡Ya está instalado el mod “CONICAL RUBBER BRAKE”! Ajuste del RANGO de desplazamiento y la RESISTENCIA del pedal del freno Si desatornillas ligeramente la tuerca (5), puedes reforzar más la resistencia del pedal del freno moviendo el tope cónico (2) más cerca de la parte trasera del brazo del pedal (si es necesario, usa...
-
Page 155: Información De Garantía Al Consumidor
En los países de la Unión Europea, esto corresponde a un período de dos (2) años a partir de la entrega del producto de Thrustmaster. En otros países, el período de garantía corresponde al límite de tiempo para interponer una acción legal referida a la conformidad en relación con este producto de Thrustmaster según las leyes... -
Page 156: Soporte Técnico
Soporte Técnico es el único autorizado para abrir y/o reacondicionar los productos de Thrustmaster (con la excepción de los procedimientos de reacondicionamiento que el Soporte técnico puede solicitar que lleve a cabo el consumidor, mediante instrucciones por escrito –... -
Page 157: Recomendación De Protección Ambiental
COPYRIGHT © 2015 Guillemot Corporation S.A. Todos los derechos reservados. Thrustmaster® es una marca comercial registrada de Guillemot Corporation S.A. Licenciado para la venta en Europa, África, Oriente Medio, Rusia, India y Oceanía. Para usar exclusivamente con PlayStation 3 y PlayStation ®... - Page 158 Manual do Utilizador ATENÇÃO: Para garantir que o seu volante T300 funciona corretamente com jogos, poderá ser-lhe pedido para instalar as atualizações automáticas dos jogos (disponível quando o sistema está ligado à Internet). 1/26...
- Page 159 CARACTERÍSTICAS TÉCNICAS 1 Base do T300 RS 7 Botões SELECT/START na PS3™ e 2 Volante Ferrari 599XX EVO SHARE/OPTIONS na PS4™ 3 2 pás de mudança de velocidades sequenciais 8 Botão PS (Up e Down) 9 Furo roscado grande (para o sistema de 4 D-Pad multidirecional fixação e parafuso de aperto)
- Page 160 LIGAR O VOLANTE A UMA TOMADA ELÉTRICA: LEIA ANTES DE CONTINUAR! A fonte de alimentação do volante varia de acordo com o país onde adquiriu o seu dispositivo. A alimentação pode ser: Interna, com: * uma unidade de alimentação situada diretamente no interior da base do volante, com um conector de tipo A.
- Page 161 * Não deixe que pó se acumule nas aberturas de ventilação. Por razões de segurança, nunca utilize o conjunto de pedais com os pés descalços ou apenas com meias calçadas nos pés. A THRUSTMASTER NÃO ASSUME QUALQUER RESPONSABILIDADE NA ®...
- Page 162 Atenção – Ferimentos resultantes dos efeitos Force Feedback e dos movimentos repetidos (continuação) * Se os sintomas ou as dores acima indicados persistirem quando recomeçar a jogar, pare de jogar e consulte o seu médico. * Guarde o volante fora do alcance das crianças. * Durante o jogo, mantenha sempre ambas as mãos posicionadas corretamente no volante sem largá- lo por completo.
- Page 163 Para visualizar a versão do firmware que o volante utiliza atualmente e atualizá-la, se necessário: no PC, aceda a http://ts.thrustmaster.com. Na secção Updates and Downloads, clique em PlayStation / Wheels / T300 RS, em seguida selecione Driver/Firmware e siga as instruções que descrevem o procedimento de transferência e instalação.
- Page 164 Ferrari® deve ficar virado ao contrário) para aceder ao parafuso de fixação pequeno situado no anel do dispositivo Thrustmaster Quick Release (12). Utilize uma chave de fendas Phillips grande para apertar o parafuso de fixação pequeno (não aplique força excessiva), rodando-o no sentido horário.
- Page 165 FIXAR O VOLANTE Fixar o volante a uma mesa ou secretária 1. Coloque o volante sobre uma mesa ou de qualquer outra superfície horizontal, plana e estável. 2. Insira o parafuso de aperto (11) no sistema de fixação (10),em seguida aperte o dispositivo rodando o parafuso no sentido anti-horário, de forma que penetre no furo roscado grande (9) situado por baixo do volante, até...
-
Page 166: Fixação / Remoção
FIXAÇÃO / DIREÇÃO REMOÇÃO Para apertar: Rode o parafuso no sentido anti- horário Para soltar: Rode o parafuso no sentido horário 9/26... - Page 167 Fixar a base do volante a um cockpit 1. Coloque a base do volante na prateleira do cockpit. 2. Insira dois parafusos M6 (não incluídos) na prateleira do cockpit e em seguida enrosque-os nas duas roscas de parafuso pequenas situadas na parte inferior do volante. Importante: O comprimento dos dois parafusos M6 não deve exceder a espessura da prateleira + 12 mm;...
- Page 168 * Não se esqueça de premir o botão PS (8) do volante para poder utilizá-lo. * O volante é reconhecido na maioria dos jogos como um volante T300 RS. * O volante está funcional em jogos compatíveis e nos menus da consola.
-
Page 169: Configurar O Volante Para O Pc
- No PC, os ajustes feitos na janela Controladores de Jogo serão salvos apenas no computador (não terão efeito no PlayStation 3 ou PlayStation ® ® - A versão do firmware do volante é exibida no canto superior direito do painel de controle do T300 RS. 12/26... - Page 170 MAPEAMENTO PARA PC 13/26...
- Page 171 CALIBRAGEM AUTOMÁTICA DO VOLANTE E DO CONJUNTO DE PEDAIS O volante calibra-se automaticamente quando liga o volante a uma tomada elétrica e o conector USB do volante à consola. Durante esta fase, o volante roda rapidamente para a esquerda e direita, cobrindo um ângulo de 900 graus, antes de parar no centro.
- Page 172 BOTÃO MODE E LUZ INDICADORA (6) Botão MODE para o conjunto de pedais O T300 é compatível com conjuntos de pedais Thrustmaster dotados de 3 pedais; estes permitem- lhe trocar eletronicamente os pedais do acelerador e da embraiagem. Para tal, basta premir o botão MODE (6) durante 2 segundos.
- Page 173 16/26...
-
Page 174: Características Técnicas
CARACTERÍSTICAS TÉCNICAS 1 Apoio de metal para batente cónico 4 Chave sextavada de 2,5 mm (incluída) 5 Porca de ajuste da posição para o batente (não instalado por predefinição) 2 Batente cónico cónico 3 Parafuso de fixação para o apoio de metal 6 Braço do pedal 8 Cabeça de metal do pedal 7 Apoio de plástico da cabeça... - Page 175 Por razões de segurança, nunca utilize o conjunto de pedais com os pés descalços ou quando estiver apenas de meias calçadas. A THRUSTMASTER® NÃO ASSUME QUALQUER RESPONSABILIDADE NA EVENTUALIDADE DE DANOS FÍSICOS RESULTANTES DA UTILIZAÇÃO DO CONJUNTO DE PEDAIS SEM CALÇADO.
- Page 176 CALIBRAGEM AUTOMÁTICA DOS PEDAIS IMPORTANTE: - Nunca ligue nem desligue o conjunto de pedais da base do volante quando este estiver ligado à PS3™ ou à PS4™, ou durante as sessões de jogo, para evitar problemas de calibragem. = Ligue sempre o conjunto de pedais ao volante antes de ligar o volante à PS3™ ou à PS4™. - Quando a calibragem automática do volante estiver concluída e o jogo tiver começado, os pedais calibram-se automaticamente depois de carregar neles várias vezes.
- Page 177 AJUSTAR O CONJUNTO DE PEDAIS Cada um dos três pedais inclui: - Uma cabeça de metal (8) com vários furos (nove para o acelerador, seis para o travão e seis para a embraiagem). - Um apoio de plástico da cabeça (7) (colocado entre a cabeça e o braço) com quatro furos. - Um braço do pedal (6) com dois furos.
- Page 178 Ajustar o ESPAÇAMENTO dos três pedais - Com a chave sextavada de 2,5 mm incluída (4), desenrosque os dois parafusos que prendem a cabeça de metal (8) e o respetivo apoio (7) na posição. - Selecione a sua posição preferida (à esquerda, ao centro ou à direita) e em seguida reaperte os parafusos de forma a fixar firmemente nessa posição a cabeça de metal (8) e o respetivo apoio (7).
- Page 179 Instalar o batente cónico (“CONICAL RUBBER BRAKE” mod) Esta modificação (ou “mod”) não é essencial, não sendo instalada por predefinição. Isto significa que o pedal do travão funciona perfeitamente mesmo sem a mod instalada. Esta mod permite-lhe experimentar uma sensação e uma resistência diferentes ao travar. Cabe a si decidir se deve ou não instalá-la, de acordo com as suas próprias preferências.
- Page 180 - Com a chave sextavada de 2,5 mm incluída (4), fixe a unidade utilizando o parafuso de fixação (3) e a pequena rosca de parafuso situada na parte inferior do conjunto de pedais. A “CONICAL RUBBER BRAKE” mod encontra-se agora instalada! Ajustar o CURSO e a FORÇA da resistência do pedal do travão Ao desenroscar ligeiramente a porca (5), pode aumentar a resistência do pedal do travão aproximando o batente cónico (2) da parte posterior do braço do pedal (se necessário, utilize uma...
-
Page 181: Informações Sobre A Garantia Para O Consumidor
Thrustmaster de acordo com a legislação em vigor do país no qual o consumidor residia à data de compra do produto Thrustmaster (se a dita ação não existir no país correspondente, então o período de garantia será... -
Page 182: Suporte Técnico
Suporte Técnico é a única parte autorizada a abrir e/ou reparar qualquer produto Thrustmaster (à exceção de quaisquer procedimentos de reparação que o Suporte Técnico possa pedir ao consumidor para realizar, através de instruções por escrito – por exemplo, devido à... -
Page 183: Direitos De Autor
DIREITOS DE AUTOR © 2015 Guillemot Corporation S.A. Todos os direitos reservados. Thrustmaster® é uma marca registada da Guillemot Corporation S.A. Licenciado para venda na Europa, África, Médio Oriente, Rússia, Índia e Oceânia. Para utilização exclusiva com a PlayStation 3 e PlayStation ®... - Page 184 Инструкция по эксплуатации ВНИМАНИЕ! Для обеспечения оптимальной совместимости рулевой системы T300 с играми, может потребоваться установка автоматических обновлений для игр (их можно загрузить, подключив игровую систему к Интернету). 1/26...
-
Page 185: Технические Характеристики
ТЕХНИЧЕСКИЕ ХАРАКТЕРИСТИКИ 1 База системы T300 RS 7 Кнопки SELECT/START для PS3™ 2 Руль для консоли Ferrari 599XX EVO или SHARE/OPTIONS для PS4™ 3 2 лепестковых переключателя (Up и Down) 8 Кнопка PS 4 Многопозиционная кнопка 9 Резьба под большой винт (для системы... -
Page 186: Подключение Рулевой Системы Кэлектророзетке Сначала Прочтите Следующее
ПОДКЛЮЧЕНИЕ РУЛЕВОЙ СИСТЕМЫ К ЭЛЕКТРОРОЗЕТКЕ СНАЧАЛА ПРОЧТИТЕ СЛЕДУЮЩЕЕ! Тип блока питания рулевой системы зависит от страны приобретения устройства. Блок питания может быть одного из следующих типов. Встроенный, в следующей комплектации: * блок питания, интегрированный непосредственно в базу рулевого колеса, с разъемом... - Page 187 * ничем не накрывайте базу; * не допускайте скопления пыли на вентиляционных отверстиях. Из соображений безопасности никогда не нажимайте на педали босой ногой или ногой в носке (без обуви). КОМПАНИЯ THRUSTMASTER ОТКАЗЫВАЕТСЯ ОТ ЛЮБОЙ ® ОТВЕТСТВЕННОСТИ В СЛУЧАЕ ПОЛУЧЕНИЯ ТРАВМЫ В РЕЗУЛЬТАТЕ...
- Page 188 Внимание — риск травмирования в результате повторяющихся движений и действия силовой обратной связи Использование рулевой системы с силовой обратной связью может вызвать боль в мышцах или суставах. Советы по предотвращению проблем со здоровьем: * не проводите за игрой продолжительное время; * после...
- Page 189 Для просмотра установленной в данный момент версии прошивки и ее обновления при необходимости откройте сайт http://ts.thrustmaster.com. В разделе Updates and Downloads выберите PlayStation / Wheels / T300 RS, затем откройте Driver/Firmware и выполните указания по загрузке и установке прошивки.
- Page 190 Разъем на руле (2): стрелка указывает вверх. После правильного позиционирования разъемов просто поверните кольцо крепежной системы Thrustmaster Quick Release (12) против часовой стрелки, удерживая на месте руль (2). Затем с максимальным усилием затяните кольцо, удерживая его на месте и поворачивая руль (по...
-
Page 191: Установка Рулевой Системы
УСТАНОВКА РУЛЕВОЙ СИСТЕМЫ Размещение рулевого колеса на столе. 1. Расположите гоночный руль на столе или иной горизонтальной плоской и устойчивой поверхности. 2. Вставьте крепежный винт (11) в систему крепления (10) и надежно зафиксируйте руль, затягивая винт против часовой стрелки, так чтобы он вошел в большое резьбовое отверстие... - Page 192 УСТАНОВКА / НАПРАВЛЕНИЕ ДЕМОНТАЖ Фиксация Закручивайте винт против часовой стрелки Ослабление Раскручивайте винт по часовой стрелке 9/26...
- Page 193 Закрепление базы рулевого колеса на кокпите 1. Разместите базу рулевого колеса на щитке кокпита. 2. Через отверстия в щитке кокпита вставьте два винта M6 (не входят в комплект) в два небольших винтовых отверстия на нижней стороне базы руля. Важно! Длина винтов M6 не должна превышать толщину щитка + 12 мм; более длинные...
- Page 194 * Не забудьте нажать кнопку PS на рулевом колесе (8) и откройте свой игровой профиль, чтобы можно было использовать руль. * Большинством игр рулевая система распознается как руль T300 RS. * Функции рулевой системы поддерживаются совместимыми играми и меню консолей.
-
Page 195: Настройка Рулевой Системы Для Пк
находиться в положении PS3™. 1. Загрузите драйверы и программу Force Feedback для ПК на сайте http://ts.thrustmaster.com. В разделе Updates and Downloads (Обновления и загрузки) выберите PC / Wheels / T300 RS и Drivers. 2. После завершения загрузки запустите процесс установки и выполните указания на экране по... - Page 196 РАСКЛАДКА ФУНКЦИЙ ДЛЯ ПК 13/26...
-
Page 197: Автоматическая Калибровка Руля И Педального Блока
АВТОМАТИЧЕСКАЯ КАЛИБРОВКА РУЛЯ И ПЕДАЛЬНОГО БЛОКА Калибровка гоночного руля выполняется автоматически при подключении рулевой системы к электророзетке и к игровой консоли через USB-разъем. Во время этой процедуры руль быстро вращается влево и вправо, совершая поворот на 900 градусов, и затем останавливается в центре. ВНИМАНИЕ! Во... - Page 198 КНОПКА И ИНДИКАТОР MODE(6) Кнопка MODE для педального блока Рулевая система T300 совместима с педальными блоками Thrustmaster с тремя педалями; на которых можно электронным способом поменять местами педали сцепления и газа. Для этого достаточно нажать кнопку MODE (6) на 2 сек.
- Page 199 16/26...
- Page 200 ТЕХНИЧЕСКИЕ ХАРАКТЕРИСТИКИ 1 Металлическая база для 3 Крепежный винт для металлической базы конусообразного стопора 4 6-гранный ключ 2,5 мм (в комплекте) 5 Регулировочная гайка для (по умолчанию не установлена) 2 Конусообразный стопор конусообразного стопора 6 Рычаг педали 8 Металлическая педаль 7 Пластиковая...
- Page 201 сохраните ее на будущее. Из соображений безопасности никогда не нажимайте на педали босой ногой или ногой в носке (без обуви). КОМПАНИЯ THRUSTMASTER® ОТКАЗЫВАЕТСЯ ОТ ЛЮБОЙ ОТВЕТСТВЕННОСТИ В СЛУЧАЕ ПОЛУЧЕНИЯ ТРАВМЫ В РЕЗУЛЬТАТЕ НАЖИМАНИЯ НА ПЕДАЛИ НЕОБУТЫМИ НОГАМИ. Предупреждение — опасность защемления педальным блоком во время игры...
- Page 202 АВТОМАТИЧЕСКАЯ КАЛИБРОВКА ПЕДАЛЕЙ ВАЖНО! - Во избежание проблем с калибровкой ни в коем случае не подключайте и не отключайте педальный блок от базы руля, пока рулевая система подключена к консоли PS3™ или PS4™, а также во время игры. = Педальный блок следует подключать к рулевой системе, прежде чем она будет подключена к...
- Page 203 РЕГУЛИРОВКА ПЕДАЛЬНОГО БЛОКА Конструкция педалей: - металлическая площадка педали (8) с несколькими отверстиями (9 отверстий на педали газа, 6 — на педали тормоза, 6 — на педали сцепления); - пластиковая прокладка для площадки (7) (крепится между площадкой и рычагом) с четырьмя...
- Page 204 Регулировка РАССТОЯНИЯ между тремя педалями - С помощью входящего в комплект шестигранного ключа 2,5 мм (4) открутите 2 винта, удерживающих металлическую площадку (8) и прокладку (7). - Выберите нужное положение педали (слева, по центру или справа) и заново закрутите винты для жесткой фиксации металлической площадки (8) и прокладки (7). Примеры...
- Page 205 Установка конусообразного стопора (конфигурация CONICAL RUBBER BRAKE mod) Данная конфигурация (mod) необязательна, поэтому стопор по умолчанию не установлен. Это означает, что педаль тормоза превосходно работает и без установленного стопора mod. Стопор mod позволяет добиться новых ощущений и сопротивления при торможении. Пользователь...
- Page 206 - Закрепите модуль с помощью шестигранного ключа 2,5 мм (4), вкрутив крепежный винт (3) в небольшое резьбовое отверстие на нижней стороне педального блока. Модуль CONICAL RUBBER BRAKE mod установлен! Регулировка ШАГА педали тормоза и СИЛЫ сопротивления Слегка ослабив гайку (5) и сдвинув конусообразный стопор (2) к задней части рычага педали, можно...
- Page 207 Корпорация Guillemot Corporation S.A., зарегистрированная по адресу Place du Granier, B.P. 97143, 35571 Chantepie, Франция, (далее — «Guillemot») гарантирует своим клиентам во всем мире, что в данном изделии Thrustmaster не будет выявлено никаких дефектов материалов и производства в течение гарантийного периода, который равен сроку предъявления претензии по соответствию для данного...
- Page 208 Дополнительные условия гарантии В течение гарантийного срока компания Guillemot, в общем и целом, не предоставляет никаких запасных частей, так как вскрытие и/или модификацию любых изделий Thrustmaster вправе осуществлять только служба технической поддержки (за исключением каких-либо процедур по модификации, которые служба технической поддержки может предложить выполнить клиенту путем...
-
Page 209: Авторские Права
АВТОРСКИЕ ПРАВА © Корпорация 2015 Guillemot Corporation S.A. Все права защищены. Thrustmaster® является зарегистрированным товарным знаком корпорации Guillemot Corporation S.A. Лицензия для продажи в Европе, Африке, на Ближнем Востоке, в России, Индии и Океании. Для исключительного использования с PlayStation 3 и PlayStation ®... - Page 210 Εγχειρίδιο χρήσης ΠΡΟΕΙΔΟΠΟΙΗΣΗ: Για να βεβαιωθείτε ότι η τιμονιέρα T300 λειτουργεί σωστά με κάθε παιχνίδι, ίσως χρειαστεί να εγκαταστήσετε τις αυτόματες ενημερώσεις του κάθε παιχνιδιού (είναι διαθέσιμα όταν το σύστημα παιχνιδιών είναι συνδεδεμένη στο Internet). 1/26...
-
Page 211: Τεχνικα Χαρακτηριστικα
ΤΕΧΝΙΚΑ ΧΑΡΑΚΤΗΡΙΣΤΙΚΑ 1 Βάση T300 RS 7 Κουμπιά SELECT/START στο PS3™ και 2 Τιμόνι Ferrari 599XX EVO SHARE/OPTIONS στο PS4™ 3 2 μοχλοί αλλαγής ταχυτήτων σειριακής 8 Κουμπί PS διάταξης (Up & Down) 9 Οπή μεγάλου σπειρώματος (για σύστημα 4 Σταυρός κατευθύνσεων πολλών κατευθύνσεων... -
Page 212: Συνδεση Τησ Τιμονιερασ Στο Ρευμα: Διαβαστε Πριν Συνεχισετε
ΣΥΝΔΕΣΗ ΤΗΣ ΤΙΜΟΝΙΕΡΑΣ ΣΤΟ ΡΕΥΜΑ: ΔΙΑΒΑΣΤΕ ΠΡΙΝ ΣΥΝΕΧΙΣΕΤΕ! Η υποδοχή τροφοδοσίας της τιμονιέρας ποικίλλει ανάλογα με τη χώρα από την οποία αγοράσατε τη συσκευή σας. Η υποδοχή τροφοδοσίας μπορεί να είναι: Εσωτερική, με τα εξής: * μια μονάδα τροφοδοσίας ρεύματος τοποθετημένη απευθείας στο εσωτερικό της βάσης της τιμονιέρας, με... - Page 213 * Μην καλύπτετε τη βάση. * Μην αφήνετε να συσσωρευτεί σκόνη επάνω στους αεραγωγούς. Για λόγους ασφάλειας, ποτέ μην χρησιμοποιείτε το σετ των πεντάλ ξυπόλητοι ή φορώντας μόνο κάλτσες. Η THRUSTMASTER ΑΠΟΠΟΙΕΙΤΑΙ ΟΠΟΙΑΣΔΗΠΟΤΕ ΕΥΘΥΝΗΣ ® ΣΕ ΠΕΡΙΠΤΩΣΗ ΤΡΑΥΜΑΤΙΣΜΟΥ ΠΟΥ ΠΡΟΚΑΛΕΙΤΑΙ ΑΠΟ ΤΗ...
- Page 214 Προειδοποίηση – Τραυματισμοί λόγω τεχνολογίας Force Feedback και επαναλαμβανόμενων κινήσεων (συνέχεια) * Αν τα συμπτώματα ή ο πόνος που αναφέρθηκαν παραπάνω επιμένουν όταν αρχίσετε ξανά το παιχνίδι, σταματήστε να παίζετε και επισκεφτείτε τον ιατρό σας. * Κρατήστε το προϊόν μακριά από παιδιά. * Κατά...
- Page 215 στον ιστότοπο http://ts.thrustmaster.com. Στην ενότητα Updates and Downloads, κάντε κλικ στις επιλογές PlayStation / Wheels / T300 RS, έπειτα επιλέξτε Driver/Firmware και ακολουθήστε τις οδηγίες που περιγράφουν τη διαδικασία λήψης και εγκατάστασης. Σημαντική σημείωση: Σε PC, ο διακόπτης επιλογέα USB (5) στη βάση της τιμονιέρας πρέπει να είναι πάντα...
- Page 216 Υποδοχή βάσης (1): Βέλος με κατεύθυνση προς τα πάνω Υποδοχή τιμονιού (2): Βέλος με κατεύθυνση προς τα πάνω Αφού τοποθετήσετε σωστά τις υποδοχές, απλώς περιστρέψτε τον δακτύλιο της συσκευής Thrustmaster Quick Release (12) αριστερόστροφα, ενώ κρατάτε το τιμόνι (2) στη θέση του.
- Page 217 ΠΡΟΣΑΡΤΗΣΗ ΤΙΜΟΝΙΕΡΑΣ Τοποθέτηση τιμονιέρας σε τραπέζι ή γραφείο 1. Τοποθετήστε την τιμονιέρα σε τραπέζι ή οποιαδήποτε άλλη οριζόντια, επίπεδη και σταθερή επιφάνεια. 2. Εισάγετε τη βίδα σύσφιξης (11) στο σύστημα προσάρτησης (10), μετά σφίξτε τη συσκευή στρέφοντας τη βίδα σύσφιξης αριστερόστροφα, ώστε να στερεωθεί στην οπή του μεγάλου σπειρώματος...
- Page 218 ΠΡΟΣΑΡΤΗΣΗ/ΑΦΑΙ ΚΑΤΕΥΘΥΝΣΗ ΡΕΣΗ Για να σφίξετε: Στρέψτε τη βίδα αριστερόστροφα Για ελευθέρωση: Στρέψτε τη βίδα δεξιόστροφα 9/26...
- Page 219 Προσάρτηση της βάσης του τιμονιού σε θέση οδηγού 1. Τοποθετήστε τη βάση του τιμονιού στην προεξοχή της θέσης του οδηγού. 2. Καθοδηγήστε τις δύο βίδες M6 (δεν περιλαμβάνονται) μέσω της προεξοχής της θέσης του οδηγού, και στη συνέχεια, τοποθετήστε τις στις δύο μικρές οπές από τα σπειρώματα που βρίσκονται...
- Page 220 * Μην ξεχνάτε να πατήσετε το κουμπί PS της τιμονιέρας (8) για να μπορέσετε να χρησιμοποιήσετε το τιμόνι. * Το τιμόνι αναγνωρίζεται από τα περισσότερα παιχνίδια ως τιμόνι T300 RS. * Το τιμόνι είναι λειτουργικό σε συμβατά παιχνίδια και σε μενού από κονσόλες.
-
Page 221: Ρυθμιση Τησ Τιμονιερασ Για Pc
4. Επιλέξτε Start (Έναρξη)/All Programs (Όλα τα προγράμματα)/Thrustmaster/FFB Racing Wheel (Τιμονιέρα FFB)/Control Panel (Πίνακας ελέγχου). Το παράθυρο διαλόγου για τους Ελεγκτές παιχνιδιού εμφανίζει το όνομα της τιμονιέρας T300 RS Racing Wheel με την ένδειξη OK. 5. Κάντε κλικ στην επιλογή Properties (ιδιότητες) για να διαμορφώσετε το τιμόνι σας στον πίνακα... - Page 222 ΑΝΤΙΣΤΟΙΧΙΣΗ ΣΕ PC 13/26...
-
Page 223: Αυτοματη Βαθμονομηση Τιμονιου Και Σετ Πενταλ
ΑΥΤΟΜΑΤΗ ΒΑΘΜΟΝΟΜΗΣΗ ΤΙΜΟΝΙΟΥ ΚΑΙ ΣΕΤ ΠΕΝΤΑΛ Η βαθμονόμηση της τιμονιέρας πραγματοποιείται αυτόματα όταν συνδέετε την τιμονιέρα στο ρεύμα και την υποδοχή USB της τιμονιέρας στην κονσόλα. Στη διάρκεια αυτής της φάσης, το τιμόνι θα περιστρέφεται γρήγορα προς αριστερά και δεξιά, καλύπτοντας... - Page 224 ΚΟΥΜΠΙ MODE ΚΑΙ ΛΥΧΝΙΑ ΕΝΔΕΙΞΗΣ (6) Κουμπί MODE για το σετ των πεντάλ Η τιμονιέρα T300 είναι συμβατή με το σετ των πεντάλ της Thrustmaster που διαθέτει 3 πεντάλ. Αυτά σας παρέχουν τη δυνατότητα να πραγματοποιείτε ηλεκτρονική εναλλαγή στο πεντάλ του...
- Page 225 16/26...
- Page 226 ΤΕΧΝΙΚΑ ΧΑΡΑΚΤΗΡΙΣΤΙΚΑ 1 Μεταλλικό στήριγμα για κωνικό στοπ 4 Κλειδί άλεν 2,5 χιλ. (περιλαμβάνεται) 5 Παξιμάδι στερέωσης θέσης για κωνικό στοπ (δεν εγκαθίσταται από προεπιλογή) 2 Κωνικό στοπ 3 Βίδα στερέωσης για μεταλλικό στήριγμα 6 Βραχίονας πεντάλ 8 Μεταλλική κεφαλή πεντάλ 7 Στήριγμα...
- Page 227 Πριν χρησιμοποιήσετε αυτό το προϊόν, πρέπει να διαβάσετε προσεκτικά αυτές τις οδηγίες και να τις φυλάξετε για μελλοντική χρήση. Για λόγους ασφαλείας, ποτέ μην χρησιμοποιείτε το σετ των πεντάλ ξυπόλητοι ή ενώ φοράτε μόνο κάλτσες. Η THRUSTMASTER ΑΠΟΠΟΙΕΙΤΑΙ ΟΠΟΙΑΣΔΗΠΟΤΕ ΕΥΘΥΝΗ ΣΕ ® ΠΕΡΙΠΤΩΣΗ ΤΡΑΥΜΑΤΙΣΜΟΥ ΠΟΥ ΠΡΟΚΑΛΕΙΤΑΙ ΑΠΟ ΤΗ ΧΡΗΣΗ ΤΟΥ ΣΕΤ...
- Page 228 ΑΥΤΟΜΑΤΗ ΒΑΘΜΟΝΟΜΗΣΗ ΠΕΝΤΑΛ ΣΗΜΑΝΤΙΚΟ: - Πότε μην συνδέετε ή αποσυνδέετε το σετ των πεντάλ από τη βάση του τιμονιού όταν το τιμόνι είναι συνδεδεμένο στην κονσόλα PS3™ ή PS4™, ή κατά τη διάρκεια του παιχνιδιού για να αποτρέψετε προβλήματα βαθμονόμησης. = Πάντα...
- Page 229 ΡΥΘΜΙΣΗ ΤΟΥ ΣΕΤ ΤΩΝ ΠΕΝΤΑΛ Καθένα από τα τρία πεντάλ διαθέτει: - Μια μεταλλική κεφαλή (8) με πολλές οπές (εννιά για το γκάζι – έξι για το φρένο – έξι για τον συμπλέκτη). - Μια πλαστική κεφαλή στήριξης (7) (ανάμεσα στην κεφαλή και στον βραχίονα) με 4 οπές. - Έναν...
- Page 230 Ρύθμιση της ΑΠΟΣΤΑΣΗΣ των τριών πεντάλ - Χρησιμοποιήστε το κλειδί άλεν των 2,5 χιλ. που παρέχεται (4) ξεβιδώστε τις δύο βίδες κρατώντας τη μεταλλική κεφαλή (8) και το στήριγμά της (7) στη σωστή θέση. - Επιλέξτε τη θέση που προτιμάτε (προς τα αριστερά, στο κέντρο ή προς τα δεξιά), μετά επανατοποθετήστε...
- Page 231 Η εγκατάσταση του κωνικού στοπ (“CONICAL RUBBER BRAKE” mod) Αυτή η τροποποίηση (ή “mod”) δεν είναι ουσιαστικής σημασίας και δεν εγκαθίσταται από προεπιλογή. Αυτό σημαίνει ότι το πεντάλ του φρένου λειτουργεί τέλεια ακόμη κι αν το mod δεν έχει εγκατασταθεί. Αυτό...
- Page 232 - Με ένα κλειδί άλεν 2,5 χιλ. (4), προσαρτήστε τη μονάδα χρησιμοποιώντας μια βίδα στερέωσης (3) και τη μικρή κεντρική βίδα με κεφαλή που βρίσκεται στο σετ των πεντάλ. Τώρα το “CONICAL RUBBER BRAKE” mod έχει εγκατασταθεί! Ρύθμιση του ΕΥΡΟΥΣ της διαδρομής του πεντάλ του φρένου και την ΙΣΧΥ της αντίστασης...
- Page 233 Granier, B.P. 97143, 35571 Chantepie, France (Γαλλία) (εφεξής “Guillemot”) εγγυάται στον καταναλωτή ότι το προϊόν της Thrustmaster δεν παρουσιάζει ελάττωμα στο υλικό ούτε κατασκευαστικές ατέλειες για το χρονικό διάστημα της εγγύησης, το οποίο αντιστοιχεί στο χρονικό όριο για άσκηση αγωγής για...
- Page 234 εμπορικών μυστικών, η Guillemot δεν θα παρέχει, κατά βάση, καμία ειδοποίηση περί μετασκευής ή ανταλλακτικών για κανένα προϊόν της Thrustmaster του οποίου η περίοδος εγγύησης έχει λήξει. Στις Η.Π.Α. και τον Καναδά, η παρούσα εγγύηση περιορίζεται στον εσωτερικό μηχανισμό και το...
-
Page 235: Πνευματικα Δικαιωματα
ΠΝΕΥΜΑΤΙΚΑ ΔΙΚΑΙΩΜΑΤΑ © 2015 Guillemot Corporation S.A. Με την επιφύλαξη παντός δικαιώματος. Η ονομασία Thrustmaster® είναι εμπορικό σήμα κατατεθέν της Guillemot Corporation S.A. Με άδεια πώλησης σε Ευρώπη, Αφρική, Μέση Ανατολή, Ρωσία, Ινδία και Ωκεανία. Για χρήση μόνο με PlayStation 3 και... - Page 236 Kullanma Kılavuzu UYARI: T300 yarış direksiyonunuzun oyunlarla düzgün çalışmasını sağlamak için, oyunların otomatik güncellemelerini yüklemeniz gerekebilir (sisteminiz İnternete bağlıyken yapılabilir). 1/26...
-
Page 237: Teknik Özellikler
TEKNİK ÖZELLİKLER 1 T300 RS tabanı 7 PS3™'de SELECT/START düğmeleri 2 Ferrari 599XX EVO direksiyon ve PS4™'te SHARE/OPTIONS 3 2 direksiyondan kumandalı sıralı vites (Up ve düğmeleri Down) 8 PS düğmesi 4 Çok yönlü D-Ped 9 Büyük dişli delik (montaj sistemi ve 5 Dahili PS4™/PS3™... -
Page 238: Yariş Di̇reksi̇yonunun Elektri̇k Pri̇zi̇ne Takilmasi: Lütfen Devam Etmeden Önce Okuyun
YARIŞ DİREKSİYONUNUN ELEKTRİK PRİZİNE TAKILMASI: LÜTFEN DEVAM ETMEDEN ÖNCE OKUYUN! Yarış direksiyonunuzun güç beslemesi cihazınızı aldığınız ülkeye göre değişir. Güç kaynağı şunlardan biri olabilir: Dahili: * Doğrudan yarış direksiyonu tabanının içine yerleştirilmiş, tip A konektörlü güç besleme birimi. * 220-240 V elektrik kablosu. = sadece 220-240 V elektrik şebekesi ile uyumlu. - Page 239 * Havalandırma deliklerinin üzerinde toz birikmesine izin vermeyin. Güvenlik nedeniyle pedal setini asla çıplak ayaklarla veya ayağınıza sadece çorap giyerek oynamayın. THRUSTMASTER® PEDAL SETİNİN AYAKKABISIZ KULLANILMASINDAN KAYNAKLANAN YARALANMALARDA HİÇBİR SORUMLULUK KABUL ETMEZ. Uyarı - Force Feedback ve tekrarlanan hareketlerden dolayı yaralanma Force Feedback direksiyonla oynamak kas veya eklem ağrısına neden olabilir.
- Page 240 Uyarı - Force Feedback ve tekrarlanan hareketlerden dolayı yaralanma (devamı) * Yeniden oynamaya başladığınızda yukarıda belirtilen semptomlar veya ağrı tekrar ederse oynamayı kesin ve bir doktora başvurun. * Çocukların ulaşabileceği yerlerden uzak tutun. * Oyun oynarken kollarınızı, tamamen gitmesine izin vermeden daima yarış direksiyonunun üzerinde doğru konumlandırılmış...
- Page 241 Yarış direksiyonunuzun halihazırda kullandığı donanım yazılımı sürümünü görmek ve gerektiğinde güncellemek için: PC'de http://ts.thrustmaster.com adresine gidin. Updates and Downloads kısmında PlayStation / Wheels / T300 RS seçeneklerine tıklayın, ardından Driver/Firmware ® seçeneğini seçerek indirme ve kurulum işlemini anlatan talimatları izleyin.
- Page 242 Ardından bileziği mümkün olduğu kadar sıkın: Bunu yapmak için bileziği yerinde tutarak yarış direksiyonunu saat yönünde döndürün. Yarış direksiyonunu taktıktan sonra Thrustmaster Quick Release (12) aygıtının bileziği üzerinde bulunan küçük montaj vidasına ulaşmak için direksiyonu 180° (direksiyona bakarken Ferrari® logosu baş aşağı...
- Page 243 YARIŞ DİREKSİYONUNUN MONTE EDİLMESİ Yarış direksiyonunun bir sehpa veya masaya monte edilmesi 1. Yarış direksiyonunu bir masa veya yatay, düz ve sağlam bir yüzeye yerleştirin. 2. Bağlantı vidasını (11) montaj sistemine takın (10) ve direksiyon tamamen sabitlenene dek bağlantı vidasını saatin aksi yönünde sıkarak, yarış direksiyonunu altındaki büyük dişli deliğe (9) geçirin.
- Page 244 MONTE ETME / YÖN SÖKME Sıkmak için: Vidayı saatin aksi yönünde çevirin Gevşetmek için: Vidayı saat yönünde çevirin 9/26...
- Page 245 Yarış direksiyonu tabanını kokpite monte etme 1. Yarış direksiyonu tabanını kokpit rafına yerleştirin. 2. İki adet M6 vidayı (ürünle verilmez) kokpit rafından geçirin ve yarış direksiyonunun altında bulunan iki küçük vida deliğine takın. Önemli: İki M6 vidanın boyu raf kalınlığı + 12 mm'yi geçmemelidir; daha uzun vidalar yarış direksiyonu tabanında bulunan dahili bileşenlere zarar verebilirler.
- Page 246 4’de, USB seçim düğmesi (5) PS4™ konumundayken: ® * Direksiyonu kullanabilmek için yarış direksiyonunun PS düğmesine (8) basmayı unutmayın. * Direksiyon çoğu oyunda T300 RS direksiyon şeklinde tanınır. * Direksiyon uyumlu oyunlarda ve konsol menülerinde çalışır. * “SHARE” ve “PS” fonksiyonu direksiyonda çalışır.
-
Page 247: Pc İçi̇n Yariş Di̇reksi̇yonu Kurulumu
3. Kurulum tamamlandığında Finish düğmesine tıklayın ve bilgisayarınızı yeniden başlatın. 4. Başlat / Tüm Programlar / Thrustmaster / FFB Racing Wheel / Control Panel’i seçerek Oyun Kumandaları penceresini açın. Oyun Kumandaları penceresi, yarış direksiyonunun adını (T300 RS Racing Wheel) Tamam durumunda gösterir. - Page 248 PC EŞLEŞTİRMESİ 13/26...
- Page 249 OTOMATİK YARIŞ DİREKSİYONU VE PEDAL SETİ KALİBRASYONU Yarış direksiyonunu elektrik prizine ve yarış direksiyonunun USB konektörünü konsola bağladığınızda yarış direksiyonu kendini otomatik olarak kalibre eder. Bu aşamada yarış direksiyonu, 900 derecelik bir açıyı kaplayıp merkezde durmadan önce sola ve sağa doğru hızlı...
- Page 250 MOD DÜĞMESİ VE GÖSTERGE LAMBASI (6) Pedal seti MOD düğmesi T300 Yarış Direksiyonu, Thrustmaster'ın 3 pedal içeren pedal setleriyle de uyumludur; bunlar, gaz ve debriyaj pedallarını elektronik olarak değiştirmenizi sağlar. Bunu yapmak için MOD düğmesine (6) 2 saniye süreyle basın.
- Page 251 16/26...
- Page 252 TEKNİK ÖZELLİKLER 1 Konik durdurucu için metal destek 4 2,5 mm Allen anahtarı (dahil) 5 Konik durdurucu için pozisyon ayar somunu (varsayılan olarak takılı değildir) 2 Konik durdurucu 3 Metal durdurucu montaj vidası 6 Pedal kolu 8 Metal pedal başlığı 7 Plastik başlık desteği 17/26...
- Page 253 üzere saklayın. Güvenlik nedeniyle pedal setini asla çıplak ayaklarla veya ayağınıza sadece çorap giyerek oynamayın. THRUSTMASTER® PEDAL SETİNİN AYAKKABISIZ KULLANILMASINDAN KAYNAKLANAN YARALANMALARDA HİÇBİR SORUMLULUK KABUL ETMEZ. Uyarı - Oyun oturumları sırasında pedal seti sıkıştırma tehlikesi * Pedal setini çocukların ulaşabileceği yerlerden uzak tutun.
- Page 254 OTOMATİK PEDAL KALİBRASYONU ÖNEMLİ: - Kalibrasyon sorunlarını önlemek amacıyla direksiyon konsola PS3™ veya PS4™'ye bağlıyken veya oyun oturumları sırasında pedal setini asla direksiyonun tabanına bağlamayın veya tabanından ayırmayın. = Pedal setini direksiyona daima direksiyonu konsola PS3™ veya PS4™'ye bağlamadan önce bağlayın.
- Page 255 PEDAL SETİNİN AYARLANMASI Üç pedal setinin her biri şunları içerir: - Çok delikli (gaz pedalında dokuz - fren pedalında altı - debriyajda altı) metal başlık (8). - Dört delikli plastik başlık desteği (7) (başlık ile kol arasına yerleştirilir). - İki delikli pedal kolu (6). DİKKAT: Kalibrasyon sorunlarını...
- Page 256 Üç pedal arasındaki BOŞLUĞUN ayarlanması - Ürünle verilen 2,5 mm Allen anahtarını (4) kullanarak metal başlık (8) ile desteğini (7) sabitleyen iki vidayı sökün. - İstediğiniz pozisyonu (sola, ortaya veya sağa) seçerek metal başlık (8) ile desteğini (7) yerleştirerek sıkıca sabitleyecek şekilde vidaları sıkın. Fren pedalını...
- Page 257 Konik durdurucunun monte edilmesi (“CONICAL RUBBER BRAKE” mod) Bu modifikasyon (veya "mod") zorunlu değildir ve varsayılan olarak monte edilmez. Yani mod monteli olmasa bile fren pedalı mükemmel çalışır. Bu mod frenleme sırasında farklı bir his ve direnç yaşamanızı sağlar. Tercihinize göre monte etmek veya etmemek size kalmıştır. - Konik durdurucuyu (2) metal desteğine (1) vidalayın.
- Page 258 - Ürünle verilen 2,5 mm Allen anahtarını (4) kullanarak üniteyi montaj vidası (3) ve pedal setinin alt kısmında bulunan küçük merkezi vida deliğini kullanarak monte edin. “CONICAL RUBBER BRAKE” mod şimdi monteli! Fren pedalının hareket ARALIĞININ ve direnç KUVVETİNİN ayarlanması Somunu (5) hafif gevşetip konik durdurucuyu (2) pedal kolunun arka kısmına yaklaştırarak fren pedalının direncini daha da kuvvetlendirebilirsiniz (gerekirse somunu yeniden sıkmak ve seçili pozisyonu korumak için 14 mm anahtar veya pense kullanın).
-
Page 259: Tüketi̇ci̇ Garanti̇ Bi̇lgi̇si̇
ürününün satın alındığı tarihte müşterinin ikamet ettiği ülkede geçerli yasalara uygun şekilde, müşterinin kusurlu ürünün ücretinin iade edilmesi veya değiştirilmesi talebinde bulunabileceği süreye karşılık gelir (İlgili ülkede bu tür bir düzenleme mevcut değilse garanti süresi Thrustmaster ürününün satın alındığı asıl tarihten itibaren bir (1) yıl olacaktır). -
Page 260: Teknik Destek
– örneğin onarım işleminin basit olmasından ve gizlilik içermemesinden dolayı). İnovasyon döngülerini dikkate almak ve bilgi birikimi ile ticari sırlarını korumak için Guillemot, prensip olarak garanti süresi dolmuş hiç bir Thrustmaster ürünü için onarım bilgisi veya yedek parça sağlamayacaktır. Amerika Birleşik Devletleri ve Kanada'da bu garanti, ürünün dahili mekanizması ve harici gövdesi ile sınırlıdır. -
Page 261: Teli̇f Hakki
TELİF HAKKI © 2015 Guillemot Corporation S.A. Tüm hakları saklıdır. Thrustmaster® Guillemot Corporation S.A.’nın tescilli ticari markasıdır. Avrupa, Afrika, Orta Doğu, Rusya, Hindistan ve Okyanusya’da satılmak üzere lisanslıdır. Yalnızca PlayStation 3 ve PlayStation 4 ile kullanmak için. ® ® Ferrari® Ferrari Idea S.p.A.’nın tescilli ticari markasıdır. - Page 262 Instrukcja obsługi OSTRZEŻENIE: W celu zapewnienia prawidłowego działania kierownicy T300 w grach może być wymagane zainstalowanie automatycznych aktualizacji gier (dostępnych, gdy system ma połączenie z Internetem). 1/26...
- Page 263 ELEMENTY 1 Podstawa T300 RS 7 Przyciski SELECT/START na konsoli 2 Kierownica Ferrari 599XX EVO PS3™ i SHARE/OPTIONS na konsoli 3 2 łopatki sekwencyjnej zmiany biegów (Up i PS4™ Down) 8 Przycisk PS 4 Wielokierunkowy d-pad 9 Duży gwintowany otwór (na element 5 Wbudowany przełącznik suwakowy USB...
- Page 264 PODŁĄCZANIE KIEROWNICY GNIAZDA ELEKTRYCZNEGO: PRZECZYTAĆ PRZED WYKONANIEM DALSZYCH CZYNNOŚCI! Rodzaj zasilania kierownicy zależy od kraju jej zakupu. Możliwe rodzaje zasilania: Wewnętrzne: * zasilacz znajdujący się bezpośrednio w podstawie kierownicy i wyposażony w złącze typu A – * kabel zasilania do sieci 220 240 V –...
- Page 265 * Nie przykrywaj podstawy. * Nie dopuszczaj do gromadzenia się kurzu w odpowietrznikach. Ze względów bezpieczeństwa zestawu pedałów nie wolno używać w bosych stopach ani w samych skarpetach. FIRMA THRUSTMASTER NIE PONOSI ŻADNEJ ODPOWIEDZIALNOŚCI ® ZA EWENTUALNE OBRAŻENIA CIAŁA WYNIKŁE Z UŻYWANIA ZESTAWU PEDAŁÓW BEZ OBUWIA.
- Page 266 — Ostrzeżenie ryzyko obrażeń ciała spowodowanych siłowym sprzężeniem zwrotnym i powtarzającymi się ruchami (ciąg dalszy) * Jeśli po ponownym rozpoczęciu gry opisane powyżej objawy lub ból powrócą, przerwij grę i skonsultuj się z lekarzem. * Trzymaj kierownicę z dala od dzieci. * Podczas gry zawsze trzymaj obie dłonie we właściwym położeniu na kierownicy bez jej całkowitego puszczania.
- Page 267 Aby wyświetlić wersję oprogramowania sprzętowego, z której obecnie korzysta kierownica, i w razie potrzeby ją zaktualizować, na komputerze wejdź na stronę http://ts.thrustmaster.com. W sekcji Updates and Downloads kliknij PlayStation / Wheels / T300 RS, następnie wybierz ...
- Page 268 Złącze podstawy (1): strzałka skierowana w górę Złącze kierownicy (2): strzałka skierowana w górę Po prawidłowym ustawieniu złączy obróć pierścień mechanizmu Thrustmaster Quick Release (12) przeciwnie do ruchu wskazówek zegara, jednocześnie przytrzymując kierownicę (2). Następnie maksymalnie dokręć pierścień. W tym celu przytrzymaj pierścień i obracaj kierownicę zgodnie z ruchem wskazówek zegara.
- Page 269 MOCOWANIE KIEROWNICY Mocowanie kierownicy do stołu lub biurka 1. Połóż kierownicę na stole lub innej poziomej, płaskiej i stabilnej powierzchni. 2. Włóż śrubę mocującą (11) w element montażowy (10), a następnie zamocuj urządzenie, wkręcając śrubę przeciwnie do ruchu wskazówek zegara w duży gwintowany otwór (9) znajdujący się...
- Page 270 MOCOWANIE/ZDEJ KIERUNEK MOWANIE Dokręcanie: Obróć śrubę przeciwnie do ruchu wskazówek zegara Odkręcanie: Obróć śrubę zgodnie z ruchem wskazówek zegara 9/26...
- Page 271 Mocowanie podstawy kierownicy do kokpitu 1. Umieść podstawę kierownicy na półce kokpitu. 2. Wkręć dwie śruby M6 (do nabycia osobno) przez półkę kokpitu w dwa niewielkie gwintowane otwory znajdujące się pod kierownicą. Ważne: Długość dwóch śrub M6 nie może przekraczać grubości półki powiększonej o 12 mm. Dłuższe śruby mogą...
- Page 272 ® * Aby móc korzystać z kierownicy, naciśnij znajdujący się na niej przycisk PS (8). * W większości gier kierownica jest rozpoznawana jako model T300 RS. * Kierownica działa w zgodnych grach i w menu konsoli. * W kierownicy działają funkcje „SHARE” i „PS”.
-
Page 273: Konfigurowanie Kierownicy Pod Kątem Komputera Pc
3. Po zakończeniu instalacji kliknij Finish (Zakończ) i uruchom ponownie komputer. 4. Wybierz Start / All Programs / Thrustmaster / FFB Racing Wheel / Control Panel (Start / Wszystkie programy / Thrustmaster / FFB Racing Wheel / Panel sterowania), aby otworzyć okno Game Controllers (Kontrolery gier). - Page 274 MAPOWANIE NA KOMPUTERZE PC 13/26...
-
Page 275: Automatyczna Kalibracja Zestawu Pedałów
AUTOMATYCZNA KALIBRACJA KIEROWNICY I ZESTAWU PEDAŁÓW Kierownica kalibruje się automatycznie po jej podłączeniu do gniazda elektrycznego oraz podłączeniu złącza USB kierownicy do konsoli. Podczas tej operacji kierownica obraca się szybko w lewo i w prawo (łącznie o 900 stopni), a następnie zatrzymuje się... - Page 276 PRZYCISK I KONTROLKA MODE (6) Przycisk MODE do zestawu pedałów Kierownica T300 jest zgodna z zestawami pedałów Thrustmaster zawierającymi 3 pedały. Zestawy te umożliwiają elektroniczną zamianę pedałów przyspieszenia i sprzęgła. W tym celu należy nacisnąć przycisk MODE (6) i przytrzymać go przez 2 sekundy.
- Page 277 16/26...
- Page 278 ELEMENTY 1 Metalowa podpórka ogranicznika 4 Klucz imbusowy 2,5 mm (w komplecie) stożkowego 5 Nakrętka do regulacji położenia ogranicznika stożkowego (domyślnie niezainstalowana) 2 Ogranicznik stożkowy 3 Śrubka mocująca do metalowej podpórki 6 Ramię pedału 8 Metalowa stopka pedału 7 Plastikowa podpórka stopki 17/26...
- Page 279 Ze względów bezpieczeństwa zestawu pedałów nie wolno używać w bosych stopach ani samych skarpetach. FIRMA THRUSTMASTER® NIE PONOSI ŻADNEJ ODPOWIEDZIALNOŚCI ZA EWENTUALNE OBRAŻENIA CIAŁA WYNIKŁE Z UŻYWANIA ZESTAWU PEDAŁÓW BEZ OBUWIA. Ostrzeżenie — ryzyko przytrzaśnięcia przez pedały podczas gry * Trzymaj zestaw pedałów z dala od dzieci.
- Page 280 AUTOMATYCZNA KALIBRACJA PEDAŁÓW WAŻNE: – Zestawu pedałów nie wolno podłączać ani odłączać od podstawy kierownicy, gdy kierownica jest podłączona do konsoli PS3™ lub PS4™ albo w trakcie gry. Pozwala to uniknąć problemów z kalibracją. = Zestaw pedałów zawsze podłączaj do kierownicy przed jej podłączeniem do konsoli PS3™ lub PS4™.
- Page 281 REGULACJA ZESTAWU PEDAŁÓW Każdy z trzech pedałów zawiera: – metalową stopkę (8) z kilkoma otworami (dziewięcioma w pedale przyspieszenia, sześcioma w pedale hamulca i sześcioma w pedale sprzęgła), – plastikową podpórkę stopki (7) (umieszczaną między stopką a ramieniem) z czterema otworami, –...
- Page 282 Regulacja ODLEGŁOŚCI między trzema pedałami – Za pomocą dostarczonego klucza imbusowego 2,5 mm (4) wykręć dwie śruby przytrzymujące metalową stopkę (8) i jej podpórkę (7). – Wybierz preferowane położenie (lewe, środkowe lub prawe), a następnie włóż i wkręć śruby w celu solidnego zamocowania metalowej stopki (8) i jej podpórki (7).
- Page 283 Instalowanie ogranicznika stożkowego (modu „CONICAL RUBBER BRAKE”) Ten element (tzw. „mod”) nie jest niezbędny i nie jest instalowany fabrycznie. Oznacza to, że pedał hamulca działa znakomicie nawet bez instalowania modu. Dodatkowy mod powoduje inne odczucia i inny opór podczas hamowania. Ewentualną...
- Page 284 – Za pomocą dostarczonego klucza imbusowego 2,5 mm (4) zamocuj element, wkręcając śrubkę mocującą (3) w niewielki gwintowany otwór znajdujący się w środkowej części spodniej powierzchni zestawu pedałów. Mod „CONICAL RUBBER BRAKE” został zainstalowany! Regulacja ZAKRESU ruchu i SIŁY oporu pedału hamulca Przez nieznaczne odkręcenie nakrętki (5) można dodatkowo zwiększyć...
-
Page 285: Informacje Dotyczące Gwarancji Dla Klienta
W krajach Unii Europejskiej jest to okres dwóch (2) lat od dostarczenia produktu Thrustmaster. W innych krajach okres gwarancji jest równy limitowi czasu, w którym klient może występować z roszczeniami z tytułu wad produktu Thrustmaster zgodnie z przepisami obowiązującymi w kraju, w którym klient mieszkał... - Page 286 (w tym między innymi za szkody spowodowane bezpośrednio lub pośrednio przez jakiekolwiek oprogramowanie lub na skutek połączenia produktu Thrustmaster z nieodpowiednim elementem, w tym w szczególności z zasilaczem, akumulatorem, ładowarką lub jakimkolwiek innym elementem niedostarczonym przez firmę...
-
Page 287: Prawa Autorskie
PRAWA AUTORSKIE © 2015 Guillemot Corporation S.A. Wszelkie prawa zastrzeżone. Thrustmaster® jest zastrzeżonym znakiem towarowym firmy Guillemot Corporation S.A. Produkt licencjonowany do sprzedaży na terenie Europy, Afryki, Bliskiego Wschodu, Rosji, Indii i Oceanii. Do użytku wyłącznie z systemami PlayStation 3 i PlayStation ®... - Page 288 ﺩﻟﻳﻝ ﺍﻟﻣﺳﺗﺧﺩﻡ :ﺗﺣﺫﻳﺭ ﺗﻌﻣﻝ ﺑﺷﻛﻝ ﺻﺣﻳﺢ ﻟﻠﺗﺄﻛﺩ ﻣﻥ ﺃﻥ ﻋﺟﻠﺔ ﺍﻟﺳﺑﺎﻕ T300 ﻣﻊ ﺃﻟﻌﺎﺏ، ﻗﺩ ﻳ ُ ﻁﻠﺏ ﻣﻧﻙ ﺗﺛﺑﻳﺕ ﺍﻟﺗﺣﺩﻳﺛﺎﺕ ﺍﻟﺗﻠﻘﺎﺋﻳﺔ ﻟﻸﻟﻌﺎﺏ (ﻓﻲ ﺍﻷﻟﻌﺎﺏ ﺑﺎﻹﻧﺗﺭﻧﺕ ﺍﻟﻧﻅﺎﻡ )ﺗﺗﻭﻓﺭ ﻋﻧﺩ ﺗﻭﺻﻳﻝ...
- Page 289 ﻣﻔﺗﺎﺡ ﻣﻧﺯﻟﻕ ﻣﺿﻣﻥ ﺑﻁ ﺃﺩﺍﺓ ﺍﻟﺭ PS4™/PS3™ ﺑﺭﻏﻲ ﺗﺛﺑﻳﺕ ﻣﻌﺩﻧﻲ + ﻣﺅﺷﺭ ﺿﻭﺋﻲ ﺃﺣﻣﺭ/ﺃﺧﺿﺭ MODE ﺯﺭ ﻟﻌﺟﻠﺔ ﺍﻟﺳﺑﺎﻕ ﻛﺎﺑﻝ ﻭﻣﻭﺻﻝ Thrustmaster Quick Release ﺻﻧﺩﻭﻕ ﺍﻟﺗﺭﻭﺱ ﻣﻭﺻﻝ L3/R3 ﺃﺯﺭﺍﺭ ً ﻣﻧﻔﺻ ﻼ ﺻﻧﺩﻭﻕ ﺍﻟﺗﺭﻭﺱ ﻳﺑﺎﻉ ُ ) (()ﺍﻟﻧﻭﻉ )ﺃ( ﺃﻭ )ﺏ...
- Page 290 !ﻳﺭﺟﻰ ﺍﻟﻘﺭﺍءﺓ ﻗﺑﻝ ﺍﻟﻣﺗﺎﺑﻌﺔ :ﻋﺟﻠﺔ ﺍﻟﺳﺑﺎﻕ ﺑﻣﻘﺑﺱ ﻛﻬﺭﺑﺎﺋﻲ ﺗﻭﺻﻳﻝ .ﻳﺧﺗﻠﻑ ﻣﺻﺩﺭ ﻁﺎﻗﺔ ﻋﺟﻠﺔ ﺍﻟﺳﺑﺎﻕ ﺍﻟﺧﺎﺻﺔ ﺑﻙ ﻁﺑ ﻘ ً ﺎ ﻟﻠﺑﻠﺩ ﺍﻟﺗﻲ ﺍﺷﺗﺭﻳﺕ ﻣﻧﻬﺎ ﺟﻬﺎﺯﻙ :ﻳﻣﻛﻥ ﺃﻥ ﻳﻛﻭﻥ ﻣﺻﺩﺭ ﺍﻟﻁﺎﻗﺔ ﺍﻟﺭﺋﻳﺳﻲ :ﺩﺍﺧﻠﻲ، ﻣﻊ (ﻭﺣﺩﺓ ﻣﺻﺩﺭ ﻁﺎﻗﺔ ﺗﻭﺟﺩ ﻣﺑﺎﺷﺭ ﺓ ً ﻓﻲ ﻗﺎﻋﺩﺓ ﻋﺟﻠﺔ ﺍﻟﺳﺑﺎﻕ، ﺑﻣﻭﺻﻝ ﻣﻥ ﺍﻟﻧﻭﻉ )ﺃ .ﻓﻭﻟﺕ...
- Page 291 ﻷﺳﺑﺎﺏ ﺗﺗﻌﻠﻕ ﺑﺎﻟﺳﻼﻣﺔ، ﻻ ﺗﺳﺗﺧﺩﻡ ﻣﺟﻣﻭﻋﺔ ﺍﻟﺩﻭﺍﺳﺔ ﺑﻘﺩﻡ ﻋﺎﺭﻳﺔ .ﺭﺏ ﻓﻘﻁ ﺃﻭ ﺃﺛﻧﺎء ﺍﺭﺗﺩﺍء ﺟﻭﺍ ﺃﻱ ﻣﺳﺋﻭﻟﻳﺔ ﻓﻲ ﺣﺎﻟﺔ ﻭﻗﻭﻉ ﺇﺻﺎﺑﺎﺕ ﻧﺎﺗﺟﺔ ﻋﻥ ﺍﺳﺗﺧﺩﺍﻡ THRUSTMASTER ® ﻻ ﺗﺗﺣﻣﻝ .ﻣﺟﻣﻭﻋﺔ ﺍﻟﺩﻭﺍﺳﺔ ﺑﺩﻭﻥ ﺣﺫﺍء ﺍﻹﺻﺎﺑﺎﺕ ﺍﻟﻧﺎﺗﺟﺔ ﻋﻥ ﻗﻭﺓ ﺭﺩ ﺍﻟﻔﻌﻝ ﻭﺍﻟﺣﺭﻛﺎﺕ ﺍﻟﻣﺗﻛﺭﺭﺓ...
- Page 292 (ﺍﻟﻧﺎﺗﺟﺔ ﻋﻥ ﻗﻭﺓ ﺭﺩ ﺍﻟﻔﻌﻝ ﻭﺍﻟﺣﺭﻛﺎﺕ ﺍﻟﻣﺗﻛﺭﺭﺓ )ﻣﺗﺎﺑﻌﺔ ﺍﻹﺻﺎﺑﺎﺕ – ﺗﺣﺫﻳﺭ .ﺇﺫ ﺍﺳﺗﻣﺭﺕ ﺍﻷﻋﺭﺍﺽ ﺃﻭ ﺍﻷﻟﻡ ﺍﻟﻣﺷﺎﺭ ﺇﻟﻳﻪ ﺃﻋﻼﻩ ﻋﻧﺩ ﺑﺩء ﺍﻟﻠﻌﺏ ﻣﺭﺓ ﺃﺧﺭﻯ، ﻓﺗﻭﻗﻑ ﻋﻥ ﺍﻟﻠﻌﺏ ﻭﺍﺳﺗﺷﺭ ﻁﺑﻳﺑﻙ .ﺗﺣﻔﻅ ﺑﻌﻳﺩ ً ﺍ ﻋﻥ ﻣﺗﻧﺎﻭﻝ ﺃﻳﺩﻱ ﺍﻷﻁﻔﺎﻝ .ﺓ ﺩﻭﻥ ﺗﻣﺭﻳﺭﻫﺎ ﻣﻧﻬﺎ ﺑﺷﻛﻝ ﻛﺎﻣﻝ ﺃﺛﻧﺎء...
- Page 293 ﻳﻣﻛﻥ ﺗﺭﻗﻳﺔ ﺍﻟﺑﺭﻧﺎﻣﺞ ﺍﻟﺛﺎﺑﺕ ﺍﻟﻣﺿﻣﻥ ﻓﻲ ﻗﺎﻋﺩﺓ ﻋﺟﻠﺔ ﺍﻟﺳﺑﺎﻕ ﺍﻟﺧﺎﺻﺔ ،ﺍﻟﻛﻣﺑﻳﻭﺗﺭ ﻋﻠﻰ :ﻟﻌﺭﺽ ﺇﺻﺩﺍﺭ ﺍﻟﺑﺭﻧﺎﻣﺞ ﺍﻟﺛﺎﺑﺕ ﺍﻟﻣﻭﺟﻭﺩ ﻋﻠﻰ ﻋﺟﻠﺔ ﺍﻟﺳﺑﺎﻕ ﺍﻟﺧﺎﺻﺔ ﺑﻙ ﺣﺎﻟ ﻳ ًﺎ ﻭﺗﺣﺩﻳﺛﻪ ﺇﺫﺍ ﻟﺯﻡ ﺍﻷﻣﺭ Updates and downloa http://ts.thrustmaster.com ، ﺍﻧﻘﺭ ﻓﻭﻕ ﻓﻲ ﺍﻟﻘﺳﻡ ﺍﻧﺗﻘﻝ ﺇﻟﻰ T300RS / Wheels / PlayStation ﻭﺍﺗﺑﻊ...
- Page 294 :ﻗﻡ ﺑﻣﺣﺎﺫﺍﺓ ﻣﻭﺍﻗﻊ ﺍﻟﻣﻭﺻﻝ ﺑﺎﺳﺗﺧﺩﺍﻡ ﺍﻷﺳﻬﻡ ﺳﻬﻡ ﻳﺷﻳﺭ ﻷﻋﻠﻰ ﻣﻭﺻﻝ ﺍﻟﻘﺎﻋﺩﺓ ﻣﻭﺻﻝ ﻋﺟﻠﺔ ﺍﻟﺳﺑﺎﻕ ﺳﻬﻡ ﻳﺷﻳﺭ ﻷﻋﻠﻰ Thrustmaster Quick Release (12) ﻋﻛﺱ ﺑﻣﺟﺭﺩ ﺗﺣﺩﻳﺩ ﻣﻭﺿﻊ ﺍﻟﻣﻭﺻﻼﺕ ﺑﻧﺟﺎﺡ، ﻗﻡ ﺑﺗﺩﻭﻳﺭ ﺣﻠﻘﺔ ﺍﻟﺟﻬﺎﺯ .ﻓﻲ ﻣﻭﺿﻌﻬﺎ ﺍﺗﺟﺎﻩ ﻋﻘﺎﺭﺏ ﺍﻟﺳﺎﻋﺔ، ﻣﻊ ﺗﺛﺑﻳﺕ ﻋﺟﻠﺔ ﺍﻟﺳﺑﺎﻕ...
- Page 295 ﺗﺭﻛﻳﺏ ﻋﺟﻠﺔ ﺍﻟﺳﺑﺎﻕ ﺗﺭﻛﻳﺏ ﻋﺟﻠﺔ ﺍﻟﺳﺑﺎﻕ ﻋﻠﻰ ﻁﺎﻭﻟﺔ ﺃﻭ ﺳﻁﺢ ﻣﻛﺗﺏ .ﺿﻊ ﻋﺟﻠﺔ ﺍﻟﺳﺑﺎﻕ ﻋﻠﻰ ﻁﺎﻭﻟﺔ ﺃﻭ ﺃﻱ ﺳﻁﺢ ﺁﺧﺭ ﺃﻓﻘﻲ ﻭﻣﺳﺗﻭﻱ ﻭﻣﺗﺯﻥ ﺯ ﻋﻥ ﻁﺭﻳﻕ ﺗﺩﻭﻳﺭ ﺍﻟﺑﺭﻏﻲ ﻓﻲ ﻋﻛﺱ ﺍﺗﺟﺎﻩ ﺛﻡ ﻗﻡ ﺑﺈﺣﻛﺎﻡ ﺍﻟﺟﻬﺎ ﻓﻲ ﺃﺩﺍﺓ ﺍﻟﺭﺑﻁ ﺃﺩﺧﻝ ﺑﺭﻏﻲ ﺍﻟﺗﺛﺑﻳﺕ .ﺍﻟﻣﻭﺟﻭﺩ...
- Page 296 ﺍﻻﺗﺟﺎﻩ ﺍﻟﺗﺭﻛﻳﺏ/ ﺍﻹﺯﺍﻟﺔ ﻟﻠﺭﺑﻁ ﺗﺩﻭﻳﺭ ﺍﻟﺑﺭﻏﻲ ﻋﻛﺱ ﺍﺗﺟﺎﻩ ﻋﻘﺎﺭﺏ ﺍﻟﺳﺎﻋﺔ ﻟﻠﻔﻙ ﺗﺩﻭﻳﺭ ﺍﻟﺑﺭﻏﻲ ﻓﻲ ﺍﺗﺟﺎﻩ ﻋﻘﺎﺭﺏ ﺍﻟﺳﺎﻋﺔ...
- Page 297 ﻭﺭﺓ ﻲ ﻣﻘﺻ ﺗﺭﻛﻳﺏ ﻗﺎﻋﺩﺓ ﻋﺟﻠﺔ ﺍﻟﺳﺑﺎﻕ ﻓ .ﺿﻊ ﻗﺎﻋﺩﺓ ﻋﺟﻠﺔ ﺍﻟﺳﺑﺎﻕ ﻋﻠﻰ ﺭﻑ ﺍﻟﻣﻘﺻﻭﺭﺓ )ﻏﻳﺭ ﻣﺿﻣﻧﻳﻥ( ﻣﻥ ﺧﻼﻝ ﺭﻑ ﺍﻟﻣﻘﺻﻭﺭﺓ، ﺛﻡ ﺃﺩﺧﻠﻬﻡ ﻓﻲ ﺳﻧﻲ ﺍﻟﻠﻭﻟﺏ ﺍﻟﺻﻐﻳﺭﻳﻥ ﺍﻟﻣﻭﺟﻭﺩﻳﻥ ﺃﺩﺧﻝ ﺑﺭﻏﻳﻳﻥ ﺃﺳﻔﻝ ﻋﺟﻠﺔ ﺍﻟﺳﺑﺎﻕ ﻣﻡ؛ ﺣﻳﺙ ﻗﺩ ﻳﺅﺩﻱ ﺍﺳﺗﺧﺩﺍﻡ ﺑﺭﺍﻏﻲ ﺃﻁﻭﻝ ﺇﻟﻰ + ﺳﻣﻙ...
- Page 298 ﺗﺗﻭﻓﺭ ﻗﺎﺋﻣﺔ ﺑﺄﻟﻌﺎﺏ T300RS PlayStation PlayStation ® ® :( ﻭﻓ ﻘ ً ﺎ ﻟﻠﻌﺑﺔ ﺍﻟﺟﺎﺭﻱ ﺗﺷﻐﻳﻠﻬﺎ( ﻋﻠﻰ ﺍﻟﻣﻁﻠﻭﺏ ﻟﻣﻔﺗﺎﺡ ﻣﺣﺩﺩ ، )ﻓﻲ ﺍﻟﻘﺳﻡ Updates and Downloads http://ts.thrustmaster.com T300RS / Wheels / PlayStation ﺍﻧﻘﺭ ﻓﻭﻕ ® ﻳﺗﻡ ﺗﺣﺩﻳﺙ ﻫﺫﻩ ﺍﻟﻘﺎﺋﻣﺔ ﺑﺎﻧﺗﻅﺎﻡ...
- Page 299 .)ﺇﻧﻬﺎء( ﻭﻗﻡ ﺑﺈﻋﺎﺩﺓ ﺗﺷﻐﻳﻝ ﺍﻟﻛﻣﺑﻳﻭﺗﺭ ﺍﻟﺧﺎﺹ ﺑﻙ Finish ﻕ ﺑﻣﺟﺭﺩ ﺍﻛﺗﻣﺎﻝ ﺍﻟﺗﺛﺑﻳﺕ، ﺍﻧﻘﺭ ﻓﻭ )ﺍﻟﺑﺩء / ﻛﺎﻓﺔ Start / All Programs / Thrustmaster / FFB Racing Wheel / Control Panel ﺣﺩﺩ )ﻭﺣﺩﺍﺕ Game Controllers / ﻟﻭﺣﺔ ﺍﻟﺗﺣﻛﻡ( ﻟﻔﺗﺢ ﻧﺎﻓﺫﺓ FFB Racing Wheel Thrustmaster / ﺍﻟﺑﺭﺍﻣﺞ...
- Page 300 ﺗﺧﻁﻳﻁ ﺍﻟﻛﻣﺑﻳﻭﺗﺭ...
- Page 301 ﺍﻟﻣﻌﺎﻳﺭﺓ ﺍﻟﺗﻠﻘﺎﺋﻳﺔ ﻟﻌﺟﻠﺔ ﺍﻟﺳﺑﺎﻕ ﻭﻣﺟﻣﻭﻋﺔ ﺍﻟﺩﻭﺍﺳﺔ ﺗﻌﻣﻝ ﻋﺟﻠﺔ ﺍﻟﺳﺑﺎﻕ ﻋﻠﻰ ﺇﺟﺭﺍء ﻣﻌﺎﻳﺭﺓ ﺫﺍﺗﻳﺔ ﺗﻠﻘﺎﺋ ﻳ ً ﺎ ﻋﻧﺩ ﺗﻭﺻﻳﻝ ﻋﺟﻠﺔ ﺍﻟﺳﺑﺎﻕ ﺑﻣﺻﺩﺭ ﺍﻟﻁﺎﻗﺔ ﺍﻟﺭﺋﻳﺳﻳﺔ ﻭﻣﻭﺻﻝ .ﻟﻌﺟﻠﺔ ﺍﻟﺳﺑﺎﻕ ﺑﻭﺣﺩﺓ ﺍﻟﺗﺣﻛﻡ ﺩﺭﺟﺔ ﻗﺑﻝ ﺍﻟﺗﻭﻗﻑ ﻓﻲ ﺧﻼﻝ ﻫﺫﻩ ﺍﻟﻣﺭﺣﻠﺔ، ﺳﺗﺩﻭﺭ ﻋﺟﻠﺔ ﺍﻟﺳﺑﺎﻕ ﺑﺳﺭﻋﺔ ﺑﺎﺗﺟﺎﻩ ﺍﻟﻳﻣﻳﻥ ﻭﺍﻟﻳﺳﺎﺭ، ﻭﺗﻐﻁﻳﺔ ﺯﺍﻭﻳﺔ .ﺍﻟﻣﻧﺗﺻﻑ...
- Page 302 ﺯﺭ ﺩﻭﺍﺳﺎﺕ ؛ ﺣﻳﺙ ﻳﻣ ﻛ ّ ﻧﻙ ﺫﻟﻙ ﻣﻥ ﺍﻟﺗﻲ ﺗﻭﻓﺭ Thrustmaster ﺩﻭﺍﺳﺔ ﻣﺗﻭﺍﻓﻘﺔ ﻣﻊ ﻣﺟﻣﻭﻋﺔ T300 ﻛﻣﺎ ﺃﻥ ﻋﺟﻠﺔ ﺳﺑﺎﻕ .ﺍﻟﺗﺑﺩﻳﻝ ﺍﻹﻟﻛﺗﺭﻭﻧﻲ ﻟﺩﻭﺍﺳﺔ ﺍﻟﺳﺭﻋﺔ ﻭﺍﻟﻘﺎﺑﺽ MODE (6) .ﻟﻣﺩﺓ ﺛﺎﻧﻳﺗﻳﻥ ﻟﻠﻘﻳﺎﻡ ﺑﺫﻟﻙ، ﻣﺎ ﻋﻠﻳﻙ ﺇﻻ ﺍﻟﺿﻐﻁ ﻋﻠﻰ ﺍﻟﺯﺭ .ﺗﻌﻣﻝ ﺍﻟﺫﺍﻛﺭﺓ ﺍﻟﺩﺍﺧﻠﻳﺔ ﻟﻌﺟﻠﺔ ﺍﻟﺳﺑﺎﻕ ﻋﻠﻰ ﺗﺧﺯﻳﻥ ﻣﺎ ﺇﺫﺍ ﻛﺎﻥ ﻳﺗﻡ ﺍﻟﺗﺑﺩﻳﻝ ﺑﻳﻥ ﺍﻟﺩﻭﺍﺳﺎﺕ ﺃﻡ ﻻ...
- Page 304 ﺍﻟﻣﻳﺯﺍﺕ ﺍﻟﺗﻘﻧﻳﺔ (ﻣﻠﻡ ﻣﻔﺗﺎﺡ ﺃﻟﻥ )ﻣﺿﻣﻥ ﺩﺍﻋﻣﺔ ﻣﻌﺩﻧﻳﺔ ﻟﻠﻣﺳﻣﺎﺭ ﺫﻭ ﺍﻟﺭﺃﺱ ﺻﻣﻭﻟﺔ ﺿﺑﻁ ﺍﻟﻣﻛﺎﻥ ﻟﻠﻣﺳﻣﺎﺭ ﺫﻭ ﺍﻟﺭﺃﺱ ﺍﻟﻣﺧﺭﻭﻁﻳﺔ ()ﻏﻳﺭ ﻣﺛﺑﺕ ﻓﻲ ﺍﻟﻭﺿﻊ ﺍﻻﻓﺗﺭﺍﺿﻲ ﺍﻟﻣﺧﺭﻭﻁﻳﺔ ﻣﺳﻣﺎﺭ ﺫﻭ ﺭﺃﺱ ﻣﺧﺭﻭﻁﻳﺔ ﻣﺳﻣﺎﺭ ﻗﻼﻭﻭﻅ ﻟﺭﺑﻁ ﺍﻟﺩﺍﻋﻣﺔ ﺍﻟﻣﻌﺩﻧﻳﺔ ﺭﺃﺱ ﺍﻟﺩﻭﺍﺳﺔ ﺍﻟﻣﻌﺩﻧﻳﺔ ﺫﺭﺍﻉ ﺍﻟﺩﻭﺍﺳﺔ ﺭﺃﺱ ﺩﺍﻋﻣﺔ ﺑﻼﺳﺗﻳﻛﻳﺔ...
- Page 305 ﻫﺬﺍ ﺍﺳﺘﺨﺪﺍﻡ ﻗﺒﻞ ﻓﻘﻂ ﺍﺭﺏ ﺍﻟﺠﻮ ﺍﺭﺗﺪﺍء ﺃﺛﻨﺎء ﺃﻭ ﺍﻟﻘﺪﻣﻴﻦ ﺣﺎﻓﻲ ﺍﻟﺪﻭﺍﺳﺎﺕ ﻣﺠﻤﻮﻋﺔ ﺗﺴﺘﺨﺪﻡ ﻻ ﺑﺎﻟﺴﻼﻣﺔ ﺗﺘﻌﻠﻖ ﻷﺳﺒﺎﺏ ﻗﺪﻣﻴﻚ ﻓﻲ THRUSTMASTER® ﻣﺠﻤﻮﻋﺔ ﺍﺳﺘﺨﺪﺍﻡ ﻋﻦ ﻧﺎﺟﻤﺔ ﺇﺻﺎﺑﺔ ﺣﺪﻭﺙ ﺣﺎﻝ ﻓﻲ ﻣﺴﺆﻭﻟﻴﺘﻬﺎ ﺗﺨﻠﻲ ﺍﻷﺣﺬﻳﺔ ﺍﺭﺗﺪﺍء ﺩﻭﻥ ﺍﻟﺪﻭﺍﺳﺎﺕ – ﺍﻷﻟﻌﺎﺏ ﺟﻠﺴﺎﺕ ﺃﺛﻨﺎء ﺍﻟﺪﻭﺍﺳﺎﺕ...
- Page 306 ﻣﻌﺎﻳﺭﺓ ﺗﻠﻘﺎﺋﻳﺔ ﻟﻠﺩﻭﺍﺳﺎﺕ :ﻫﺎﻡ PS4™ PS3™ ﺃﻭ ﻻ ﺗﻭﺻﻝ ﻣﺟﻣﻭﻋﺔ ﺍﻟﺩﻭﺍﺳﺎﺕ ﺃﻭ ﺗﻔﺻﻠﻬﺎ ﻣﻥ ﻗﺎﻋﺩﺓ ﺍﻟﻌﺟﻠﺔ ﻋﻧﺩ ﺗﻭﺻﻳﻝ ﺍﻟﻌﺟﻠﺔ ﺇﻟﻰ ﻭﺣﺩﺓ ﺍﻟﺗﺣﻛﻡ .ﺃﻭ ﺃﺛﻧﺎء ﺟﻠﺳﺎﺕ ﺍﻷﻟﻌﺎﺏ ﻟﺗﺟﻧﺏ ﻣﺷﺎﻛﻝ ﺍﻟﻣﻌﺎﻳﺭﺓ PS4™ PS3™ ﺩﺍﺋ ﻣ ً ﺎ ﻭﺻﻝ ﻣﺟﻣﻭﻋ ﺃﻭ ﺔ ﺍﻟﺩﻭﺍﺳﺎﺕ ﺇﻟﻰ ﺍﻟﻌﺟﻠﺔ ﻗﺑﻝ ﺗﻭﺻﻳﻝ ﺍﻟﻌﺟﻠﺔ ﺇﻟﻰ ﻭﺣﺩﺓ ﺍﻟﺗﺣﻛﻡ .ﺑﻣﺟﺭﺩ...
- Page 307 ﺿﺑﻁ ﻣﺟﻣﻭﻋﺔ ﺍﻟﺩﻭﺍﺳﺎﺕ :ﻼﺙ ﺩﻭﺍﺳﺎﺕ ﻋﻠﻰ ﺗﺣﺗﻭﻱ ﻛﻝ ﻭﺍﺣﺩﺓ ﻣﻥ ﺍﻟﺛ .(ﻟﻠﻘﺎﺑﺽ – ﻟﻠﻣﻛﺑﺢ – ﻟﻠﻣﺳﺭﻉ ) ﺫﺍﺕ ﺛﻘﻭﺏ ﻣﺗﻌﺩﺩﺓ ﺭﺃﺱ ﻣﻌﺩﻧﻳﺔ .ﺛﻘﻭﺏ ( )ﺗﻭﺿﻊ ﻣﺎ ﺑﻳﻥ ﺍﻟﺭﺃﺱ ﻭﺍﻟﺫﺭﺍﻉ( ﺫﺍﺕ ) ﺭﺃﺱ ﺑﻼﺳﺗﻳﻛﻳﺔ ﺩﺍﻋﻣﺔ .( ﺫﻭ ﺛﻘﺑﻳﻥ ) ﺫﺭﺍﻉ ﺩﻭﺍﺳﺔ PS3™...
- Page 308 ﺗﻌﺩﻳﻝ ﺍﻟﻣﺳﺎﻓﺎﺕ ﺑﻳﻥ ﺍﻟﺩﻭﺍﺳﺎﺕ ﺍﻟﺛﻼﺛﺔ ( ﻓﻲ ﻣﻛﺎﻧﻬﺎ ) ( ﻭﺩﻋﺎﻣﺗﻬﺎ (، ﻓﻙ ﺍﻟﺑﺭﻏﻳﻳﻥ ﺍﻟﻣﺛﺑﺗﻳﻥ ﻟﻠﺭﺃﺱ ﺍﻟﻣﻌﺩﻧﻳﺔ ) ﻣﻡ ﺍﻟﻣﺿﻣﻥ ﺑﺎﺳﺗﺧﺩﺍﻡ ﻣﻔﺗﺎﺡ ﺃﻟﻥ ﺣﺩﺩ ﺍﻻﺭﺗﻔﺎﻉ ﺍﻟﻣﻔﺿﻝ ﻟﻙ )ﺇﻟﻰ ﺍﻟﻳﺳﺎﺭ ﺃﻭ ﺍﻟﻣﻧﺗﺻﻑ ﺃﻭ ﺍﻟﻳﻣﻳﻥ(، ﺛﻡ ﺍﺳﺗﺑﺩﻝ ﺍﻟﺑﺭﺍﻏﻲ ﻭﺃﻋﺩ ﺇﺣﻛﺎﻡ ﺭﺑﻁﻬﺎ ﺑﺣﻳﺙ ﺗﻛﻭﻥ .( ﻣﺛﺑﺗﺔ...
- Page 309 ("ﺗﺭﻛﻳﺏ ﺍﻟﻣﺳﻣﺎﺭ ﺫﻭ ﺍﻟﺭﺃﺱ ﺍﻟﻣﺧﺭﻭﻁﻳﺔ )ﺗﻌﺩﻳﻝ "ﺍﻟﻣﻛﺑﺢ ﺍﻟﻣﻁﺎﻁﻲ ﺍﻟﻣﺧﺭﻭﻁﻲ ﻣﻣﺎ ﻳﻌﻧﻲ ﺃﻥ ﻭﻅﺎﺋﻑ ﺩﻭﺍﺳﺔ ﺍﻟﻣﻛﺑﺢ ﺗﻌﻣﻝ ﺑﺷﻛﻝ .ﻻ ﻳﻌﺗﺑﺭ ﻫﺫﺍ ﺍﻟﺗﻌﺩﻳﻝ ﺿﺭﻭﺭ ﻳ ًﺎ ﻭﻻ ﻳﺗﻡ ﺗﺭﻛﻳﺑﻪ ﻓﻲ ﺑﺷﻛﻝ ﺍﻓﺗﺭﺍﺿﻲ .ﺭﻛﻳﺏ ﺍﻟﺗﻌﺩﻳﻝ ﻣﺛﺎﻟﻲ ﺣﺗﻰ ﻓﻲ ﺣﺎﻝ ﻋﺩﻡ ﺗ .ﻳﺗﻳﺢ ﻟﻙ ﻫﺫﺍ ﺍﻟﺗﻌﺩﻳﻝ ﺗﺟﺭﺑﺔ ﺇﺣﺳﺎﺱ ﻣﺧﺗﻠﻑ ﻭﻣﻘﺎﻭﻣﺔ ﻋﻧﺩ ﺍﻟﻛﺑﺢ .ﻭﻳﺭﺟﻊ...
- Page 310 ( ﻭﺍﻟﺳﻥ ﺍﻟﻠﻭﻟﺑﻲ ﺍﻟﺻﻐﻳﺭ ﺍﻟﻣﺭﻛﺯﻱ ) (، ﺍﺭﺑﻁ ﺍﻟﻭﺣﺩﺓ ﺑﺎﺳﺗﺧﺩﺍﻡ ﺑﺭﻏﻲ ﺍﻟﺭﺑﻁ ) ﻣﻠﻡ ﺑﺎﺳﺗﺧﺩﺍﻡ ﻣﻔﺗﺎﺡ ﺃﻟﻥ .ﺍﻟﻣﻭﺟﻭﺩ ﻋﻠﻰ ﺍﻟﺟﺎﻧﺏ ﺍﻟﺳﻔﻠﻲ ﻣﻥ ﻣﺟﻣﻭﻋﺔ ﺍﻟﺩﻭﺍﺳﺎﺕ " ﺗﻡ ﺍﻵﻥ ﺗﺭﻛﻳﺏ ﺗﻌﺩﻳﻝ "ﺍﻟﻣﻛﺑﺢ ﺍﻟﻣﻁﺎﻁﻲ ﺍﻟﻣﺧﺭﻭﻁﻲ ﻧﻁﺎﻕ ﺍﻟﺳﻔﺭ ﻟﺩﻭﺍﺳﺔ ﺍﻟﻣﻛﺑﺢ ﻭﻗﻭﺓ ﺍﻟﻣﻘﺎﻭﻣﺔ ﺗﻌﺩﻳﻝ (، ﻳﻣﻛﻧﻙ ﺯﻳﺎﺩﺓ ﺗﻌﺯﻳﺯ ﻣﻘﺎﻭﻣﺔ ﺩﻭﺍﺳﺔ ﺍﻟﻔﺭﺍﻣﻝ ﻋﻥ ﻁﺭﻳﻕ ﺗﺣﺭﻳﻙ ﺍﻟﻣﺳﻣﺎﺭ ﺫﻭ ) ﻋﻥ...
- Page 311 .ﺭﺍﺟﻊ ﺩﻟﻳﻝ ﻣﺳﺗﺧﺩﻡ ﺍﻟﻠﻌﺑﺔ ﺃﻭ ﺍﻟﺗﻌﻠﻳﻣﺎﺕ ﺍﻟﻣﺗﻭﻓﺭﺓ ﻋﻠﻰ ﺍﻹﻧﺗﺭﻧﺕ ﻟﻠﺣﺻﻭﻝ ﻋﻠﻰ ﻣﺯﻳﺩ ﻣﻥ ﺍﻟﻣﻌﻠﻭﻣﺎﺕ ﺗﺗﻭﻓﺭ ﺍﻟﻌﺩﻳﺩ ﻣﻥ ﻣﻭﺿﻭﻋﺎﺕ ﺍﻟﺗﻌﻠﻳﻣﺎﺕ ﻭﺍﻟﺗﻠﻣﻳﺣﺎﺕ )ﻏﻳﺭ ﺍﻟﻣﺿﻣﻧﺔ ﻓﻲ ﻫﺫﺍ ﺍﻟﺩﻟﻳﻝ( ﻋﻠﻰ ﻣﻭﻗﻊ ﻭﻳﺏ .()ﺍﻟﺩﻋﻡ ﺍﻟﻔﻧﻲ Technical Support ، ﺃﺳﻔﻝ http://ts.thrustmaster.com ﺍﻟﺩﻋﻡ ﺍﻟﻔﻧﻲ .ﻭﺗﺣﺩﻳﺩ ﺍﻟﻠﻐﺔ http://ts.thrustmaster.com ﺇﺫﺍ ﻭﺍﺟﻬﺕ ﻣﺷﻛﻠﺔ ﻣﻊ ﺍﻟﻣﻧﺗﺞ ﺍﻟﺧﺎﺹ ﺑﻙ، ﻓﻳﺭﺟﻰ ﺍﻻﻧﺗﻘﺎﻝ ﺇﻟﻰ...
- Page 312 :ﻻ ﻳﺴﺮﻱ ﻫﺬﺍ ﺍﻟﻀﻤﺎﻥ ﺃﻭ ﻏﻴﺮ ﺍﻟﻤﻼﺋﻢ ﺃﻭ ﺍﻹﻫﻤﺎﻝ ﺃﻭ ﺣﺎﺩﺙ ﺃﻭ ﺍﻹﻫﻼﻙ ﻧﺘﻴﺠﺔ ﺍﻻﺳﺘﻌﻤﺎﻝ ﺍﻟﻌﺎﺩﻱ، ﺃﻭ ﺃﻱ ﺳﺒﺐ ﺁﺧﺮ ﻻ ﻳﺮﺗﺒﻂ ﺑﻮﺟﻮﺩ ﺑﻮﺍﺳﻄﺔ Thrustmaster ﺍﻟﻤﺜﺎﻝ ﻻ ﺍﻟﺤﺼﺮ، ﺗﺠﻤﻴﻊ ﻣﻨﺘﺞ ﻋﻴﺐ ﻓﻲ ﺍﻟﻤﻮﺍﺩ ﺃﻭ ﺍﻟﺘﺼﻨﻴﻊ )ﺑﻤﺎ ﻓﻲ ﺫﻟﻚ، ﻋﻠﻰ ﺳﺒﻴﻞ...
- Page 313 ﺣﻘﻭﻕ ﺍﻟﻧﺷﺭ ﻫﻲ ﻋﻼﻣﺔ ﺗﺟﺎﺭﻳﺔ Thrustmaster®. ﺟﻣﻳﻊ ﺍﻟﺣﻘﻭﻕ ﻣﺣﻔﻭﻅﺔ © 2015 Guillemot Corporation S.A. .Guillemot Corporation S.A. ﻣﺳﺟﻠﺔ ﻟﺷﺭﻛﺔ .ﻣﺭﺧﺹ ﻟﻠﺑﻳﻊ ﻓﻲ ﺃﻭﺭﻭﺑﺎ ﻭﺇﻓﺭﻳﻘﻳﺎ ﻭﺍﻟﺷﺭﻕ ﺍﻷﻭﺳﻁ ﻭﺭﻭﺳﻳﺎ ﻭﺍﻟﻬﻧﺩ ﻭﺃﻭﻗﻳﺎﻧﻭﺳﻳﺎ .PlayStation ﻭ PlayStation ﻟﻼﺳﺗﺧﺩﺍﻡ ﺣﺻﺭ ﻳ ً ﺎ ﻣﻊ ® ®...
- Page 314 FOR P 3 – P 4 SYSTEMS TATION® TATION® User Manual WARNING: To ensure that your T300 wheel functions correctly with games for PlayStation 3 or PlayStation 4 systems, ® ® you may be required to install the games’ automatic updates (available when your system is connected to the Internet).
-
Page 315: Technical Features
TECHNICAL FEATURES 1 T300 RS base 7 SELECT/START buttons on PS3™ and 2 Ferrari 599XX EVO Wheel SHARE/OPTIONS on PS4™ 3 2 sequential paddle shifters (up & down) 8 PS button 4 Directional buttons 9 Large threaded hole (for attachment system 5 PS4™... -
Page 316: Plugging The Racing Wheel Into An Electrical Outlet: Please Read Before Proceeding
PLUGGING THE RACING WHEEL INTO AN ELECTRICAL OUTLET: PLEASE READ BEFORE PROCEEDING! Your racing wheel’s power supply varies according to the country where you purchased your device. The power supply can be: Internal, with: * a power supply unit located directly inside the racing wheel’s base, with a type A connector. - Page 317 * Do not let any dust build up on the air vents. For safety reasons, never use the pedal set with bare feet or while wearing only socks on your feet. THRUSTMASTER DISCLAIMS ALL RESPONSIBILITY IN THE EVENT OF ®...
- Page 318 Warning – Injuries due to force feedback and repeated movements (continued) * If the symptoms or pain indicated persist when you start playing again, stop playing and consult your doctor. * Keep out of children’s reach. * During gameplay, always leave both hands correctly positioned on the wheel without completely letting go.
- Page 319 To display the firmware version that your racing wheel is currently using and update it if required: on PC, visit http://ts.thrustmaster.com. In the Updates and Downloads section, click PlayStation Wheels / T300 RS, then select Driver/Firmware and follow the instructions describing the download and installation procedure. 6/26...
- Page 320 Once you have installed the wheel, rotate it 180° (when facing the wheel, the Ferrari® logo should be upside down) to access the small attachment screw located on the ring of the Thrustmaster Quick Release (12) device. Use a large Phillips screwdriver to tighten the small attachment screw (do not use excessive force), turning it clockwise.
- Page 321 ATTACHING THE RACING WHEEL Attaching the racing wheel to a table or a desktop 1. Place the racing wheel on a table or any other horizontal, flat and stable surface. 2. Insert the fastening screw (11) in the attachment system (10), then tighten the device by turning the screw counterclockwise, so that it feeds into the large threaded hole (9) located beneath the racing wheel, until the wheel is perfectly stable.
- Page 322 ATTACHMENT / DIRECTION REMOVAL To tighten: Turn the screw anticlockwise To release: Turn the screw clockwise 9/26...
- Page 323 Attaching the racing wheel’s base to a cockpit 1. Place the racing wheel’s base on the cockpit shelf. 2. Drive two M6 screws (not included) through the cockpit shelf, then feed them into the two small screw threads located on the underside of the racing wheel. Important: The length of the two M6 screws must not exceed the thickness of the shelf + 12 mm;...
- Page 324 * Don't forget to press the racing wheel’s PS button (8) in order to be able to use the wheel. * The wheel is recognised in most games as a T300 RS wheel. * The wheel is functional in compatible games and in system menus.
- Page 325 USB plug to your computer and complete the installation. 3. Once the installation is complete, click Finish and restart your computer. 4. Select Start / All Programs / Thrustmaster / FFB Racing Wheel / Control Panel to open the Game Controllers window.
- Page 326 PC MAPPING 13/26...
-
Page 327: Automatic Racing Wheel And Pedal Set Calibration
AUTOMATIC RACING WHEEL AND PEDAL SET CALIBRATION The wheel automatically self-calibrates when you plug the racing wheel into an electrical outlet and connect the racing wheel’s USB connector to the system. During this phase, the racing wheel will rotate quickly towards the left and the right, covering a 900 degree angle, before stopping at the center. - Page 328 NORMAL SWAPPED AROUND GREEN Other information regarding the MODE button To learn more about the MODE button and indicator light, please visit http://ts.thrustmaster.com. In the Updates and Downloads section, click PlayStation / Wheels / T300 RS, then select Manual/Help file.
- Page 329 16/26...
- Page 330 TECHNICAL FEATURES 1 Metal support for conical stop 4 2.5 mm Allen key (included) 5 Position adjustment nut for conical stop (not installed by default) 2 Conical stop 3 Attachment screw for metal support 6 Pedal arm 8 Metal pedal head 7 Plastic head support 17/26...
- Page 331 For safety reasons, never use the pedal set with bare feet or while wearing only socks on your feet. THRUSTMASTER® DISCLAIMS ALL RESPONSIBILITY IN THE EVENT OF INJURY RESULTING FROM USE OF THE PEDAL SET WITHOUT SHOES. Warning – Pedal set pinching hazard during gaming sessions * Keep the pedal set out of the reach of children.
- Page 332 AUTOMATIC CALIBRATION OF PEDALS IMPORTANT: - Never connect or disconnect the pedal set from the base of the wheel when the wheel is connected to the system or PC, or during gaming sessions, to avoid calibration problems. = Always connect the pedal set to the wheel before connecting the wheel to the system or PC. - Once the wheel has self-calibrated and the game has started, the pedals automatically calibrate themselves after being pressed a few times.
- Page 333 ADJUSTING THE PEDAL SET Each of the three pedals includes: - A metal head (8) with multiple perforations (nine for the accelerator – six for the brake – six for the clutch). - A plastic head support (7) (placed between the head and the arm) with four perforations. - A pedal arm (6) with two perforations.
- Page 334 Adjusting the SPACING of the three pedals - Using the included 2.5 mm Allen key (4), unscrew the two screws holding the metal head (8) and its support (7) in place. - Select your preferred position (to the left, centered, or to the right), then replace and re-tighten the screws so that the metal head (8) and its support (7) are held firmly in place.
- Page 335 Installing the conical stop (“CONICAL RUBBER BRAKE” mod) This modification (or “mod”) is not essential, and is not installed by default. This means that the brake pedal functions perfectly even if the mod is not installed. This mod lets you experience a different feeling and resistance when braking. It’s up to you whether or not to install it, depending on your own preferences.
- Page 336 - Using the included 2.5 mm Allen key (4), attach the unit using the attachment screw (3) and the small central screw thread located on the underside of the pedal set. The “CONICAL RUBBER BRAKE” mod is now installed! Adjusting the brake pedal’s RANGE of travel and STRENGTH of resistance By slightly unscrewing the nut (5), you can further strengthen the resistance of the brake pedal by moving the conical stop (2) closer to the back of the pedal’s arm (if necessary, use a 14 mm wrench or pliers to re-tighten the nut and maintain the selected position).
- Page 337 (2) years from delivery of the Thrustmaster product. In other countries, the warranty period corresponds to the time limit to bring an action for conformity with respect to the Thrustmaster product according to applicable laws of the country in which the consumer was domiciled on the date of purchase of the Thrustmaster product (if no such action exists in the corresponding country, then the warranty period shall be one (1) year from the original date of purchase of the Thrustmaster product).
-
Page 338: Technical Support
(including, but not limited to, any damages caused directly or indirectly by any software, or by combining the Thrustmaster product with any unsuitable element, including in particular power supplies, rechargeable batteries, chargers, or any other elements not supplied by Guillemot for this product). -
Page 339: Environmental Protection Recommendation
COPYRIGHT © 2015 Guillemot Corporation S.A. All rights reserved. Thrustmaster is a registered trademark of Guillemot ® Corporation S.A. Ferrari® is a registered trademark of Ferrari Idea S.p.A. Manufactured & distributed under license by Sony Computer Entertainement America LLC. Playstation, the PS family logo, PS3, PS4 and “... - Page 340 3 – P TATION® TATION® Manual del usuario ADVERTENCIA: Para asegurarte de que tu volante de carreras T300 funcione correctamente con juegos para sistemas PlayStation 3 o PlayStation ® ® puede que tengas que instalar las actualizaciones automáticas de los juegos (disponibles cuando tu consola está...
-
Page 341: Características Técnicas
CARACTERÍSTICAS TÉCNICAS 1 Base de T300 RS 7 Botones SELECT/START en PS3™ y 2 Volante Ferrari 599XX EVO SHARE/OPTIONS en PS4™ 3 2 levas de cambio secuenciales (Up y Down) 8 Botón PS 4 D-Pad multidireccional 9 Agujero roscado grande (para sistema de 5 Interruptor selector de USB de PS4™... - Page 342 ¡CONEXIÓN DEL VOLANTE DE CARRERAS A UN ENCHUFE ELÉCTRICO: LEER ANTES DE CONTINUAR! La fuente de alimentación del volante de carreras varía en función del país en el que hayas comprado el dispositivo. La fuente de alimentación puede ser: Interna, con: * Una unidad de fuente de alimentación situada directamente en el interior de la base del volante de carreras, con un conector de tipo A.
- Page 343 * No dejes que se acumule polvo en las rejillas de ventilación. Por razones de seguridad, no uses nunca los pedales con los pies descalzos o únicamente con calcetines en los pies. THRUSTMASTER DECLINA TODA RESPONSABILIDAD EN CASO DE ®...
- Page 344 Advertencia – Lesiones debidas a Force Feedback y los movimientos repetitivos (continuación) * Si los síntomas o el dolor indicados anteriormente persisten cuando vuelves a jugar, deja de hacerlo y consulta al médico. * Mantén el volante fuera del alcance de los niños. * Durante el juego, mantén siempre ambas manos colocadas correctamente en el volante sin dejarlas completamente caídas.
- Page 345 Para mostrar la versión de firmware que está usando actualmente tu volante de carreras y actualizarla si es necesario: en PC, visita http://ts.thrustmaster.com. En la sección Updates and Downloads, haz clic en PlayStation / Wheels / T300 RS y, a continuación, selecciona Driver/Firmware y sigue ...
- Page 346 Conector del volante de carreras (2): Flecha apuntando hacia arriba Una vez que los conectores estén colocados correctamente, simplemente gira el anillo del dispositivo Thrustmaster Quick Release (12) hacia la izquierda, mientras sostienes el volante de carreras (2) en su posición.
- Page 347 FIJACIÓN DEL VOLANTE DE CARRERAS Fijación del volante de carreras a una mesa o un escritorio 1. Coloca el volante de carreras en una mesa o en otra superficie horizontal, plana y estable. 2. Inserta el tornillo de sujeción (11) en el sistema de fijación (10) y, a continuación, aprieta el dispositivo girando el tornillo a la izquierda, para que entre en el agujero roscado grande (9) situado debajo del volante de carreras, hasta que el volante esté...
- Page 348 COLOCACIÓN / INDICACIÓN RETIRADA Para apretar: Gira el tornillo hacia la izquierda Para aflojar: Gira el tornillo hacia la derecha 9/26...
- Page 349 Fijación de la base del volante de carreras a una cabina 1. Coloca la base del volante de carreras en el estante de la cabina. 2. Pasa dos tornillos M6 (no incluidos) a través del estante de la cabina e insértalos en los dos agujeros roscados pequeños situados en la cara inferior del volante de carreras.
- Page 350 * No olvides pulsar el botón PS del volante de carreras (8) para poder usar el volante. * El volante se reconoce en la mayoría de los juegos como un volante T300 RS. * El volante está operativo en los juegos compatibles y en los menús de la consola.
- Page 351 PS3™. 1. Dirígete a http://ts.thrustmaster.com para descargar los controladores y el software de Force Feedback para PC. En la sección Updates and Downloads, haz clic en PC / Wheels / T300 RS y, a continuación, selecciona Drivers.
- Page 352 ASIGNACIÓN EN PC 13/26...
-
Page 353: Calibración Automática De Los Pedales
CALIBRACIÓN AUTOMÁTICA DEL VOLANTE Y DE LOS PEDALES El volante de carreras se calibra solo automáticamente cuando enchufas el volante de carreras a la red eléctrica y conectas el conector USB del volante de carreras a la consola. Durante esta fase, el volante de carreras girará rápidamente hacia la izquierda y la derecha, cubriendo un ángulo de 90 grados, antes de detenerse en el centro. - Page 354 BOTÓN MODE Y LUZ INDICADORA (6) Botón MODE de los pedales El T300 es compatible con los pedales de Thrustmaster que incluyan 3 pedales que te permitirán intercambiar electrónicamente los pedales del acelerador y el embrague. Para ello, simplemente pulsa el botón MODE (6) durante 2 segundos.
- Page 355 16/26...
-
Page 356: Características Técnicas
CARACTERÍSTICAS TÉCNICAS 1 Soporte metálico para tope cónico 3 Tornillo de sujeción de soporte metálico 4 Llave Allen de 2,5 mm (incluida) (no está instalado de forma 5 Tuerca de ajuste de posición para tope predeterminada) 2 Tope cónico cónico 6 Brazo del pedal 8 Cabeza del pedal metálica 7 Soporte de cabeza de plástico... - Page 357 Por motivos de seguridad, no utilizar nunca los pedales con los pies desnudos o únicamente con calcetines en los pies. THRUSTMASTER® DECLINA TODA RESPONSABILIDAD EN CASO DE LESIONES PRODUCTO DEL USO DE LOS PEDALES SIN CALZADO. Advertencia – Peligro de pillarse con los pedales durante las sesiones de juego * Mantén los pedales fuera del alcance de los niños.
- Page 358 CALIBRACIÓN AUTOMÁTICA DE LOS PEDALES IMPORTANTE: - No conectes ni desconectes nunca los pedales de la base del volante cuando el volante esté conectado a la consola o al PC, ni durante las sesiones de juego, para evitar problemas de calibración.
- Page 359 AJUSTE DE LOS PEDALES Cada uno de los tres pedales incluye: - Una cabeza metálica (8) con varias perforaciones (nueve para el acelerador, seis para el freno y seis para el embrague). - Un soporte de cabeza de plástico (7) (situado entre la cabeza y el brazo) con cuatro perforaciones.
- Page 360 Ajuste del ESPACIADO de los tres pedales - Con la llave Allen de 2,5 mm incluida (4), desatornilla los dos tornillos que sujetan la cabeza metálica (8) y su soporte (7) en su sitio. - Selecciona la posición que prefieras (a la izquierda, centrada o a la derecha) y, a continuación, vuelve a colocar y apretar los tornillos de forma que la cabeza metálica (8) y su soporte (7) queden sujetos firmemente en su sitio.
- Page 361 Instalación del tope cónico (mod “CONICAL RUBBER BRAKE”) Esta modificación (o “mod”) no es esencial y no se instala de forma predeterminada. Esto significa que el pedal del freno funciona perfectamente aunque no esté instalado el mod. Este mod te permite experimentar una resistencia y sensación diferentes al frenar. Depende de ti instalarlo o no, en función de tus preferencias.
- Page 362 - Con la llave Allen de 2,5 mm incluida (4), fija la unidad con el tornillo de sujeción (3) y la rosca de tornillo central pequeña situada en la cara inferior de los pedales. ¡Ya está instalado el mod “CONICAL RUBBER BRAKE”! Ajuste del RANGO de desplazamiento y la RESISTENCIA del pedal del freno Si desatornillas ligeramente la tuerca (5), puedes reforzar más la resistencia del pedal del freno moviendo el tope cónico (2) más cerca de la parte trasera del brazo del pedal (si es necesario, usa...
- Page 363 En los países de la Unión Europea, esto corresponde a un período de dos (2) años a partir de la entrega del producto de Thrustmaster. En otros países, el período de garantía corresponde al límite de tiempo para interponer una acción legal referida a la conformidad en relación con este producto de Thrustmaster según las leyes...
- Page 364 Soporte Técnico es el único autorizado para abrir y/o reacondicionar los productos de Thrustmaster (con la excepción de los procedimientos de reacondicionamiento que el Soporte técnico puede solicitar que lleve a cabo el consumidor, mediante instrucciones por escrito –...
-
Page 365: Declaración De Conformidad
NOTICIA DE CONFORMIDAD EN USA: este dispositivo cumple con los límites para dispositivos de computación de Clase B de acuerdo con la Parte 15 de las reglas FCC. COPYRIGHT © 2015 Guillemot Corporation S.A. Todos los derechos reservados. Thrustmaster es una marca registrada de ®... - Page 366 POUR SYSTÈMES P 3 – P TATION® TATION® Manuel de l’utilisateur ATTENTION : Pour que le volant T300 fonctionne correctement avec les jeux PlayStation 3 ou PlayStation ® ® il peut être nécessaire d’installer les mises à jour automatiques de ces jeux (disponibles lorsque votre système est connecté...
-
Page 367: Caracteristiques Techniques
CARACTERISTIQUES TECHNIQUES 1 Base T300 RS 7 Boutons SELECT/START sur PS3™ 2 Roue Ferrari 599XX EVO et SHARE/OPTIONS sur PS4™ 3 2 leviers séquentiels de changement de 8 Bouton PS vitesse (up & down) 9 Gros pas de vis (pour le système de... - Page 368 RELIER LE VOLANT AU SECTEUR = A LIRE IMPERATIVEMENT En fonction du pays où vous avez acheté votre volant, l’alimentation secteur de votre volant diffère. Elle est : Soit interne avec : * Boitier d’alimentation directement dans la base du volant avec connecteur type A * Câble d’alimentation secteur 220-240V.
- Page 369 * Ne laissez pas la poussière s’accumuler sur les grilles d’aération. Pour des raisons de sécurité, ne jouez pas pieds nus ou en chaussettes lorsque vous utilisez le pédalier. THRUSTMASTER DECLINE TOUTE RESPONSABILITE EN CAS DE ® BLESSURE SUITE A UNE UTILISATION DU PEDALIER SANS CHAUSSURES.
- Page 370 Avertissement – Blessures dues au retour de force et aux mouvements répétitifs (suite) * Si les symptômes ou les douleurs indiqués ci-dessus persistent lorsque vous reprenez le jeu, arrêtez de jouer et consultez votre médecin. * Laissez hors de portée des enfants. * Lors des phases de jeu, laissez toujours vos deux mains correctement positionnées sur le volant sans jamais le lâcher complètement.
- Page 371 Pour afficher la version de firmware de votre volant et le mettre à jour si nécessaire : sur PC, allez sur http://ts.thrustmaster.com, dans la section Mise à jour et téléchargement, cliquez sur PlayStation / Volant / T300 RS puis Pilote/Firmware et suivez les instructions et la procédure de téléchargement et d’installation.
- Page 372 Lorsque la roue est installée, tournez-la de 180° (vu de face, le Logo Ferrari® doit être à l’envers) afin d’accéder à la petite vis de fixation située sur la bague du Thrustmaster Quick Release (12). A l’aide d’un gros tournevis cruciforme, vissez sans forcer la petite vis de fixation dans le sens des aiguilles d’une montre.
- Page 373 FIXATION DU VOLANT Fixer le volant sur une table ou un bureau 1. Placez le volant sur une table ou autre surface plane. 2. Placez la vis de serrage (11) dans le système de fixation (10), puis vissez l’ensemble (dans le sens inverse des aiguilles d’une montre) dans le gros pas de vis (9) situé...
- Page 374 MONTAGE / SENS DEMONTAGE Pour serrer : Vissez dans le sens inverse des aiguilles d’une montre Pour desserrer : Dévissez dans le sens des aiguilles d’une montre 9/26...
- Page 375 Fixer la base du volant sur un cockpit 1. Placez la base du volant sur la tablette du cockpit 2. Vissez 2 vis M6 (non fournies) dans la tablette du cockpit et dans les 2 petits pas de vis situés sous le volant.
- Page 376 * N’oubliez pas d’appuyer sur bouton PS (8) du volant pour que celui-ci soit fonctionnel. * Le volant est reconnu dans la plupart des jeux comme un volant T300 RS. * Le volant est fonctionnel dans les jeux compatibles et dans les menus du système.
- Page 377 1. Allez sur http://ts.thrustmaster.com pour télécharger les pilotes et le logiciel Force Feedback pour PC. Dans la section Mise à jour et téléchargement, cliquez sur PC / Volants / T300 RS, puis Pilotes. 2. Une fois le téléchargement terminé, lancez l’installation, puis suivez les instructions affichées à l’écran pour brancher le connecteur USB du volant sur votre PC et pour terminer l’installation.
- Page 378 MAPPING PC 13/26...
- Page 379 CALIBRAGE AUTOMATIQUE DU VOLANT ET DES PEDALES La roue du volant s’autocalibre de manière automatique une fois le volant relié au secteur et le connecteur USB connecté. Cette opération entraîne des mouvements rapides du volant de gauche à droite sur 900° avant de s’immobiliser au centre.
- Page 380 Volant / T300 RS puis Manuel / Fichier Aide. AIDES & FAQ DIVERSES (non notifiées dans ce manuel) Allez sur http://ts.thrustmaster.com. Dans la section Mise à jour et téléchargement, cliquez sur PlayStation / Volant / T300 RS puis Manuel / Fichier Aide.
- Page 381 16/26...
- Page 382 CARACTERISTIQUES TECHNIQUES 1 Support métallique pour la butée conique Clé Allen 2,5 mm fournie Ecrou de réglage de position de la butée (non installée par défaut) 2 Butée conique conique 3 Vis de fixation du support métallique Bras de pédale Tête métallique de pédale Support de tête plastique 17/26...
- Page 383 Avant d’utiliser ce produit, lisez attentivement cette documentation et conservez-la pour pouvoir la consulter ultérieurement. Pour des raisons de sécurité, ne jouez pas pieds nus ou en chaussettes lorsque vous utilisez le pédalier. THRUSTMASTER DECLINE TOUTE RESPONSABILITE EN CAS DE ® BLESSURE SUITE A UNE UTILISATION DU PEDALIER SANS CHAUSSURES.
- Page 384 CALIBRAGE AUTOMATIQUE DES PEDALES IMPORTANT : - Ne branchez ou débranchez jamais le pédalier de la base du volant lorsque celui-ci est connecté au système ou au PC, ou en cours de jeu, pour ne pas fausser la calibration. = Branchez toujours le pédalier avant de relier le volant au système ou au PC. - Une fois le volant autocalibré...
- Page 385 REGLAGES DU PEDALIER Chacune des 3 pédales comprend : - Une tête métallique (8) avec plusieurs perforations (9 pour l’accélérateur – 6 pour le frein – 6 pour l’embrayage). - Un support de tête plastique (7) (placé entre la tête et le bras) avec 4 perforations. - Un bras de pédale (6) avec 2 perforations.
- Page 386 Ajuster l’ECARTEMEMENT des 3 pédales - A l’aide de la clé Allen 2,5 mm fournie (4), dévissez les 2 vis maintenant la tête métallique (8) et son support (7). - Choisissez ensuite votre position (à gauche, au centre ou à droite), puis revissez le tout. Exemples ici avec la pédale de frein : Position à...
- Page 387 Installer la butée conique (MOD « CONICAL RUBBER BRAKE ») Ce MOD n’est pas obligatoire et n’est pas installé par défaut. Cela signifie que la pédale de frein fonctionne parfaitement même si le MOD n’est pas installé. Ce MOD permet d’apporter un feeling et une résistance différents lors des freinages. Il appartiendra à...
- Page 388 - A l’aide de la clé Allen 2,5 mm fournie (4), fixez l’ensemble en utilisant la vis de fixation (3) et le petit pas de vis central situé sous le pédalier. Le MOD « CONICAL RUBBER BRAKE » est désormais installé ! Ajuster la COURSE de débattement et la FORCE de résistance de la pédale de frein En dévissant légèrement l’écrou (5), vous pouvez également durcir davantage la résistance de la...
- Page 389 Thrustmaster selon la législation en vigueur dans le pays où le consommateur avait son domicile lors de l’achat du produit Thrustmaster (si une telle action en conformité n’existe pas dans ce pays alors la période de garantie est de un (1) an à compter de la date d’achat d’origine du produit Thrustmaster).
- Page 390 échéant, la ou les pièces détachées nécessaires). Compte tenu de ses cycles d'innovation et pour préserver ses savoir-faire et secrets, Guillemot ne fournira, en principe, ni notice de remise en état, ni pièce détachée pour tout produit Thrustmaster dont la période de garantie est expirée.
- Page 391 UTILISATEURS CANADIENS : Cet appareil numérique de la classe B respecte toutes les exigences du Règlement sur le matériel brouilleur du Canada. COPYRIGHT © 2015 Guillemot Corporation S.A. Tous droits réservés. Thrustmaster est une marque déposée de Guillemot ® Corporation S.A. Ferrari® est une marque déposée de Ferrari Idea S.p.A.
- Page 392 PARA SISTEMAS P 3 – P TATION® TATION® Manual do Usuário ATENÇÃO: Para garantir que o seu volante T300 funcione corretamente com jogos para os sistemas PlayStation 3 ou PlayStation ® ® poderá ser pedido para instalar as atualizações automáticas dos jogos (disponível quando o console está...
-
Page 393: Características Técnicas
CARACTERÍSTICAS TÉCNICAS 1 Base do T300 RS 7 Botões SELECT/START no PS3™ e 2 Volante Ferrari 599XX EVO SHARE/OPTIONS no PS4™ 3 2 pás de mudança de marchas sequenciais 8 Botão PS (Acima e Abaixo) 9 Furo roscado grande (para o sistema de 4 D-Pad multidirecional fixação e parafuso de aperto) - Page 394 LIGAR O VOLANTE A UMA TOMADA ELÉTRICA: LEIA ANTES DE CONTINUAR! A fonte de alimentação do volante varia de acordo com o país onde você adquiriu o dispositivo. A alimentação pode ser: Interna, com: * uma unidade de alimentação situada diretamente no interior da base do volante, com um conector de tipo A.
- Page 395 * Não deixe que pó se acumule nas aberturas de ventilação. Por razões de segurança, nunca utilize o conjunto de pedais com os pés descalços ou apenas com meias calçadas nos pés. A THRUSTMASTER NÃO ASSUME QUALQUER RESPONSABILIDADE NA ®...
- Page 396 * Evite jogar durante longos períodos de tempo. * Faça um intervalo de 10 a 15 minutos após cada hora de jogo. * Se sentir cansaço ou dores nas mãos, pulsos, braços, pés ou pernas, pare de jogar e descanse durante algumas horas antes de recomeçar a jogar.
- Page 397 Para visualizar a versão do firmware que o volante utiliza atualmente e atualizá-la, se necessário: no PC, acesse http://ts.thrustmaster.com. Na seção Updates and Downloads, clique em PlayStation / Wheels / T300 RS, selecione Driver/Firmware e siga as instruções que descrevem o procedimento de transferência e instalação.
- Page 398 Ferrari® deve ficar virado ao contrário) para acessar o parafuso de fixação pequeno situado no anel do dispositivo Thrustmaster Quick Release (12). Utilize uma chave de fenda Phillips grande para apertar o parafuso de fixação pequeno (não aplique força excessiva), girando-o no sentido horário.
- Page 399 FIXAR O VOLANTE Fixar o volante a uma mesa 1. Coloque o volante sobre uma mesa ou qualquer outra superfície horizontal, plana e estável. 2. Insira o parafuso de aperto (11) no sistema de fixação (10), depois aperte o dispositivo girando o parafuso no sentido anti-horário, de forma que penetre no furo roscado grande (9) situado abaixo do volante, até...
- Page 400 FIXAÇÃO / DIREÇÃO REMOÇÃO Para apertar: Gire o parafuso no sentido anti- horário Para soltar: Gire o parafuso no sentido horário 9/26...
- Page 401 Fixar a base do volante a um cockpit 1. Coloque a base do volante na prateleira do cockpit. 2. Insira dois parafusos M6 (não incluídos) na prateleira do cockpit e, em seguida, enrosque-os nas duas roscas de parafuso pequenas situadas na parte inferior do volante. Importante: O comprimento dos dois parafusos M6 não deve exceder a espessura da prateleira + 12 mm;...
- Page 402 * Não se esqueça de pressionar o botão PS (8) do volante para poder utilizá-lo. * O volante é reconhecido na maioria dos jogos como um volante T300 RS. * O volante funciona em jogos compatíveis e nos menus do console.
- Page 403 - No PC, os ajustes feitos na janela Controladores de Jogo serão salvos apenas no computador (não terão efeito no PlayStation 3 ou PlayStation ® ® - A versão do firmware do volante é exibida no canto superior direito do painel de controle do T300 RS. 12/26...
- Page 404 MAPEAMENTO PARA PC 13/26...
- Page 405 CALIBRAGEM AUTOMÁTICA DO VOLANTE E DO CONJUNTO DE PEDAIS O volante calibra-se automaticamente quando ligado a uma tomada elétrica e o conector USB do volante ao console. Durante esta fase, o volante gira rapidamente para a esquerda e direita, cobrindo um ângulo de 900 graus, antes de parar no centro.
- Page 406 BOTÃO MODE E LUZ INDICADORA (6) Botão MODE para o conjunto de pedais O T300 é compatível com conjuntos de pedais Thrustmaster dotados de 3 pedais; estes permitem- lhe trocar eletronicamente os pedais do acelerador e da embreagem. Para tal, basta pressionar o botão MODE (6) durante 2 segundos.
- Page 407 16/26...
- Page 408 CARACTERÍSTICAS TÉCNICAS 1 Apoio de metal para batente cônico 4 Chave sextavada de 2,5 mm (incluída) 5 Porca de ajuste da posição para o batente (não instalado por predefinição) 2 Batente cônico cônico 3 Parafuso de fixação para o apoio de metal 6 Braço do pedal 8 Cabeça de metal do pedal 7 Apoio de plástico da cabeça...
- Page 409 Por razões de segurança, nunca utilize o conjunto de pedais com os pés descalços ou quando estiver apenas de meias calçadas. A THRUSTMASTER® NÃO ASSUME QUALQUER RESPONSABILIDADE NA EVENTUALIDADE DE DANOS FÍSICOS RESULTANTES DA UTILIZAÇÃO DO CONJUNTO DE PEDAIS SEM CALÇADO.
- Page 410 CALIBRAGEM AUTOMÁTICA DOS PEDAIS IMPORTANTE: - Nunca ligue nem desligue o conjunto de pedais da base do volante quando este estiver ligado ao console ou ao PC, ou durante as sessões de jogo, para evitar problemas de calibragem. = Ligue sempre o conjunto de pedais ao volante antes de ligar o volante ao console ou ao PC. - Quando a calibragem automática do volante estiver concluída e o jogo tiver começado, os pedais calibram-se automaticamente depois de pisar neles várias vezes.
- Page 411 AJUSTAR O CONJUNTO DE PEDAIS Cada um dos três pedais inclui: - Uma cabeça de metal (8) com vários furos (nove para o acelerador, seis para o freio e seis para a embreagem). - Um apoio de plástico da cabeça (7) (colocado entre a cabeça e o braço) com quatro furos. - Um braço do pedal (6) com dois furos.
- Page 412 Ajustar o ESPAÇAMENTO dos três pedais - Com a chave sextavada de 2,5 mm incluída (4), desenrosque os dois parafusos que prendem a cabeça de metal (8) e o respectivo apoio (7) na posição. - Selecione a sua posição preferida (à esquerda, ao centro ou à direita) e, em seguida, reaperte os parafusos de forma a fixar firmemente nessa posição a cabeça de metal (8) e o respectivo apoio (7).
- Page 413 Instalar o batente cônico (“CONICAL RUBBER BRAKE” mod) Esta modificação (ou “mod”) não é essencial, não sendo instalada por predefinição. Isto significa que o pedal do freio funciona perfeitamente mesmo sem a mod instalada. Esta mod permite-lhe experimentar uma sensação e uma resistência diferentes ao frear. Cabe a você...
- Page 414 - Com a chave sextavada de 2,5 mm incluída (4), fixe a unidade utilizando o parafuso de fixação (3) e a pequena rosca de parafuso situada na parte inferior do conjunto de pedais. A “CONICAL RUBBER BRAKE” mod encontra-se agora instalada! Ajustar o CURSO e a FORÇA da resistência do pedal do freio Ao desenroscar ligeiramente a porca (5), você...
- Page 415 Thrustmaster de acordo com a legislação em vigor do país no qual o consumidor residia à data de compra do produto Thrustmaster (se a dita ação não existir no país correspondente, então o período de garantia será...
- Page 416 Suporte Técnico é a única parte autorizada a abrir e/ou reparar qualquer produto Thrustmaster (com exceção de quaisquer procedimentos de reparação que o Suporte Técnico possa pedir ao consumidor para realizar, através de instruções por escrito – por exemplo, devido à...
-
Page 417: Declaração De Conformidade
Este equipamento foi testado e considerado em conformidade com os limites para um dispositivo digital Classe B, conforme a Parte 15 das regras da FCC. DIREITOS AUTORAIS © 2015 Guillemot Corporation S.A. Todos os direitos reservados. Thrustmaster ® é uma marca registada da Guillemot Corporation S.A. - Page 418 ユーザーズマニュアル 警告: PlayStation®3 または PlayStation®4 のシステムソフトウエアのバージョンによ っては、全ての機能がお使いいただけない場合があります。 その場合は、最新のシステムソフトウエアにバージョンアップしてからご利用下さ い。 システムソフトウエアのバージョン確認およびアップデートに関しましてはお使 いのゲーム機本体の取扱説明書を御覧ください。 本製品は PlayStation®2、PlayStation®、PS one®では、ご使用になれません。 また、PlayStation®2 規格のソフトウェアでの動作につきましては保証いたしかねま す。 1/28...
- Page 419 保証規定 ※ 本製品を使用される前に必ずお読みください。 この度は、本製品をお買い上げいただき誠にありがとうございます。以下の保証規定をお 読みいただき内容を同意の上、本製品をご使用ください。 初期不良期間はお買い上げ日から1週間とさせていただいております。 保証期間はお買い上げ日から 1 年間です。 注意: 個人売買(インターネット等)で購入された際の購入日は、保証開始日として起算できま せん。 社会的信用のある販売店での購入時のみ、購入日を保証開始日としますので、個人売買の 場合は、商品の発売日から保証開始日として起算させて頂きます。 製品がユーザーマニュアル記載の通常の使用方法により正常に動作しなくなった場合は、 弊社の判断で無償にて交換/修理いたします。完売等の場合は同等品と無償で交換いたし ます。 交換の場合、お客様からお送りいただいた製品等は返却いたしかねます。また、修理の際 に取り外した部品等も返却いたしかねます。 保証期間内でも、次の場合は保証が受けられません。 1. 弊社製品と判断出来ない場合。 2. ハードウェア自身の消耗に起因する故障または損傷(本製品は性質上、物理的な機 構の耐久性能に依存する製品寿命がございます)。 3. 火災、地震、水害、落雷、ガス害、塩害、その他の天災地変、公害や異常電圧によ る故障または損傷。 4. お買い上げ後の輸送、移動時の落下などお取り扱いが不適当なため生じた故障・損 傷。 5. ご使用時の不備あるいは接続している他の機器によって生じた故障または損傷。 6. ユーザーマニュアルの記載内容に反するお取り扱いによって生じた故障または損傷。 7. 弊社以外で改造、調整、部品交換などをされた場合。 8. 本製品の故障に起因するデータ損失などの付随する損害に関しては一切保証できま せん。 9.
- Page 420 カスタマーサポート 本製品に異常を感じられた場合は、すぐに使用を中止し、カスタマーサポートへご相談く ださい。 ■保証を受ける際に用意するもの 購入店と購入した日付が分かる書類(購入時のレシート、保証書シール、保証書レシート 、通販の代引伝票など)が必要となります。 それらは決して捨てたりせずに大切に保管してください。 ご購入日付を証明する書類をご呈示いただけない場合、保証期間内であっても有償での修 理対応となりますので、あらかじめご了承下さい。 又、保証を受ける権利はご購入者以外(保証の譲渡)が所有する事はできません。 ■ご送付についてのご案内 本製品に異常が発生した場合、カスタマーサポートにご相談頂いた後に、本製品をカスタ マーサポートまでご送付いただく場合がございます。現象、環境等の詳細をお書き添え頂 き、配送業者様の送り状(伝票)に“不良検証品”と明記の上、お買い上げ時のレシート 等と共に本製品をお送りください。 発送される際は、紛失等のトラブルを防ぐため、必ず受領確認の取れる宅配便でご送付く ださい。 封書、郵便小包等の郵送は固くお断り申し上げます。 ※ なお、輸送中の事故については、弊社にて責任を負いかねます。あらかじめご了承くだ さい。 ■交換/修理依頼時のご注意 以下の点をご了承の上、交換/修理をご依頼頂けますようお願いいたします。 1. 交換/修理のご依頼について:交換/修理のご依頼は日本国内にお住まいの方とさせて 頂きます。 2. 代替機の貸出について:交換/修理に伴う代替機の貸出等は行っておりません。 3. 製品の交換について:修理が困難な場合には、修理せずに同等品と交換させて頂く事が ございます。この場合、お客様にて貼られたシールなどはお返しできません。 4. お客様が設定されたデータについて:弊社にて修理作業を行う際にお客様が設定された データを消去する場合があります。この場合は、工場出荷初期状態でお返しすることと なります。(製品ごと交換する場合も同様です) ■送料について 1. 初期不良期間内(お買い上げ日から1週間) :初期不良期間の送料は往復共に弊社が負 担させていただきます。 2.
- Page 421 技術仕様 1 T300 RS ベース部 7 PS3® 用 SELECT/START ボタン、または 2 Ferrari 599XX EVO Wheel PS4™ 用 SHARE/OPTIONS ボタン 3 シーケンシャル パドルシフト x 2 (上下) 8 PS ボタン 4 方向ボタン 9 大きなねじ穴 (アタッチメントシステム 5 PS4™/PS3® 用内蔵 USB スライドスイッチ および締め付けねじ用) 6 MODE ボタン + 赤/緑インジケータランプ...
- Page 422 ステアリングホイールを電源コンセントに接続する前に:まず 最初にお読みください ステアリングホイールの電源は、ご購入いただいた国によって異なります。 主電源には以下のタイプがあります。 電源内蔵型: * 電源ユニットがステアリングホイールのベース部に内蔵されており、A タイプのコネクター を搭載しています。 * 220~240 V 主電源ケーブル = 220~240V の電源コンセント専用です。 絶対に 220~240V の電源ケーブルを 100~130V の電源コンセントに接続しないでください! 絶対に、このケーブルを主電源アダプターに接続しない でください。 電源内蔵型: * 電源ユニットがステアリングホイールのベース部に内蔵されており、A タイプのコネクター を搭載しています。 * 100~125 V 主電源ケーブル = 100~125 V の電源コンセント専用です。 絶対に 100~125V の電源ケーブルを 220~240V の電源コンセントに接続しないでください! 絶対に、このケーブルを主電源アダプターに接続しない...
- Page 423 警告 本製品を使用する前にこのマニュアルをよくお読みになり、いつでも参照できるよう 手近な所に保管してください。 警告 – 感電 * 本製品は湿気・ホコリの多い場所や、直射日光のあたる場所で保管しないでくださ い。 * コネクターやケーブルを、ねじったり引っ張ったりしないでください。 * 本製品やコネクターをぬらさないでください。 * 本製品をショートさせないでください。 * 分解や改造は絶対にしないでください。本製品を火の中に投棄したり、高温にさら したりしないでください。 * 付属の電源ケーブル以外は使用しないでください。 * 電源ケーブルやコネクターが破損していたり、裂けていたり、断線している場合は 絶対に使用しないでください。 * 電源ケーブルの片方がコンセントにしっかり差し込まれており、もう片方がステア リングホイールのベース部の背面にしっかりと接続されていることをご確認くださ い。 * ステアリングホイールを分解しないでください: 内部にはユーザーが保守可能な部 品はありません。修理はカスタマーサポートまでご依頼ください。 * メーカー指定のアタッチメント/アクセサリー以外は使用しないでください。 * ステアリングホイールの動作に異常 (変なにおいや音、過度な発熱など) が発生し たときは、使用をただちに中止し、電源コードをコンセントから抜き、他のケーブ ルもすべて抜いてください。 * ステアリングホイールを長期間使用しない場合は、必ず電源コードをコンセントか ら抜いておいてください。...
- Page 424 排気口 ステアリングホイールのベース部にある排気口をふさがないでください。最適な換気 を確保するため、以下を必ずお守りください。 * ステアリングホイールのベース部を、壁面から少なくとも 10cm 以上離してくださ い。 * ベース部を狭いスペースに置かないでください。 * ベース部をふさがないでください。 * 排気口にホコリがたまらないようにしてください。 ペダルセットは、裸足もしくは靴下しか着用していない状態で絶対 に使用しないでください。 THRUSTMASTER® は、靴を着用せずにペダルセットを使用したことに よって生じたいかなるケガについても一切責任を負いません。 警告 – フォースフィードバック、および繰り返しの動きによる負傷の可 能性 フォースフィードバック対応ステアリングホイールを使ったゲームプレイは、筋肉 や関節の痛みなどの症状を引き起こす恐れがあります。この危険性は、次のような 予防措置をとることによって減らすことができます。 * 長時間のプレイは避けてください。 * 1 時間ごとに 10~15 分の休憩をとるようにしてください。 * 手、手首、腕、足を始めとする身体の部位に疲れや痛みを感じたときはプレイを ただちに中止し、再開する前に数時間の休憩をとるようにしてください。 * 休憩後にプレイを再開しても、上記の症状や痛みがとれない場合は、プレイを中 止して医師に相談してください。 * 本製品は、お子様の手の届かない場所で使用してください。...
- Page 425 重量注意 本製品の対象年齢は 本製品を、自分や人に落とさないように 16 歳以上です。 ご注意ください。 正 誤 誤 警告 – ペダル挟まれ危険 (プレイ時) * ペダルセットは、お子様の手の届かない場所で使用および保管してください。 *プレイ中は、ペダルの両サイド付近に指を絶対に置かないでください。 * ゲームプレイ中は、ペダルの後方ベース部付近に指を絶対に置かないでください。 * プレイ中は、ペダルのフロントベース部付近に指を絶対に置かないでください。 危険 危険 危険 8/28...
- Page 426 警告 – ペダル挟まれ危険 (非プレイ時) * ペダルセットは、子供の手が届かない安全な場所に保管してください。 レーシングコントローラーのファームウェアのアップデート ステアリングホイールのベース部に搭載されているファームウェアは、製品機能の 改良・強化が図られた最新ファームウェアにアップデートすることが可能です。 お使いのステアリングホイールの現在のファームウェアバージョンを表示し、必要 に応じてアップデートを行うには次の URL にアクセスしてください (PC から): http://ts.thrustmaster.com 。 [Updates and downloads] か ら [PlayStation® / Wheels / T300 RS] をクリックし、[Driver / Firmware] を選択してファームウェ アのダウンロードおよびセットアップ手順にしたがってください。 重要な注意事項: PC で使用時には、レーシングコントローラーのベース部にある USB スライドスイッ チ は常に「PS3」のポジションにセットしておく必要があります。...
- Page 427 ステアリングホイールをベース部に設置する 矢印を使って、コネクターの位置を合わせます。 ベース部 コネクター:上向き矢印 ステアリングホイール コネクター:上向き矢印 (12) コネクターを正しい位置にセットしたら、Thrustmaster クイックリリース デ バイスのリングを、ステアリングホイール の位置を固定しながら逆時計回りに 回すだけです。 次に、リングをできるだけきつく締めます。リングの位置を固定した状態で、ステア リングホイールを時計方向に回してください。 ステアリングホイールをインストールしたら、180°回転させることで (ステアリン グホイールを正面から見たとき、Ferrari® ロゴが逆さになります)、Thrustmaster (12) クイックリリース デバイスのリング部にある小さな取り付けねじにアクセスで きます。大きなプラスドライバーで、小さな取り付けねじを時計方向に回して締めま す (締めすぎ注意)。 プラスドライバーで小さな取り付けねじを締める際には、力の入れすぎにご注意くだ さい。少し抵抗を感じたら、それ以上ねじを回さないでください。 10/28...
- Page 428 ステアリングホイールを取り付ける ステアリングホイールをテーブルまたは机に取り付ける 1. ステアリングホイールを、テーブルなど平らで水平かつ、安定した場所に置き ます。 2. アタッチメントシステム (10) に締め付けねじ (11) を差し込み、ねじを逆時 計回りに回して、ステアリングホイール底面の大きなねじ穴 に締め込み ます (ステアリングホイールがしっかりと固定されるまで)。 正 誤 警告:絶対に、アタッチメントシステムを取り付けずにねじだけを閉めな いでください。ステアリングホイールが損傷する恐れがあります。 11/28...
- Page 429 取り付け / 取り 方向 外し 締めるとき: ねじを 逆時計回り 取り外すとき: ねじを 時計回り 12/28...
- Page 430 ステアリングホイールのベース部をコックピットに取り付ける 1.ステアリングホイールのベース部を、コックピットの上に置きます。 2.2 本の M6 ねじ (付属していません) をコックピットに通し、ステアリングホ イール底面の 2 つの小さなねじ穴に差し込みます。 重要:使用する M6 ねじ 2 本 の長さが、コックピットの厚さ + 12 mm を超 えないようにしてください。それよりも長いねじを使用すると、ステアリング ホイールのベース部の内部部品が破損する恐れがあります。 3. 必要であれば、大きなねじ穴に締め付けねじを差し込んで、標準アタッチメン トシステムを取り付けてください。 PlayStation®3 / PlayStation®4 マッピング 13/28...
- Page 431 レーシングコントローラーを PlayStation®3 または PlayStation®4 用に セットアップする* (17) 1. ペダルセットを、ステアリングホイールのベース部背面にあるコネクター に接続します。 (14) 2. 電源ケーブルを、ステアリングホイールのベース部背面にあるコネクター に接続します。 3. 電源ケーブルを、同じ電圧仕様のコンセントに差し込んでください。 詳しくは本マニュアル 3 ページの「ステアリングホイールを電源コン セントに接続する前に」の項をご参照ください。 4. ステアリングホイールのベース部にある USB スライドスイッチ は、ご使用 のゲーム機またはゲームに応じて、「PS3」または「PS4」のポジションにセット しておく必要があります。 (15) 5. ステアリングホイールの USB コネクター を、ゲーム機本体のいずれかの USB ポートに接続します。 6. ゲーム機の電源を入れると、ステアリングホイールの自動調整が行われます。 7. *PlayStation 4 での使用時 (USB スライドスイッチ「PS4」セット時) このステ ®...
- Page 432 * このステアリングホイールは、互換性のあるゲームおよびシステムメニューで使 用できます。 * このステアリングホイールでは SHARE ボタンおよび PS ボタンを使用できます。 - T150 と互換性のある PlayStation®3 および PlayStation®4 ゲームの一覧 (およ び各ゲームプレイ時に必要となる USB スライドスイッチ のポジション) は 次の URL にて確認できます: http://ts.thrustmaster.com ([Updates and downloads] から [PlayStation® / Wheels / T300 RS] をクリック してください。) この一覧は定期的に更新されます。 15/28...
- Page 433 ステアリングホイールとペダルセットの自動調整 ステアリングホイールを電源コンセントにつなげて、ステアリングホイールの USB コネクターを PlayStation®3 または PlayStation®4 に接続すると、ステアリングホ イールの自動調整が実行されます。 自動調整では、ステアリングホイールが左右方向に合計 900° すばやく回転し、最 後にセンターで停止します。 警告: 自動調整が行われている間は、絶対にステアリングホイールに触れないでください。 調整が正しく行われなかったり、ケガをしたりする恐れがあります ペダルセットの自動調整 ステアリングホイールがゲーム機に接続されている状態、もしくはゲームプレイ中 は、絶対にペダルセットをステアリングホイールのベース部に接続 (またはベース 分から取り外し) しないでください。調整が正しく行われない場合があります。 ペダルセットは必ず、ステアリングホイールをゲーム機に接続する前に、ステアリ ングホイールに接続してください。 ステアリングホイールの調整が完了してゲームが起動した後、ペダルを数回踏むと ペダルは自動的に調整されます。 警告: ペダルの自動調整が行われている間やゲームのロード中は、 絶対にペダルを踏まないでください!調整が正しく行われない恐れがあります。 ステアリングホイールやペダルセットが正しく動作しない、あるいは調整が正しく ないと思われる場合: ゲーム機本体の電源をオフにし、ステアリングホイールを完全に取り外します。次 に、(電源ケーブルとペダルのセットを含む) すべてのケーブルをつなぎ直してから 、ゲーム機本体とゲームを再起動してください。 16/28...
- Page 434 MODE ボ タ ン お よ び イ ン ジ ケ ー タ ラ ン プ に つ い て さ ら に 詳 し く 知 る に は 、 http://ts.thrustmaster.com を ご 覧 く だ さ い 。 [Updates and downloads] か ら...
- Page 435 ヘルプ ファイルとよくある質問 (本マニュアルには含まれてい ません) http://ts.thrustmaster.com を 参 照 し て く だ さ い 。 ま た 、 [Updates and downloads] か ら ▸[PlayStation / Wheels / T300 RS] を ク リ ッ ク し 、 [Manual/Help file] を選択してください。...
- Page 436 19/28...
- Page 437 技術仕様 1 円錐ストップ用金属サポート 4 2.5 mm2.5 mm 六角レンチ (付属) (出荷時には取り付けられていません) 5 円錐ストップ位置調整ナット 2 円錐ストップ 3 金属サポート取り付けねじ 6 ペダルアーム 8 メタルペダルヘッド 7 プラスチック製ヘッドサポート 20/28...
- Page 438 警告 本製品をお使いになる前に、このマニュアルをしっかりとお読みになり、いつでも参 照できる場所に保管しておいてください。 ペダルセットは、裸足もしくは靴下しか着用していない状態で絶対 に使用しないでください。安全のため、必ず靴を着用してください 。 THRUSTMASTER® は、靴を着用せずにペダルセットを使用したことに よって生じたいかなるケガについても一切責任を負いません。 警告 – ペダルセット挟まれ危険 * ペダルセットは、お子様の手の届かない場所で使用および保管してください。 *プレイ中は、ペダルの両サイド付近に指を絶対に置かないでください。 *プレイ中は、ペダルの後方ベース部付近に指を絶対に置かないでください。 *プレイ中は、ペダルのフロントベース部付近に指を絶対に置かないでください。 危険 危険 危険 21/28...
- Page 439 ペダルの自動調整 重要: - 調整トラブルを避けるため、ステアリングホイールが PS3® または PS4™ に接 続された状態で、ステアリングホイールのベース部からペダルセットを絶対に 取り外さないでください。 - ペダルセットは必ず、PS3® または PS4™ に接続する前に、ステアリングホイー ルに接続してください。 - ステアリングホイールの自動調整が終了してゲームが起動すると、ペダルも数 回踏まれることで自動的に調整されます。 - 調整トラブルを防ぐため、ゲームの起動中は絶対にステアリングホイールを動 かしたり、ペダルを踏んだりしないでください。 - ペダルセットが正しく動作しない、あるいは調整が正しくないと思われる場合 は、ゲーム機本体の電源をオフにし、ステアリングホイールを完全に取り外し ます。次に、(電源ケーブルとペダルのセットを含む) すべてのケーブルをつな ぎ直してから、ゲーム機本体とゲームを再起動してください。 ペダルセットをコックピットに取り付ける - ペダルセットを、ペダルセット底面のねじ山を使って取り付けます。 - 2 本の M6 ねじ (付属していません) をコックピットのペダルサポートプレー トに通し、ペダルセット底面の 2 つの小さなねじ穴に差し込みます。 重要:使用する...
- Page 440 ペダルセットの調整 3 つのペダルに含まれるもの: - 複数の穴が開いた金属製ヘッドヘッド (アクセル用に 9 個、ブレーキ用に 6 個、クラッチ用に 6 個)。 - 4 個の穴が開けられた "プラスチック製ヘッドサポート " (ヘッドとアーム の間)。 - 2 個の穴が空いたペダルアー 。 注意:調整トラブルを防ぐため、ペダル セットの調整を行う前に、必ずステアリン グホイールの USB ケーブルを PS3® または PS4™ から取り外してください。 23/28...
- Page 441 アクセルペダルの高さの調整 - 付属の 2.5mm 六角レンチ で、"金属製ヘッド " とそのサポート部分 を固定している 2 個のねじを緩めて取り外します。 - 任意の高さポジションを選択してからねじを戻し、"金属製ヘッド " とその サポート部分 がしっかりと固定されるまでねじを締めます。 低ポジション (デフォルト) 高ポジション 3 ペダルのスペース間隔の調整 - 付属の 2.5mm 六角レンチ で、"金属製ヘッド " とそのサポート部分 を固定している 2 個のねじを緩めて取り外します。 - 任意のポジション (左、中央、右) を選択してからねじを戻し、"金属製ヘッド " とそのサポート部分 がしっかりと固定されるまでねじを締めます。 ブレーキペダルのセッティング例: 左ポジショ...
- Page 442 ペダルの傾き調整 - 付属の 2.5mm 六角レンチ で、"金属製ヘッド " とそのサポート部分 を固定している 2 個のねじを緩めて取り外します。 - プラスチック製ヘッドサポート を 180°回してからねじを戻し、"金属製 ヘッド " とそのサポート部分 がしっかりと固定されるまでねじを締め ます。 アクセルペダルのセッティング例: 傾き小 傾き大 (デフォルト) ペダル毎にセッティング可能な傾きポジション数: - アクセルペダル 2 ポジション - ブレーキペダル 2 ポジション - クラッチペダル 2 ポジション 25/28...
- Page 443 円錐ストップの取り付け ("CONICAL RUBBER BRAKE" MOD) このカスタム変更 (MOD) は必須でないため、デフォルトでは取り付けられてい ません。この MOD が取り付けられていない場合、ブレーキペダルは最も標準的 に動作します。 MOD を取り付けることで、ブレーキ時のフィーリングや抵抗をアレンジして楽し むことができます。 お好みに合わせてご利用ください。 - 円錐ストップ を、金属サポート にねじで取り付けます。 - 位置調整ナット を底部 (円錐ストップのねじ山) に取り付けます。 - 円錐ストップをブレーキペダルのアーム部分にセットします。 26/28...
- Page 444 - 付属の 2.5 mm 六角レンチ を使い、円錐ストップをペダルセット底面にあ る小さな中央ねじ山に、取り付けねじ を使って取り付けます。 これで"CONICAL RUBBER BRAKE" MOD の取り付けが完了しました! ブレーキペダルの可動域と抵抗強さの設定 ナット を少し緩めて、円錐ストップ をペダルアームのバックに近づけ ることで、ブレーキペダルの抵抗を強めることができます (必要に応じて、14 mm のスパナもしくはラジオペンチを使用して固定してください)。円錐ストップ をペダルのアームのバックに近く取りつけるほど抵抗は大きくなります。 注意:円錐ストップがブレーキペダルのバックの非常に近くにあると、最大調整 値に到達しにくくなる場合があります。そのような場合は: ブレーキペダルを、最大値に達するまでゆっくり、かつ強く踏みつける (必要であれば、ペダルの上に一瞬立っても構いません))、あるいは 円錐ストップをブレーキペダルのアームのバックからもう少し離します。 27/28...
- Page 445 著作権 ©2015 Guillemot Corporation S.A. All rights reserved. Thrustmaster® は 、 Guillemot Corporation S.A. の登録商標です。 "PlayStation"、"PS4"、 "PS3"および"PS one"は株式会社ソニー・コンピュータエ ンタテインメントの登録商標または商標です。 "Sony Entertainment Network"はソニー株式会社の商標です。 Ferrari® is a registered trademark of Ferrari Idea S.p.A. All rights reserved. その他、本書に記載の登録商標およびブランド名は、それぞれの 所有権者に帰属します。 本書に含まれるイラストには法的拘束力はありません。本書に 含まれる内容、設計および仕様は、事前の通告なしに変更される場合があり、また、各 国で異なる場合があります。 TouchSense® テクノロジーは、Immersion Software Ireland Limited からライセン...
- Page 446 사용설명서 경고: 게임에서 T300 레이싱 핸들의 기능이 올바로 발휘되도록 하려면 게임 인터넷에 연결되어 있어야 자동 자동 업데이트를 설치해야 합니다( 업데이트 기능을 사용할 수 있습니다) 1/24...
- Page 447 기술적 특징: 1 T300 RS 베이스 7 SELECT/START(선택/시작) 2 Ferrari 599XX EVO 핸들 버튼 - PS3™ 및 3 2 개의 시퀀셜 기어 패들 시프터(위 및 SHARE/OPTIONS(공유/옵션) 아래) 버튼 - PS4™ 4 방향 버튼 8 PS 버튼 5 PS4™/PS3™ 용 내장 USB 슬라이딩...
- Page 448 레이싱 핸들을 전기 콘센트에 연결하기: 연결하기 전에 읽어 주십시오! 레이싱 핸들의 전원공급장치는 기기를 구매한 국가별로 다릅니다. 한국의 경우 전원공급장치: 내부: * 전원공급장치 (C 형 커넥터) 가 레이싱 핸들 베이스 내부에 위치. * 220-240 V 전원 공급 케이블. = 220-240 V 전원만 사용 가능. 케이블을...
- Page 449 경고 이 제품을 사용하기 전에 이 설명서를 주의 깊게 읽고 나중에 참고할 수 있도록 잘 보관하시기 바랍니다. 경고 – 감전 * 본 제품은 건조한 곳에 보관해야 하며, 먼지나 태양광선에 노출시키지 마십시오. * 커넥터 및 케이블을 비틀거나 잡아 당기지 마십시오. * 본 제품이나 제품의 커넥터에 액체를 흘리지 마십시오. * 제품을...
- Page 450 안전한 사용을 위해 페달 세트를 절대 맨발 또는 양말만 신은 상태에서 조작하지 마십시오. ® 는 신발 없이 페달 세트를 조작함으로써 THRUSTMASTER 발생하는 부상에 대해 어떠한 책임도 지지 않습니다. 경고 – 포스 피드백 및 반복적인 움직임으로 인한 부상 위험 포스 피드백(게임 기기에서 충격 또는 진동을 실제로 체감하는 기능)레이싱...
- Page 451 중량 제품 본 제품은 만 16 세 이상의 사용자만 본 제품을 본인이나 다른 사람에게 조작해야 합니다 떨어뜨리지 않도록 주의하십시오! 반드시 준수 절대 금지 절대 금지 경고 – 게임 중 페달 세트에 끼일 위험 * 페달 세트에 어린이가 접근하지 못하게 하십시오. * 게임...
- Page 452 레이싱 핸들 펌웨어 업데이트 레이싱 핸들 베이스에 포함된 펌웨어는 제품을 개선시킨 최신 버전으로 업데이트할 수 있습니다. 레이싱 핸들이 현재 사용 중인 펌웨어 버전을 표시하고 필요한 경우 버전을 업데이트 하려면 PC에서 다음 사이트에 연결합니다. http://ts.thrustmaster.com. Updates and Downloads(업데이트 및 다운로드)부분에서 PlayStation /Wheels/T300 RS ...
- Page 453 레이싱 핸들을 장착한 후에는 Thrustmaster 퀵 릴리즈 장치 (12)의 링에 있는 소형 부착 나사에 손이 닿을 수 있도록 핸들을 180° 회전시키십시오(핸들을 마주봤을 때 ® 로고의 위아래가 뒤집힌 상태이어야 합니다). 대형 십자 드라이버로 소형 부착 Ferrari 나사를 시계 방향으로 돌려 조입니다(무리한 힘을 가하지 마십시오).
- Page 454 레이싱 핸들 부착하기 테이블이나 책상에 레이싱 핸들 부착하기 1. 레이싱 핸들을 테이블 또는 수평 상태의 평평하고 안정된 표면 위에 놓습니다. 2. 조임 나사 (11) 를 부착 시스템 (10) 에 삽입한 후, 나사를 시계 반대 방향으로 돌려서 기기를 조입니다. 이때, 레이싱 핸들 밑에 있는 대형 나사 구멍 (9) 에 나사를...
- Page 455 부착/제거 방향 조이기: 나사를 시계 반대 방향으로 돌립니다 풀기: 나사를 시계 방향으로 돌립니다 10/24...
- Page 456 레이싱 핸들 베이스를 조종석에 부착하기 1. 레이싱 핸들 베이스를 조종석 선반에 놓습니다. 2. 조종석 선반을 통해 2 개의 M6 나사(제품에 포함되지 않음)를 밀어넣은 후, 레이싱 핸들 밑에 있는 2 개의 소형 나사산 속에 삽입합니다. 중요 두 개의 나사의 길이가 선반 두께 를...
-
Page 457: Playstation®3 또는 Playstation®4 용 레이싱 핸들 설정
PLAYSTATION®3 또는 PLAYSTATION®4 용 레이싱 핸들 설정 1. 페달 세트를 레이싱 핸들 베이스에 있는 커넥터(17) 에 연결합니다. 2. 전원 공급 케이블을 레이싱 핸들 베이스에 있는 커넥터(14) 에 연결합니다. 3. 전원 공급 케이블을 동일한 전압을 공급하는 전원 콘센트에 연결합니다. 이에 대한 자세한 내용은 이 사용설명서 페이지의... - Page 458 - On PlayStation®4 의 경우, USB 슬라이딩 스위치 (5)가 PS4™ 위치로 설정되어 있어야 합니다. * 핸들을 사용하려면, 레이싱 핸들의 PS 버튼 (8)을 반드시 눌러야 합니다. * 대부분의 게임에서 핸들이 T300 RS 핸들로 인식됩니다. * 호환되는 게임과 시스템 메뉴에서 핸들이 기능을 발휘합니다. * 핸들에서 “SHARE”(공유)및 “PS” 기능이 작동합니다.
- Page 459 페달 세트 자동 보정 페달 세트가 시스템에 연결되어 있는 경우 또는 게임 중인 경우에는 페달 세트를 절대로 레이싱 핸들 베이스에 연결하지(또는 페달 세트를 베이스에서 분리하지)마십시오(이로 인해 보정이 잘못될 수 있습니다). 레이싱 핸들을 시스템에 연결하기 전에 반드시 페달 세트를 연결하십시오. 레이싱 핸들의 보정이 완료되고 게임이 시작된 후, 페달을 몇 번 누르면 자동으로 페달이...
- Page 460 레이싱 핸들의 내부 메모리에는 페달이 교대되었는지 여부가 저장됩니다. 가속 페달 및 클러치 페달 MODE 표시등 (6) 색상 정상 적색 교대 시 녹색 MODE 버튼에 대한 다른 도움말 MODE 버튼 및 표시등에 대한 더 자세한 내용은 http://ts.thrustmaster.com 에서 확인할 수 있습니다. 및 다운로드)부분에서 Updates Downloads(업데이트 을 클릭한...
- Page 461 16/24...
- Page 462 기술적 특징 2.5 MM 1 원뿔형 정지 장치용 금속 4 2.5 mm Allen 키(제품에 포함) (기본적으로 미설치) 지지대 5 원뿔형 정지 장치용 위치 조정 너트 2 원뿔형 정지 장치 3 금속 지지대 부착 나사 6 페달 암 8 금속 페달 헤드 7 플라스틱...
- Page 463 이 제품을 사용하기 전에 이 설명서를 주의 깊게 읽고 나중에 참고할 수 있도록 잘 보관하시기 바랍니다. 안전한 사용을 위해 페달 세트를 절대 맨발 또는 양말만 신은 상태에서 조작하지 ® 마십시오. THRUSTMASTER 는 신발 없이 페달 세트를 조작함으로써 발생하는 부상에 대해 어떠한 책임도 지지 않습니다. 경고 – 게임 도중 페달 세트에 끼일 위험...
- Page 464 페달 자동 보정 중요: - 보정 관련 문제가 발생하지 않도록 하려면 핸들이 PS3™ 또는 PS4™에 연결되어 있는 경우, 또는 게임 중인 경우 절대로 페달 세트를 연결하거나 연결 해제하지 마십시오. = 핸들을 PS3™ 또는 PS4™에 연결하기 전에 반드시 페달 세트를 연결하십시오. - 핸들의...
- Page 465 페달 세트 조절 세 개의 페달에는 각각 다음 구성품이 포함됩니다. - 여러 구멍(액셀용 9 개, 브레이크용 6 개, 클러치용 6 개)이 있는 메탈 헤드(8) 1 개 = - 4 개의 구멍이 있는 플라스틱 헤드 지지물 (7) 1 개(헤드와 암 사이에 위치) - 2 개의...
- Page 466 세 개 페달의 ‘간격’ 조정 - 제품에 포함된 2.5 mm Allen 키 (4)를 이용해서 메탈 헤드 (8)와 그 지지물(7)을 제자리에 고정시키는 2 개의 나사를 푸십시오. - 원하는(왼쪽, 가운데, 오른쪽으로)위치를 선택한 후 메탈 헤드 (8)와 그 지지물(7)을 제자리에 고정시킬 수 있도록 나사를 다시 조이십시오. 브레이크...
- Page 467 원뿔형 정지 장치 설치(“원뿔형 고무 브레이크” ) 이 개조물은 반드시 필요한 것은 아니므로 기본적으로 설치되어 있지 않습니다 즉 이 개조물이 설치되지 않았어도 브레이크 페달은 완벽하게 기능을 발휘합니다 이 개조물은 브레이크 제동 시 다른 느낌과 저항감을 제공합니다 설치 여부는 사용자의 결정에 따릅니다 - 원뿔형...
- Page 468 - 제품에 포함된 2.5 mm Allen 키 (4)를 이용해서 기기를 부착 나사(3)와 페달 세트 밑면에 있는 소형 중앙 나사산을 이용해서 기기를 부착합니다. 원뿔형 고무 브레이크 가 설치되었습니다 “ ” 브레이크 페달의 이동 범위 및 저항력 조정 너트(5)를 약간 풀어서 페달 암의 뒤쪽에 가까운 원뿔형 정지 장치(2)를 이동시켜 브레이크...
- Page 469 COPYRIGHT © 2015 Guillemot Corporation S.A. 모든 권리 보유. Thrustmaster®는 Guillemot Corporation S.A.의 등록상표입니다. “ ”, “PlayStation”, “ ”, “ ”은 Sony Computer Entertainment, Inc 의 등록상표입니다. “ ”는 Sony Computer Entertainment, Inc 의 상표입니다. 다른 모든 상표는 해당 소유자의...
- Page 470 User Manual WARNING: To ensure that your T300 racing wheel functions correctly with games, you may be required to install the game’s automatic updates (available when your system is connected to the Internet). 1/24...
-
Page 471: Technical Features
TECHNICAL FEATURES 1 T300 RS base 7 SELECT/START buttons on PS3™ and 2 Ferrari 599XX EVO Wheel SHARE/OPTIONS on PS4™ 3 2 sequential paddle shifters (up & down) 8 PS button 4 Directional buttons 9 Large threaded hole (for attachment system 5 Built-in USB sliding switch for PS4™/PS3™... -
Page 472: Plugging The Racing Wheel Into An Electrical Outlet: Please Read Before Proceeding
PLUGGING THE RACING WHEEL INTO AN ELECTRICAL OUTLET: PLEASE READ BEFORE PROCEEDING! Your racing wheel’s power supply varies according to the country where you purchased your device. The power supply can be: Mainland China: internal, with: * A power supply unit located directly inside the racing wheel's base, with a type A connector *A 220-240V mains power supply cable = compatible only with a 220-240V electrical supply. - Page 473 Hong Kong: internal, with: * A power supply unit located directly inside the racing wheel's base, with a type G connector *A 220-240V mains power supply cable = compatible only with a 220-240V electrical supply. Never connect the 220-240V cable to a 100-130V power outlet! Never connect this cable to a mains power adapter! Korea: internal, with: * A power supply unit located directly inside the racing wheel's base, with a type C...
- Page 474 * Do not let any dust build up on the air vents. For safety reasons, never use the pedal set with bare feet or while wearing only socks on your feet. THRUSTMASTER DISCLAIMS ALL RESPONSIBILITY IN THE EVENT OF ®...
- Page 475 Warning – Injuries due to force feedback and repeated movements Playing with a force feedback racing wheel may cause muscle or joint pain. To avoid any problems: * Avoid lengthy gaming periods. * Take 10 to 15 minute breaks after each hour of play. * If you feel any fatigue or pain in your hands, wrists, arms, feet or legs, stop playing and rest for a few hours before you start playing again.
- Page 476 To display the firmware version that your racing wheel is currently using and update it if required: on PC, visit http://ts.thrustmaster.com. In the Updates and Downloads section, click PlayStation Wheels / T300 RS, then select Driver/Firmware and follow the instructions describing the download and installation procedure. Important note: On PC, the USB sliding switch (5) on the racing wheel’s base must always be set to the PS3™...
- Page 477 Once you have installed the wheel, rotate it 180° (when facing the wheel, the Ferrari® logo should be upside down) to access the small attachment screw located on the ring of the Thrustmaster Quick Release (12) device. Use a large Phillips screwdriver to tighten the small attachment screw (do not use excessive force), turning it clockwise.
- Page 478 ATTACHING THE RACING WHEEL Attaching the racing wheel to a table or a desktop 1. Place the racing wheel on a table or any other horizontal, flat and stable surface. 2. Insert the fastening screw (11) in the attachment system (10), then tighten the device by turning the screw anticlockwise, so that it feeds into the large threaded hole (9) located beneath the racing wheel, until the wheel is perfectly stable.
-
Page 479: Attachment / Removal
ATTACHMENT / DIRECTION REMOVAL To tighten: Turn the screw anticlockwise To release: Turn the screw clockwise 10/24... - Page 480 Attaching the racing wheel’s base to a cockpit 1. Place the racing wheel’s base on the cockpit shelf. 2. Drive two M6 screws (not included) through the cockpit shelf, then feed them into the two small screw threads located on the underside of the racing wheel. Important: The length of the two M6 screws must not exceed the thickness of the shelf + 12 mm;...
- Page 481 3 AND P 4 MAPPING TATION® TATION® 12/24...
- Page 482 * Don't forget to press the racing wheel’s PS button (8) in order to be able to use the wheel. * The wheel is recognised in most games as a T300 RS wheel. * The wheel is functional in compatible games and in system menus.
-
Page 483: Automatic Racing Wheel And Pedal Set Calibration
AUTOMATIC RACING WHEEL AND PEDAL SET CALIBRATION The wheel automatically self-calibrates when you plug the racing wheel into an electrical outlet and connect the racing wheel’s USB connector to the system. During this phase, the racing wheel will rotate quickly towards the left and the right, covering a 900 degree angle, before stopping at the centre. - Page 484 NORMAL SWAPPED AROUND GREEN Other information regarding the MODE button To learn more about the MODE button and indicator light, please visit http://ts.thrustmaster.com. In the Updates and Downloads section, click PlayStation / Wheels / T300 RS, then select Manual/Help file.
- Page 485 16/24...
- Page 486 TECHNICAL FEATURES 1 Metal support for conical stop 4 2.5 mm Allen key (included) 5 Position adjustment nut for conical stop (not installed by default) 2 Conical stop 3 Attachment screw for metal support 6 Pedal arm 8 Metal pedal head 7 Plastic head support 17/24...
- Page 487 For safety reasons, never use the pedal set with bare feet or while wearing only socks on your feet. THRUSTMASTER® DISCLAIMS ALL RESPONSIBILITY IN THE EVENT OF INJURY RESULTING FROM USE OF THE PEDAL SET WITHOUT SHOES. Warning – Pedal set pinching hazard during gaming sessions * Keep the pedal set out of the reach of children.
- Page 488 AUTOMATIC CALIBRATION OF PEDALS IMPORTANT: - Never connect or disconnect the pedal set from the base of the wheel when the wheel is connected to the PS3™ or PS4™, or during gaming sessions, to avoid calibration problems. = Always connect the pedal set to the wheel before connecting the wheel to the PS3™ or PS4™. - Once the wheel has self-calibrated and the game has started, the pedals automatically calibrate themselves after being pressed a few times.
- Page 489 ADJUSTING THE PEDAL SET Each of the three pedals includes: - A metal head (8) with multiple perforations (nine for the accelerator – six for the brake – six for the clutch). - A plastic head support (7) (placed between the head and the arm) with four perforations. - A pedal arm (6) with two perforations.
- Page 490 Adjusting the SPACING of the three pedals - Using the included 2.5 mm Allen key (4), unscrew the two screws holding the metal head (8) and its support (7) in place. - Select your preferred position (to the left, centered, or to the right), then replace and re-tighten the screws so that the metal head (8) and its support (7) are held firmly in place.
- Page 491 Installing the conical stop (“CONICAL RUBBER BRAKE” mod) This modification (or “mod”) is not essential, and is not installed by default. This means that the brake pedal functions perfectly even if the mod is not installed. This mod lets you experience a different feeling and resistance when braking. It’s up to you whether or not to install it, depending on your own preferences.
- Page 492 - Using the included 2.5 mm Allen key (4), attach the unit using the attachment screw (3) and the small central screw thread located on the underside of the pedal set. The “CONICAL RUBBER BRAKE” mod is now installed! Adjusting the brake pedal’s RANGE of travel and STRENGTH of resistance By slightly unscrewing the nut (5), you can further strengthen the resistance of the brake pedal by moving the conical stop (2) closer to the back of the pedal’s arm (if necessary, use a 14 mm wrench or pliers to re-tighten the nut and maintain the selected position).
- Page 493 COPYRIGHT © 2015 Guillemot Corporation S.A. All rights reserved. Thrustmaster® is a registered trademark of Guillemot Corporation S.A. “ ”, “PlayStation”, “ ” and “ ” are registered trademarks of Sony Computer Entertainment, Inc. “ ” is a registered trademark or trademark of the same company.
- Page 494 用户手册 警告: 为了确保 T300 赛车方向盘在游戏过程中正常工作, 可能需要安装游戏的自动更新(需将系统连接到互联网)。 1/24...
- Page 495 技术特性 1 T300 RS 底座 7 SELECT/START(选择/启动)按钮 2 法拉利 599XX EVO 方向盘 (PS3™);SHARE/OPTIONS(分 3 2 个连续换档拨片(向上、向下) 享/选项)按钮(PS4™) 4 方向按钮 8 PS 按钮 5 内置 USB 滑动开关 9 大螺纹孔 (供 PS4™/PS3™ 使用) (供附着系统和紧固螺钉使用) 6 MODE(模式)按钮 + 10 附着系统 红色/绿色指示灯 11 金属紧固螺钉...
- Page 496 将赛车方向盘插入电源插座:继续进行之前请仔细阅读以下说明! 赛车方向盘的电源随购买设备所在的国家而异。 电源可采用以下类型: 中国大陆:内置,配有: * A 型接口电源部件,直接安装在赛车方向盘底座内部 * 220-240V 电源线 = 只兼容 220-240V 供电电源。 切勿将 220-240V 电源线连接到 100-130V 电源插座!切勿将该电源 线连接到电源适配器! 台湾:内置,配有: * A 型接口电源部件,直接安装在赛车方向盘底座内部 * 100-125V 电源线 = 只兼容 100-125V 供电电源。 切勿将 100-125V 电源线连接到 220-240V 电源插座!切勿将该电源线 连接到电源适配器! 3/24...
- Page 497 韩国:内置,配有: * C 型接口电源部件,直接安装在赛车方向盘底座内部 * 220-240V 电源线 = 只兼容 220-240V 供电电源。 切勿将 220-240V 电源线连接到 100-130V 电源插座!切勿将该电源线 连接到电源适配器! 重要说明:如果您不知道使用方向盘所在区域采用哪一种供电电压,请咨询当地的 电力供应商。 警告 使用本产品之前,请仔细阅读本手册并妥为保存供以后参考。 警告 — 电击 * 请将本产品置于干燥处,请勿将其暴露于灰尘或阳光下。 * 请勿扭曲或拉拽接口和线缆。 * 请勿将任何液体溅到产品或其接口上。 * 请勿使本产品短路。 * 切勿拆卸本产品;请勿将其投入火中以及暴露于高温下。 * 请使用随赛车方向盘提供的电源线,切勿使用除此之外的其他电源线。 * 如果线缆或者其接口损坏、开裂或破损,请勿使用电源线。 * 确保电源线正确插入电源插座,并正确连接到赛车方向盘底座背面的接口。 * 请勿打开赛车方向盘:里面没有用户可维修部件。任何维修必须由制造商、其授权代...
- Page 498 通气孔 确保未阻塞赛车方向盘底座上的任何通气孔。为了实现最佳通风,请确保做到以下几点: * 方向盘底座与任何墙面至少保持 10cm 的距离。 * 请勿将底座置于任何狭窄空间。 * 请勿遮盖底座。 * 请避免灰尘在通气孔堆积。 为安全起见,切勿赤脚或脚上只穿着袜子使用踏板组。 ® 对于在未穿鞋的情况下使用踏板组 THRUSTMASTER 而造成的伤害不承担任何责任。 警告 — 力回馈和重复动作所导致的伤害 使用力回馈赛车方向盘玩游戏可能会导致肌肉或关节疼痛。如欲避免任何问题,请采 取以下措施: * 避免游戏时间过长。 * 游戏每进行一小时之后应休息 10 到 15 分钟。 * 如果感觉手、腕、臂、腿或脚出现任何疲劳或疼痛,请停止游戏并休息几个小时, 然后再重新开始游戏。 * 重新开始游戏之后,如果症状或疼痛持续存在,请停止游戏并咨询医生。 * 请放在儿童接触不到的地方。 * 在游戏过程中,要始终保持双手在方向盘处于正确位置,而不是完全随意放置。 * 在游戏过程中,切勿将手或手指放在踏板下方或靠近踏板组的任何位置。...
- Page 499 始终保持 绝对禁止 绝对禁止 警告 — 玩游戏时踏板组夹住危险 * 请将踏板组放在儿童接触不到的地方。 * 在游戏过程中,切勿将手指放在踏板两侧或靠近踏板两侧的任何位置。 * 在游戏过程中,切勿将手指放在踏板后基座上或靠近踏板后基座的任何位置。 * 在游戏过程中,切勿将手指放在踏板前基座上或靠近踏板前基座的任何位置。 绝对禁止 绝对禁止 绝对禁止 警告 — 不玩游戏时踏板组夹住危险 * 请将踏板组存放在安全的地方,放在儿童接触不到的地方。 6/24...
- Page 500 更新赛车方向盘的固件 可将封装在赛车方向盘底座的固件更新为具有产品增强功能的最新版本。 要显示赛车方向盘当前所使用的固件版本,如有需要则进行更新:在电脑上,访问以 下网址 http://ts.thrustmaster.com。在 Updates and Downloads(更新和下载) 区点击 PlayStation /Wheels/T300 RS(PlayStation®/方向盘/T300 RS),然后选 择 Driver/Firmware(驱动程序/固件)并按照操作说明所描述的下载和安装过程进行。 重要提示: 在电脑上,赛车方向盘底座上的 USB 滑动开关 (5) 必须始终设置在 PS3™ 的位置。 将方向盘安装在底座上 使用箭头对准接口位置: 底座 (1) 接口:箭头朝上 赛车方向盘 (2) 接口:箭头朝上 接口正确定位之后,只需将方向盘 (2) 保持在适当位置,同时逆时针方向旋转图马思特 快速拆卸 (12) 装置的套环。 然后,尽可能拧紧套环:要做到这一点,需将套环保持在适当位置并顺时针旋转赛车方 向盘。...
- Page 501 ® 安装好方向盘之后,将其旋转 180°(面对方向盘时,Ferrari 徽标应该是颠倒的)以贴 近位于图马思特快速拆卸 (12) 装置套环上的小连接螺钉。使用一把大菲利普斯螺丝刀 顺时针转动小连接螺钉(请勿过度用力)将其拧紧。 拧紧小连接螺钉时请勿过度用力。 (使用菲利普斯螺丝刀)! 只要感觉遇到阻力请立即停止转动螺钉。 8/24...
- Page 502 安装赛车方向盘 将赛车方向盘安装到桌子或桌面上 1. 将赛车方向盘放在桌子上或其他任何水平、平坦和稳定的表面上。 2. 将紧固螺钉 (11) 插入附着系统 (10),然后逆时针方向转动螺钉将装置固定好, 使其穿入位于赛车方向盘下方的大螺纹孔 (9),直到方向盘完全稳固。 始终保持 绝对禁止 警告:附着系统未安装到位的情况下,切勿单独拧紧螺钉! (否则可能会损坏赛车方向盘。) 9/24...
- Page 503 连接/拆卸 方向 如欲拧紧: 逆时针方向 转动螺钉 如欲拧开: 顺时针方向 转动螺钉 10/24...
- Page 504 将方向盘底座连接到驾驶舱 1. 将方向盘底座放到驾驶舱支架上。 2. 将两枚 M6 螺钉(未含)穿过驾驶舱支架,然后穿入位于赛车方向盘底部的两道 小螺纹。 重要说明:两枚 M6 螺钉的长度不得超过支架厚度 +12mm;更长的螺钉可能会 损坏位于赛车方向盘底座之内的内部组件。 3. 如有需要,将紧固螺钉插入大螺纹孔来拧紧标准附着系统。 ® ® 3 和 PLAYSTATION 4 映射图 PLAYSTATION 方向按钮 SELECT (选择) (PS3 PS 按钮 START (启动) (PS3 SHARE (分享) (PS4 OPTIONS (选项) (PS4 11/24...
- Page 505 4 而 USB 滑动开关 (5) 处于 PS3™ 的位置时: * 方向盘在大多数游戏中被识别为 T500RS 方向盘。 * 方向盘可在兼容游戏中正常工作,但在系统菜单中无法工作。 * 方向盘上的“SHARE(分享)”和“PS”功能无法工作。 ® - 连接 PlayStation 4 而 USB 滑动开关 (5) 处于 PS4™ 的位置时: * 为了能够使用方向盘,请勿忘记按赛车方向盘的 PS 按钮 (8)。 * 方向盘在大多数游戏中被识别为 T300 RS 方向盘。 * 方向盘可在兼容游戏和系统菜单中正常工作。 12/24...
- Page 506 * 方向盘上的“SHARE(分享)”和“PS”功能可正常工作。 - 可访问以下网址查看与 T300 RS 兼容的 PlayStation® 3 和 PlayStation® 4 游戏 列表(以及根据所玩游戏需要设置的 USB 滑动开关 (5) 的位置): http://ts.thrustmaster.com/ ® (在 Updates and Downloads(更新和下载)区点击 PlayStation Wheels/T300 RS(PlayStation®/方向盘/T300 RS))。 该列表定期更新。 赛车方向盘和踏板组自动校准 将赛车方向盘插入电源插座并将赛车方向盘的 USB 接口连接到系统时,方向盘会自动 进行自校准。 在此阶段,方向盘会快速向左、向右旋转,转动角度达 900 度,然后停在中央。 警告: 在自校准阶段切勿触摸赛车方向盘! (否则可能会导致校准不正确和/或人身伤害。)...
- Page 507 如 欲 了 解 MODE ( 模 式 ) 按 钮 和 指 示 灯 的 更 多 信 息 , 请 访 问 以 下 网 址 : http://ts.thrustmaster.com。 在 Updates and Downloads(更新和下载)区点击 PlayStation /Wheels/T300 RS (PlayStation/方向盘/T300 RS),然后选择 Manual/Help file(手册/帮助文件)。 14/24...
- Page 508 帮助文件和常见问题解答(未包含在本手册中) 请访问以下网址 http://ts.thrustmaster.com,在 Updates and Downloads(更新 ® 和下载)区点击 PlayStation /Wheels/T300 RS(PlayStation®/方向盘/T300 RS), 然后选择 Manual/Help file(手册/帮助文件)。 设置电脑赛车方向盘* 更新赛车方向盘的固件 *电脑兼容性未经过测试,也未获得索尼电脑娱乐公司的支持 如欲了解更多信息,请访问以下网址:http://ts.thrustmaster.com。 15/24...
- Page 509 技术特性 1 锥形制动块金属支架(默认情况下未安装) 4 2.5mm 艾伦内六角扳手 2 锥形制动块 (随附) 3 金属支架连接螺钉 5 锥形制动块位置调整螺母 6 踏板臂 8 金属踏板头 7 塑料踏板头支架 16/24...
- Page 510 警告 使用本产品之前,请确保仔细阅读这些说明并妥为保存供以后参考。 为安全起见,切勿赤脚或脚上只穿着袜子使用踏板组。 ® 对于在未穿鞋的情况下使用踏板组 THRUSTMASTER 而造成的伤害不承担任何责任。 警告 — 游戏期间踏板组夹住危险 * 请将踏板组放在儿童接触不到的地方。 * 在游戏期间,切勿将手指或拇指放在踏板两侧或靠近踏板两侧的位置。 * 在游戏期间,切勿将手指或拇指放在踏板后基座上或靠近踏板后基座的位置。 * 在游戏期间,切勿将手指或拇指放在踏板前基座上或靠近踏板前基座的位置。 绝对禁止 绝对禁止 绝对禁止 17/24...
- Page 511 踏板自动校准 重要说明: - 方向盘连接到 PS3™ 或 PS4™ 时或在游戏期间,切勿将踏板组连接到赛车方向 盘底座或断开其与底座的连接,以避免出现校准问题。 = 将方向盘连接到 PS3™ 或 PS4™ 之前,要始终先连接踏板组。 - 方向盘完成自校准且游戏启动之后,踏板踩下几次之后就会自动进行自校准。 - 方向盘进行自校准或游戏启动时切勿踩踏板,以避免出现校准问题。 如果或踏板无法正常工作,或者似乎未能正确校准,请关闭系统电源,完全断开 方向盘的连接,然后重新连接所有线缆(包括电源线和踏板组线缆),恢复系统 供电并重新启动游戏。 将踏板组连接到驾驶舱 - 使用位于踏板组底部的小螺纹进行连接。 - 将两枚 M6 螺钉(未随附)拧入驾驶舱的踏板支撑板,并穿入位于踏板组底部的 两道小螺纹。 重要说明:两枚 M6 螺钉的长度不得超过驾驶舱的踏板支撑板厚度另外加上 10mm; 以避免损坏踏板组的内部组件。 18/24...
- Page 512 调整踏板组 三个踏板中的每一个都包含以下部件: - 金属踏板头 (8),带多个穿孔(加速踏板 9 个 — 刹车踏板 6 个 — 离合器踏板 6 个) - 塑料踏板头支架 (7)(位于踏板头和踏板臂之间),带 4 个穿孔。 - 踏板臂 (6),带 2 个穿孔。 注意:为了避免出现校准问题,在对踏板组进行任何调整之前,请确保始终先断开方 向盘的 USB 线缆与 PS3™ 或 PS4™ 的连接。 调整加速踏板的高度 - 使用随附的 2.5mm 艾伦内六角扳手 (4) 拧开固定金属踏板头 (8) 及其支架 (7) 的 两个螺钉。...
- Page 513 调整三个踏板的间距 - 使用随附的 2.5mm 艾伦内六角扳手 (4) 拧开固定金属踏板头 (8) 及其支架 (7) 的 两个螺钉。 - 选择所偏好的位置(靠左、居中或靠右),然后重新装好螺钉并拧紧,使得金属 踏板头 (8) 及其支架 (7) 牢牢地固定就位。 刹车踏板实例图示: 左侧位置 居中位置(默认) 右侧位置 每个踏板的可能间距位置数目: - 加速踏板三个 - 刹车踏板三个 - 离合器踏板三个 调整踏板的倾角 - 使用随附的 2.5mm 艾伦内六角扳手 (4) 拧开固定金属踏板头 (8) 及其支架 (7) 的 两个螺钉。...
- Page 514 加速踏板实例图示: 小倾角位置 大倾角位置(默认) 每个踏板的可能倾角位置数目: - 加速踏板两个 - 刹车踏板两个 - 离合器踏板两个 安装锥形制动块(“锥形橡胶刹车”mod) 这种改造(或“mod”)并非必要,默认情况下未安装。这意味着即使未安装 mod, 刹车踏板也可完全正常工作。 通过该 mod 可在刹车时体验不同的感觉和阻力。 可根据个人偏好决定是否安装。 - 将锥形制动块 (2) 拧到其金属支架 (1) 上。 - 将位置调整螺母 (5) 拧到末端(拧到锥形制动块的螺纹上)。 21/24...
- Page 515 - 将该部件装在单元刹车踏板臂的背面。 - 使用随附的 2.5mm 艾伦内六角扳手 (4),通过连接螺钉 (3) 和位于踏板组底部的 小中央螺纹安装该部件。 此时“锥形橡胶刹车” mod 已经安装完成! 22/24...
- Page 516 步提高刹车踏板的阻力(如有需要,可使用 14mm 扳手或钳子重新拧紧螺母并保 持选定位置)。锥形制动块距离踏板臂背面越近,阻力强度就会越大。 注意:锥形制动块距离刹车踏板臂背面非常近的情况下,可能会难以达到最大校准 值。如果出现这种情况,可采取以下措施: * 慢慢地用力踩刹车踏板以达到最大校准值(如有必要,在踏板上站立片刻 — 只 保持一秒钟),然后松脚;或者 * 将锥形制动块移动至距离刹车踏板臂背面稍远的位置。 版权所有 © 2015 Guillemot Corporation S.A. 保留所有权利。Thrustmaster® 是 Guillemot Corporation S.A. 的注册商标。“ ”、“PlayStation”、“ ”和“ ”是 Sony Computer Entertainment Inc. 的注册商标。“ ”是 Sony Computer Entertainment Inc. 的商标。所有其他商标是其各自所有者的财产。产品图片不具 约束力。以上内容、设计和规格若有变更,恕不另行通知。并且,以上信息可能因...
- Page 517 24/24...
- Page 518 User Manual WARNING: To ensure that your T300 racing wheel functions correctly with games, you may be required to install the game’s automatic updates (available when your system is connected to the Internet). 1/24...
-
Page 519: Technical Features
TECHNICAL FEATURES 1 T300 RS base 7 SELECT/START buttons on PS3™ and 2 Ferrari 599XX EVO Wheel SHARE/OPTIONS on PS4™ 3 2 sequential paddle shifters (up & down) 8 PS button 4 Directional buttons 9 Large threaded hole (for attachment system 5 Built-in USB sliding switch for PS4™/PS3™... -
Page 520: Plugging The Racing Wheel Into An Electrical Outlet: Please Read Before Proceeding
PLUGGING THE RACING WHEEL INTO AN ELECTRICAL OUTLET: PLEASE READ BEFORE PROCEEDING! Your racing wheel’s power supply varies according to the country where you purchased your device. The power supply can be: Mainland China: internal, with: * A power supply unit located directly inside the racing wheel's base, with a type A connector *A 220-240V mains power supply cable = compatible only with a 220-240V electrical supply. - Page 521 Korea: internal, with: * A power supply unit located directly inside the racing wheel's base, with a type C connector *A 220-240V mains power supply cable = compatible only with a 220-240V electrical supply. Never connect the 220-240V cable to a 100-130V power outlet! Never connect this cable to a mains power adapter! IMPORTANT: if you do not know which voltage is supplied in the area in which you are using your racing wheel, please refer to your local electricity supplier.
- Page 522 * Do not let any dust build up on the air vents. For safety reasons, never use the pedal set with bare feet or while wearing only socks on your feet. THRUSTMASTER DISCLAIMS ALL RESPONSIBILITY IN THE EVENT OF ®...
- Page 523 ALWAYS NEVER NEVER Warning – Pedal set pinch hazard when playing * Keep the pedal set out of children’s reach. * During gameplay, never place your fingers on or anywhere near the sides of the pedals. * During gameplay, never place your fingers on or anywhere near the pedal’s rear base. * During gameplay, never place your fingers on or anywhere near the pedal’s front base.
- Page 524 To display the firmware version that your racing wheel is currently using and update it if required: on PC, visit http://ts.thrustmaster.com. In the Updates and Downloads section, click PlayStation Wheels / T300 RS, then select Driver/Firmware and follow the instructions describing the download and installation procedure. Important note: On PC, the USB sliding switch (5) on the racing wheel’s base must always be set to the PS3™...
- Page 525 Once you have installed the wheel, rotate it 180° (when facing the wheel, the Ferrari® logo should be upside down) to access the small attachment screw located on the ring of the Thrustmaster Quick Release (12) device. Use a large Phillips screwdriver to tighten the small attachment screw (do not use excessive force), turning it clockwise.
- Page 526 ATTACHING THE RACING WHEEL Attaching the racing wheel to a table or a desktop 1. Place the racing wheel on a table or any other horizontal, flat and stable surface. 2. Insert the fastening screw (11) in the attachment system (10), then tighten the device by turning the screw anticlockwise, so that it feeds into the large threaded hole (9) located beneath the racing wheel, until the wheel is perfectly stable.
-
Page 527: Attachment / Removal
ATTACHMENT / DIRECTION REMOVAL To tighten: Turn the screw anticlockwise To release: Turn the screw clockwise 10/24... - Page 528 Attaching the racing wheel’s base to a cockpit 1. Place the racing wheel’s base on the cockpit shelf. 2. Drive two M6 screws (not included) through the cockpit shelf, then feed them into the two small screw threads located on the underside of the racing wheel. Important: The length of the two M6 screws must not exceed the thickness of the shelf + 12 mm;...
- Page 529 * Don't forget to press the racing wheel’s PS button (8) in order to be able to use the wheel. * The wheel is recognised in most games as a T300 RS wheel. * The wheel is functional in compatible games and in system menus.
-
Page 530: Internal Temperature Sensor
AUTOMATIC RACING WHEEL AND PEDAL SET CALIBRATION The wheel automatically self-calibrates when you plug the racing wheel into an electrical outlet and connect the racing wheel’s USB connector to the system. During this phase, the racing wheel will rotate quickly towards the left and the right, covering a 900 degree angle, before stopping at the centre. - Page 531 NORMAL SWAPPED AROUND GREEN Other information regarding the MODE button To learn more about the MODE button and indicator light, please visit http://ts.thrustmaster.com. In the Updates and Downloads section, click PlayStation / Wheels / T300 RS, then select Manual/Help file.
- Page 532 15/24...
-
Page 533: Technical Features
TECHNICAL FEATURES 1 Metal support for conical stop 4 2.5 mm Allen key (included) 5 Position adjustment nut for conical stop (not installed by default) 2 Conical stop 3 Attachment screw for metal support 6 Pedal arm 8 Metal pedal head 7 Plastic head support 16/24... - Page 534 For safety reasons, never use the pedal set with bare feet or while wearing only socks on your feet. THRUSTMASTER® DISCLAIMS ALL RESPONSIBILITY IN THE EVENT OF INJURY RESULTING FROM USE OF THE PEDAL SET WITHOUT SHOES. Warning – Pedal set pinching hazard during gaming sessions * Keep the pedal set out of the reach of children.
- Page 535 AUTOMATIC CALIBRATION OF PEDALS IMPORTANT: - Never connect or disconnect the pedal set from the base of the wheel when the wheel is connected to the PS3™ or PS4™, or during gaming sessions, to avoid calibration problems. = Always connect the pedal set to the wheel before connecting the wheel to the PS3™ or PS4™. - Once the wheel has self-calibrated and the game has started, the pedals automatically calibrate themselves after being pressed a few times.
- Page 536 ADJUSTING THE PEDAL SET Each of the three pedals includes: - A metal head (8) with multiple perforations (nine for the accelerator – six for the brake – six for the clutch). - A plastic head support (7) (placed between the head and the arm) with four perforations. - A pedal arm (6) with two perforations.
- Page 537 Adjusting the SPACING of the three pedals - Using the included 2.5 mm Allen key (4), unscrew the two screws holding the metal head (8) and its support (7) in place. - Select your preferred position (to the left, centered, or to the right), then replace and re-tighten the screws so that the metal head (8) and its support (7) are held firmly in place.
- Page 538 Installing the conical stop (“CONICAL RUBBER BRAKE” mod) This modification (or “mod”) is not essential, and is not installed by default. This means that the brake pedal functions perfectly even if the mod is not installed. This mod lets you experience a different feeling and resistance when braking. It’s up to you whether or not to install it, depending on your own preferences.
- Page 539 - Using the included 2.5 mm Allen key (4), attach the unit using the attachment screw (3) and the small central screw thread located on the underside of the pedal set. The “CONICAL RUBBER BRAKE” mod is now installed! Adjusting the brake pedal’s RANGE of travel and STRENGTH of resistance By slightly unscrewing the nut (5), you can further strengthen the resistance of the brake pedal by moving the conical stop (2) closer to the back of the pedal’s arm (if necessary, use a 14 mm wrench or pliers to re-tighten the nut and maintain the selected position).
- Page 540 COPYRIGHT © 2015 Guillemot Corporation S.A. All rights reserved. Thrustmaster® is a registered trademark of Guillemot Corporation S.A. “ ”, “PlayStation”, “ ” and “ ” are registered trademarks of Sony Computer Entertainment, Inc. “ ” is a trademark of the same company.
- Page 541 24/24...
- Page 542 用戶手冊 警告: 為確保 T300 賽車方向盤在遊戲時能正常運作,請安裝遊戲的自動更新 (更新會在主機連接到網絡時進行)。 1/24...
- Page 543 技術特點 1 T300 RS 底座 7 PS3™ 的 SELECT(選擇)/START(開 2 法拉利 599XX EVO 方向盤 始)按鈕及 PS4™ 的 SHARE(分享)/ 3 2 組變速槳(上 & 下) OPTIONS(選項)按鈕 4 方向按鈕 8 PS 按鈕 5 內置 PS4™/PS3™ USB 滑動開關 9 大螺絲孔(供固定裝置及固定螺桿使用) 6 MODE(模式)按鈕 + 紅色/綠色指...
- Page 544 將賽車方向盤連接到電源插座:進行前請先閱讀以下事項! 賽車方向盤的電源線視乎購買產品的國家而有所不同。 電源線可能為: 中國大陸:内部電源,連同: * 已直接安裝於方向盤底座內的電源裝置,附 A 型接頭 * 220-240V 電源線 = 僅兼容 220-240V 電源 切勿將 220-240V 電源線連接到 100-130V 電源插座!切勿將此電源線 連接到電源適配接頭! 台灣:内部電源,連同: * 已直接安裝於方向盤底座內的電源裝置,附 A 型接頭 * A 100-125V 電源線 = 僅兼容 100-125V 電源 切勿將 100-125V 電源線連接到 220-240V 電源插座!切勿將此電源線 連接到電源適配接頭! 3/24...
- Page 545 香港:内部電源,連同: * 已直接安裝於方向盤底座內的電源裝置,附 G 型接頭 * 220-240V 電源線 = 僅兼容 220-240V 電源 切勿將 220-240V 電源線連接到 100-130V 電源插座!切勿將此電源線 連接到電源適配接頭! 重要提示:如果您不知道方向盤使用地的供電電壓,請諮詢當地的供電商。 警告 使用本產品前,請仔細閱讀本手冊,並將其保存以供日後參考。 注意 – 慎防觸電 * 請將本產品存放於乾燥通風處,切勿暴露在灰塵或日光下。 * 請勿捲曲或拉扯接頭及電源線。 * 請勿讓任何液體潑濺到本產品或其接頭上。 * 請勿讓本產品發生短路。 * 切勿拆卸本產品;請勿將產品擲入火中或暴露在高溫環境下。 * 請勿使用其他非賽車方向盤隨附的電源線。 * 電源線或接頭如有損壞、斷裂或破損時,請勿使用。 * 請確保電源線的插頭已正確插入電源插座,並與賽車方向盤背面的底座正確連接。 * 請勿打開賽車方向盤:內裏零件並不提供保養服務。如有任何問題,請交由製造商、...
- Page 546 通風口 請勿堵塞賽車方向盤底座的通風口。為確保最佳的通風,請遵循以下指示: * 請將方向盤底座與牆壁保持 10 cm 以上的距離。 * 請勿將底座置於狹窄處。 * 請勿以任何物品覆蓋底座。 * 請勿讓灰塵在通風口堆積。 為確保安全,請勿在赤腳或僅穿襪子時使用腳踏板組。 ® 使用腳踏板組時若因未穿鞋而導致受傷,圖馬思特 概不負責。 注意 – 因力回饋及重複動作而可能造成的損傷 使用力回饋賽車方向盤可能會導致肌肉或關節疼痛。為免造成損傷: * 避免長時間遊玩。 * 每玩一小時請至少休息 10 至 15 分鐘。 * 若雙手、手腕、手臂、雙腳或腿部感到疲勞或疼痛,請停止遊玩,並休息幾小時後 才繼續遊玩。 * 若再次遊玩時仍有上述症狀或疼痛,請停止遊玩,並求醫診治。 * 請放在小孩無法觸及的地方。 * 遊玩期間請將雙手放在方向盤的正確位置,避免方向盤隨意轉動。 * 遊玩期間請勿將雙手或手指伸往腳踏板之下或腳踏板組附近。 * 在校準及遊玩期間,請勿將手或手臂穿過方向盤。...
- Page 547 注意 – 遊玩時請小心別被腳踏板組夾傷 * 請將腳踏板組放在小孩無法觸及的地方。 * 遊玩期間,請勿將手指放在腳踏板邊緣或附近。 * 遊玩期間,請勿將手指放在腳踏板後方或附近。 * 遊玩期間,請勿將手指放在腳踏板前方或附近。 禁止 禁止 禁止 注意 – 非遊玩時亦請小心別被腳踏板夾傷 * 請將腳踏板組放在安全且小孩無法觸及的地方。 更新賽車方向盤的韌體 將賽車方向盤底座的韌體更新為最新版本,可以改善產品性能。 若要確認所使用的賽車方向盤目前的韌體版本,並進行更新:請使用個人電腦前往 http://ts.thrustmaster.com。在「Updates and Downloads(更新與下載)」項目 點擊「PlayStation /Wheels/T300 RS(PlayStation®/方向盤/T300 RS)」,並選 擇「Driver/Firmware(驅動程式/韌體)」,然後遵循指示進行下載及安裝程序。 重要說明: 在 PC 上,遊戲賽車方向盤上的 USB 滑動開關 (5) 必須總是設於 PS3™ 位置。 6/24...
- Page 548 將方向盤安裝至底座 依照箭頭方向對準接頭位置: 底座 (1) 接頭:箭頭方向往上 賽車方向盤 (2) 接頭:箭頭方向往上 接頭插入正確位置後,將賽車方向盤 (2) 固定在適當位置,並逆時針旋轉圖馬思特快速 拆卸裝置 (12) 的裝置環。 然後,盡可能擰緊裝置環:將裝置環固定在適當位置,並順時針旋轉賽車方向盤。 ® 方向盤安裝完畢後,將其旋轉 180°(面朝方向盤時,法拉利 標誌為顛倒狀態),會見 到圖馬思特快速拆卸裝置 (12) 裝置環上的小型安裝螺絲。使用大型十字螺絲批以順時 針方向來擰緊小型安裝螺絲(請勿過度用力)。 7/24...
- Page 549 擰緊小型安裝螺絲時,請勿過度用力 (使用十字螺絲批)! 感到有阻力時,請停止轉動螺絲。 安裝賽車方向盤 將賽車方向盤固定在桌面上 1. 將賽車方向盤置於餐桌或其他保持水平、平坦且穩定的平面上。 2. 將固定螺桿 (11) 插入固定裝置 (10),然後以逆時針方向將螺桿擰入賽車方向盤 下方的大螺孔 (9),直至方向盤完全固定為止。 保持 禁止 警告:切勿在裝置固定完畢前擰緊螺桿! (以免賽車方向盤損壞) 8/24...
- Page 550 組裝/拆卸 方向 擰緊: 以逆時針方向轉入 鬆開: 以順時針方向轉出 9/24...
- Page 551 安裝賽車方向盤底座至駕駛座 1. 將賽車方向盤底座置於駕駛座框架上。 2. 將 2 顆 M6 螺絲(不隨附)穿過駕駛座框架,並擰進腳踏板組底部的 2 個小螺 絲孔。 重要說明:2 顆 M6 螺絲的長度不能超出框架厚度 + 12 mm,螺絲過長可能會造 成腳踏板組內部的零件損壞。 3. 必要時可將固定螺桿插入螺絲孔來擰緊固定裝置。 10/24...
- Page 552 PLAYSTATION®3 及 PLAYSTATION®4 示意圖 方向按鈕 SELECT (選擇) (PS3 START (開始) (PS3 PS 按鈕 SHARE (分享) (PS4 OPTIONS (選項) (PS4 11/24...
- Page 553 進行在 PlayStation®3 或 PlayStation®4 使用賽車方向盤的設定 1. 將腳踏板組連接到賽車方向盤底座背面的接頭 (17)。 2. 將電源線連接至賽車方向盤底座背面的接頭 (14)。 3. 將電源線插入相同電壓的電源插座。 更多詳細資訊,請參閱本手冊第 3 頁的「將賽車方向盤插頭插入電源插 座」章節。 4. 配合所使用的主機或遊戲,將賽車方向盤底座的 USB 滑動開關 (5) 推向 PS3™ 或 PS4™ 位置。 5. 將賽車方向盤的 USB 接頭 (15) 連接到主機的 USB 連接埠。 6. 賽車方向盤會在主機啟動後,自動進行校準。 7. 使用 PlayStation®4 時(USB 滑動開關設在 PS4™ 位置):如要使用方向盤,請按 下賽車方向盤的...
- Page 554 - 使用 PlayStation®4 時,將 USB 滑動開關 (5) 設在 PS4™位置: * 如要使用方向盤,請按下賽車方向盤的「PS」按鈕 (8) 。 * 大部分遊戲會將方向盤識別為 T300 RS 方向盤。 * 方向盤可在兼容的遊戲與系統選單正常操作。 * 方向盤可使用「SHARE(分享)」及「PS」的機能。 - 有關與 T300 RS 方向盤(配合所玩的遊戲將 USB 滑動開關 (5) 設定在適當 位置後)兼容的 PlayStation®3 及 PlayStation®4 遊戲列表,請參閱: http://ts.thrustmaster.com (在「Updates and Downloads(更新與下載)」項目點擊 ®...
- Page 555 自動校準腳踏板組 腳踏板組連接至主機或正在遊玩時,切勿將腳踏板組連接到賽車方向盤底座(或從底 座拔除),以免導致校準不當。 將賽車方向盤連接至主機前,請先連接腳踏板組。 賽車方向盤校準完成並遊戲啟動後,腳踏板在會在踩踏數次後自動進行校準。 警告: 切勿在賽車方向盤校準或正在載入遊戲時踩踏腳踏板! (以免導致校準不當) 賽車方向盤或腳踏板組無法正常運作,或是疑似校準不良時: 請關閉主機電源,完整拔除賽車方向盤的所有連接線,然後重新連接所有連接線(包 含電源線與腳踏板組),並重新啟動主機與遊戲。 內部溫度感應器 方向盤的冷卻系統由散熱器及風扇組成。 • 恆溫器會監控方向盤的內部溫度。 • 當您在遊戲使用方向盤時: - 冷卻風扇會在方向盤達到一定溫度(遊戲進行了數分鐘後,視乎力回饋效應強度) 時啟動。 - 方向盤溫度過高時,力回饋效應強度會自動降低(以保護馬達)。溫度緩降時, 力回饋效應則會自動提升。 • 結束遊戲時:由於馬達的熱慣性,冷卻風扇會持續運作,直至溫度低於風扇啟動的 溫度為止。此方法令方向盤易於散熱,並可以保護馬達(視在遊戲使用方向盤時的 溫度,冷卻過程可能需時 5 至 45 分鐘)。 14/24...
- Page 556 要 了 解 更 多 關 於 MODE ( 模 式 ) 按 鈕 及 指 示 燈 的 詳 情 , 請 瀏 覽 http://ts.thrustmaster.com。在「Updates and Downloads(更新與下載)」項目 點擊「PlayStation /Wheels/T300 RS(PlayStation®/方向盤/T300 RS)」,然後 選擇「Manual/Help file(手冊/輔助說明)」。 輔助說明及常見問題(不包含在本手冊內) 請瀏覽 http://ts.thrustmaster.com,在「Updates and Downloads(更新與下載)」...
- Page 557 16/24...
- Page 558 技術特點 2.5 MM 1 錐形塞金屬支架(並未預設安裝) 4 2.5 mm 內六角扳手(隨附) 2 錐形塞 5 錐形塞位置調整螺母 3 金屬支架固定螺桿 6 踏板臂 8 金屬踏板頭 7 膠踏板頭支架 17/24...
- Page 559 警告 使用本產品前,請仔細閱讀本手冊,並將其保存以供日後參考。 為確保安全,請勿在赤腳或僅穿襪子時使用腳踏板組。 ® 使用腳踏板組時若因未穿鞋而導致受傷,圖馬思特 概不負責。 注意 – 遊玩時請小心別被腳踏板組夾傷 * 請將腳踏板組放在小孩無法觸及的地方。 * 遊玩期間,請勿將手指放在腳踏板邊緣或附近。 * 遊玩期間,請勿將手指放在腳踏板後方或附近。 * 遊玩期間,請勿將手指放在腳踏板前方或附近。 禁止 禁止 禁止 18/24...
- Page 560 自動校準腳踏板組 重要提示: - 腳踏板組連接至主機或正在遊玩時,切勿將腳踏板組連接到賽車方向盤底座(或 從底座拔除),以免導致校準不當。 = 將賽車方向盤連接至 PS3™ 或 PS4™ 前,請先連接腳踏板組。 - 賽車方向盤校準完成並遊戲啟動後,腳踏板在會在踩踏數次後自動進行校準。 - 切勿在賽車方向盤校準或正在載入遊戲時踩踏腳踏板,以免導致校準不當。 賽車方向盤或腳踏板組無法正常運作,或是疑似校準不良時,請關閉主機電源, 完整拔除賽車方向盤的所有連接線,然後重新連接所有連接線(包含電源線與腳 踏板組),並重新啟動主機與遊戲。 將腳踏板組安裝到駕駛座 - 將腳踏板組安裝在底部的小螺絲孔。 - 將 2 顆 M6 螺絲(不隨附)穿過駕駛座框架,並擰進腳踏板組底部的 2 個小螺 絲孔。 重要說明: 2 顆 M6 螺絲的長度不能超出框架厚度 + 10 mm,螺絲過長可能會造成 腳踏板組內部的零件損壞。 19/24...
- Page 561 調整腳踏板組 三個踏板均包括: - 一個金屬踏板頭 (8),上有多個開孔(9 個為油門踏板使用、6 個為煞車踏板使 用、6 個為離合器踏板使用)。 - 一個膠踏板頭支架 (7)(置於踏板頭及踏板臂之間),上有四個開孔。 - 一個踏板臂 (6) ,上有兩個開孔。 注意:為免校準不當,在調整腳踏板組前,請先將方向盤的 USB 連接線從 PS3™ 或 PS4™ 拔除。 調整油門高度 - 使用隨附的 2.5 mm 內六角扳手 (4),將固定金屬踏板頭的兩顆螺絲 (8) 及其支 架擰出 (7)。 - 選擇希望的高度,並重新擰緊螺絲,使金屬踏板頭 (8) 及其支架 (7) 固定在適當 位置。...
- Page 562 調整 3 個腳踏板的間距 - 使用隨附的 2.5 mm 內六角扳手 (4),將固定金屬踏板頭的兩顆螺絲 (8) 及其支 架擰出 (7)。 - 選擇希望的位置(靠左、置中或靠右),並重新擰緊螺絲,使金屬踏板頭 (8) 及 其支架 (7) 固定在適當位置。 煞車踏板圖例: 靠左位置 置中位置(預設) 靠右位置 每個踏板可能的間隔位置數: - 油門踏板:3 個 - 煞車踏板:3 個 - 離合器踏板:3 個 調整腳踏板的傾斜角度 - 使用隨附的 2.5 mm 內六角扳手 (4),將固定金屬踏板頭的兩顆螺絲 (8) 及其支 架擰出...
- Page 563 安裝錐形塞(「錐形橡膠煞車器」修改器) 此修改器並非必須,亦不是預設安裝。這代表即使未安裝修改器,煞車踏板亦能正 常運作。 此修改器可以讓您在煞車時感受到截然不同的體驗和阻力。 是否要安裝隨你喜歡。 - 將錐形塞擰進 (2) 其金屬支架 (1)。 - 將位置調整螺母 (5) 擰進底部(錐形塞的螺絲孔)。 - 將修改器置於煞車踏板臂背部。 22/24...
- Page 564 - 使用隨附的 2.5 mm 內六角扳手 (4),將修改器以固定螺絲 (3) 固定在腳踏板組 下方的小型中央螺絲孔。 「錐形橡膠煞車器」修改器已安裝成功! 調整煞車踏板的行動範圍及阻力強度 稍微鬆開螺母 (5),可以將錐形塞 (2) 進一步移近踏板臂,增強煞車踏板的阻力(如 有需要,可以使用 14 mm 扳手或鉗子重新擰緊螺母,並將其固定在選定的位置)。 錐形塞與踏板臂背面的距離愈近,阻力強度則愈高。 註:如果錐形塞非常接近煞車踏板臂,你可能會較難達到最大校準值。若有如此情況: * 請緩慢地用力踩踏煞車踏板,以求達到最大值(如有需要,可簡單站在踏板上一 秒),然後鬆開;不然, * 將錐形塞稍為移離煞車踏板臂的背面。 23/24...
- Page 565 版權所有 © 2015 Guillemot Corporation S.A. 保 留 所 有 權 利 。 圖 馬 思 特 ® 為 Guillemot Corporation S.A 的 註 冊 商 標 。 「 」 、 「 PlayStation 」 、 「 」 及 「 」為 Sony Computer Entertainment, Inc 的註冊商標。「 」為...
- Page 566 User Manual WARNING: To ensure that your T300 racing wheel functions correctly with games, you may be required to install the game’s automatic updates (available when your system is connected to the Internet). 1/24...
-
Page 567: Technical Features
TECHNICAL FEATURES 1 T300 RS base 7 SELECT/START buttons on PS3™ and 2 Ferrari 599XX EVO Wheel SHARE/OPTIONS on PS4™ 3 2 sequential paddle shifters (up & down) 8 PS button 4 Directional buttons 9 Large threaded hole (for attachment system 5 Built-in USB sliding switch for PS4™/PS3™... - Page 568 PLUGGING THE RACING WHEEL INTO AN ELECTRICAL OUTLET: PLEASE READ BEFORE PROCEEDING! Your racing wheel’s power supply varies according to the country where you purchased your device. The power supply can be: Mainland China: internal, with: * A power supply unit located directly inside the racing wheel's base, with a type A connector *A 220-240V mains power supply cable = compatible only with a 220-240V electrical supply.
- Page 569 Hong Kong: internal, with: * A power supply unit located directly inside the racing wheel's base, with a type G connector *A 220-240V mains power supply cable = compatible only with a 220-240V electrical supply. Never connect the 220-240V cable to a 100-130V power outlet! Never connect this cable to a mains power adapter! Korea: internal, with: * A power supply unit located directly inside the racing wheel's base, with a type C...
- Page 570 * Do not let any dust build up on the air vents. For safety reasons, never use the pedal set with bare feet or while wearing only socks on your feet. THRUSTMASTER DISCLAIMS ALL RESPONSIBILITY IN THE EVENT OF ®...
- Page 571 Warning – Injuries due to force feedback and repeated movements Playing with a force feedback racing wheel may cause muscle or joint pain. To avoid any problems: * Avoid lengthy gaming periods. * Take 10 to 15 minute breaks after each hour of play. * If you feel any fatigue or pain in your hands, wrists, arms, feet or legs, stop playing and rest for a few hours before you start playing again.
- Page 572 To display the firmware version that your racing wheel is currently using and update it if required: on PC, visit http://ts.thrustmaster.com. In the Updates and Downloads section, click PlayStation Wheels / T300 RS, then select Driver/Firmware and follow the instructions describing the download and installation procedure. Important note: On PC, the USB sliding switch (5) on the racing wheel’s base must always be set to the PS3™...
- Page 573 Once you have installed the wheel, rotate it 180° (when facing the wheel, the Ferrari® logo should be upside down) to access the small attachment screw located on the ring of the Thrustmaster Quick Release (12) device. Use a large Phillips screwdriver to tighten the small attachment screw (do not use excessive force), turning it clockwise.
- Page 574 ATTACHING THE RACING WHEEL Attaching the racing wheel to a table or a desktop 1. Place the racing wheel on a table or any other horizontal, flat and stable surface. 2. Insert the fastening screw (11) in the attachment system (10), then tighten the device by turning the screw anticlockwise, so that it feeds into the large threaded hole (9) located beneath the racing wheel, until the wheel is perfectly stable.
- Page 575 ATTACHMENT / DIRECTION REMOVAL To tighten: Turn the screw anticlockwise To release: Turn the screw clockwise 10/24...
- Page 576 Attaching the racing wheel’s base to a cockpit 1. Place the racing wheel’s base on the cockpit shelf. 2. Drive two M6 screws (not included) through the cockpit shelf, then feed them into the two small screw threads located on the underside of the racing wheel. Important: The length of the two M6 screws must not exceed the thickness of the shelf + 12 mm;...
- Page 577 3 AND P 4 MAPPING TATION® TATION® 12/24...
- Page 578 * Don't forget to press the racing wheel’s PS button (8) in order to be able to use the wheel. * The wheel is recognised in most games as a T300 RS wheel. * The wheel is functional in compatible games and in system menus.
-
Page 579: Automatic Racing Wheel And Pedal Set Calibration
AUTOMATIC RACING WHEEL AND PEDAL SET CALIBRATION The wheel automatically self-calibrates when you plug the racing wheel into an electrical outlet and connect the racing wheel’s USB connector to the system. During this phase, the racing wheel will rotate quickly towards the left and the right, covering a 900 degree angle, before stopping at the centre. - Page 580 NORMAL SWAPPED AROUND GREEN Other information regarding the MODE button To learn more about the MODE button and indicator light, please visit http://ts.thrustmaster.com. In the Updates and Downloads section, click PlayStation / Wheels / T300 RS, then select Manual/Help file.
- Page 581 16/24...
- Page 582 TECHNICAL FEATURES 1 Metal support for conical stop 4 2.5 mm Allen key (included) 5 Position adjustment nut for conical stop (not installed by default) 2 Conical stop 3 Attachment screw for metal support 6 Pedal arm 8 Metal pedal head 7 Plastic head support 17/24...
- Page 583 For safety reasons, never use the pedal set with bare feet or while wearing only socks on your feet. THRUSTMASTER® DISCLAIMS ALL RESPONSIBILITY IN THE EVENT OF INJURY RESULTING FROM USE OF THE PEDAL SET WITHOUT SHOES. Warning – Pedal set pinching hazard during gaming sessions * Keep the pedal set out of the reach of children.
- Page 584 AUTOMATIC CALIBRATION OF PEDALS IMPORTANT: - Never connect or disconnect the pedal set from the base of the wheel when the wheel is connected to the PS3™ or PS4™, or during gaming sessions, to avoid calibration problems. = Always connect the pedal set to the wheel before connecting the wheel to the PS3™ or PS4™. - Once the wheel has self-calibrated and the game has started, the pedals automatically calibrate themselves after being pressed a few times.
- Page 585 ADJUSTING THE PEDAL SET Each of the three pedals includes: - A metal head (8) with multiple perforations (nine for the accelerator – six for the brake – six for the clutch). - A plastic head support (7) (placed between the head and the arm) with four perforations. - A pedal arm (6) with two perforations.
- Page 586 Adjusting the SPACING of the three pedals - Using the included 2.5 mm Allen key (4), unscrew the two screws holding the metal head (8) and its support (7) in place. - Select your preferred position (to the left, centered, or to the right), then replace and re-tighten the screws so that the metal head (8) and its support (7) are held firmly in place.
- Page 587 Installing the conical stop (“CONICAL RUBBER BRAKE” mod) This modification (or “mod”) is not essential, and is not installed by default. This means that the brake pedal functions perfectly even if the mod is not installed. This mod lets you experience a different feeling and resistance when braking. It’s up to you whether or not to install it, depending on your own preferences.
- Page 588 - Using the included 2.5 mm Allen key (4), attach the unit using the attachment screw (3) and the small central screw thread located on the underside of the pedal set. The “CONICAL RUBBER BRAKE” mod is now installed! Adjusting the brake pedal’s RANGE of travel and STRENGTH of resistance By slightly unscrewing the nut (5), you can further strengthen the resistance of the brake pedal by moving the conical stop (2) closer to the back of the pedal’s arm (if necessary, use a 14 mm wrench or pliers to re-tighten the nut and maintain the selected position).
- Page 589 COPYRIGHT © 2015 Guillemot Corporation S.A. All rights reserved. Thrustmaster® is a registered trademark of Guillemot Corporation S.A. “ ”, “PlayStation”, “ ” and “ ” are registered trademarks of Sony Computer Entertainment, Inc. “ ” is a registered trademark or trademark of the same company.