Table of Contents
Advertisement
Order Number MAC1002002CE
E4
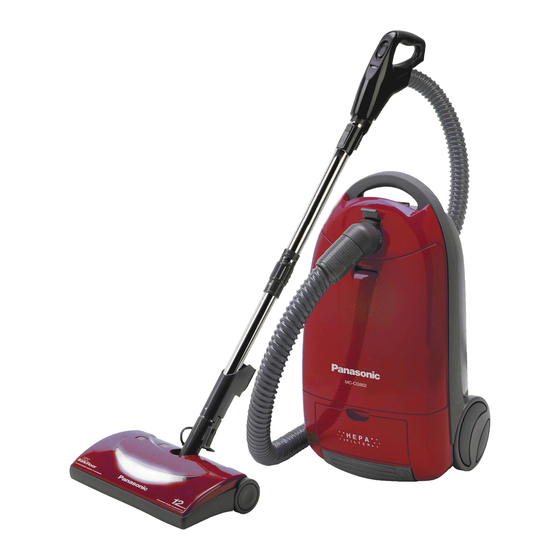
Vacuum Cleaner
MC-CG902-00
Specifications are subject to change without notice for further improvement.
© 2010 PANASONIC CONSUMER ELECTRONICS
COMPANY,
DIVISION
OF
PANASONIC
CORPORTATION OF NORTH AMERICA. All rights
reserved. Unauthorized copying and distribution is a
violation of law.
Advertisement
Table of Contents

Related Manuals for Panasonic MC-CG902-00


Summary of Contents for Panasonic MC-CG902-00
-
Page 1: Vacuum Cleaner
Order Number MAC1002002CE Vacuum Cleaner MC-CG902-00 Specifications are subject to change without notice for further improvement. © 2010 PANASONIC CONSUMER ELECTRONICS COMPANY, DIVISION PANASONIC CORPORTATION OF NORTH AMERICA. All rights reserved. Unauthorized copying and distribution is a violation of law. -
Page 2: Table Of Contents
MC-CG902-00 CONTENTS Page Page 1 WIRING DIAGRAM 3.1. BELT 1.1. Wiring Schematic 3.2. BULB 1.2. Pictoral Diagram 3.3. POWER NOZZLE MOTOR 2 EXPLODED VIEW AND PARTS LIST 3.4. AGITATOR ASSEMBLY 2.1. Power Nozzle 4 SERVICE PROCEDURES - CANISTER 2.2. Canister 4.1. -
Page 3: Wiring Diagram
MC-CG902-00 1 WIRING DIAGRAM 1.1. Wiring Schematic 1.2. Pictoral Diagram NOTE: For general servicing, it is necessary to eliminate pinching of any wire during reassembly. After servicing any electrical component or electrical enclosure, the unit should be reassembled and checked for dielectric breakdown or current leakage. -
Page 4: Exploded View And Parts List
MC-CG902-00 2 EXPLODED VIEW AND PARTS LIST 2.1. Power Nozzle 2.1.1. Exploded View... - Page 5 MC-CG902-00 2.1.2. Parts List (Power Nozzle) Ref. No. Part No. Part Name & Description Remarks AC50XDMKZR03 POWER NOZZLE ASSEMBLY AC02RDGBZRU3 NOZZLE TOP AC21HAKTZ000 WINDOW COVER AC10AAKTZV06 FURNITURE GUARD AC13DAUJZVU6 BUTTON EXTENSION AC21HGJZ00 LENS HEIGHT ADJUST AC37KAKSZ000 FILTER-INTAKE/EXHAUST AC01QAKTZW03 AGITATOR COVER...
-
Page 6: Canister
MC-CG902-00 2.2. Canister 2.2.1. Exploded View... - Page 7 MC-CG902-00 2.2.2. Parts List Ref. No. Part No. Part Name & Description Quantity Remarks AC41KBAKZRU3 FILTER COVER AC46NAKTZV06 CORD REWIND BUTTON AC38KBRMZ000 HEPA FILTER AC93FAUXZ000 MOTOR ENCLOSURE AC03FAKTZ000 MOTOR RUBBER SUPPORT AC16KGFZ00 DUST BAG AMC414-8999 SCREW SHIPPED 10 PER PACKAGE...
-
Page 8: Hose & Attachments
MC-CG902-00 2.3. Hose & Attachments 2.3.1. Exploded View 2.3.2. Parts List Ref. No. Part No. Part Name & Description Quantity Remarks AC94PCHKZV06 HOSE ASSEMBLY AC96RAKZZV06 FLOOR BRUSH AC60RAKZZV06 CREVICE TOOL AC86RAKZZV06 FABRIC BRUSH AC88RAKZZV06 DUSTING BRUSH AC05PSUZV06 HOSE ONLY AC92PCAZZV06... -
Page 9: Cord Reel
MC-CG902-00 2.4. Cord Reel 2.4.1. Exploded View 2.4.2. Parts List Ref. No. Part No. Part Name & Description Quantity Remarks AC99NCVAZV06 CORD REEL AC94NAKTZV06 BRAKE LEVER AXTN4+16BFY SCREW SHIPPED 10 PER PACKAGE AC19NAVAZ000 CONTACT BASE AC98NCVAZ000 CONTACT DISC ASSY AC01NCUHZ000... -
Page 10: Packing Materials
MC-CG902-00 2.5. Packing Materials 2.5.1. Exploded View 2.5.2. Parts List Ref. No. Part No. Part Name & Description Quantity Remarks AC61ZDMKZ000 PACKAGING ASSEMBLY INCLUDES ITEMS A - H AC01ZDMKZ000 OPERATING INSTRUCTIONS... -
Page 11: Service Procedures - Power Nozzle
MC-CG902-00 3 SERVICE PROCEDURES - POWER NOZZLE 3.1. BELT 6. Lift agitator assembly out and remove worn belt. 3.1.1. Belt Removal 1. Turn Power Nozzle upside down. 2. Unscrew the two (2) Power Nozzle cover screws. 3.1.2. Belt Replacement 1. Install new belt over motor drive, then over belt path. -
Page 12: Bulb
MC-CG902-00 3.3. POWER NOZZLE MOTOR 3.3.1. Specifications 1. 120V., 60Hz. 2. Amps 2.0/2.7 (max.) at 18,000/14,550 R.P.M. 3. Watts 225/298 (max.) at 18,000/14,550 R.P.M. 4. Torque 55/100 Nm at 18,000/14,550 R.P.M. 3.3.2. Motor Replacement 5. Rotate cover back. Press cover firmly until side and rear 1. -
Page 13: Agitator Assembly
MC-CG902-00 3.4. AGITATOR ASSEMBLY 3.4.1. Agitator Checking 1. When brushes are worn to the level of the base support bars, replace the agitator. 8. Reroute all wiring per original layout utilizing wire retainers provided, and proper placement of wires to prevent 3.4.2. -
Page 14: Service Procedures - Canister
MC-CG902-00 4 SERVICE PROCEDURES - CANISTER 4.1. HOOD servicing the motor. 4.2.2. Replacement 4.1.1. Removal 1. Set the canopy cover in position and secure the canopy 1. Lift up on the hood release as the hood is raised. with (4) screw holes. - Page 15 MC-CG902-00 4. Replace canopy cover and brake pedal (see Canopy Cover Replacement. 5. Replace hood (see Hood Replacement).
Need help?
Do you have a question about the MC-CG902-00 and is the answer not in the manual?
Questions and answers