Advertisement
Quick Links
Welcome
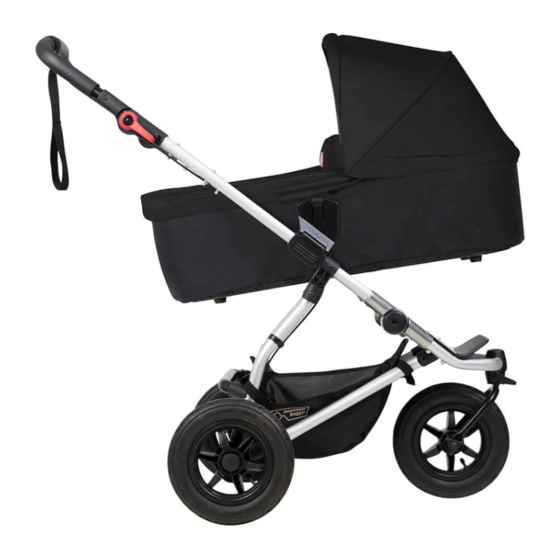
Congratulations on your purchase of a Mountain Buggy carrycot.
We know how precious and inspiring a new little person can be in your world. It's so
important to be able to show your baby to the world and just as important to show the
world to your baby.
At Mountain Buggy you and your baby matter to us. That's why we have spent years
researching and developing a product that is safe, comfortable and in tune with
modern parents needs. We want you to be able to live your new family lifestyle with all
the freedom and satisfaction you have always experienced.
We also know that many parents use strollers incorrectly and as a result may put
their children at risk. Please take the time to read through this manual carefully. Your
Mountain Buggy carrycot will provide you with optimum safety if you follow the
instructions as detailed.
If you have any concerns, questions or comments about your Mountain Buggy carrycot
or how to use it, please do not hesitate to contact us. We'd love to hear from you.
Fitting a carrycot to your buggy is simple. However, it is important to follow the correct
instructions.
1
Advertisement

Related Manuals for Mountain Buggy swift carrycot


Summary of Contents for Mountain Buggy swift carrycot
- Page 1 At Mountain Buggy you and your baby matter to us. That’s why we have spent years researching and developing a product that is safe, comfortable and in tune with modern parents needs.
- Page 2 For the sake oF your precious passenger, please read these warnings beFore using your Mountain buggy carrycot. Important: Please read instructions carefully, follow them strictly and keep these instructions for future reference. Your child’s safety is your responsibility and may be compromised if you do not follow these instructions.
-
Page 3: Removing The Seat
Preparing your stroller to fit the Carrycot Before you can attach the Carrycot to your stroller you will need to remove the fabric sunhood and seat on your stroller. Removing the Sunhood Standing beside your stroller and using a reasonable degree of force, pull the sunhood support wire towards you (by about 50mm/2in). - Page 4 Preparing your stroller (continued) Important InformatIon for Double anD ��� trIple StrollerS Centre bar If you have a double or triple stroller you will need to remove the centre metal bars of the frame to release the domed fabric. You may then need to reattach the metal bars without the fabric, depending on whether you are attaching a Double or a Twin Carrycot.
- Page 5 Fitting your Carrycot to your stroller Mountain Buggy offer a range of carrycot and stroller combinations, so please choose the instructions you need to follow from the list below based on which carrycot model you are wanting to attach to which stroller.
- Page 6 Have a look at sides of Carrycot. There are three holes 4 x snap locks on each side of Carrycot to allow snap locks to be fitted. Configuration varies depending on the Mountain Buggy model you have. Allen key 2 x screws •...
- Page 7 Configuration 1 instructions (continued) Fitting the Carrycot to the Frame Ensure snap locks are rotated so screw holes are ✘ on top. Open snap locks. Place Carrycot onto Buggy frame. Confirm positioning as pictured below. ✔ TERRAIN URBAN tube joint sunhood joint Place snap lock X directly above Place snap lock Y directly above tube joint...
- Page 8 Configuration 2 instructions pleaSe follow theSe InStructIonS If you ��� are fIttIng: a: a Double Carrycot to a Double Stroller b: a Double Carrycot to a Triple Stroller a Twin Carrycot to a Triple Stroller Fitting the Snap Locks and Slider Plate to the Carrycot Preparation PARTS LIST Make sure you have all the necessary...
- Page 9 Configuration 2 instructions (continued) For Urban (Jungle) models URBAN Fit second snaplock to position B. Fit small screw and cover button to hole C. For Terrain Models TERRAIN Fit second snap lock to position C. Fit small screw and cover button to hole B. Fitting the Sliding Plate to the Carrycot •...
- Page 10 Configuration 2 instructions (continued) Terrain TERRAIN • Align Hole 1 of sliding plate with Hole A of Carrycot. Align Hole 2 of sliding plate with hole C of Carrycot. • Place screws into Holes 1 and 2. Using Allen key, tighten in a clockwise direction.
Need help?
Do you have a question about the swift carrycot and is the answer not in the manual?
Questions and answers