Table of Contents
Advertisement
©The contents of this Instruction Manual may not be copied, reproduced, republished, downloaded, posted, broadcast or
transmitted in any way without first obtaining the written permission of Pingtek Power Tools Ltd the copyright owners.
255mm (10") Multipurpose Sliding
Compound Mitre Saw
Original Instructions
PT-255
Advertisement
Table of Contents

Related Manuals for Pingtek PT-255


Summary of Contents for Pingtek PT-255
- Page 1 Compound Mitre Saw Original Instructions PT-255 ©The contents of this Instruction Manual may not be copied, reproduced, republished, downloaded, posted, broadcast or transmitted in any way without first obtaining the written permission of Pingtek Power Tools Ltd the copyright owners.
- Page 2 IMPORTANT INFORMATION USING OUTDOORS FOR: improper service. Thank you for your purchase of a Pingtek WARNING: For your protection if this tool is For any questions relating to this guarantee Machine. All Pingtek machines are built to a to be used outdoors it should not be...
-
Page 3: Labels And Symbols
Unmodified plugs and matching outlets will lead, seek professional advice. Lead based damaged. Contact Pingtek Power Tools for tions are as specified in BS EN 60745- reduce the risk of electric shock. paints should only be removed by a replacement labels. - Page 4 Check clothing and gloves away from moving ● Always wear Personal Protective be avoided. Pingtek is not liable for damage misalignment or binding of moving parts, parts. Loose clothes, jewellery or long hair that occurs during transit. This will be the...
-
Page 5: Carrying Your Mitre Saw
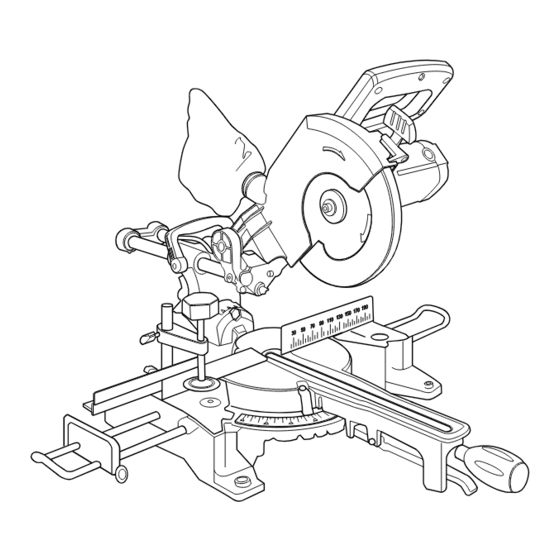
●When repositioning the machine at a must not be replaced with a different come to a complete halt. conducted by Pingtek or their authorized new location a safety check should be agent. version. If a laser guide fails to operate it... - Page 6 Annotated Overall View of Pingtek Mitre Saw regarded as exact or as a substitute for the accurate and careful marking out of the 1. ON/OFF TRIGGER S WITCH 2. BLADE GUARD LOCKING TRIGGER 3. CUTTING HANDLE 4. DUST BAG work-piece.
-
Page 7: Technical Specification
WARNING: To be accurate, an estimation MODEL NUMBER PT- 255 of exposure level in the actual conditions of Your Pingtek Machine needs some minor VOLTAGE/FREQUENCY 230V ~ 50 Hz adjustments/assembly before it can be use should also take account of all parts of... -
Page 8: Bevel Pointer Adjustment
CHECKING THE PRECISION ANGLES To Adjust: To Adjust: To Adjust: ●Loosen the Bevel Lock Handle and tilt the ●Loosen the Bevel Pointer Screw using a ●Return the Cutting Head to the upright WARNING: Only attempt these procedures Cutting Head to the left. screwdriver (not supplied) position. -
Page 9: Permanently Mounting The Mitre Saw
engage with the two (2) support brackets screws (two to each side) positioned THE HOLD DOWN CLAMP (Fig. 9) workbench. (Fig. 10) provided in the interior of the base. through elongated slots in the Fence Fig. 9 1) Hex headed bolt casting. - Page 10 ●It may be necessary to countersink any clamp is so positioned that it does not BASIC CHOP CUTTING Fig. 13 washers or nuts etc on the underside of the interfere with the path of the blade or other mounting board. moving machine parts.
- Page 11 ●Operate the lower guard locking/release left hand sides. and cut through the leading edge of the Fig. 18 lever with your thumb to release the Cutting Mitre Cutting is possible with or without the work-piece. ●Gently push the Cutting Handle rearwards Head.
- Page 12 ●Allow the blade to come to a complete THE SLIDING LH UPPER FENCE The Cutting Head can be set at any angle previously described in BASIC MITER CUTTING. The Left Hand side of the Fence has an up to a 45° to the Left Hand side only. halt.
-
Page 13: Maintenance
This maintenance adjustment/cleaning THE REPEAT STOP (Fig. 32) facility allows your Pingtek machine to cut procedures with the machine disconnected slots in a work-piece. The use of the Repeat Stop can greatly aid from the mains power supply. -
Page 14: Other Adjustments
In accordance with the provisions of the following directives: ●Lift the insert from the table. This product has been carefully manufactured ●Remove any debris that may have accumulated and subjected to the Pingtek’s stringent Quality 2006/41/EC: The Machinery Directive under the insert. Control (QC) Process.
Need help?
Do you have a question about the PT-255 and is the answer not in the manual?
Questions and answers