Table of Contents
Advertisement
Advertisement
Table of Contents

Related Manuals for Husqvarna Viking Jade 20


Summary of Contents for Husqvarna Viking Jade 20
- Page 1 User’s Guide K E E P I N G T H E WO R L D S E W I N G ™...
-
Page 2: Important Safety Instructions
This household sewing machine is designed to comply with IEC/EN 60335-2-28 and UL1594. IMPORTANT SAFETY INSTRUCTIONS When using an electrical appliance, basic safety precautions should always be followed, including the following: Read all instructions before using this household sewing machine. Keep the instructions at a suitable place close to the machine. - Page 3 • If the LED lamp is damaged or broken, it must be replaced by the manufacturer or its service agent or a similarly qualified person, in order to avoid a hazard. • If the cord connected with the foot control is damaged, it must be replaced by the manufacturer or its service agent or a similarly qualified person, in order to avoid a hazard.
-
Page 4: Table Of Contents
TABLE OF CONTENTS Introduction ..........5 Sewing ............26 Machine Overview ..........5 Selecting a Stitch ..........26 Front ............5 Stitch Settings ..........26 Needle Area ........... 6 Stitch Length/Stitch Density ......26 Rear Side ............6 Stitch Width/Needle Position......27 Storage Box ........... 6 Mirror Side to Side ........ -
Page 5: Introduction
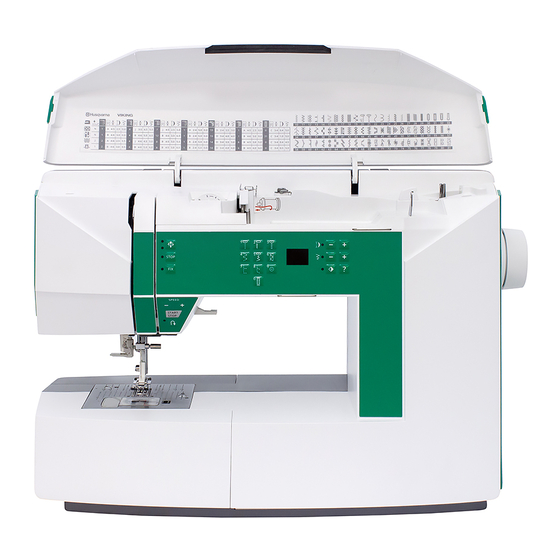
1 Introduction Machine Overview Front 1. Lid with stitch overview 12. Free arm 2. Thread guide 13. Thread guide for auxiliary spool 3. Thread tension dial 14. Bobbin winder thread guide and tension disc 4. Thread tension discs 15. Spool pin 5. -
Page 6: Needle Area
Needle Area 1. Buttonhole lever 2. Needle threader 3. Presser foot ankle 4. Presser foot 5. Needle bar 6. Needle clamp screw 7. Needle thread guide 8. Presser foot lift 9. Presser bar Rear Side 1. Handle 2. Drop feed teeth switch Storage Box The storage box is for storing the foot control, power cord and any accessories. -
Page 7: Accessories
Accessories Included Accessories 1. Thread net 2. Edge guide 3. Felt pad (2) 4. Bobbins (5, one is on the machine) 5. Screwdriver 6. Auxiliary spool pin 7. Seam ripper 8. Brush. Use the sharp edge of the brush to clean the area around the feed teeth. -
Page 8: Presser Feet
Presser Feet Utility Foot A Attached on the machine upon delivery. This foot is used mainly for straight stitching and zigzag stitching with a stitch length longer than 1.0. Decorative Stitch Foot B When sewing decorative stitches or short zigzag stitches and other utility stitches with less than 1.0 mm stitch length, use this foot. -
Page 9: Stitch Overview
Stitch Overview Utility Stitches Stitch № Presser foot Thread Name Description tension One-Step 3–4 Bartack buttonhole Standard buttonhole for most fabric weights. Buttonhole Foot/C 4–5 Straight stitch, center For all types of sewing. needle position 3–5 Stretch stitch, left For seams in tricot and stretch fabrics. needle position 3–4 Reinforced straight... - Page 10 Stitch № Presser foot Thread Name Description tension 4–5 ¼″ seam stitch Sews straight stitch ¼″ from the right edge of the presser foot A. 6–8 Hand-look quilt stitch Imitates hand quilt stitch. Thread the needle with *P/A invisible thread and the bobbin with light weight soft cotton thread in a color to compliment quilt.
-
Page 11: Quilt Stitches
Quilt Stitches Note: The numbers below the stitch number is the recommended thread tension setting for each stitch. Tip: Stitches 53–57 are meant to be sewn with a wing needle for a special effect. Decorative Stitches Note: The numbers below the stitch number is the recommended thread tension setting for each stitch. 1 Introduction... -
Page 12: Preparations
3. Wipe the machine, particularly around the needle and needle plate to remove any oil before sewing. Note: Your HUSQVARNA VIKING® JADE™ 20 machine is adjusted to provide the best stitch result at normal room temperature. Extreme hot and cold temperatures can affect the sewing result. -
Page 13: Connect The Power Cord And Foot Control
Connect the Power Cord and Foot Control Among the accessories you will find the power cord and the foot control. Note: Consult a qualified electrician if you are in doubt about how to connect the machine to the power source. Unplug the power cord when the machine is not in use. -
Page 14: Free Arm
Free Arm To use the free arm, slide off the accessory tray. Remove the tray by sliding it to the left. Use the free arm to facilitate sewing pant legs and sleeve hems. To replace the accessory tray, slide it onto the machine until it fits in place. -
Page 15: Threading The Machine
Vertical Position Raise the spool pin to the vertical position. Place a felt pad under the thread spool. This is to prevent the thread from reeling off too fast. Do not place a spool cap on top of the spool pin as that would prevent the spool from rotating. Auxiliary Spool Pin The auxiliary spool pin is used when winding a bobbin thread from a second spool of thread or for a second spool... -
Page 16: Needle Threader
Needle Threader The needle threader allows you to thread the needle automatically. The needle must be in its highest position to use the built-in needle threader. Press the needle up/ down button to make sure the needle is fully raised. We also recommend lowering the presser foot. -
Page 17: Threading For Twin Needle
Threading for Twin Needle Replace the sewing needle with a twin needle. Make sure that the presser foot is raised and the needle is in its highest position. 1. Thread the first thread as described in Threading the Machine, page 15. 2. -
Page 18: Bobbin Winding
Bobbin Winding Winding From Horizontal Position 1. Place the felt pad and thread spool on the spool pin in horizontal position. Slide on a spool cap of the right type and direction. 2. Place the thread under the thread guide (A) from right to left. -
Page 19: Winding Through The Needle
Winding Through the Needle Make sure the presser foot is raised and the needle is in its highest position. Note: Use a metal presser foot when bobbin winding from the needle. Pull the thread from the needle under the presser foot and to the right through the thread guide (A). -
Page 20: Thread Tension
Thread Tension To set the thread tension, turn the dial on top of the machine. Depending on the fabric, batting, thread, etc, the tension may need to be adjusted. See Stitch Overview, page 9 for thread tension recommendations. For the best stitch appearance and durability, make sure the needle thread tension is correctly adjusted, i.e. -
Page 21: Needles
Needles The sewing machine needle plays an important role in successful sewing. Use only quality needles. We recommend needles of system 130/705H. The needle package included with your machine contains the most frequently used sizes. Universal Needle Universal needles have a slightly rounded point and come in a variety of sizes. -
Page 22: Changing The Needle
Changing the Needle Press the ON/OFF switch to “O”. 1. Loosen the needle screw with the screwdriver. 2. Remove the needle. 3. Push the new needle upwards with the flat side away from you until it will go no further. 4. -
Page 23: Function Buttons
Function Buttons 1. Needle stop up/down with 5. Start/stop 9. Stitch width/needle position indicator 6. Reverse 10. Mirror side to side 2. STOP function 7. Stitch selection buttons 11. View presser foot recommendation 3. FIX function 8. Stitch length 4. Speed + and - Needle Stop Up/Down With Indicator Press the needle stop up/down to move the needle up or down. -
Page 24: Start/Stop
When sewing with metallic threads, or when sewing on delicate fabrics, lower the speed for optimal results. Start/Stop Press this button to start or stop the machine sewing when you are not using the foot control. Press start/stop to begin and press again to stop. -
Page 25: Warning Messages
LED display. Please refer to the troubleshooting section to find a recommended solution. When the problem has been solved, the machine will continue to sew. Note: If the problem is still not solved, please contact your local authorized HUSQVARNA VIKING® retailer. 2 Preparations... -
Page 26: Sewing
3 Sewing When the machine is turned on, straight stitch 1 is selected by default. Selecting a Stitch Stitches 0-9 are illustrated on the stitch selection buttons. If you press any of the stitch selection buttons once, you select the stitch illustrated on that button. Stitches numbered from 10 and up are illustrated with stitch numbers inside the lid. -
Page 27: Stitch Width/Needle Position
Stitch Width/Needle Position To see current stitch width, press “–” or “+” once next to the stitch width icon. The stitch width value will be indicated on the display. After a few seconds, the display will return to show the stitch number. To change the stitch width, press “–”... -
Page 28: Sewing Guide
Sewing Guide Consult the sewing guide on the left, inside the lid for a fast, easy way to select the best stitch, stitch length, stitch width, thread tension, presser foot and presser foot pressure for your sewing technique and fabric. 1. -
Page 29: Sewing Techniques
Sewing Techniques 1. Seam: sews two pieces of fabric together. 2. Overcast: finish fabric edges to prevent them from fraying and help them lay flat. 3. Seam/overcast: sews the seam and overcasts the edge all at one time. 4. Baste: a temporary stitching for fitting garments, gathering and marking. -
Page 30: Basic Sewing Techniques
Basic Sewing Techniques Seam A seam sews two pieces of fabric together with a seam allowance that will usually be pressed open. In most cases, edges of the seam allowance are finished with an overcast stitch before sewing the seam. Seams in stretch fabric must stretch with the fabric. -
Page 31: Overcast
Overcast Overcast fabric edges to prevent fraying and to help them lay flat. It is easier to overcast before the garment is sewn together. Presser foot J is recommended for light and medium weight fabric to prevent puckering along the edge. Presser foot B is used for heavy weight fabric. -
Page 32: Baste
Baste Basting is temporary stitching for fitting garments, gathering and marking. Set the machine to a long stitch length and reduce the tension so the threads are easy to remove or to pull for gathering. Fabric: All types of fabric. Select: Stitch number 1. -
Page 33: Hem
Refer to the sewing guide to select the visible or topstitch hem that is best for your fabric weight and type. For woven fabrics, select straight stitch number 1. For stretch fabrics, select stitch number 6. Jeans Hem When sewing over seams in extra heavy fabric or a blue jeans hem, the foot can tip as it rides over the seam. -
Page 34: Sewing Buttonholes
Sewing Buttonholes The buttonholes in your sewing machine are specially adjusted for different types of fabric and garments. Learn about different buttonholes and when to use them by studying the stitch table in the overview chapter. Refer to the sewing guide to select the best buttonhole and stitch settings for your fabric. -
Page 35: Manual Buttonhole
Manual Buttonhole To sew a buttonhole longer than 25mm, use the manual buttonhole foot C. 1. Lower the buttonhole lever and presser foot. Press the start/stop button or the foot control to start sewing while pushing the buttonhole lever away from you until the machine starts sewing a straight stitch backwards. - Page 36 Corded Buttonhole (Stretch Fabrics) When sewing buttonholes in stretch fabrics we recommend cording the buttonhole to increase the stability and keep the buttonhole from stretching out. 1. Loop a piece of heavy thread or pearl cotton over the metal bar extending from the center back of the manual buttonhole foot or of the plastic bar of the One-Step Buttonhole Foot.
-
Page 37: Sewing On Buttons
Tip: You can also use a sew-on button foot (part number 412934545), available as an optional accessory at your local authorized HUSQVARNA VIKING® retailer. Note: The pre-set width of 3mm is recommended for most buttons. When sewing a tiny button or a very large coat button, decrease or increase the stitch width until the swing of the needle matches the holes of the button. -
Page 38: Sewing Zippers
Sewing Zippers The Zipper Foot E can be snapped on either the right or the left of the needle, making it easy to sew both sides of the zipper. To sew the other side of the zipper, reposition the Zipper Foot. Move the needle position to the far left or right to stitch close to the zipper teeth or cording. -
Page 39: Darning And Mending
Darning and Mending Darning a small hole or a tear before it becomes larger can save a garment. Choose a fine thread in a color as close to your garment as possible. 1. Place the fabric in position under the presser foot. 2. -
Page 40: Quilting
Quilting A quilt usually consists of three layers, two layers of fabric with a layer of batting sandwiched between. To sew three layers together, you have a wide variety of stitches and techniques to choose from. When the quilting is finished simply bind the edges or make it into cushions, wearable art or other smaller projects. - Page 41 Free motion quilting is done with the feed teeth lowered. You move the fabric manually to determine the stitch length. When free motion quilting, use the Open Toe Free Motion Spring Foot (optional accessory, part number 4130376-46). Begin by basting your quilt through all layers, starting from the center of your quilt and working out.
-
Page 42: Maintenance
4 Maintenance Cleaning the Machine To keep your sewing machine operating well, clean it often. No lubrication (oiling) is needed. Wipe the exterior surface of your machine with a soft cloth to remove any dust or lint built up. Cleaning the Bobbin Area Lower the feed teeth and turn off the machine. -
Page 43: Replacing The Needle Plate
In this troubleshooting guide you will find solutions to any issues you may have with your machine. For further information please contact your local authorized HUSQVARNA VIKING® retailer who will be happy to help you. General Problems Fabric does not feed? Make sure the feed teeth are not lowered. -
Page 44: Bobbin Thread Breaks
Are you using poor thread with slubs or thread which has Change to a new high quality thread purchased from an become dry? authorized HUSQVARNA VIKING® retailer. Is the correct spool cap used? Attach the correct spool cap for your thread spool. -
Page 45: Technical Specification
The Main Motor Becomes Overloaded Has the thread become twisted or jammed in the bobbin case Remove the needle plate and clean threads and lint from the area or the feed teeth? feed teeth and bobbin case area. Re-thread the machine, both top and bobbin threads. Have Your Sewing Machine Serviced Regularly by Your Local Authorized Retailer! If you have followed this troubleshooting information and still have problems, contact your retailer. -
Page 47: Index
Index Accessories ..............7 Fabric Selection ............28 Accessory Tray ............. 6 feed teeth..............20 Auxiliary spool pin ............7 felt pad..............14 Felt pad ............... 7 Auxiliary Spool Pin............15 FIX Function ............. 23 Free arm..............5 Free Arm..............14 Free Motion Quilting ........... - Page 48 Seam ripper..............7 Selecting a Stitch ............26 Needle Area ..............6 Self-Adhesive Glide Plate ..........8 Needle bar ..............6 Sewing Buttonholes ............. 34 Needle clamp screw............6 Sewing Guide ............. 28 Needle plate ..............5 Sewing on Buttons ............37 Needle Position ............
- Page 49 Warning Messages ............25 Winding From Horizontal Position ........ 18 Winding Through the Needle ........19 Woven fabric .............. 28 Zipper Foot E .............. 8...
-
Page 51: Intellectual Property
We reserve the right to change the machine equipment and the assortment of accessories without prior notice, or make modifications to the performance or design. Such modifications, however, will always be to the benefit of the user and the product. INTELLECTUAL PROPERTY JADE, VIKING and KEEPING THE WORLD SEWING &... - Page 52 www.husqvarnaviking.com...
Need help?
Do you have a question about the Jade 20 and is the answer not in the manual?
Questions and answers