Table of Contents
Advertisement
Quick Links
Advertisement
Table of Contents
Troubleshooting

Related Manuals for Rocstor RocSecure AMPHIBIOUS X5


Summary of Contents for Rocstor RocSecure AMPHIBIOUS X5
- Page 1 secure your future AMPHIBIOUS X5 User Manual...
-
Page 2: Table Of Contents
TABLE OF CONTENTS IMPORTANT NOTICES • Safety Notices ________________________________________________________ • General Notices • Capacity Disclaimer ___________________________________________________ • Care and Handling GENERAL • Introduction ____ ________________________________________________ • Box Contents • Minimum System Requirements _____________________________________ • Connectors and Amphibious rear view • Device Specifications ______________________________________________ MUST BE READ FIRST... - Page 3 Administrative Functions Changing your User password CHANGING YOUR ADMINISTRATIVE PASSWORD RESET THE USER PASSWORD Helpful Information Partitioning and formatting your hard drive ___________________________________ • Windows XP • ________________________________________________________________ • Care and Handling INSTALLING YOUR DRIVE • Amphibious as a bootable device _________________________________________ •...
- Page 4 KNOWLEDGE BASE • Amphibious HX Unique Features _________________________________________ • Specifications • Encryption Technology (Q&A) ____________________________________________ • How to Daisy-Chain FireWire ports to your Amphibious Drive • Introduction to Interfaces (ports) and Cables Introduction to Formatting File Allocation Table (FAT) and FAT 32 __________________________________ HFS Plus or HFS+ LIMITED WARRANTY...
-
Page 5: Important Notices
• Rocstor Amphibious X5 has been designed to be compliant with the SATA hard drive operating specifications as well as USB 1.1/2.0 and FireWire 400/800 operating specifications. Rocstor accepts no liability for any loss of data or the inability of X5 to work with equipment that are not compatible with the operating specifications. - Page 6 • Do not attempt to disassemble and service the Amphibious drive during the warranty period. • Please read the Safety Notices and Limited Warranty information in this Manual and on the Rocstor website (www.rocstor.com) for further details. ROCSECURE | AMPHIBIOUS X5 user manual Page | 6...
-
Page 7: General
GENERAL Introduction AMPHIBIOUS X5 Secure – Encrypted Ruggedized Mobile Drive FireWire 800 (400) and USB 2.0 Amphibious X5 is the simplest and technologically advanced single- factor authentication real-time hardware encrypted ruggedized external drive in the market today; securing your Data-AT-Rest (DAR). Designed and engineered to satisfy the requirements of demanding security concerned professionals, Amphibious support a fast solid- state (SSD) or a hard disk drive (HHD). -
Page 8: Box Contents
Rocstor’s line of encrypted drives offers the technologies you need to keep your data secure and safe. Choose Rocsecure drives and secure your future. Box Contents • External hard disk drive • USB cable • 9-pin to 9-pin FireWire 800 (1394b) cable •... -
Page 9: Minimum System Requirements
Minimum System Requirements Mac Users: Window Users: Hardware: FireWire 800* (0r 400**) or Hardware: FireWire 800* (0r 400**) or USB 2.0 port(s.) USB 2.0 port(s.) Mac: PowerPC or Intel processor running Operating Systems: Microsoft Windows Mac OS 10.5, and later 2000, Vista, Windows 7 or 8 Recommended memory: 512 MB RAM Recommended memory: 512 MB RAM... -
Page 10: Device Specifications
• 2.5” SATA 9.5mm height Hard Disk or Solid State Drives Drive compatibility Bus Interface • USB 2.0 • FireWire 800 (400) • USB mini-B connector Physical • FireWire 9-pin connector • Dimensions: 130mm (L) x 78mm (W) x 22mm (H) Power •... -
Page 11: Must Be Read First
• If you lose/forget your passwords, you lose your data. • Rocstor does not keep a note of any codes nor will be able to reset. Before operating the device, please NOTE the followings:... - Page 12 • For security reasons you MUST type slowly and always wait for the beeping sound before typing (the number or command) again. • Limited Warranty does not cover nonoperational devices due to failures stated above. For further inquiries please contact www.ROCSTOR.com or call +1.818.449.2000 ROCSECURE | AMPHIBIOUS X5 user manual Page | 12...
-
Page 13: Cable Types
Cable Types FireWire 400 (IEEE 1394a) 6-Pin FireWire 400 connector FireWire 400 can transfer data between • devices at 400 Mbits/sec FireWire 800 (IEEE 1394b) 9-Pin FireWire 800 connector FireWire 400 can transfer data between • devices at 800 Mbits/sec USB supports three data transfer rates: •... -
Page 14: Installation
INSTALLATION How to Connect the Interface Cables - Connecting the Drive Turn ON your computer and wait until it fully boots up to load all programs. Connecting X5 to a computer via USB port To connect X5 to your computer via USB, follow these easy steps: FIRST, insert the USB connector to your computer’s USB port. -
Page 15: Connecting X5 To A Computer Via Firewire Ports
Notes: using USB port: • Connecting to a non-USB compliant port may cause operation damage or failure. • To achieve USB 2.0 speeds, always connect X5 directly to a USB 2.0 Hi-Speed host (computer) port. Connecting X5 to a computer via FireWire ports To connect X5 to your computer via FireWire ports, follow these easy steps: FIRST, insert the FireWire connector to your computer’s FireWire port. -
Page 16: Important Notes
FireWire 400: If your computer supports FireWire 400 with a 6 pin port available, please ensure that you have a 9-to-6 pin bilingual cable. Connect the 6 pin end of the cable to the computer’s FireWire port, and the 9 pin end to X5’s FireWire port. IMPORTANT NOTE: As long as the drive is ON, it performs as any standard external drive;... -
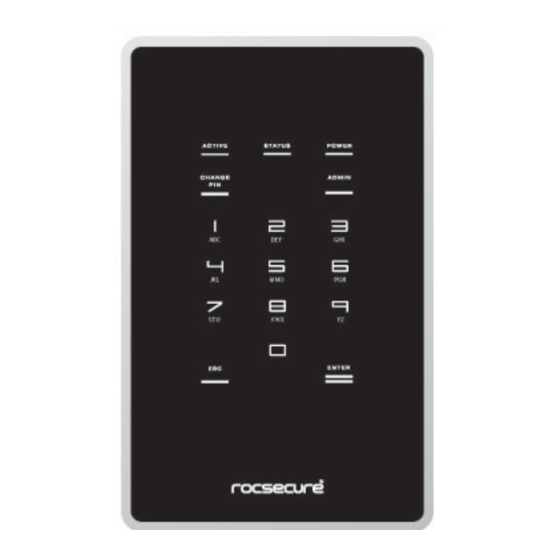
Page 17: Using The Built-In Keypad
USING THE BUILT-IN KEYPAD The built-in keypad allows you to enter/change your password (refer to page 18 on Authentication and page 22 on changing password). It works on the principle of capacitive sensing to provide a better user experience and can detect the presence of a touch on the button. -
Page 18: Authentication
AUTHENTICATION Amphibious X5 requires users to authenticate themselves via single-factor authentication before they are granted access to the installed drive. In order to do so, users must present PIN (Pin Number = Password - something you know). The authentication process involves typing (slowly) the correct Password (PIN entry) onto Amphibious X5. - Page 19 SECURITY Note: • If an incorrect PIN is entered, the Error LED will blink continuously. Press the Esc button to restart Amphibious X5. If you have mistyped your PIN, press the Esc key at any time to restart the entire authentication process. You will be LOCKED-OUT after 3 incorrect PIN attempts / entry.
-
Page 20: Setting Up The Amphibious X5
Setting up Amphibious X5 After you have successfully authenticated yourself to X5, drive access will be granted. The connected drive will then present itself to the operating system as a removable drive. Please wait for a few seconds for this process to fully complete. The mounting duration depends on your drive and operating system. -
Page 21: Disconnecting X5
DISCONNECTING X5 CAUTION: To prevent data loss, ensure that all active applications are closed before shutting down X5. To disconnect X5, follow your operating system’s proper device removal process. Windows XP 1. Double click on the Safely Remove Hardware Icon in your system tray. -
Page 22: Administrative Functions
ADMINISTRATIVE FUNCTIONS You can perform certain administrative functions with X5. These functions are only available when X5 is first powered up. CAUTION: Please read the following instructions carefully and follow them when performing administrative functions. Changing your User password You can change your user password with X5. It is recommended that you change the default factory password to another one that only you know. -
Page 23: Changing Your Administrative Password
• Pressing the Esc key restarts the entire authentication process. CHANGING YOUR ADMINISTRATIVE PASSWORD The Admin password provides the only means to user password recovery on X5. It is recommended that you change the default factory Admin password to another one that only you know. -
Page 24: Reset The User Password
RESET THE USER PASSWORD This mode allows the administrator to reset a locked-out user. The admin password MUST be correctly presented in order for this process to take place. To reset a locked-out user, follow these steps: 1. Power up X5 by connecting to the host via USB or FireWire. Ensure the STATUS LED blinks once. - Page 25 The Hard drive is preformatted for Plug-and-Play operation. After a few seconds a Rocstor HD icon will show on the “My Computer” folder under the Windows OS. Under the Mac OS, the Amphibious HD will appear on the “Desktop.” IMPORTANT NOTE: As long as the drive is ON it performs as any standard external drive;...
-
Page 26: Helpful Information
Helpful Information Partitioning and formatting your hard drive In order to use a new hard drive with Amphibious X5, you will have to partition and format the drive. Follow these steps to do so: CAUTION: Performing partition and format operations will erase all data in the drive. Windows XP 1. -
Page 27: Care And Handling
Care and Handling The following are some important information on the proper care and handling of Amphibious X5. Please take a moment to review these instructions. • As with any storage solution, it is recommended that the data of the connected drive be backed up regularly. -
Page 28: Installing Your Drive
Macintosh operating systems. To begin using your Rocstor drive, simply connect a data cable and power cord. There’s no need to shut down your computer because your Rocstor drive is hot-pluggable. Just plug it in and it’s ready to use. -
Page 29: Reformatting Your Drive (Mac And Pc)
Desktop and the drive’s activity light is green, you can safely disconnect or turn off the drive. Reformatting Your Drive As mentioned previously, all Rocstor hard drives are formatted as blank FAT32 volumes (otherwise noted on the retail packaging) that are compatible with most modern Windows and Macintosh operating systems. -
Page 30: Partitioning And Formatting The Amphibious Drive On A Mac Os
Amphibious drive and data. PARTITIONING AND FORMATTING THE AMPHIBIOUS DRIVE ON A MAC OS All Rocstor drives are factory formatted with FAT32, unless otherwise stated on the retail box. WARNING: Formatting and Partitioning the Amphibious Drive will destroy all of its data. To protect your data, back it up before formatting or partitioning this device. -
Page 31: Instructions For Partitioning And Formatting From Fat32 To Hfs
INSTRUCTIONS FOR PARTITIONING AND FORMATTING FROM FAT32 to HFS+: Connect the Rocstor drive to the computer via a port. The drive will appear as an icon on the Desktop on the middle right side (figure 1.0 below) the icon will represent the method of connection (USB or FireWire). - Page 32 Note: If the Hard Drive is connected via USB port, the desktop would indicate the USB (figure 1.1) if it is connected via FireWire port, it would then indicate FireWire as (figure 1.2) on the “Macintosh HD” icon. The same procedures would also apply to the following steps. Once the icon appears on the “Desktop”...
- Page 33 In the “Macintosh HD” menu, click on the “Applications” icon. In the “Applications” menu, click on the “Utilities” icon (figure 3.0.) Figure 3.0 ROCSECURE | AMPHIBIOUS X5 user manual Page | 33...
- Page 34 In the “Utilities” menu, click on the “Disk Utility” icon (figure 4.0.) Figure 4.0 ROCSECURE | AMPHIBIOUS X5 user manual Page | 34...
- Page 35 On the left side of the “Disk Utility” menu is a list of available drives (figure 5.0.) One will show as Rocstor drive. Click on the icon showing the disk capacity (figure 5.1.) Figure 5.0 Figure 5.1 ROCSECURE | AMPHIBIOUS X5 user manual...
- Page 36 You are now in the Rocstor menu. Click on the “Partition” tab and then click the “Current” tab under “Volume Scheme.” A drop down “Partition” menu will appear. In the “Partition” menu, you may select any number of partitions available under “Volume Scheme.”...
- Page 37 Volume Information: select a name for your drive (figure 7.0.) Figure 7.0 Format: Click on either the “Format” area or the Blue up/down arrows. Select Mac OS extended (journal). ROCSECURE | AMPHIBIOUS X5 user manual Page | 37...
- Page 38 After selecting the type of format, click the “Apply” tab in the lower right of the screen, (figure 7.1.) On the next screen, Partition Disk, click “Partition” (figure 8.0) Figure 7.1 Figure 8.0 ROCSECURE | AMPHIBIOUS X5 user manual Page | 38...
- Page 39 The drive will begin to format (figure 8.1) and upon completion; the same icon that first appeared on the Desktop will reappear with your designed name on the Desktop (figure 9.0) Figure 8.1 Figure 9.0 You can now Exit or close to return to the desktop. ROCSECURE | AMPHIBIOUS X5 user manual Page | 39...
-
Page 40: Partitioning & Formatting The Amphibious On Windows 2000, Xp, Vista, 7, 8
PARTITIONING AND FORMATTING THE AMPHIBIOUS DRIVE ON WINDOWS 2000, XP AND VISTA and Windows 7 and 8 All Rocstor drives are factory formatted with FAT32, unless otherwise stated on the retail box. WARNING: Formatting and Partitioning the Amphibious Drive will destroy all of its data. To protect your data, back it up before formatting or partitioning this device. -
Page 41: Different Ways To Get To The Control Panel
DIFFERENT WAYS TO GET TO THE CONTROL PANEL: (You may use any one of the following methods) 1. If the icon “My Computer” shows on your desktop, click or double click on the icon. Under “Other Places” click on “Control Panel.” Under Windows XP under Vista/Windows 7 OS 2. - Page 42 3. If the icon “My Computer” does not show on your desktop, click on the Start icon on the lower left of your screen. If the Control Panel link is not displayed, click on the Settings link and then click on the Control Panel link. 4.
-
Page 43: Instructions Upon Reaching The Control Panel
INSTRUCTIONS UPON REACHING CONTROL PANEL a. After reaching the Control Panel, click on Administrative Tools. b. After reaching Administrative Tools, click on Computer Management. c. After reaching Computer Management, click on Disk Management. ROCSECURE | AMPHIBIOUS X5 user manual Page | 43... -
Page 44: Instructions For Partitioning And Formatting From Fat32 To Ntfs
INSTRUCTIONS FOR PARTITIONING AND FORMATTING FROM FAT32 to NTFS 1. In the “Disk Management” window, right click the Rocstor drive in the upper portion of the menu to highlight it. In the drop down menu, select “Delete Partition.” WARNING: Formatting and Partitioning the Amphibious Drive will destroy all of its data. To protect your data, back it up before formatting or partitioning this device. - Page 45 4. The Rocstor drive will show up in the lower menu as an “Unallocated” disk. 5. Right click anywhere in the “Unallocated” disk area in the lower menu. 6. Click on “New Partition.” 7. You are taken to “Welcome to the New Partition Wizard.” Click “Next”.
- Page 46 8. Click on “Primary partition” (it should be selected as the default partition). Click “Next”. 9. Under “Specific Partition Size,” click Next to accept the default setting, which is the maximum size allowed. ROCSECURE | AMPHIBIOUS X5 user manual Page | 46...
- Page 47 10. Under “Assign Drive Letter or Path,” accept the default letter and click “Next”. 11. In the “Format Partition,” accept the default setting. ROCSECURE | AMPHIBIOUS X5 user manual Page | 47...
- Page 48 14. You now reached the “Completing the New Partition Wizard” screen. It displays the various settings you previously selected. If you are satisfied with your selections, click “Finish” to complete the new formatting. At this time the Rocstor disk drive is being formatted, which may take a few minutes.
- Page 49 15. You will return automatically to the “Disk Management” window and will see the newly formatted Rocstor disk on the screen with the name you selected. If no new name was entered in the “Volume label,” the Rocstor drive will show up as “New Volume.” To rename the volume at this time, right click “New Volume”...
-
Page 50: Troubleshooting
Troubleshooting Rocstor data storage products are subjected to several quality control tests before leaving our factory. However, from time to time, the product may not work after shipment or would experience intermittent problems under certain criteria and/or situations. Should you experience a problem with your Amphibious X5, please review the Manual and read the possible solutions that fit your problem. -
Page 51: Problem Query
In the event that your Amphibious X5 does not function properly, please refer to the following checklist to find out what the problem is. If further technical support is required, please contact your Amphibious X5 Mobile reseller or ROCSTOR-ROCSECURE Technical Support at ROCSTOR-ROCSECURE Technical Support Hotline Number: +1.818.449.2000... - Page 52 Problem Query Possible reason and remedy The drive is not Is the file system supported When using an existing drive in a new operating recognized. by the operating system? system, ensure that the file system used by the drive is compatible with the new operating system. Is your Amphibious X5 Ensure that the AMPHIBIOUS X5 is plugged into a connected to a USB port?
-
Page 53: Troubleshooting For Macintosh Computers
Troubleshooting for MACINTOSH computers Problem: The computer does not recognize the drive Solutions: • Is the Amphibious light ON and is the cable connected from the HD device to the computer. Amphibious HD icon should appear on the desktop. Continue to review this guide to find the solution. - Page 54 Notes: • When connecting the device to USB 2.0 port in your computer, please be sure that the connection at the host computer is Supper Speed USB 2.0 and drivers (if required) are installed; otherwise you may experience slower transfer speed between the host computer and the Amphibious device.
-
Page 55: Troubleshooting For Pc Windows Based Computers
20 seconds and then restarted. • If a conflict with drivers or extensions exists, contact Rocstor for assistance; email tech support at support@rocstor.com or call technical support department at 888.877.7716. Problem: The FireWire ports would not mount (work) with Windows 2000 Solution: •... - Page 56 Problem: There is no increase in performance when the Amphibious drive is connected via the USB cable to a USB 2.0 port. Solution: • Ensure that the USB 2.0 drivers for the host bus and device have been properly and securely installed.
-
Page 57: Frequently Asked Questions
Frequently Asked Questions What is Amphibious X5? Amphibious X5 is a secure portable hard disk for 2.5” SATA hard drives. It provides access control via a built-in keypad and data-at-rest security via hardware-based full disk encryption. How easy it is to use X5? It is very simple and straightforward. - Page 58 Can the password be changed later without data loss? Yes, the user password may be easily changed without any data loss. Can I use X5 with my operating system? Yes. Because X5 uses hardware for the authentication and encryption processes, it is operating system independent.
-
Page 59: Knowledge Base
Amphibious X5 Unique Features • Ruggedized • Bootable • Bus-Powered • No software to install • DAR – Data At Rest • Special epoxy on the Circuit board • No Licensing fees • No Maintenance (or extra fees) • Hardware encryption (not a software imbedded in a chip) •... -
Page 60: Specifications
Specifications • Dimensions: ~5.3 x 3.4 x 0.9 inches ~132 x 8.30 x 2.6 centimeters • Weight: ~ 8 ounces – 0.25 Kilogram • Transfer rates: FireWire 800 up to 800 MB/s and USB 2.0 up to 480 Mbits/s (or USB 1.1 up to 12 Mbits/s) ROCSECURE | AMPHIBIOUS X5 user manual Page | 60... -
Page 61: Encryption Technology (Q&A)
Encryption Technology One of the most secure and cutting-edge hardware-based encryption chipsets is integrated into the internal circuitry of the Amphibious lines. The chipset contains features such as Advanced Encryption Standard Algorithm AES-256 bit key strength, and real-time encryption so that there is virtually zero time in encrypting and decrypting the data. - Page 62 is strongly encrypted by AES (Advanced Encryption Standard). There is no possibility that clear text will remain on the hard drive. Q: What is hardware-based encryption? A: Encryption is a sophisticated mathematical calculation (or algorithm) combining a “secret key” and clear text. The resulting “cipher text” is an unreadable code that can only be decrypted with the original “secret key.”...
- Page 63 Q: Are Amphibious encrypted drives compatible with all disk drive types? A: Amphibious encrypted hard drives are compatible with Ultra SATA/eSATA compliant disk drives in real-time performance. Q: Can Amphibious external drives work with any operating system? A: Amphibious external drives require no device drivers and are independent from all operating systems.
- Page 64 (Communications Security Establishment) of Canada certified hardware AES (Advanced Encryption Standard) algorithm. How does it work? X-Wall MX, an SATA to SATA cryptographic bridge chip, sits right in between host SATA and the device SATA hard drive, encrypting entire SATA drive with wire speed performance while providing up to 256-bit AES hardware strength.
- Page 65 As the entire SATA hard drive is encrypted, there is no possibility of any secret being left unprotected on the drive, including password and "Secret Key." In an X-Wall MX protected system (drive), there is no simple way to read the data without the right "Secret Key." Only YOU have the right Key to unlock your data.
-
Page 66: How To Daisy-Chain Firewire Ports To Your Amphibious Drive
How to Daisy-Chain through FireWire ports to your Amphibious Drive at one time Daisy-Chain (Connecting Multiple Devices) means that device A is connected to device B and device B is connected to device C and so forth. All connections are made only through FireWire ports. - Page 67 Configuration 2: Connecting to a host computer that supports FireWire 400 Host Computer X5 (or other devices) FireWire FireWire FireWire FireWire FireWire 400 Port 1 Port 2 Port 1 Port 2 port 9-to-9 Pin cable 9-to-6 Pin cable ROCSECURE | AMPHIBIOUS X5 user manual Page | 67...
-
Page 68: Introduction To Interfaces (Ports) And Cables
Introductions: Interfaces (ports) and Cables FireWire is Apple Inc.’s brand name for the IEEE 1394 interface (although the 1394 standard also defines a backplane interface). FireWire is also known as i.LINK (Sony’s name) and DV (Panasonic’s name, not to be confused with DV camcorder tapes). - Page 69 FireWire 800 (IEEE 1394b) 9-pin FireWire 800/3200 (IEEE 1394b) connector was introduced commercially by Apple in 2003. This newer 1394 specification (1394b) and corresponding products allow a transfer rate of 786.432 Mbits/sec full-duplex via a new encoding scheme termed beta mode.
- Page 70 • USB 3.0: A Supper-Speed (USB 3.0) rate of up to 5,000 Mbits/s (1GB/3.3sec) • USB 2.0: A Hi-Speed rate of 480 Mbits/s (60 MB/s). All Rocstor devices are integrated with USB 2.0, Hi-Speed. • USB 1.1: A Full Speed rate of 12 Mbits/s (1.5 MB/s). All USB Hubs support Full Speed.
- Page 71 Compassion Chart: Transfer Bandwidth Speed Power (Mbits/s) (Mbits/s) Max. Cable Length Feet (meters) Provided Device per channel 3000 26 Ft (8 m) eSATA 3000 6.5 Ft (2 m) 1 (15 W/ port multiplier) SATA 300 3000 3.3 Ft (1 m) 1 per line SATA 150 1500...
-
Page 72: Introduction To Formatting
Introductions: Formatting File Allocation Table (FAT) FAT is a file system developed by Microsoft for MS-DOS and is the primary file system for consumer versions of Microsoft Windows. The FAT file system is relatively uncomplicated and is supported by virtually all existing operating systems for personal computers. -
Page 73: Hfs Plus Or Hfs
HFS Plus or HFS+ This is a file system developed by Apple Inc. to replace their Hierarchical File System (HFS) as the primary file system used in Macintosh computers (or other systems running Mac OS). It is also one of the formats used by the iPod digital music player. HFS Plus is also referred to as Mac OS Extended (or, erroneously, “HFS Extended”), where its predecessor, HFS is also referred to as Mac OS Standard (or, erroneously, as “HFS Standard”). -
Page 74: Limited Warranty
Rocstor. The replacement part or product takes on either the Limited Warranty status of the removed part or product or the thirty (30) day limited warranty of the spare part. In the unlikely event that your Rocstor product has a recurring failure, Rocstor, at its discretion, may elect to provide you with a replacement unit of Rocstor‘s choosing that is at least equivalent to your Rocstor branded product in hardware performance. - Page 75 Rocstor does not warrant that the operation of this product will be uninterrupted or error-free. Rocstor is not responsible for damage that occurs as a result of your failure to follow the instructions that came with the Rocstor branded product.
- Page 76 PERFORM, INCLUDING ANY LOST PROFITS OR SAVINGS OR SPECIAL, INCIDENTAL OR CONSEQUENTIAL DAMAGES. ROCSTOR IS NOT LIABLE FOR ANY CLAIM MADE BY A THIRD PARTY OR MADE BY YOU FOR A THIRD PARTY. THIS LIMITATION OF LIABILITY ALSO APPLIES WHETHER DAMAGES ARE SOUGHT OR A CLAIM IS MADE UNDER THIS LIMITED WARRANTY OR AS A TORT CLAIM (INCLUDING NEGLIGENCE AND STRICT PRODUCT LIABILITY), A CONTRACT CLAIM OR ANY OTHER CLAIM.
-
Page 77: Technical Support
Rocstor on the Rocstor branded product or included with the Rocstor branded product at the time of your purchase or lease of the product is available for a fee. WARNING: The individual user should take care to determine prior to use whether this device is suitable, adequate or safe for the use intended. -
Page 78: Acknowledgements
Technical Support All Rocstor hard drives are backed by free telephone technical support for two (2) years from the date of purchase. Please register your product with Rocstor. To register, fill in the Limited Warranty Registration form in the Support tab at www.rocstor.com. -
Page 79: Contact Information
Educational sales information: academic_sales@Rocstor.com Federal, State & Local government sales information: government_sales@Rocstor.com Resellers/Business Development/OEM Partners All Channel National and International Resellers, VARs, Consultants … contact Rocstor Channel Sales: In U.S., call: 888.877.7716 Out of USA call +1.818.449.2000 Email: reseller_info@Rocstor.com ROCSECURE | AMPHIBIOUS X5 user manual... -
Page 80: Technical Support / Return Authorization "Rma
Thank you for purchasing Amphibious X5 Rocstor Ver.0610I ROCSECURE | AMPHIBIOUS X5 user manual Page | 80...
Need help?
Do you have a question about the RocSecure AMPHIBIOUS X5 and is the answer not in the manual?
Questions and answers