Table of Contents
Advertisement
Quick Links
Please read this manual before you begin!
1270
Failure to follow this manual's instructions may
result in damage to the Triangle Power Base,
AC adapter and/or Laser Pegs®. Not adhering to
For Boys And Girls
these instructions will void the manufacturer's
Ages 5 And Up
warranty. The packaging must be kept because
6 Models+
it contains important information.
WARNING:
ANY CREATION YOU CAN BUILD
CHOKING HAZARD
-
Small parts.
LIGHTED
Not for children under 3 yrs.
Do not submerge in water.
CONSTRUCTION SET INCLUDES:
• 10 Laser Pegs®
• 78 Construction Parts
• Laser Pegs® Peg Cord
• Triangle Power Base
• Instruction Manual
Construction Compatible
Requires 3-AA Batteries
Compatible with other construction kits
Batteries NOT
EN71, RoHS COMPLIANT
Included
This product complies to
all safety requirements
of ASTM F 963
MODEL INSTRUCTIONS
All additional model instructions can
be downloaded at www.LaserPegs.com
Laser Peg
®
Parts List
x1
x2
x4
Y PEG
SQUARE
WHEEL PEG
Stackable
PEG
Each Laser Peg® is color coded on the circuit board inside
Color
Code
each shape.
Laser Pegs
Stackable
®
Laser Pegs
®
link that
Triangle Power
Laser Pegs
allows you to connect to
Base
Peg Cord
other construction kits.
Construction Parts List
x7
x4
x4
x6
x2
x5
x14
x6
x4
x2
x1
x9
x2
x8
x2
www.LaserPegs.com
This manual is copyright and cannot be reproduced or used online without Laser
Pegs®Ventures LLC permission. Copyright 2013 © All Rights Reserved US Patent
#7,731,558 Additional Global & Multiple Patents Pending. Laser Pegs® Ventures
LLC. 8304 Consumer Ct., Sarasota FL 34240. Contact: Support@LaserPegs.com
Connecting Pegs
To construct with Laser Pegs®, slide two pieces together to
form a connection. Slide each piece on and off smoothly.
Push Red
Red
Power Button
Power Button
to turn on/off
Push Red Power Button to
cycle through 3 different
light settings.
AC Adapter
OFF/ON/FLASH
Connection
Replacing Batteries
1. Remove the three (3) screws.
2. Place three (3) AA batteries in the correct
position - as displayed inside the Triangle
Power Base.
3. Reassemble the Triangle Power Base.
4. Replace the three (3) screws.
5. Push RED Power Button to turn on!
6. Do not mix old and new batteries.
7. Do not mix alkaline, standard (carbon-
zinc), or rechargeable (nickel-cadmium,
NiMH) batteries!
8. Exhausted batteries are to be removed
from the Triangle Power Base.
x3
9. Never connect more than 200 Laser Pegs®
10. Non-rechargeable batteries are not to be
recharged.
11. Rechargeable batteries are only to be
recharged under adult supervision.
12. Rechargeable batteries are to be removed
from the toy before being recharged.
13. Batteries are to be inserted with the
correct polarity.
14. The supply terminals are not to be short-
circuited.
Using an
AC Adapt
er
Remove all batteries
from Laser Pegs® power
base before using the
®
5-volt AC adapter.
*To avoid short-circuits, keep metal objects and
other unauthorized materials from obstructing
the peg holes.
The AC adapter and the Triangle Power Base are to be regularly examined for
x2
damage to the cord, plug, enclosure and other parts, and in the event of such
damage, they must not be used until the damage has been repaired.
WARNING! Each Laser Peg® draws current from the batteries. Therefore, the more
pegs you use, the quicker you will deplete your battery power! As the power
weakens, the current will slowly fail and some Laser Pegs® will illuminate (typically
the reds and yellows) and some won't. When the Laser Pegs® dim the Laser Pegs®
are not broken, they just need stronger batteries or an AC Adapter.
You have 3 simple options...
1. Use a 5-volt AC Adapter –available from www.LaserPegs.com
2. Change the batteries.
3. Use high quality batteries. They will last a little longer, but they will still deplete
rapidly the more laser pegs you connect!
www.LaserPegs.com
This manual is copyright and cannot be reproduced or used online without Laser
Pegs®Ventures LLC permission. Copyright 2013 © All Rights Reserved US Patent
#7,731,558 Additional Global & Multiple Patents Pending. Laser Pegs®Ventures
LLC. 8304 Consumer Ct Sarasota FL. 34240. Contact: Support@LaserPegs.com
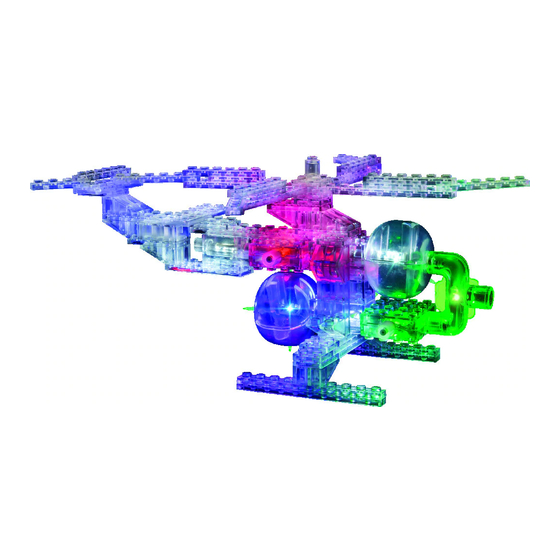
HELICOPTER — An aircraft that moves vertically and horizontally, using lift and propulsion
derived from revolving rotors.
HELICOPTER V2.0
Model
Difficulty
Level
Peg Holes
A
STEP
1
Add 3-AA Batteries
3-AA Batteries
STEP
2
B
When using an AC
Adapter, NEVER
place the adapter
plug into the Tri-
angle Power Base
top peg holes.
C
Never connect more than 200
Laser Pegs® when using a 5-volt
(2000mA) AC Adapter.
STEP
4
D
STEP
5
STEP
6
STEP
7
STEP
3
STEP
8
STEP
9
Advertisement
Table of Contents

Related Manuals for Laser Pegs HELICOPTER V2.0 1270


Summary of Contents for Laser Pegs HELICOPTER V2.0 1270
- Page 1 Laser Pegs® will illuminate (typically STEP the reds and yellows) and some won’t. When the Laser Pegs® dim the Laser Pegs® are not broken, they just need stronger batteries or an AC Adapter.
- Page 2 STEP STEP STEP STEP STEP STEP STEP COMBINE STEP STEP COMBINE STEP STEP STEP STEP STEP STEP STEP STEP www.LaserPegs.com Copyright 2013© All Rights Reserved Global & Multiple Patents Pending. US Patent #7,731,558...
- Page 3 STEP STEP STEP STEP COMBINE STEP STEP STEP STEP STEP COMBINE STEP STEP STEP STEP STEP STEP...
- Page 4 STEP STEP STEP STEP STEP STEP STEP COMBINE ATTACH MODEL TO THE TRIANGLE POWER BASE WITH THE PEG CORD STEP STEP COMBINE MODEL INSTRUCTIONS STEP All additional model instructions can be downloaded at www.LaserPegs.com STEP MEDIC SPACE CRUISER STEP R2-SPEEDSTER S5-RUNNER SATELLITE TOWER www.LaserPegs.com...
Need help?
Do you have a question about the HELICOPTER V2.0 1270 and is the answer not in the manual?
Questions and answers