Table of Contents
Advertisement
Advertisement
Table of Contents

Related Manuals for Cadac Maestro 3B


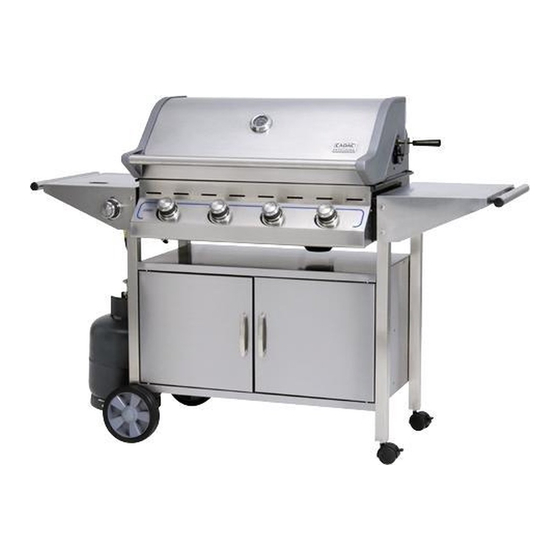
Summary of Contents for Cadac Maestro 3B
- Page 1 USER INSTRUCTIONS MAESTRO 3B (98323S), MAESTRO 4B (98324S), MAESTRO DElUxE (98320S), PATIO 3B SElECT (98520S), PATIO 4B SElECT (98521S), PATIO ENTERTAINER 3 (98522S), PATIO ESSENCE 3 (98335S), PATIO ENTERTAINER 4 (98523S), PATIO ENTERTAINER 4B DElUxE (98342S) ADVENTURE TO GO...
-
Page 2: Table Of Contents
CONTENTS GENERAl INTRODUCTION SAfETy INfORMATION fITTING AND ChANGING ThE GAS CylINDER USING ThE APPlIANCE COOkING ON ThE APPlIANCE DIRECT OR INDIRECT COOkING CARING fOR ThE GRIll PlA TES GENERAl MAINTENANCE TROUBlE ShOOTING ClEANING STORAGE SPARES AND ACCESSORIES RETURNING ThE APPlIANCE fOR REPAIR OR SERVICE WARRANTEE PARTS ASSEMBly PROCEDURE... -
Page 3: General
O-ring fitted. Firmly clamp hose into • The CADAC Patio BBQ is a low pressure appliance and must be used in conjunction with a CADAC 2,8kPa regulator and position using a hose clamp at both ends of the low pressure hose. -
Page 4: Using The Appliance
• The CADAC Patio BBQ is fitted with a CADAC Jet to regulate the correct amount of gas. Should the hole in the Jet become • Note! All burners are fitted with an automatic Ignitor. -
Page 5: Storage
*The warranty on stainless steel parts will only apply if the correct care is taken in accordance with the printed instruction. The warranty will only apply if the unit is assembled and operated in accordance with the printed instructions. Use of a CADAC... -
Page 6: Parts
16. PARTS The parts shown below are used to assemble the trolley unit. Refer to the manual for further instructions on how to assemble your unit. (Model: 98324S) PART NO. DESCRIPTION ILLUSTRATION QUANTITY PART NO. DESCRIPTION ILLUSTRATION QUANTITY AxLE BOLT CASTOR WHEEL FRONT PANEL &... - Page 7 16. PARTS The parts shown below are used to assemble the trolley unit. Refer to the manual for further instructions on how to assemble your unit. (Models: 98335S and 98323S) PART NO. DESCRIPTION ILLUSTRATION QUANTITY PART NO. DESCRIPTION ILLUSTRATION QUANTITY AxLE BOLT &...
- Page 8 16. PARTS PART NO. DESCRIPTION ILLUSTRATION QUANTITY The parts shown below are used to assemble the trolley unit. Refer to the manual for further instructions on how to assemble your unit. (Model: 98520S) RUBBER WHEEL PART NO. DESCRIPTION ILLUSTRATION QUANTITY AxLE BOLT AND NUT CYlINDER BRACKET SIDE PANEL AND...
- Page 9 16. PARTS PART NO. DESCRIPTION ILLUSTRATION QUANTITY The parts shown below are used to assemble the trolley unit. Refer to the manual for further instructions on how to assemble your unit. (Model: 98521S) RUBBER WHEEL PART NO. DESCRIPTION ILLUSTRATION QUANTITY AxLE BOLT AND NUT CYlINDER BRACKET SIDE PANEL AND...
- Page 10 16. PARTS The parts shown below are used to assemble the trolley unit. Refer to the manual for further instructions on how to assemble your unit. (Model: 98522S and 98530S) PART NO. DESCRIPTION ILLUSTRATION QUANTITY PART NO. DESCRIPTION ILLUSTRATION QUANTITY AxLE BOLT AND NUT RUBBER WHEEL SIDE PANEL AND...
- Page 11 16. PARTS The parts shown below are used to assemble the trolley unit. Refer to the manual for further instructions on how to assemble your unit. (Models 98320S, 98523S, 98333S, 98342S, 98531S) PART NO. DESCRIPTION ILLUSTRATION QUANTITY PART NO. DESCRIPTION ILLUSTRATION QUANTITY AxLE BOLT AND NUT...
-
Page 12: Assembly Procedure
17. ASSEMBly PROCEDURE ASSEMBLY INSTRUCTIONS for Maestro 4B / 98324S, Maestro 3B / 98323S and Patio 3 Essence / 98335S. Figure 1 Figure 5 • Place the BBQ unit, lying on its back, on a flat, level surface. • Turn the unit upright and place it on a flat surface. - Page 13 17. ASSEMBly PROCEDURE Figure 5 5.1 Fit the door handles to the doors using the screw supplied. 5.2 Fit the M6 stud to the bottom of the door using the M6 nut & washer supplied. Patio Entertainer 4 / 98523S, Patio Entertainer 3 / 98522S, 98530S, 98531S, Maestro Deluxe / 98320S, 98333S and 5.3 Fit the top rotating axle to the door using the M3x12 screws and m3 nuts supplied.
- Page 14 17. ASSEMBly PROCEDURE Figure 5 5.1 Fit the door handles to the doors using the screw supplied. 5.2 Fit the M6 stud to the bottom of the door using the M6 nut & washer supplied. Patio 4B Select / 98521S, Patio 3B Select / 98520S, 5.3 Fit the top rotating axle to the door using the M3x12 screws and m3 nuts supplied.
Need help?
Do you have a question about the Maestro 3B and is the answer not in the manual?
Questions and answers