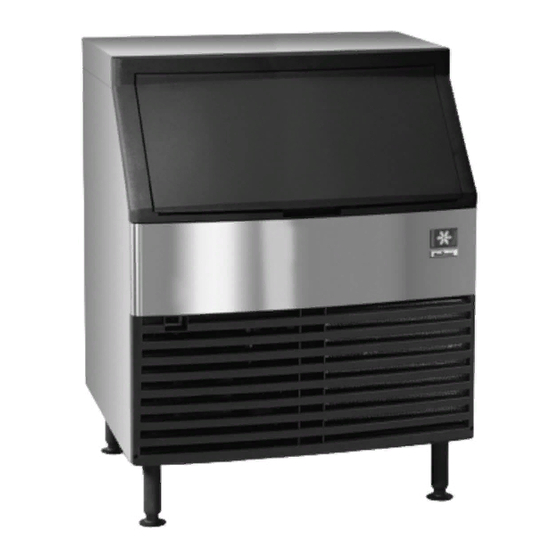
Manitowoc Q130 Installation, Use & Care Manual
Undercounter model
Hide thumbs
Also See for Q130:
- Installation, use & care manual (50 pages) ,
- Installation and service manual (40 pages) ,
- Technician's handbook (236 pages)
Table of Contents
Advertisement
Manitowoc
Q130/Q210/Q270
UnderCounter Model
Ice Machine
Installation, Use & Care Manual
This manual is updated as new information and models are released.
Visit our website for the latest manual. www.manitowocice.com
This manual contains English and French text
America's #1 Selling Ice Machine
Part Number 040001358 05/10
Advertisement
Table of Contents

Related Manuals for Manitowoc Q130


Summary of Contents for Manitowoc Q130
-
Page 1: Ice Machine
Manitowoc Q130/Q210/Q270 UnderCounter Model Ice Machine Installation, Use & Care Manual This manual is updated as new information and models are released. Visit our website for the latest manual. www.manitowocice.com This manual contains English and French text America’s #1 Selling Ice Machine... -
Page 2: Table Of Contents
Q130/Q210/Q270 Ice Machine ........ - Page 3 Table of Contents (continued) Section 4 Maintenance Interior Cleaning and Sanitizing ........General .
-
Page 4: General Information
Q210 or Q270 ice machines. person responsible for their safety. Q130, Q210 and Q270 model ice machines do not have a water curtain covering the evaporator. The ice damper performs the functions of the water curtain see Section 4 for details. -
Page 5: Installation Instructions
The listed NOTE: An optional 2 ½" caster assembly is available for values are recommended for efficient operation and use in place of the legs on the Q130, Q210 and Q270. servicing only. Installation instructions are supplied with the casters. -
Page 6: Electrical Service
(when the electrical load is presumably to ground. Manitowoc Ice, Inc. does not highest). recommend the use of a GFCI/GFI circuit protection with The 115/1/60 ice machines are factory pre-wired with a our equipment. -
Page 7: Water Service/Drains
• Vent the bin drain to the atmosphere. Do not vent the Important condenser drain on water-cooled models. If you are installing a Manitowoc water filter COOLING TOWER APPLICATIONS system, refer to the Installation Instructions (Water-Cooled Models) supplied with the filter system for ice making water inlet connections. -
Page 8: Water Supply And Drain Line Sizing/Connections
Installation Instructions Section 2 Water Supply and Drain Line Sizing/Connections ! Caution Plumbing must conform to state and local codes. Location Water Water Ice Machine Tubing Size Up to Ice Machine Fitting Temperature Pressure Fitting Ice Making 40F (4C) Min. 20 psi (137.9 kPA) Min. -
Page 9: Before Starting The Ice Machine
Installation Instructions Before Starting the Ice Machine All Manitowoc ice machines are factory-operated and adjusted before shipment. Normally, new installations do not require any adjustment. To ensure proper operation, follow the Operational Checks in Section 3 of this manual. Starting the ice machine and completing the Operational Checks are the responsibilities of the owner/operator. -
Page 10: Operation
Section 3 Operation Ice Making Sequence of Operation HARVEST SEQUENCE 5. Harvest INITIAL START-UP OR START-UP AFTER AUTOMATIC SHUT-OFF The water pump de-energizes stopping flow over the evaporator. The rising level of water in the sump trough 1. Pressure Equalization diverts water out of the overflow tube, purging excess Before the compressor starts the hot gas valve is minerals from the sump trough. -
Page 11: Energized Parts Chart
Section 3 Operation Energized Parts Chart CONTROL BOARD RELAYS RELAY LENGTH CONDENSER WATER HOT GAS RELAY COMPRESSOR of “ON” PUMP VALVE COIL FAN MOTOR TIME INITIAL START-UP/ START UP AFTER AUTO SHUT-OFF: Seconds 1. Pressure Equalization 2. Refrigeration System Start-up Seconds FREEZE SEQUENCE:... -
Page 12: Operational Checks
Before water will flow into the water trough the float GENERAL valve shut-off must be in the OPEN position. Your Manitowoc ice machine was factory-operated and adjusted before shipment. Normally, a newly installed ice machine does not require any adjustment. -
Page 13: Water Level Check
Section 3 Operation WATER LEVEL CHECK ICE BRIDGE THICKNESS CHECK Check the water level while the ice machine is in the ice The ice thickness probe is factory-set to maintain the ice mode and the water pump is running. The correct water bridge thickness at 1/8"... -
Page 14: Interior Cleaning And Sanitizing
WASH position. GENERAL Clean and sanitize the ice machine every six months for Step 4 Add the proper amount of Manitowoc Ice efficient operation. If the ice machine requires more Machine Cleaner to the water trough. frequent cleaning and sanitizing, consult a qualified... - Page 15 Do not force this removal. Be sure the locating pin is Ice Thickness Probe Cleaning clear of the hole before sliding the distribution tube out. • Mix a solution of Manitowoc ice machine cleaner and water (2 ounces of cleaner to 16 ounces of water) in Disassembly a container. •...
- Page 16 COMPRESSION FITTING THUMBSCREW SHUT-OFF VALVE SPLASH SHIELD REMOVE ICE THICKNESS PROBE THUMBSCREW Q130 Water Distribution Tube Removal CAP AND FILTER SCREEN • Loosen the two thumbscrews, which secure the distribution tube. • Lift the distribution tube up off the thumbscrews.
- Page 17 Maintenance G. Remove the Water Trough H. Remove the ice damper. • Apply downward pressure on the siphon tube and Q130 remove from the bottom of the water trough. • Grasp left side of ice damper and apply pressure •...
- Page 18 Maintenance Section 4 I. Remove the Bin Door Step 7 Mix a solution of cleaner and warm water. Depending on the amount of mineral buildup, a larger • Grasp the rear of the bin door and pull bin door quantity of solution may be required. Use the ratio in the forward approximately 5".
- Page 19 WASH position. When sanitizing, pay particular attention to the following areas: Step 15 Add the proper amount of Manitowoc Ice Machine Sanitizer to the water trough. • Evaporator plastic parts - including top, bottom and...
-
Page 20: Ice Machine Inspection
Maintenance Section 4 Ice Machine Inspection Cleaning the Condenser Check all water fittings and lines for leaks. Also, make GENERAL sure the refrigeration tubing is not rubbing or vibrating Warning against other tubing, panels, etc. Disconnect electric power to the ice machine head Do not put anything (boxes, etc.) in front of the ice section and the remote condensing unit at the machine. -
Page 21: Checklist
Section 5 Customer Support Checklist If a problem arises during operation of your ice machine, follow the checklist below before calling service. Routine adjustments and maintenance procedures are not covered by the warranty. Problem Possible Cause To Correct Ice machine does not operate. No electrical power to the ice machine. -
Page 22: Safety Limit Feature
In addition to the standard safety controls, such as the A. If the safety limit feature has stopped the ice high pressure cutout, your Manitowoc ice machine machine, it will restart after a short delay. features built-in safety limits which will stop the ice Proceed to step 2. -
Page 23: Commercial Ice Machine Warranty
Commercial Ice Machine Warranty Manitowoc Ice, Inc. (hereinafter referred to as the “COMPANY”) warrants for a period of thirty-six months from the installation date (except as limited below) that new ice machines manufactured by the COMPANY shall be free of defects in material or workmanship under normal and proper use and maintenance as specified by the COMPANY and upon proper installation and start-up in accordance with the instruction manual supplied with the ice machine.