Advertisement
Table of Contents
- 1 Important Safety Instructions
- 2 Compliance with Fcc Regulations
- 3 Protect Your Furniture
- 4 Dear Jensen® Customer
- 5 Location of Controls
- 6 Remote Control
- 7 Getting Started
- 8 Setting the Clock
- 9 Listening to the Radio
- 10 Bluetooth Operation
- 11 Aux in Operation
- 12 Tape Operation
- 13 Using Headphone
- 14 Care and Maintenance
- 15 Troubleshooting Guide
- 16 Specification
- Download this manual
Advertisement
Table of Contents

Related Manuals for Jensen JMC-1250


Summary of Contents for Jensen JMC-1250
- Page 1 BLUETOOTH 3-SPEED STEREO TURNTABLE 3 CD CHANGER MUSIC SYSTEM WITH DUAL CASSETTE DECK USER MANUAL JMC-1250 PLEASE READ THIS USER MANUAL COMPLETELY BEFORE OPERATING THIS UNIT AND RETAIN THIS BOOKLET FOR FUTURE REFERENCE.
-
Page 2: Important Safety Instructions
WARNING TO PREVENT FIRE OR SHOCK HAZARD, DO NOT USE THIS PLUG WITH AN EXTENSION CORD, RECEPTACLE OR OTHER OUTLET UNLESS THE BLADES CAN BE FULLY INSERTED TO PREVENT BLADE EXPOSURE. TO PREVENT FIRE OR SHOCK HAZARD, DO NOT EXPOSE THIS APPLIANCE TO RAIN OR MOISTURE. The Caution Marking is located at the back enclosure of the apparatus. - Page 3 16. Do not overload wall outlet. Use only power source as indicated. 17. Use replacement part as specified by the manufacturer. 18. Upon completion of any service or repairs to this product, ask the service technician to perform safety checks. 19.
-
Page 4: Compliance With Fcc Regulations
COMPLIANCE WITH FCC REGULATIONS This device complies with Part 15 of the FCC Rules. Operation is subject to the following two conditions: (1) This device may not cause harmful interference, and (2) This device must accept any interference received, including interference that may cause undesired operation. -
Page 5: Protect Your Furniture
The serial number of this product is found on its bottom cover. You should note the serial number of this unit in the space provided as a permanent record of your purchase to aid in identification in the event of theft of loss. Model Number : JMC-1250 Serial Number :... -
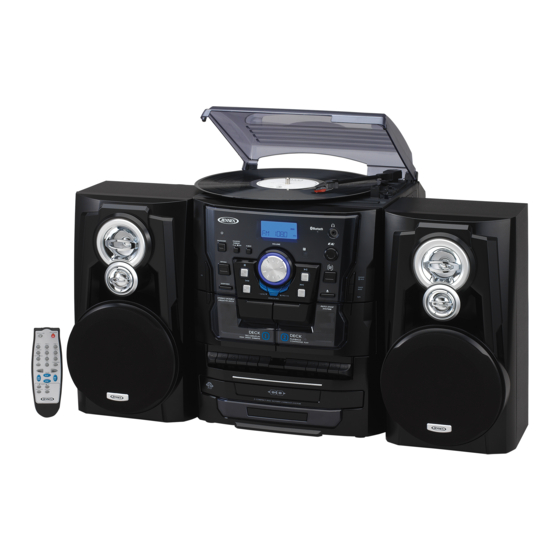
Page 6: Location Of Controls
LOCATION OF CONTROLS... - Page 7 DUST COVER 20 REMOTE SENSOR LCD DISPALY 21 PRE-SET EQ BUTTON VOLUME UP/DOWN BUTTON 22 PLAY/PAUSE BUTTON X-BASS BUTTON 23 DISC SKIP BUTTON STANDBY LED INDICATOR 24 PHONO/BLUETOOTH/AUX BUTTON FM MODE / DUBBING SPEED 25 TUNER/BAND BUTTON SELECTOR POWER ON/STANDBY BUTTON 26 TAPE BUTTON STOP 27 CD DOOR OPEN/CLOSE BUTTON...
-
Page 8: Remote Control
REMOTE CONTROL BUTTON DESCRIPTION OPEN/CLOSE PRESS TO OPEN & CLOSE THE CD DOOR POWER PRESS TO TURN THE UNIT ON AND OFF (STANDBY MODE) DISC 1,2,3 PRESS TO SELECT THE DISC PLAYBACK DIRECTLY DISC-CH PRESS TO SELECT THE NEXT DESIRE DISC AND ROTATE THE DISC TRAY SLEEP PRESS TO ACTIVE SLEEP FUNCTION... -
Page 9: Getting Started
3. The unit will go into standby mode. The STANDBY LED INDICATOR (#5) will turn on. 4. Press the POWER ON/STANDBY BUTTON (#7) once to turn on the JMC-1250. The STANDBY LED INDICATOR (#5) will turn off. Press POWER ON/STANDBY BUTTON (#7) again to turn off the JMC-1250. -
Page 10: Setting The Clock
Setting the Radio Station Presets The JMC-1250 allows you to store up to 40 station presets ( AM-20 and FM-20 ) for easy recall at any time. 1. Press the POWER ON/STANDBY BUTTON (#7) to turn on the JMC-1250. - Page 11 Note : • If no buttons are pressed after 5 seconds when setting the Radio Station Presets, the JMC-1250 will return to tuner mode • The Radio Station Presets may be lost if the main power switch is turned off. If this occurs, you will need to reset the Radio Station Preset.
-
Page 12: Bluetooth Operation
4. Turn on the Bluetooth function for the device you want to link to, and enable the search or scan function to find the JMC-1250. 5. Select "JMC-1250" from the device list when it appears on your device screen. If required, enter the pass code “0000” to pair (link) JMC-1250 with your device. -
Page 13: Aux In Operation
Mode. The LCD DISPLAY (#2) will show AUX. 4. Start playing the device you plugged into the AUX IN Jack (#37).. 5. Slowly adjust both the volume controls of your JMC-1250 and the external device until you reach a comfortable listening level. Note :... - Page 14 CD PLAY / PAUSE MODE 1. Press the PLAY/PAUSE BUTTON (#22) to start playback. The first track of the first disc will be played and the play indicator will appear on the LCD DISPLAY (#2). 2. You can also press either the “ DISC 1”, “ DISC 2 ”, “ DISC 3 ” buttons on the remote control to start playing a specific disc in the tray.
-
Page 15: Tape Operation
BUTTON (#8) to stop playback and press it twice to clear all programmed track TAPE OPERATION GENERAL OPERATION • Press POWER ON/STANDBY BUTTON (#7) to turn on the JMC-1250. • Press TAPE BUTTON (#26) to enter Tape Mode. The LCD DISPLAY (#2) will show TAPE. STOP / EJECT KEY Press to stop all deck operations. - Page 16 CONTINUOUS PLAYBACK OF TWO CASSETTES 1.) Insert a pre-recorded tape into both cassette compartments with the tape you want to play first in DECK 2. 2.) Press the Play button on DECK 2 to begin playback. 3.) Press the Pause button and then Play button of DECK 1.
- Page 17 C. RECORDING FROM CD Press the CD BUTTON (#10) to enter CD Mode. Insert a blank cassette tape in deck 1 which suitable for recording. Press the “PAUSE” button first and then “RECORD” & “PLAY” key at deck 1. Recording function is now on STANDBY. Activate the CD player, and then press the “PAUSE”...
-
Page 18: Using Headphone
7. Press the “MODE” button on remote to confirm, “ ” icon flash and timer source CD/PHONO/TUNER/TAPE appears on the display. 8. Press the MEM/CLOCK-ADJ button (#14) once, timer source flashing. 9. Press the SKIP UP/ DOWN buttons (#28/12) to set source to be controlled by timer and then press the MEM/CLOCK-ADJ button (#14) to finish. -
Page 19: Care And Maintenance
CARE AND MAINTENANCE 1. Do not subject the unit to excessive force, shock, dust or extreme temperature. 2. Do not tamper the internal components of the unit. 3. Clean your unit with a dry cloth. Solvent or detergent should never be used. 4. - Page 20 • • • • If the cassette feels tight while performing operation shown (see Fig.2), the tape may be jamming due to ridges formed in the winding of the tape (visible through the center window). These may be removed, in most cases, by fast winding of the cassette from one end to the other and back again.
-
Page 21: Troubleshooting Guide
TROUBLE SHOOTING GUIDE PROBLEM POSSIBLE CAUSE SOLUTION The unit is disconnected from Reconnect to the AC outlet. The unit does not the AC outlet respond (no Plug another device into the power) AC outlet is not functioning. same outlet to confirm the outlet is working. -
Page 22: Specification
SPECIFICATION Power Requirement Main unit: AC120V~ 60Hz Remote control 2 x 1.5V “AAA” (UM-4) size batteries (not included) Frequency Range Radio Band FM 88 ~ 108 MHz AM 520 ~ 1710 KHz Power Consumption Main Unit: 35Watts SPECTRA GREEN NOTICE At Spectra, environmental and social responsibility is a core value of our business. - Page 23 90 DAY LIMITED WARRANTY AND SERVICE VALID IN THE U.S.A. ONLY SPECTRA MERCHANDISING INTERNATIONAL, INC. warrants this unit to be free from defective materials or factory workmanship for a period of 90 days from the date of original customer purchase and provided the product is utilized within the U.S.A. This warranty is not assignable or transferable.
Need help?
Do you have a question about the JMC-1250 and is the answer not in the manual?
Questions and answers