
Subscribe to Our Youtube Channel
Related Manuals for Jensen JBS-350


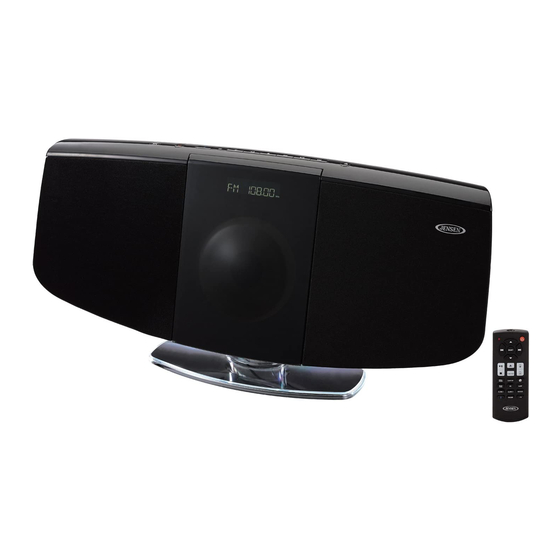
Summary of Contents for Jensen JBS-350
- Page 1 Wall Mountable Bluetooth Music System with CD USER MANUAL JBS-350 PLEASE READ THIS USER MANUAL COMPLETELY BEFORE OPERATING THIS UNIT AND RETAIN THIS BOOKLET FOR FUTURE REFERENCE.
-
Page 2: Dear Jensen® Customer
The serial number of this product is found on its back cover. You should note the serial number of this unit in the space provided as a permanent record of your purchase to aid in identification in the event of theft of loss. Model Number: JBS-350 Serial Number: ________________... -
Page 3: Important Safety Instructions
IMPORTANT SAFETY INSTRUCTIONS When used in the directed manner, this unit has been designed and manufactured to ensure your personal safety. However, improper use can result in potential electrical shock or fire hazards. Please read all safety and operating instructions carefully before installation and use, and keep these instructions handy for future reference. -
Page 4: Compliance With Fcc Regulations
16. Battery shall not be exposed to excessive heat such as sunshine, fire or the like 17. Danger of explosion if battery is incorrectly replaced. Replace only with the same or equivalent type. 18. Do not attempt to dismantle, open or repair this product yourself. If a fault occurs, seek advice from your local qualified service technician or contact the distributor via the telephone number at the back of this instruction manual. -
Page 5: Protect Your Furniture
CAUTION Follow the advice below for safe operations. ON PROTECTION AGAINST LASER ENERGY EXPOSURE o As the laser beam used in this compact disc player is harmful to the eyes, do not attempt to disassemble the casing. o Stop operation immediately if any liquid or solid object should fall into the cabinet. -
Page 6: Installation Options
INSTALLATION OPTIONS ATTACHING THE STAND Align the top portion of the stand with the mounting area located on the bottom of the main unit. Once in place, the round mounting on the stand will align with the circular mounting tab located on the back of the unit. A “click” sound is heard when the stand is attached. - Page 7 Spacer Sleeves Screw Wall plugs plastic...
-
Page 8: Location Of Controls
LOCATION OF CONTROLS MAIN UNIT FRONT VIEW BACK VIEW... -
Page 9: Top View
TOP VIEW USB CHARGING AUX IN 1000mA SNOOZE LCD Display CD Door Built-in Speaker Wall Mounting Keyholes DC IN Jack Stand FM Wire Antenna Power On / Standby Bluetooth Mode / SNOOZE Button Function Mode Button (FM / CD / AUX ) Volume Down / Up Button ... -
Page 10: Remote Control
REMOTE CONTROL Remote Control Operating Indicator In FM preset mode: Select Preset Channel locations. ▲ / ▼ In FM mode: Recall Preset Stations • In CD / BLUETOOTH mode: Skip to the previous or next track. • In CD mode: Press & hold to fast backward/forward. •... - Page 11 FUNC TION Mode se lecto r (RADIO / CD / AUX IN). • In CD mode: Program CD tracks PROG / PRESE T • In FM mode: Memo ry the Pres et Stations CLOC K SE T Cloc k Set Mode Button In F M radio mode: Select FM Stereo / Mon o.
-
Page 12: Getting Started
GETTING STARTED ACCESSORIES INCLUDED Carefully remove the unit and all accessories from the display carton. Please verify that you have all the following accessories before recycling the gift box. User Manual AC Adaptor Input: 100-240V~ 50/60Hz Output: 12V 1500 mA, center-positive Remote control Wall mounting instruction sheet Wall mounting kit (2 screws, 2 spacer sleeves and 2 plastic anchors) - Page 13 NOTE ON NON-MAGNETICALLY SHIELDED SPEAKERS This unit is not magnetically shielded and may cause color distortion on the screen of some TVs or video monitors. To avoid this, you may need to move the unit further away from the TV or monitor if unnatural color shifts or image distortion occurs. Remote Control The remote control operates on one CR2025 battery (included).
-
Page 14: Setting The Clock (Remote Control Only)
TURNING THE UNIT POWER ON/OFF 1. In Off (standby) mode, tap the POWER Button on main unit or remote control to turn the unit ON. The last selected input mode icon will show on LCD display. 2. To turn the unit OFF (standby), tap the POWER Button on main unit or remote control again. -
Page 15: Radio Operation
NOTE: 1.) The system provides dual alarm settings so you can preset another wake up time individually by using the ALARM 2 Button. 2.) If “Wake to CD” is selected but a CD is not inserted, the alarm will default to the Beeping Alarm automatically when the alarm wake time is reached. -
Page 16: Preset Radio Stations
stop scanning when it receives the next broadcasting station of adequate signal strength. Button on main unit or VOL+ / – Button on 5. Press the volume control remote control to adjust the volume control to the desired volume level. FM &... -
Page 17: Cd Player Operation
Release the button to continue playing your selection. 10. To stop playing, press the STOP Button 11. Turn off the JBS-350 when you have finished listening. DIFFERENT PLAY MODE S (REMOTE CONTROL ONLY) Press the FM ST/MODE Button on remote control repeatedly to select different of play modes when CD or MP3 CD is playing. -
Page 18: Bluetooth Operation
NFC compatible devices. 1. Make sure your Smartphone or Bluetooth device has the NFC feature, and it is turned ON (enabled). 2. Turn on the JBS-350 power, press the Bluetooth Button on main unit or... - Page 19 Bluetooth device to locate the NFC touch point if you are not sure where it is. 4. If the JBS-350 is in pairing mode, it will turn on and enter Bluetooth mode automatically and pair with your smartphone. Display will show “CONNECTED”...
-
Page 20: Auxiliary Input Operation
song. If you want to pair the JBS-350 with another Bluetooth enabled device, press and hold the Button for 3 seconds or turn off the Bluetooth function of device currently paired with JBS-350 then repeat step 3 above. - Page 21 CHARGING YOUR SMART PHONE OR PORTABLE DEVICE This unit features a 1 AMP USB port on the top of the unit for charging your portable device (iPod, iPhone, Android phone, etc.) when used with the USB charging cord that came with your device. 1.
-
Page 22: Care And Maintenance
CARE AND MAINTENANCE 1. Do not subject the unit to excessive force, shock, dust or extreme temperature. 2. Do not tamper the internal components of the unit. 3. Clean your unit with a dry cloth. Solvent or detergent should never be used. 4. -
Page 23: Specifications
CD player will not Unit not in CD function mode. Select CD function mode. play CD is installed incorrectly. Insert CD with label facing to the CD door. If the CD is self-compiled, the Use better quality blank media used may not be media and retest. - Page 24 90 DAY LIMITED WARRANTY AND SERVICE VALID IN THE U.S.A. ONLY SPECTRA MERCHANDISING INTERNATIONAL, INC. warrants this unit to be free from defective materials or factory workmanship for a period of 90 days from the date of original customer purchase and provided the product is utilized within the U.S.A. This warranty is not assignable or transferable.
Need help?
Do you have a question about the JBS-350 and is the answer not in the manual?
Questions and answers
Can you dim the display on the Jensen JBS-359
@Mary Graham
Yes, the display on the Jensen JBS-350 dims automatically when the unit is turned off (standby mode).
This answer is automatically generated
Can you dim the display on the Jensen JBS-350
Yes, the display on the Jensen JBS-350 will dim when the unit is turned off (standby mode).
This answer is automatically generated