Table of Contents
Advertisement
Quick Links
Gigabit Media Converter
User's Manual
Link 10/100/1000BASE-T to 100-/1000-Mbps SFP fiber connections.
Order toll-free in the U.S.: Call 877-877-BBOX (outside U.S. call 724-746-5500)
Customer
FREE technical support 24 hours a day, 7 days a week: Call 724-746-5500 or fax 724-746-0746
Support
Mailing address: Black Box Corporation, 1000 Park Drive, Lawrence, PA 15055-1018
Information
Web site: www.blackbox.com • E-mail: info@blackbox.com
BLACK BOX
LGC220AE
®
Advertisement
Table of Contents

Subscribe to Our Youtube Channel
Related Manuals for Black Box LGC220AE


Summary of Contents for Black Box LGC220AE
- Page 1 Order toll-free in the U.S.: Call 877-877-BBOX (outside U.S. call 724-746-5500) Customer FREE technical support 24 hours a day, 7 days a week: Call 724-746-5500 or fax 724-746-0746 Support Mailing address: Black Box Corporation, 1000 Park Drive, Lawrence, PA 15055-1018 Information Web site: www.blackbox.com • E-mail: info@blackbox.com...
- Page 2 Trademarks Used in this Manual Trademarks Used in this Manual Black Box and the Double Diamond logo are registered trademarks of BB Technologies, Inc. Microsoft, Windows, and Internet Explorer are registered trademarks of Microsoft Corporation. Mozilla and Firefox are registered trademarks of the Mozilla Foundation.
- Page 3 FCC and IC RFI Statements Federal Communications Commission and Industry Canada Radio Frequency Interference Statements This equipment generates, uses, and can radiate radio-frequency energy, and if not installed and used properly, that is, in strict accordance with the manufacturer’s instructions, may cause inter ference to radio communication. It has been tested and found to comply with the limits for a Class A computing device in accordance with the specifications in Subpart B of Part 15 of FCC rules, which are designed to provide reasonable protection against such interference when the equipment is operated in a commercial environment.
- Page 4 NOM Statement Instrucciones de Seguridad (Normas Oficiales Mexicanas Electrical Safety Statement) 1. Todas las instrucciones de seguridad y operación deberán ser leídas antes de que el aparato eléctrico sea operado. 2. Las instrucciones de seguridad y operación deberán ser guardadas para referencia futura. 3.
-
Page 5: Product Safety
Failure to follow these precautions and warnings might cause product malfunction, electrical shock, or even fire. If this product is working abnormally (e.g. generating smoke), please stop using this product and contact Black Box Technical Support at 724-746-5500 or info@blackbox.com. DO NOT install this product under conditions listed below: •... -
Page 6: Table Of Contents
Table of Contents Table of Contents 1. Specifications ..................................7 2. Overview ....................................8 2.1 Introduction ...................................8 2.2 Features ..................................8 2.3 What’s Included ................................8 2.4 Hardware Description ..............................9 3. Preparing for Management ..............................10 3.1 Preparation for the Web Interface ..........................10 3.2 Preparation for the Telnet Interface .......................... -
Page 7: Specifications
Chapter 1: Specifications 1. Specifications Approvals Certifications: FCC Class A, EMC safety Class A; Standards: IEEE 802.3a, IEEE 802.3u, IEEE 802.3z, IEEE 802.3x flow control Data Transfer Rate 2000 Mbps, full-duplex Transmission Media Twisted-pair: 1000BASE-T CAT5/5e/6 UTP/STP, up to 328 feet (100 m) Connectors (1) RJ-45, (1) SFP cage... -
Page 8: Overview
• Provides link loss forwarding and 9.6 K jumbo frame support. 2.3 What's Included Your package should contain the following items. If anything is missing or damaged, contact Black Box Technical Support at 724-746-5500 or info@blackbox.com. • 10/100/1000BASE-T to 100-/1000-Mbps SFP Media Converter •... -
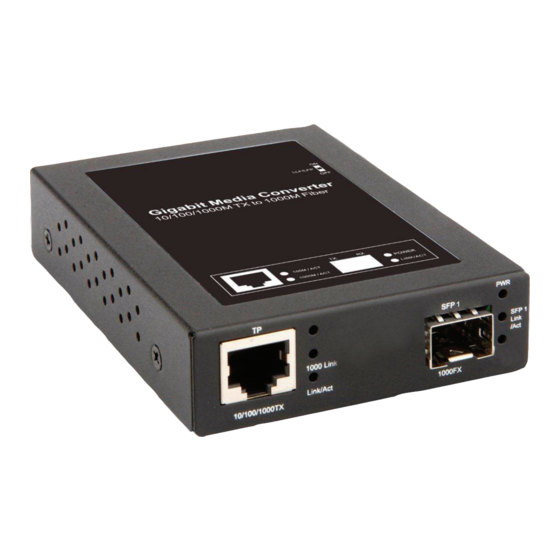
Page 9: Hardware Description
Chapter 2: Overview To download this user manual from the Black Box Web site: 1. Go to www.blackbox.com 2. Enter the part number (LGC220AE) in the search box: 3. Click on the “Resources” tab on the product page, and select the document you wish to download. -
Page 10: Preparing For Management
Chapter 3: Preparing for Management 3. Preparing for Management You can remotely manage this media converter via Telnet or a Web browser (such as Microsoft Internet Explorer or Mozilla ® ® ® ® Firefox ) to access and configure the media converter from anywhere on the network. ®... -
Page 11: Preparation For The Telnet Interface
Chapter 3: Preparing for Management Figure 3-2. Login screen. 8. Type in the username and password. The default username and password are both admin. The Welcome page appears. Figure 3-3. Welcome page. If you can't login to the media converter, the following steps can help you to identify the problem. 1. - Page 12 Chapter 3: Preparing for Management Access Telnet with Putty: 1. Open Telnet/PuTTY Choose Telnet in the Protocol field, and in the Session configuration, enter the Host Name (IP Address of your media converter, default value is 192.168.2.1) and Port number (default Telnet =23, SSH = 22). Then click on “Open” to start the PuTTy session console.
-
Page 13: Configuration Via The Web User Interface
Chapter 4: Configuration via the Web User Interface 4. Configuration via the Web User Interface After you login to the media converter’s configuration Web page, you can configure the settings or monitor system status. Click the menu button in the left side of the Web page to open the function pages. 4.1 Network Information Figure 4-1. -
Page 14: Password Setting
Chapter 4: Configuration via the Web User Interface 4.2.2 Password Setting Figure 4-3. Password Setting screen. You can set a new password for the media converter’s configuration Web page here. The password must be alphanumeric characters (“a” – ”z”, “A” – “Z”, “0” – “9”, and “_”) and is case-sensitive. You must input the old password when setting a new password. -
Page 15: Port Configuration
Chapter 4: Configuration via the Web User Interface Table 4-1. Converter Configuration screen options. Option Description Jumbo Frame (9K) Enable this function for Jumbo Frame packet (9K) transmitting. Link Transparent To enable Remote Fault Detect and Link Loss Carry Forward functions, select this option. -
Page 16: Mib Counter
Chapter 4: Configuration via the Web User Interface NOTE: The rate limit you set here must be the multiple of 64. If the rate limit you input is not the multiple of 64, it will be set to 64 automatically. Press the “Apply” button to apply all the settings you’ve configured here. 4.2.5 MIB Counters Figure 4-6. -
Page 17: Vlan
Chapter 4: Configuration via the Web User Interface 4.2.7 VLAN VLAN Group Figure 4-8. VLAN Group screen. You can set 16 VLAN entries if this function is enabled. Each VLAN entry contains its VID and member port. Press the “Apply” button to apply all the settings you’ve made here. -
Page 18: Q-In-Q
Chapter 4: Configuration via the Web User Interface Table 4-3 (continued). VLAN per port settings screen options. Egress Link Type Description Don’t Touch Tag The media converter will not insert or remove VLAN tags to/from packets transmitting through this port. Port VLAN Entry Select Port base VLAN index. -
Page 19: Port Policy
Chapter 4: Configuration via the Web User Interface 4.2.9 Port Policy Figure 4-11. Port to Queue screen. You can set the priorities of each physical port here in this page. When a packet without VLAN tag is received from the connection port, it will be handled according to the priority value you set here. -
Page 20: Remote Setting
Chapter 4: Configuration via the Web User Interface 4.3 Remote Setting 4.3.1 802.3ah Function 802.3ah Configuration Figure 4-13. 802.3ah Configuration screen. You can set 802.3ah OAM in this page. Enable/disable 802.3ah function and set its mode as passive or active mode. Press the “Apply”... -
Page 21: 802.3Ah Status
Chapter 4: Configuration via the Web User Interface 4.3.3 802.3ah Status You can view IEEE 802.3ah status on this Web page. Figure 4-15. IEEE 802.3ah status screen. 4.4 Tools 4.4.1 System Reboot Press the “System Reboot” button to restart the system. All settings will be kept. 4.4.2 Save and Restore Figure 4-16. -
Page 22: Firmware Upgrade
Chapter 4: Configuration via the Web User Interface 4.4.3 Firmware Upgrade Figure 4-17. Firmware Upgrade screen. You can update the media converter’s firmware in this Web page. Press the “Browse…” button to select the firmware from your PC, then press the “Update” button to start updating the firmware. NOTE: It might take 60 seconds to update the firmware. -
Page 23: Telnet
Chapter 5: Telnet 5. Telnet Telnet provides another way to configure your media converter. 5.1 Telnet Overview Figure 5-1. Telnet screen. As mentioned in Chapter 3, Preparing for Management, telnet provides another way to configure your media converter if your PC doesn’t have access to a Web page. -
Page 24: Configure Local
Chapter 5: Telnet 5.3 Configure Local Figure 5-3. Configure Local screen. To enter the “Configure Local” sub-menu, type “3” in the telnet interface. To refresh the menu, type “0” in the telnet interface. To leave this sub-menu, press the escape key on your keyboard. 5.3.1 IP Configuration Figure 5-4. -
Page 25: Restore Factory Default
Chapter 5: Telnet 5.3.2 Restore Factory Default Figure 5-5. Restore Factory Default screen. To reset the media converter’s settings to their default values, type “2” in the “Configure Local” sub-menu. 5.3.3 Save Configure Figure 5-6. Save Configure screen. To save your media converter’s current settings, type “3” in the “Configure Local” sub-menu. 5.3.4 Reset Figure 5-7. -
Page 26: 802.3Ah Oam Function
Chapter 5: Telnet 5.4 802.3ah OAM Function To enter the “802.3ah OAM Function” sub-menu, type “4” in the telnet interface. To refresh the menu, type “0” in the telnet interface. To leave this sub-menu, press the escape key on your keyboard. 5.4.1 802.3ah Configuration Figure 5-8. -
Page 27: Mib Counter
Chapter 5: Telnet 5.5 MIB Counter To view the media converter’s MIB counters, type “5” in the telnet interface. Figure 5-10. MIB Counter screen. 5.6 Close Connection To disconnect the telnet connection, type “6” in the telnet interface. 724-746-5500 | blackbox.com Page 27... -
Page 28: Appendix. Ip Configuration For Your Pc
Appendix: IP Configuration for Your PC Appendix. IP Configuration for Your PC This appendix describes how to set the IP address of your PC so you can connect to the configuration Web page. The configuration Web page allows you to set system variables or monitor system status. The following section will show you how to set the IP address properly in a Microsoft Windows 8 environment. - Page 29 Appendix: IP Configuration for Your PC 3. An Ethernet Status window will pop up. Click on the Properties button as shown in Figure A-3. Figure A-3. Ethernet status screen. 724-746-5500 | blackbox.com Page 29...
- Page 30 Appendix: IP Configuration for Your PC 4. An Ethernet Properties window will pop up. Double click on the Internet Protocol Version 4 (TCP/IPv4). Figure A-4. Select Internet Protocol Version 4 (TCP/IPv4). 724-746-5500 | blackbox.com Page 30...
- Page 31 Appendix: IP Configuration for Your PC 5. An Internet Protocol Version 4 (TCP/IPv4) Properties window will pop up. Set your PC’s IP address and subnet mask as shown in Figure A-5. By default, your product’s IP address should be 192.168.2.1.You can set any IP address for your PC as long as it’s not the same as your media converter's IP address and is in the same network segment as your media converter’s IP address.
- Page 32 About Black Box Black Box provides an extensive range of networking and infrastructure products. You’ll find everything from cabinets and racks and power and surge protection products to media converters and Ethernet switches all supported by free, live 24/7 Tech support available in 60 seconds or less.
Need help?
Do you have a question about the LGC220AE and is the answer not in the manual?
Questions and answers