Table of Contents
Advertisement
Advertisement
Table of Contents

Related Manuals for Onn ONA16AV009


Summary of Contents for Onn ONA16AV009
-
Page 1: Portable Dvd Player
PORTABLE DVD PLAYER MODEL: ONA16AV009 PRODUCT GUIDE... -
Page 2: Important Safety Instruction
IMPORTANT SAFETY INSTRUCTION CAUTION The lightning flash with arrowhead RISK OF ELECTRIC SHOCK symbol within an equilateral triangle DO NOT OPEN is intended to alert the user to the presence of uninsulated dangerous CAUTION: TO REDUCE THE RISK OF voltage within the product`s enclosure that may ELECTRIC SHOCK, DO NOT REMOVE be of sufficient magnitude to constitute a risk of C O V E R ( O R B A C K ) . - Page 3 IMPORTANT SAFETY INSTRUCTION 7 ) D o n o t b l o c k a n y v e n t i l a t i o n WARNING openings. Install in accordance with the USE UNDER SUPERVISION OF AN ADULT manufacturer's instructions.
- Page 4 IMPORTANT SAFETY INSTRUCTION moved with care. Never push objects of any kind into the Quick stop, excessive force and uneven product through openings as they may touch surfaces may cause the appliance and cart dangerous voltage points or short out parts combination to overturn.
-
Page 5: Notes On Handling
IMPORTANT SAFETY INSTRUCTION to this product, ask the service technician to NOTES ON HANDLING: perform safety checks to determine that the ● When shipping the unit, always use the product is in proper operational condition. original shipping carton and packing materials. For maximum protection, repack the unit as it 23 ) Wall or ceiling mounting was originally packed at the factory. -
Page 6: Important Safety Instructions
IMPORTANT SAFETY INSTRUCTIONS of the glass. In the same way, moisture may condense on the optical pick-up lens inside this unit, one of the most crucial internal parts of the DVD player. Moisture condensation occurs during the following cases: ● When you bring the DVD player directly from a cold place to a warm place. ●... -
Page 7: About Discs
ABOUT DISCS The region number for this DVD Player is: 1 See the following page for information regarding region numbers. PLAYABLE DISCS: The following discs can be played back on this DVD player: DISC TYPES: Data on most DVDs is divided into sections called titles and then into subsections called chapters, each of which is given a title or chapter number. -
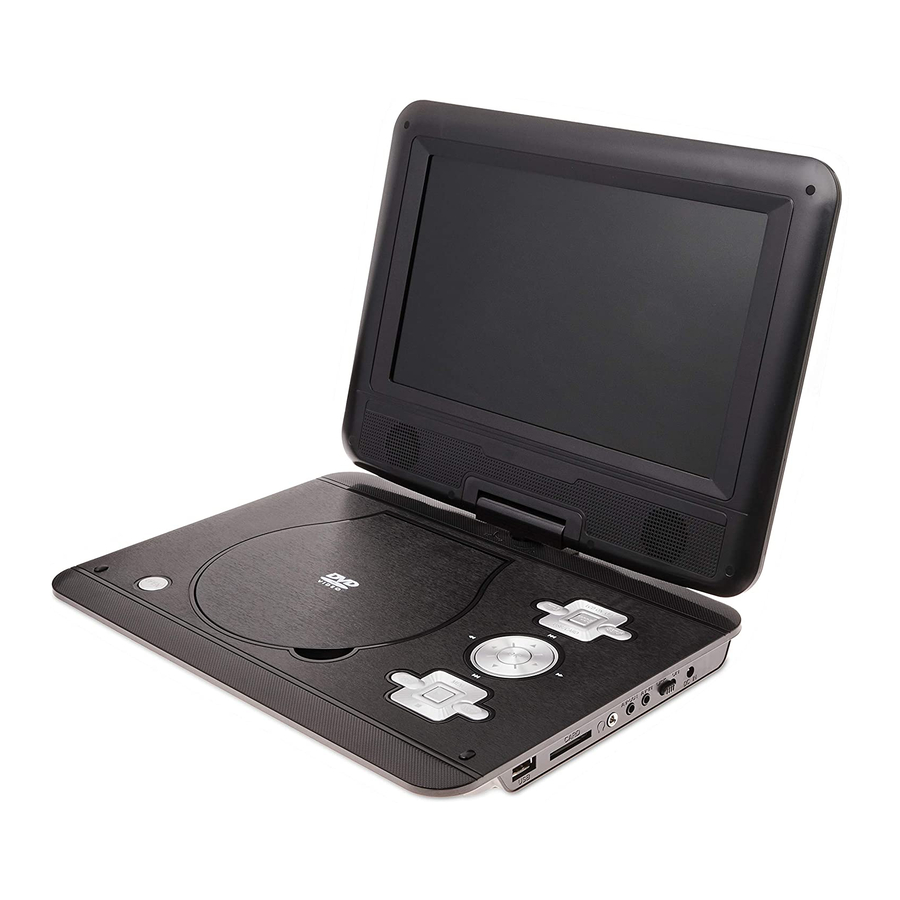
Page 8: Location Of Controls
LOCATION OF CONTROLS TITLE USB/CARD 1. LCD ON/OFF: Press to turn on or turn off (Saving the battery power while music playback) the screen. TITLE: Press to return to disc's title page. (Function depends on the disc recording). MODE: Press to enter to AV IN mode; press again to resume normal mode. SETUP: Press to enter to DVD system setup menu and press again to exit. -
Page 9: Right Side View
LOCATION OF CONTROLS Right Side View: DC IN AV-OUT AV-IN CARD 5. USB Port 10. POWER ON/OFF Switch: Slide to ON position to power on. Slide to OFF position to 6. CARD Slot shut off. (Phones) Jack 11. DC IN Jack: DC input jack (DC 9-12V, 1A 8. -
Page 10: Remote Control
REMOTE CONTROL 1. POWER Button 2. VOLUME +/– Buttons MUTE Button 4. MENU Button POWER 5. Direction Buttons Button Button ( Play/Pause Button USB/CARD Button TITLE Button MENU AUDIO Button GOTO Button REPEAT Button 15. SLOW Button 16. LCD ON/OFF Button 17. -
Page 11: Battery Installation (Remote Control)
BATTERY INSTALLATION (REMOTE CONTROL) battery door and lift it off. 2.Install two (2) x AAA size batteries (not included )into the battery compartment as the figure on righ and the polarity markin evice. 3. Do not mix old and new batteries and Do not mix alkaline, standard (carbon-zinc) or rechargeable (ni-cad, ni-mh, etc.) batteries. directions. -
Page 12: Charging By Supplied Ac/Dc Adaptor
POWER SOURCE The unit has a built-in DC 7.4V Lithium-ion rechargeable battery. Recharge it as follows: Charging by supplied AC/DC Adaptor: Charging by supplied AC/DC Adaptor: Connect the small plug from the supplied AC/DC Adaptor to the DC IN Jack on the right of unit. Connect the AC/DC Adaptor to the wall outlet having AC 100-240V~;... - Page 13 CONNECTIONS 1.Connecting to a TV or Video Player such like DVD; VCR; DVR Players ... (AV connection cable not included) DC IN AV-OUT AV-IN CARD Video input jack ( Yellow ) Audio left channel input jack ( White ) Audio right channel input jack ( Red ) Audio/Video cable Connected to the Video Player Connected to the TV...
- Page 14 SWIVEL PANEL The viewing angle of the swivel panel can adjust as below as desired: 180°...
- Page 15 OPERATIONS 1. Lift up the panel and turn to desired angle. Slide the Power ON/OFF switch to "ON" position to power on the unit, the Green Indicator on front of the player will light. 2. Press the OPEN button to open the disc door. Place the disc on the center spindle with label side facing up.
- Page 16 OPERATIONS GOTO LCD ON/OFF ~ To select the desired Title and Chapter, press the Press to turn on or off the LCD display. GOTO Button once, the Title and Chapter selection menu will appear on the screen. Use the Direction POWER and Numeric Buttons to select the desired title and Press to turn to standby mode.
-
Page 17: Usb Or Card Playback
USB or CARD PLAYBACK 1. Insert the USB Device or SD/MMC memory card into the USB port /card slot as the figure below. DC IN AV-OUT AV-IN CARD NB: The unit supported to playback: ~ MP3; WMA (Music file) ~ JPG (Pictures) ~ MPEG2;... -
Page 18: System Setup
SYSTEM SETUP Setting Menus: In stop playback mode, press the SETUP Button the setting menu will appear on the screen as below. Using the ◄, ►, ▲, ▼ need to set or reset. Press the Direction Buttons to select and highlight the function you Button to enter or confirmed the selection. - Page 19 SYSTEM SETUP In Video Setup Page: 1. If "Picture" is selected, using the Direction and OK Buttons to set the panel quality such like Sharpness; Brightness; Contrast; Hue or Saturation as desired. Sharpness; Brightness; 2. If Picture Quality is selected, using the Direction and OK Buttons to set the Contrast;...
-
Page 20: Care And Maintenance
CARE AND MAINTENANCE Caring for Discs Treat the disc carefully. Handle the disc only by its edges. Never allow your fingers to contact with the shiny, unprinted side of the disc. ● Do not attach adhesive tape, stickers, etc. to the disc label. ●... -
Page 21: Specifications Are Subject To Change Without Notice
SPECIFICATIONS Power Source: Power Source: Built-in DC 7.4V Lithium-ion rechargeable battery, recharge by DC 9-12V, 1A through DC IN Jack Power Source of Remote Control: DC 3V, 2 x AAA Size Batteries Disc Compatibility: DVD/VCD/SVCD/DVCD/CD/CD-R/CD-RW/DVD±R/DVD±RW SPECIFICATIONS ARE SUBJECT TO CHANGE WITHOUT NOTICE ACCESSORIES 1 x User's Manual 1 x AC/DC Adaptor... -
Page 22: Limited Product Warranty
LIMITED PRODUCT WARRANTY This quality product is warranted to be free from manufacturer’s defects in material and workman-ship, provided that the unit is used under the normal operating conditions intended by the manufacturer. Should you have any problem with this product, please and it is highly recommended to visit our website at www.curtisint.com before you take any other steps as we have additional copies of instruction manuals, operating manuals and trouble shooting tips on our website which gives you the answer on most of the...
Need help?
Do you have a question about the ONA16AV009 and is the answer not in the manual?
Questions and answers
What kind of adapter do I need to charge/power this device? We have misplaced the one that came with the DVD player (ONA16AV009).
The Onn DVD player model ONA16AV009 requires an AC adapter power cord supply charger with an input of 100-240V AC / 50-60Hz.
This answer is automatically generated
I do not know where the stop and pause button is
The Play/Pause button is located on the remote control and is labeled as item 8. There is no separate Stop button mentioned in the provided context.
This answer is automatically generated