Advertisement
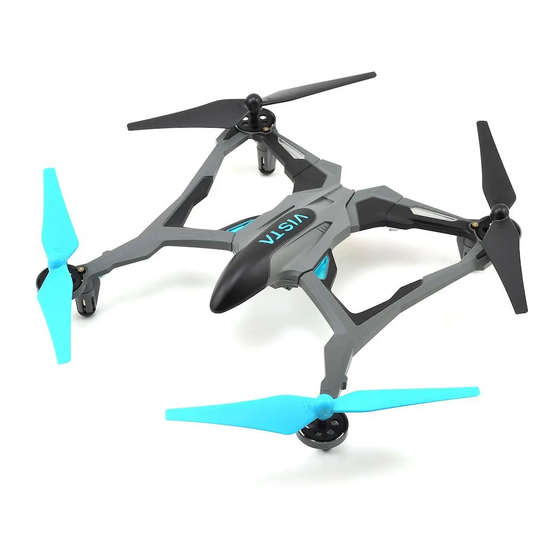
Vista UAV Quadcopter
CHARGING
Plug the charger into a USB to AC adapter (DIDP1125 not included)
or a computer USB port and connect the battery. The red LED will
be steady while charging and fl ash when the charge is complete.
NEVER leave the battery unattended while charging.
DO NOT allow the USB port to power down while the charger
is connected to the battery.
ALWAYS unplug the charger from the USB port and the
battery when charging is complete.
NEVER charge a puffed or damaged battery.
CONTROLLER SETUP
Remove the screw
and slide the cover
down to insert the
included 4 A A A
batteries.
LINKING
1. Turn on the controller with
the left stick at its lowest
position.
2. Connect the
battery to the
Vista and place it
on a level surface.
The red LED on
the quad will fl ash
rapidly when the quad is linked to the controller.
™
Spare Blades
(2 black, 2 color)
FLYING
FLYING BASICS
1. Place the Vista on the ground at least 6 feet away with the
tail facing you.
2. Take off by "slowly" advancing the left stick until the quad
takes off. Change the altitude using small movements.
3. Use the right stick to make the Vista move left, right, forward
1
or backward. Keep in mind that when the nose is facing you,
moving the right stick to the right will make the quad appear
to move to the left.
4. Moving the left stick to the left or right will rotate the nose
of the Vista left or right.
5. Always use small stick movements to control the Vista until
you are familiar with the how the model responds to the
controls.
6. Always unplug the Vista's battery and turn off the transmitter
2
when you're done fl ying.
Radio Controlled
Quadcopter
AAA Batteries (4)
Flight
Battery
Screwdriver
USB Charger
Radio
Advertisement
Table of Contents

Related Manuals for Dromida Vista UAV


Summary of Contents for Dromida Vista UAV
- Page 1 ™ Radio Controlled Quadcopter Spare Blades (2 black, 2 color) AAA Batteries (4) Vista UAV Quadcopter Radio Flight Battery Screwdriver USB Charger CHARGING FLYING Plug the charger into a USB to AC adapter (DIDP1125 not included) or a computer USB port and connect the battery. The red LED will be steady while charging and fl...
-
Page 2: Low Battery Indicators
DUAL RATES SLT COMPATIBILITY The agility of the Vista can be changed by The Vista has a receiver that is compatible with other SLT transmitters pushing down on the right stick to select like the Tactic™ TTX650. A transmitter with an ANYLINK can also be used low or high control rates. -
Page 3: Motor Replacement
3. Remove the motor from the frame and insert the replacement. Make sure FRONT Color Blades, that the wire colors on the Color LEDs replacement motor are the same as the original. The motors for the clockwise props have black and white wires. -
Page 4: Fcc Requirement
The separate collection PLEASE DO NOT RETURN YOUR PRODUCT TO THE STORE. Dromida will and recycling of your waste equipment at the time of disposal will help to repair or replace factory defects for 90 days from the date of purchase. - Page 5 The objects of the declaration described here are in conformity with the requirements of the specifi cations listed below, following the provisions of the European R&TTE directive 1995/5/EC: EN300 328 V1.8.1. Technical requirements for radio equipment ETSI EN 301 489-1 V1.8.1, 301 489-17 V1.3.2 General EMC requirements for radio equipment Hobbico, Inc.
-
Page 6: Replacement Parts
11 DIDE1184 Led Arm Covers Green 16 DIDE1189 Canopy LED Light Strip 3 DIDE1175 Bearing Set 11 DIDE1185 Led Arm Covers Red DIDJ1105 Transmitter 4 DIDE1176 Gear Set 11 DIDE1186 Led Arm Covers White © 2015 Dromida, ® a Hobbico company. dromida.com DIDE03xx v2...
Need help?
Do you have a question about the Vista UAV and is the answer not in the manual?
Questions and answers