Table of Contents
Advertisement
Quick Links
Advertisement
Table of Contents

Related Manuals for Baumatic BSPO615


Summary of Contents for Baumatic BSPO615
- Page 1 3172643-002 02/07/13 11:30 Página 1 Installation and Instructions for Use BSPO615...
- Page 2 3172643-002 02/07/13 11:30 Página 2 Dear Customer, Congratulations on purchasing your new product from Think Appliances. To register your parts and labour warranty (some conditions apply please refer to your warranty card for more details) please contact out Customer Care team on: 1800 444 357 Our Customer Care centre is there to ensure you get the most out of your appliance.
-
Page 3: Safety Instructions
3172643-002 02/07/13 11:30 Página 3 SAFETY INSTRUCTIONS Read these instructions carefully to obtain the best performance from your oven. Keep this manual so that it can be read by a new owner. Electrical safety • In order to connect the oven to the mains, the technician should use an H05SS-F power cable. - Page 4 3172643-002 02/07/13 11:30 Página 4 original spare parts. Repairs or handling by others may damage the appliance or cause malfunctioning that could be hazardous to your safety. • Unplug your oven if it malfunctions. Child Safety During use, the appliance becomes hot. Care should be taken to avoid touching heating elements inside the oven.
-
Page 5: Cleaning And Maintenance
3172643-002 02/07/13 11:30 Página 5 • The oven heats up when in use, so please use oven gloves when performing operations inside the oven and avoid touching the heating elements. • Only use the supplied temperature probe inside the oven (in models that come with this feature). Cleaning and Maintenance •... -
Page 6: Before First Use
3172643-002 02/07/13 11:30 Página 6 Before First Use Other Important Instructions • There may be traces of grease and other sub- The oven must always be operated with the stances in the oven as a result of its manu- door closed. facturing process. - Page 7 3172643-002 02/07/13 11:30 Página 7 Safety when using the pyrolytic cleaning During the pyrolytic cleaning process: cycle • Do not leave any cloths or fabric hanging Before the cleaning cycle starts you must: from the oven handle or in close contact with it.
- Page 8 3172643-002 02/07/13 11:30 Página 8 Instructions to remove the shelf supports Pyrolytic Self-Cleaning Procedure and/or telescopic guide rails. • This setting allows you to carry out a 1 Remove all accessories from inside the pyrolytic cleaning cycle, which involves the oven.
-
Page 9: If Something Goes Wrong
3172643-002 02/07/13 11:30 Página 9 3 Apply pressure with your fingers on Point 1 If Something Goes Wrong located on the upper part of both sides of the oven door. Figure 3. 4 Without releasing the pressure applied to The oven stops working Point 1, pull on the plastic seal above the door. -
Page 10: Technical Specifications
3172643-002 02/07/13 11:30 Página 10 Technical Specifications • The unit material, including covering materi- als and glue must be able to withstand tem- peratures of 120 ºC. If the appliance does not work, inform Technical Service of the kind of problem you are experiencing and give the: 1 Serial Number (S-No) Electrical Connection... -
Page 11: Control Panel
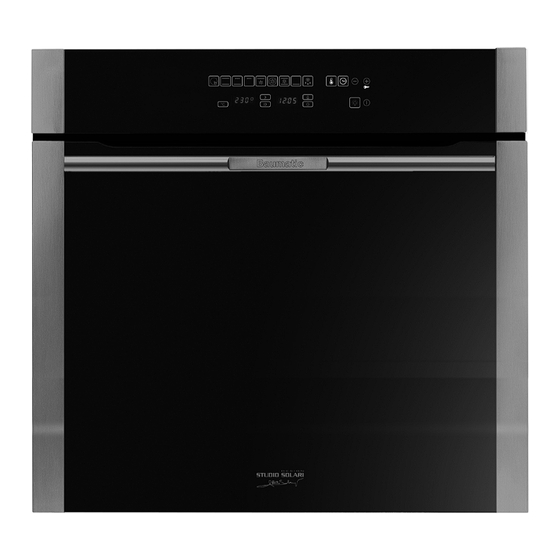
3172643-002 02/07/13 11:30 Página 11 Control Panel 6 7 8 9 11 Cooking functions 17 Electronic timer sensor 12 Temperature display 18 - Sensor 13 Door lock indicator light 19 + Sensor / Child safety function 14 Pyrolytic function indicator display 10 On / Off 15 Electronic timer 11 Inside light... -
Page 12: Oven Functions
3172643-002 02/07/13 11:30 Página 12 Oven Functions Convencional Conventional with Fan This function is for use when baking cakes, Suitable for roasts and cakes. The fan spreads where the heat should be even to give a the heat evenly throughout the inside of the spongy texture. -
Page 13: Recommendations For Defrosting Food
3172643-002 02/07/13 11:30 Página 13 Recommendations for Defrosting Food The defrost function works by means of a 2- • Meat and fish do not need to be completely level system of hot air. HI is for meats in thawed before cooking. Condiments can be general and LO is for fish, cakes, pastries and added once the surface is soft. - Page 14 3172643-002 02/07/13 11:30 Página 14 Oven Use 6 7 8 9 Use of the electronic timer Caution Manual Operation The electronic clock features Touch-Control After setting the clock, the oven is ready for use: technology. To operate, simply touch the glass 1 Press the On sensor control symbols with your fingertip.
- Page 15 3172643-002 02/07/13 11:30 Página 15 Oven Lighting 3 You will then hear two beeps, the display will show the time left before the alarm sounds The inside light will go on: and the symbol will flash slowly, – When the oven door is open. If the door is indicating that the timer has been set.
- Page 16 3172643-002 02/07/13 11:30 Página 16 Programming the Cooking Stop Time 16 This will be confirmed by two beeps. The current time will show on the display and 1 Press on the clock sensor several times symbol will remain lit. until the symbol lights up.
- Page 17 3172643-002 02/07/13 11:30 Página 17 PROGRAMMING AND OPERATING THE PYROLYTIC FUNCTION 6 7 8 9 Follow the instructions below to carry out a 6 Once the pyrolytic programme is selected, pyrolytic cleaning cycle: touch sensor (12). You will hear a double beep confirming that the programme is set.
- Page 18 3172643-002 02/07/13 11:30 Página 18 9 When the pyrolytic cleaning cycle has fi - 13 Open the oven door and wipe the inside nished, you will hear an alarm. with a damp cloth, cleaning up the ash from the cleaning cycle. Areas in the oven 10 Touch any of the oven’s sensors to stop that are difficult to access will need to be the alarm.
- Page 19 3172643-002 02/07/13 11:30 Página 19 INCIDENTS WHEN OPERATING THE PYROLYTIC FUNCTION 6 7 8 9 INCIDENT CAUSE SOLUCIÓN My accessories and shelf You have not removed the You must replace them and supports are damaged. accessories and supports remove them in later during the pyrolytic cleaning cleaning cycles.
- Page 20 3172643-002 02/07/13 11:30 Página 20 INCIDENT CAUSE SOLUTION A flashing symbol E:1 stopped heating up. The oven door has not been appears on the temperature locked. The door lock has display (2) and an alarm not worked. sounds. The oven has Touch any sensor to stop A flashing symbol E:1 The door is locked but the...
- Page 21 3172643-002 02/07/13 11:30 Página 21 INCIDENT CAUSE SOLUTION IMPORTANT If the temperature inside the oven is very high (above 250 ºC), you will see that E4 flashes but the time does not start to count down. You should wait until the oven cools down, when the countdown will begin.
- Page 22 3172643-002 02/07/13 11:30 Página 22 Changing the oven light bulb Caution • Change the bulb. Make sure the oven is unplugged before • Reassemble the glass cover and ensure that changing the bulb. everything fits in the correct position. • Detach the chrome supports by loosening the screw (E).
-
Page 23: Shelf Positions
3172643-002 02/07/13 11:30 Página 23 Shelf positions You should use the shelf position(s) that you find are best suited to your personal cooking preferences. Insert the oven shelf and deep tray between the 2 side rails at any position (1 to 7) on both sides. - Page 24 3172643-002 02/07/13 11:30 Página 24 Figure Fig 1 Fig 2 Fig 4 Fig 3 Fig 5 Fig 6 Fig 7...
- Page 25 3172643-002 02/07/13 11:30 Página 25 Fig 8 Fig 9...
- Page 26 3172643-002 02/07/13 11:30 Página 26 Fig 10 Fig 11 Fig 12 Fig 13 Fig 14...
- Page 27 3172643-002 02/07/13 11:30 Página 27...
- Page 28 1800 444 357 Website www.thinkappliances.com (NZ) Applico Ltd. Private Bag 92900 Onehunga, Auckland, New Zealand 1061 Website www.baumatic.co.nz (UK) United Kingdom Baumatic Ltd., Baumatic Buildings, 6 Bennet Road, Reading, Berkshire RG2 0QX United Kingdom Sales Telephone (0118) 933 6900 Website www.baumatic.co.uk...
Need help?
Do you have a question about the BSPO615 and is the answer not in the manual?
Questions and answers