Table of Contents
Advertisement
OWNER'S MANUAL
Falcon Mini Bike
Read this manual carefully. It contains important safety information.
No one under the age of 16 should operate this Mini Bike. Parents should consider child's age, size,
maturity and ability before allowing to ride.
Minimum Age Requirement: 16
Always wear a helmet; It could save your Life!
Do not remove this operator's manual from this vehicle.
Please obtain, review, and follow provincial / municipal government acts and regulations pertaining to
owning and operating an off-road vehicle.
1
Advertisement
Table of Contents

Related Manuals for RPS Falcon 200


Summary of Contents for RPS Falcon 200
- Page 1 OWNER’S MANUAL Falcon Mini Bike Read this manual carefully. It contains important safety information. No one under the age of 16 should operate this Mini Bike. Parents should consider child’s age, size, maturity and ability before allowing to ride. Minimum Age Requirement: 16 Always wear a helmet;...
- Page 2 Congratulations on your purchase of Ricky Power Sports,LLC Falcon200 Mini Bike. Your Mini bike is warranted to be free of manufacturing defects in material and workmanship for a period of 90 days from the date of purchase. During the warranty period Ricky Power Sports, LLC will at its option, repair, provide replacement parts or replace your Ricky Power Sports, LLC Falcon200 Mini Bike at no charge.
-
Page 3: Table Of Contents
Table of Contents SAFE OPERATION....................3 SAFETY GEAR.....................4 MODIFICATION OF VEHICLE................4 MAIN DATA......................5 PARTS & SUBASSEMBLIES................6 OPERATION......................8 FUEL VALVE....................8 ENGINE STARTING AND STOPPING............9 SWITCHES ON THE RIGHT HANDLEBAR..........10 CHECK-UPS, ADJUSTMENT AND MAINTENANCE..........11 CHANGING THE OIL..................12 CHECK-UP OF SPARK PLUG..............12 CHECKING & CLEANING THE AIR FILTER..........13 ADJUSTING THE THROTTLE CABLE............14 ADJUSTING THE CARBURETOR...............14 ADJUSTMENT OF REAR BRAKE...............15... - Page 4 Please read this manual and follow all instructions carefully. To emphasize the special information, the symbol and the words WARNING or CAUTION have some special meanings. Pay great attention to the messages. NOTE: Indicating special information which is to make maintenance easier or instructions clearer. WARNING and CAUTION are arranged like this: This user’s manual contains important safety and maintenance information.
-
Page 5: Safe Operation
SAFE OPERATION Rules for Safe Operation · A pre-operation check must be conducted, before starting the engine, insure safety, prevent mishaps, and damage to components. · It is strongly suggested that all operators take a certified motorcycle rider’s course prior to operating the vehicle. -
Page 6: Safety Gear
SAFETY GEAR 1. Never operate this mini bike without wearing a DOT approved motorcycle helmet which fits properly. Operators should also wear eye protection (goggles or face shield), gloves, boots, long-sleeved shirt or jacket, and long pants. 2. Loose clothes are not suitable for motorcycle driving or riding as they may get caught on footrest or wheel, resulting in danger. -
Page 7: Main Data
MAIN DATA Description Data Description Data Overall length 1730mm Cylinder bore x stroke 6.8cm X 5.4cm Overall width 750mm PTO shaft rotation Counter clockwise Overall height 990mm Output, Rated 3.8Kw/3600 rpm Wheelbase 1150mm Torque, Rated 10N.m/2500 rpm Curb Mass 73kg Idling speed 1500 +/-150 rpm Payload... -
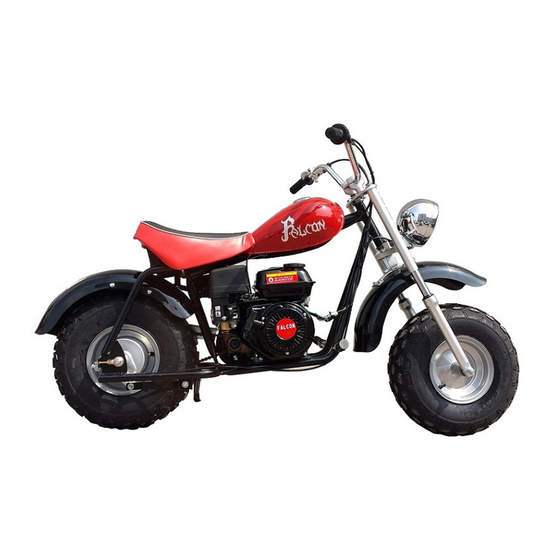
Page 8: Parts & Subassemblies
PARTS & SUBASSEMBLIES... -
Page 10: Operation
OPERATION FUEL VALVE Fuel filling The capacity of the fuel tank is 3.6L Unscrew the gas cap by turning it counter clockwise and carefully fill the tank with unleaded gasoline through the opening. DO NOT MIX GAS AND OIL TOGETHER, THIS IS A 4- STROKE ENGINE. -
Page 11: Engine Starting And Stopping
Starting Engine: 1. Place fuel valve lever to “ON” Position. 2. Place Choke lever to “ON” Position. 3. Set the ignition switch to “ “Position. 4. Pull the Start Recoil cord until engine starts. 5. After engine has sufficiently warmed up, place Choke lever in “OFF”... -
Page 12: Switches On The Right Handlebar
SWITCHES ON RIGHT HANDLEBAR Ignition switch The ignition switch is provided on the right handlebar. When the switch is turned to “ ” (off) position, the engine will not start or stops the engine. When the switch is turned to “ ”... -
Page 13: Check-Ups, Adjustment And Maintenance
CHECK-UPS, ADJUSTMENT AND MAINTENANCE Checking the Oil Check the engine oil each time prior to operating the mini bike. The oil level should be between the upper and lower lines of the oil gauge. 1. Set the Mini Bike on level ground, screw off the oil gage plug, wipe the oil gage rod clean and then insert the gage plug into the crankcase again to check the oil level. -
Page 14: Changing The Oil
CHANGING THE OIL 1. Remove the “Screw Plug” located at the bottom of the engine and let the oil drain into an approved collection container. DO NOT PERFORM THIS PROCEDURE WHILE THE ENGINE IS HOT. SERIOUS BURNS COULD RESULT FROM CONTACT WITH HOT OIL. 2. -
Page 15: Checking & Cleaning The Air Filter
CHECKING & CLEANING THE AIR FILTER 1. Remove seat to access air filter. Seat is removed by removing nut located under seat (see photo). 2. Locate Air Filter Box under seat and remove cover. 3. Remove air filter. 4. Remove foam cover from Air filter element. 5. -
Page 16: Adjusting The Throttle Cable
ADJUSTING THE THROTTLE CABLE Make sure the throttle cable is adjusted properly. To adjust throttle cable, rotate adjustment nut located at the hand throttle. Check if the throttle twist grip has the required free operating movement. The required free operating movement: 2-6mm (.078 -.24in) . If the grip cannot be moved freely, turn the adjusting nut to ensure proper operating movement. -
Page 17: Adjustment Of Rear Brake
ADJUSTMENT OF REAR BRAKE 1. The front brake hand grip should have free operating movement of 5-7mm (.2-.3in) . 2. To make adjustment, turn rear adjusting nut clockwise to reduce and counterclockwise to increase the free operating movement of the hand brake. 3. -
Page 18: Adjustment Of Chain
ADJUSTMENT OF CHAIN 1. When chain adjustment is needed, loosen rear axle bolt. 2. Turn the chain adjusting nuts on the left and right sides to adjust the tension of the chain and to align the marking of the chain adjuster with the engraved lines in the similar position on both sides. 3. -
Page 19: Vehicle Washing
VEHICLE WASHING Cleaning the vehicle regularly can slow down the color fading of its body and make it easier to check if there is any damage and any oil leakage. CAUTION Washing the Mini Bike with over-pressurized water may cause damage to some of its components. Therefore, do use a pressure washer to clean the vehicle. -
Page 20: Instructions For Storage
INSTRUCTIONS FOR STORAGE If the vehicle is not going to be used for a long period of time, for example, in winter time, some steps should be taken to prevent malfunction of and damage to its components which might be caused by long storage. -
Page 21: Resumption Of Service After Storage
RESUMPTION OF SERVICE AFTER STORAGE 1. Remove the covering and remove the wooden blocks used in storing the vehicle. Change the engine oil if the vehicle has been out of service for over 4 months. 2. Drain off the remaining atomized anti-rust oil from the fuel tank, followed by filling it with fresh gasoline therein. -
Page 22: Maintenance Routine Diagram
“*” means: This item of maintenance should be carried out at a service center. It may be also done by the user with reference to this manual provides special tools and authorized spare parts are used. The user must also be capable of completing the procedure. “**”... -
Page 23: Troubleshooting
TROUBLESHOOTING Engine will not Start 1. Fuel Valve OFF Move Fuel valve lever to ON. 2. Choke OPEN Move Chock Lever to CLOSED. 3. Out of fuel Refuel 4. Bad fuel; engine stored without treating or Drain fuel from tank and carburetor. Refuel with draining gasoline, or refueled with bad gasoline fresh gasoline. -
Page 24: Electric Diagram
ELECTRICAL DIAGRAM (FALCON200 MINI BIKE) -
Page 25: Emission Control System Warranty
Ricky Power sports, LLC.– EMISSION CONTROL SYSTEM WARRANTY YOUR WARRANTY RIGHTS AND OBLIGATIONS The emission control system warranty period for this vehicle begins on the date the vehicle is delivered to the first purchaser other than an authorized dealer, or the date it is first used as a demonstrator, lease, or company vehicle, whichever comes first and continues for 30 months after that date, or 5,000km, whichever comes first, provided there has been no abuse, neglect or improper maintenance of your vehicle. - Page 26 effectiveness of your vehicle’s emission control system. If such a replacement part is used and an authorized dealer determines it is defective or causes a failure of a warranted part, your claim for repair to bring your vehicle into compliance with applicable standards may be denied. This Emission Control System Warranty is in addition to the standard Limited Warranty.
- Page 27 all other remedies. All express warranties not stated in this warranty are disclaimed. Some states do not allow limitations on how long an implied warranty lasts, so the above limitations may not apply if it is inconsistent with the controlling state law. No dealer is authorized to modify this Emission Control System Warranty.
- Page 28 Ricky Power Sports, LLC. Toll Free: 1-844-250-2199 2651&2653 Manana Drive, Dallas, TX75220...
Need help?
Do you have a question about the Falcon 200 and is the answer not in the manual?
Questions and answers