Table of Contents
Advertisement
Quick Links
Advertisement
Table of Contents

Related Manuals for NEO Adventure


Summary of Contents for NEO Adventure
-
Page 2: Table Of Contents
Table of contents 1)Accessories--------------------------------------------------------------------- 2 2) amera --------------------------------------------------- 3 3) amera features-------------------------------------- ----------------4 4)Overview----------------------------------------------------------------------- 6 5)Basic operation-----------------------------------------------------------------8 6)Photo and video---------------------------------------------------------------12 7)Advanced menu settings-----------------------------------------------------17 8)Uploading files----------------------------------------------------------------23 9)Battery ------------------------------------------------------------------------ 24 10)Camera and accessory assembly------------------------------------------25 11)Warning message and Firmware update--------------------------------- 31 12)Specifications sheet---------------------------------------------------------32... -
Page 3: Accessories
1. Accessories 60M waterproof case Quick fix mount Remote controller USB cable 1/4 tripod mount Flat adhesive mount Vented adhesive mount Battery Manual *Surfboard mount *Chest harness mount *Helmet mount *Car suction cup mount *Headbelt mlount *Rollbar mount Noted: *marked are optional accessories. -
Page 4: Amera
2. amera VIDEO/one button back Lens Microphone Red/status indicator Green/power indicator Operation buttons Up/pause Menu/delete Power/playback Speaker AV out HDMI... -
Page 5: Amera Features
3. amera features * Mini size 68*46*33mm, about 90g * FULL HD 1080P recording * Integrated 1.5 inch LCD screen * Scratch proof and unbreakable lens of waterproof case * Waterproof case 60M, shockproof 2M and dustproof * Waterproof remote controller, remote distance 15-20M * Fast forward, Slow-motion * Digital Image Stabilizer(DIS) * Contrast, ISO,Metering adjustment... - Page 6 3. amera features * View angle :170 degree * Video : HD resolutions 1080p :1920x1080,30fps 720p:1280x720, 60fps; 1280*720, 30fps * 5M CMOS * Lithium battery : 2.5 hours, 1000mAh * H.264 advanced compression , HDMI output * OSD Language: English, German, French, Italian, Russian, Spanish, Portuguese, Japanese, Korean..
-
Page 7: Overview
4. Overview: Main Buttons: Power/playback button Menu/delete button DC button Video button Photo mode Advanced setting mode USB mode Video mode... - Page 8 4. Overview: Video resolution, Photo resolution Metering status Micro SD card inside Default 1080p default 5M Default central Self shot Time stamp Power White balance Time on LCD(for example): 02:46:48-----The remaining video recording time 2012-1-1 08:09:10-----Real Time...
-
Page 9: Basic Operation
5. Basic operations For the first time, before using camera: A. Insert micro SD card. Without card, green indicator flashes. The camera is compatible with high speed micro SD card (class 4 or higher) B. Insert battery into the camera ( In the bottom of the camera ). C. - Page 10 5. Basic operations indicator on. Long press the POWER button for 3 seconds, your camera will be off. In the standby mode, the red indicator is off. D. Recording video When the camera is on, press VIDEO button and your camera begins to record video. The red indicator flashes.
- Page 11 5. Basic operations It also can by controller by DC Button on the remote controller. F. One button back mode When you are setting menu or reviewing files, just press VIDEO button once, your camera will be back to the pre-record mode. G.
- Page 12 5. Basic operations H. Pause and seamless recording During recording, press UP button, you can see the red recording time of below LCD is paused.The red indicator is always on. When pressing the same button again, it will go on recording. Finally you will get a complete video file which is cool for editing.
-
Page 13: Photo And Video
6. Photo and video Photo *Press MENU button, you can see photo icon. *Press OK button to go into setting menu. *Press M or VIDEO button to be back. Size: 3M, 5M,8M and 12M are available to choose for different size pictures. Self shot: 5 sec, 10sec, 20sec are available to choose. - Page 14 6. Photo and video Triple shot: Turn it on, after pressing DC button, it will take 3 photos every 2 seconds. The red indicator will flash once for one photo. Time lapse: Time lapse is used to take a series of photos at 2,3,5,20,30 or 60 second intervals. After choosing the interval seconds and pressing DC button once, it will take photos intermittently.
- Page 15 6. Photo and video *Press M or VIDEO button to be back. Sound recognition When the camera begins to record, you can hear one Di. When the camera stops recording, you can hear Di Di. So it can be recognized by sound easily. Resolution: 1080P/30fps,720P/60fps,720P/30fps,WVGA/60fps ,WVGA/30fps, VGA/30fps...
- Page 16 6. Photo and video Motion detection, Video duration and Loop video: All of them are mainly for car use. Motion detection means the camera will begin to record after detecting motion. Usually it records when the car begins to move on and stops recording when the car is power off. Loop recording means the file will be recovered again and again.
- Page 17 6. Photo and video 4x digital zoom During 720p recording, you can zoom the video by LEFT and RIGHT button. Fast forward, Slow-motion When playback video, at the same time press LEFT button to choose slow motion to view your extreme sports video clearly:1/2,1/4,1/8,1/16,1/32,1/64. Press RIGHT button to choose fast forward:2x,4x,8x,16x,32x,64x...
-
Page 18: Advanced Menu Settings
7. Advanced menu settings Menu settings: Using the SETUP, you can custom the camera's functions based on your shooting demands and personal favorates. *Press MENU button, you can see photo icon. *Press OK button to go into setting menu. *Press M or VIDEO button to be back. Firmware version: You can check the version no. - Page 19 7. Advanced menu settings LCD off: It can save energy during recording when the LCD is off. 5sec, 10sec, 2 minutes are available for choice. Volume: 0-13 can be chosen by LEFT and RIGHT buttons. 0 means mute and 13 means max. Reset: Please be careful.
- Page 20 7. Advanced menu settings Language: English, German, French, Italian, Russian, Spanish, Portuguese, Japanese, Korean and even more. TV standard: This setting decides both the video recording frame rate and playback on TV. If viewing a TV in North America, please select NTSC. If viewing on a PAL TV(usually except for North America), please choose PAL.
- Page 21 7. Advanced menu settings If the beep is off, the volume button will be invalid. Scene mode: Choosing the scene mode to set up the camera immediately. Auto, night scene, sports, landscape, sunset, Sand&snow, spotlight. Frequency: 50HZ, 60HZ Usually 60Hz is American and Japanese TV's, 50Hz is European and Australian. Contrast: Standard, hard, soft Enhanced contrast to hard level to make the video or photo more colorful and clearer.
- Page 22 7. Advanced menu settings AE ISO: Auto, 100, 200, 400, 800 100-200 middle, 400-800 high When the environment is dim, you can increase the ISO. Note: After increasing the ISO, the video/photo is not clear enough. Metering mode: Center average spot Choosing any one, the matching icon will show on the LCD left side.
- Page 23 7. Advanced menu settings Auto power off: The camera will turn off automatically after a specific period of inacitivity:1min, 2min, 5min (when no video or photo is taking or no button is pressed).
-
Page 24: Uploading Files
8. Uploading files When connecting USB with camera successfully, there will ba a connecting icon the right up screen. Then you can find a disk in your computer. Note: Before inserting the USB cable, please turn on the camera. -
Page 25: Battery
9. Battery The li-ion battery in your standard package is only partially charged. For a full charge, when the camera is off, connecting the camera with PC by USB cable. *The battery working time is about 2.5 hours. *The battery will charge up to 80% in 1-2 hours while 100% in 4 hours. *When the camera is off, red indicator is on during charging. -
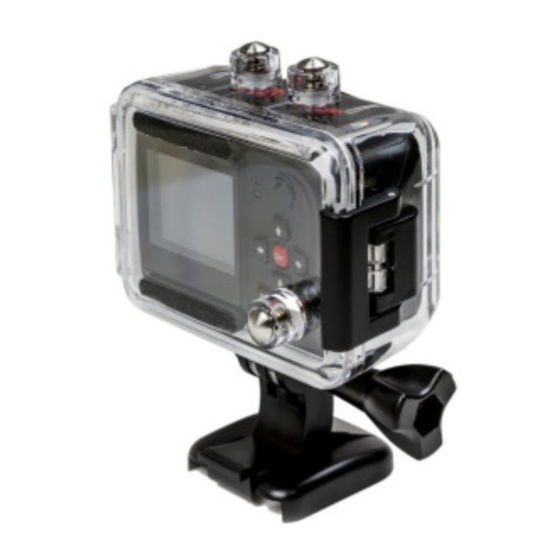
Page 26: Camera And Accessory Assembly
10. Camera and accessory assembly Attaching your camera to mounts First step Keep the lock 90 degree to mount the adhesive mount and then lock it. *The adhesive mount is a square which supports 4 directions. - Page 27 10. Camera and accessory assembly Second step Keep the quick fix mount and the case 90 degree to fix or release the mount. You can adjust the mount in any other degree.
- Page 28 10. Camera and accessory assembly Third Step Press the lock to 90 degree to fix the mount.
- Page 29 10. Camera and accessory assembly *After taking out the quick fix mount, please do keep the lock 180 degree horizontal level.Or the wheel gear inside will fall.
- Page 30 10. Camera and accessory assembly Mount 1/4 tripod hole Firstly mount the hole on any 1/4 tripod hole accessory and then push them together into the case. Also please take them out from case firstly and then depart the 1/4 hole with the accessory.
- Page 31 10. Camera and accessory assembly Noted Tips: *Clean the surface firstly. Wax,oil,dirt and other debris will reduce adhesion which can result in a weak bond or even losing your camera. *Please also keep you waterproof case's rubber door clean. even if a piece of hair will make it leak.
-
Page 32: Warning Message And Firmware Update
11. Warning message and firmware update *Green indicator flashes: low power or no micro SD card. *Usually the software can be updated by micro SD card. Copy the software into card root. Insert the card into camera and turn it on. Choose YES,the camera will be refreshed automatically.
Need help?
Do you have a question about the Adventure and is the answer not in the manual?
Questions and answers