Advertisement
Table of Contents
- 1 What Your 1 Year Warranty Means
- 2 Explanation of the Symbols on the Equipment
- 3 III. Introduction
- 4 Safety Instructions
- 5 Remaining Hazards
- 6 Intended Use
- 7 Technical Data
- 8 Before Starting the Equipment
- 9 Attachment and Operation
- 10 Working Instructions
- 11 Maintenance
- 12 Disposal and Recycling
- 13 XIV. Storage
- 14 XVI. Trouble Shooting
- Download this manual
Advertisement
Table of Contents

Related Manuals for Gardenline MFH3300-4P


Summary of Contents for Gardenline MFH3300-4P
- Page 1 Petrol Multi Garden Tool Instruction manual AFTER SALES SUPPORT MFH3300-4P TEL: 1300 855 831 WEB: www.scheppach.com.au N16188 MADE IN CHINA...
-
Page 2: What Your 1 Year Warranty Means
Petrol Multi Garden Tool 1 What your 1 year warranty means Great care has gone into the manufacture of this product and it should therefore provide you with years of good service when used properly. In the event of product failure within its intended use over the c 1 years after the date of purchase, we will remedy the problem as quickly as possible once it has been brought to our attention. - Page 3 Congratulations on choosing to buy a GARDENLINE product. ® All products brought to you by GARDENLINE are manufactured to the highest standards of ® performance and safety, and, as part of our philosophy of customer service and satisfaction, are bracked by our comprehensive 1 Year Warranty.
- Page 4 AFTER SALES SUPPORT TEL: 1300 855 831 WEB: www.scheppach.com.au...
- Page 5 AFTER SALES SUPPORT TEL: 1300 855 831 WEB: www.scheppach.com.au...
- Page 6 AFTER SALES SUPPORT TEL: 1300 855 831 WEB: www.scheppach.com.au...
- Page 7 WIND CORD AFTER SALES SUPPORT TEL: 1300 855 831 WEB: www.scheppach.com.au...
- Page 8 AFTER SALES SUPPORT TEL: 1300 855 831 WEB: www.scheppach.com.au...
-
Page 9: Explanation Of The Symbols On The Equipment
II. Explanation of the symbols on the equipment Warning! Petrol is very Read the instruction flammable. Avoid smoking manual. or bringing any flame or sparks near fuel. Warning! Risk of injury! Warning! Denotes risk of Do not let your hands or personal injury, loss of life, feet come in contact with or damage to the tool in... -
Page 10: Iii. Introduction
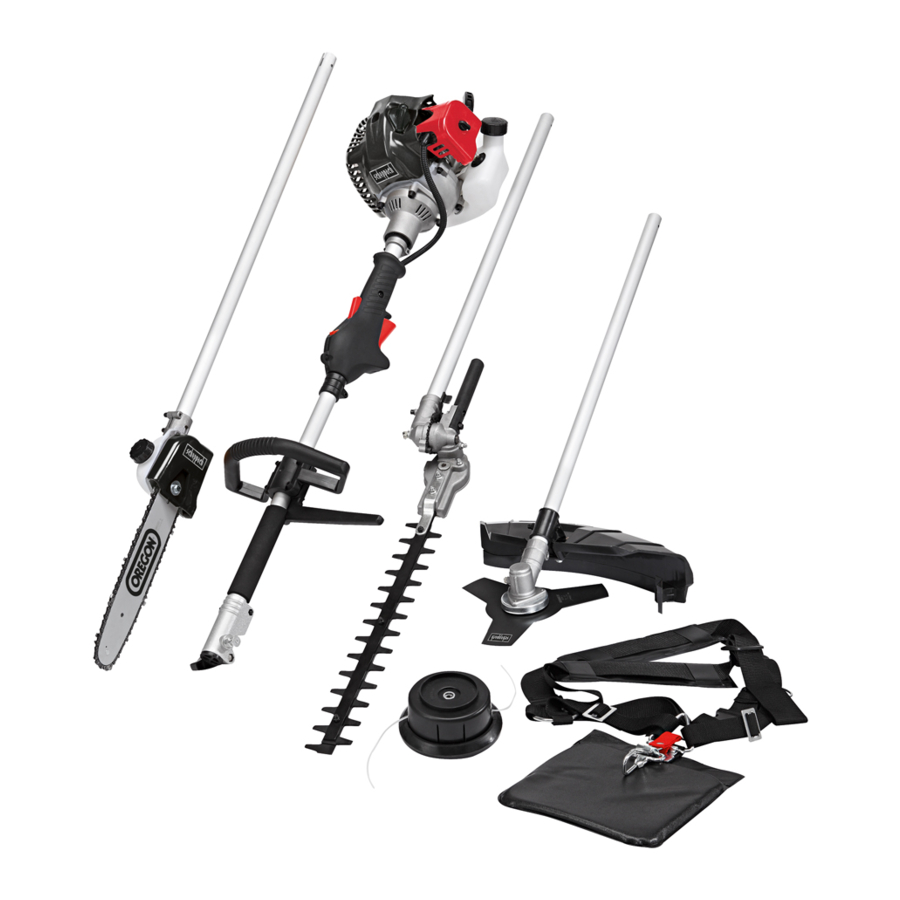
1. Motor drive unit 2. Pole saw GARDENLINE product. ® 3. Hedge trimmer All products brought to you by GARDENLINE are man- ® ufactured to the highest standards of performance and 4. Power scythe 5. Grass trimmer safety, and, as part of our philosophy of customer service and satisfaction, are backed by our comprehensive 1 Year 6. -
Page 11: Safety Instructions
VI. Safety instructions vapor can escape. – Make sure the handles are dry, clean, and free of petrol – Make sure that no persons or animals are close to the mixed with oil. working area (minimum distance of 15m). – Do not use the tool without exhaust pipe and when the Grass being cut and thrown up may contain foreign exhaust pipe guard is not properly installed. -
Page 12: Remaining Hazards
– Store the tool out of the reach of children. • Pay particular attention to branches under tension. – Store the tool at a safe and dry location. • Always pull the tool out of the wood when the saw –... -
Page 13: Technical Data
IX. Technical data X. Before starting the equipment MFH3300-4P Each time before use, check the following: Technical data • That there are no leaks in the fuel system. -
Page 14: Attachment And Operation
fuel into an airtight container and keep it in the dark and Take the outer flange off after release the nut, then cool room. put the blade (17), outer flange (17b), shield (17a) and nut according to priority as below picture. Note 2 Fuel mixing table the blade rotation direction needs be same as below Mixing procedure: 40 parts petrol to 1 part oil... -
Page 15: Working Instructions
• Unscrew the tank cap (B) and remove it. Fig. 19 pulled out. • Pour in the fuel carefully. Avoid spilling! • Screw the tank cap on firmly by hand. Note: Do not start the motor in tall grass. Draining fuel. Fig. 36 m Attention: When the engine has been switched off, •... - Page 16 To minimize the risk of accidents by use of the cutting pectedly during cutting. blade, take note of following points: You could also attend by fractured and dead branches • Never cut shrubbery or wood whose diameter is larger out, which is solved by the shake and fall on you. For than 2cm.
-
Page 17: Maintenance
Withdrawal plies to non-authorised modifications of the tool, use of The withdrawal occurs when the chain on the underside non-authorised spare parts, accessories, working tools, of the bar suddenly stuck because it is jammed or en- unrelated and not intended use, secondary damages due to use of faulty components. - Page 18 by: Amount of oil is too high in the petrol mix, poor oil parts they are in the shape and size of the original quality, old petrol mix, or plugged up air filter. parts as necessary. • Screw the spark plug by hand completely into the •...
-
Page 19: Disposal And Recycling
After cutting, clean the unit thoroughly. Store the unit in a 5 Fill the tank with the relevant mixture of fuel and oil. dry room allow the motor to cool down beforehand. See the section „Fuel and oil“. Transport Important hint in case of sending the equipment to a To transport the machine, empty the petrol tank as service station: described in section 8 draining fuel. -
Page 20: Xvi. Trouble Shooting
XVI. Troubleshooting The table below contains a list of fault symptoms and explains what you can do to remedy the problem if your equip- ment fails to work properly. If the problem still persists after working through the list, please contact your nearest ser- vice workshop. - Page 21 Petrol multi garden tool Warranty Details The product is guaranteed to be free from defects in workmanship and parts for a period of 12 months from the date of purchase. Defects that occur within this warranty period, under normal use and care, will be repaired, replaced or refunded at our discretion. The bene ts conferred by this warranty are in addition to all rights and remedies in respect of the product that the consumer has under the Competition and Consumer Act 2010 and similar state and territory laws.
- Page 22 Petrol multi garden tool Repair and Refurbished Goods or Parts Notice Unfortunately, from time to time, faulty products are manufactured which need to be returned to the Supplier for repair. Please be aware that if your product is capable of retaining user-generated data (such as les stored on a computer hard drive, telephone numbers stored on a mobile telephone, songs stored on a portable media player, games saved on a games console or les stored on a USB memory stick) during the process of repair, some or all of your stored...
Need help?
Do you have a question about the MFH3300-4P and is the answer not in the manual?
Questions and answers
What is spark plug replacement details
For the Gardenline MFH3300-4P, replace the spark plug if the electrode is severely worn or has strong incrustation. The correct electrode gap is 0.25 inches (0.63 mm). Use an equivalent spark plug and tighten it to a torque of 12–15 Nm using the supplied spark plug wrench.
This answer is automatically generated
The chord to the spark plug is broken, can it be repaired
The manual does not mention repairing the spark plug cord. It only suggests checking the ignition cable for damage. If damaged, contacting the service center is recommended.
This answer is automatically generated
Where is the fuel filter