Table of Contents
Advertisement
Advertisement
Table of Contents

Related Manuals for BIXOLON SRP-280C


Summary of Contents for BIXOLON SRP-280C
- Page 1 User’s Manual SRP-280 Impact Printer Rev. 1.11 http://www.bixolon.com...
-
Page 2: Table Of Contents
SRP-280 ■ Table of Contents ※ Manual Information & Usage Precautions ..............3 1. Content Confirmation ....................7 2. Product Part Names...................... 8 3. Installation & Usage ...................... 9 3-1 Power Connection ..................... 9 3-2 Interface Cable Connection ..................10 3-3 Cash Drawer Connection .................. -
Page 3: Manual Information & Usage Precautions
This manual provides information on each character code page that can be used with this product. We at BIXOLON maintain ongoing efforts to enhance and upgrade the functions and quality of all our products. In following, product specifications and/or user manual content may be changed without prior notice. -
Page 4: Safety Precautions
SRP-280 ■ Safety Precautions In using the present appliance, please keep the following safety regulations in order to prevent any hazard or material damage. WARNING Violating following instructions can cause serious injury or death. Do not plug several products in one multi-outlet. You must use only the supplied adapter. - Page 5 SRP-280 CAUTION Violating following instructions can cause slight wound or damage the appliance. Keep the desiccant out of children’s reach. If you observe a strange smoke, odor or noise from the printer, unplug it before taking following • If not, they may eat it. measures.
-
Page 6: Other Precautions
BIXOLON Co., Ltd. is not legally liable for any damages resulting from the use of the information in this manual. BIXOLON Co., Ltd. and its affiliates are not legally liable (United States excluded) for any... -
Page 7: Content Confirmation
SRP-280 1. Content Confirmation The following items should all be contained in the printer package. Contact the dealer from which the purchase was made if any item is damaged and/or missing. SRP-280C SRP-280A Power Cord AC Adapter Paper Roll Ribbon Cartridge... -
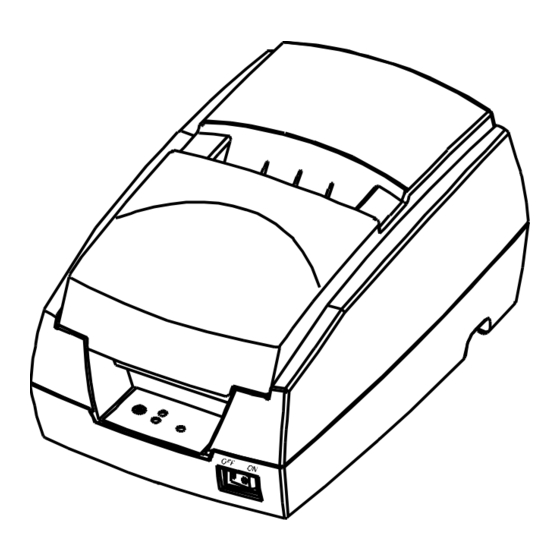
Page 8: Product Part Names
SRP-280 2. Product Part Names Cartridge Knob Printer Cover Ribbon Cartridge Auto Cutter Head Cover Paper Feed Button Power Switch - 8 - Rev. 1.11... -
Page 9: Installation & Usage
SRP-280 3. Installation & Usage 3-1 Power Connection Connect power to the printer as shown below. AC Adapter Power Connector Power Cord 1) Turn off the printer power switch. 2) Check to see that the AC adapter voltage matches that of the power source. 3) Connect the AC adapter jack to the printer power connector. -
Page 10: Interface Cable Connection
SRP-280 3-2 Interface Cable Connection Connect the printer with a POS system (PC, ECR, etc.) via an interface cable as shown below. This printer supports the following communications interface standards. - RS-232C (Serial) - IEEE1284 (Parallel) - USB Interface Connector Interface Cable 1) Turn off the power switch on both the printer and the POS system (PC, ECR, etc.). -
Page 11: Cash Drawer Connection
SRP-280 3-3 Cash Drawer Connection Connect the printer and cash drawer via the interface cable as shown below. Cash Drawer Connector Cash Drawer Cable 1) Turn off the power switch on both the printer and the POS system (PC, ECR, etc.). 2) Connect the cash drawer cable to the printer cash drawer connector. -
Page 12: Ribbon Cartridge Installation
SRP-280 3-4 Ribbon Cartridge Installation Install the ribbon cartridge as shown below. Cartridge Knob Printer Cover Ribbon Cartridge 1) Turn off the printer power switch. 2) Open the printer cover. 3) Before inserting the ribbon cartridge, turn the cartridge knob clockwise in order prevent the ribbon from tangling. -
Page 13: Paper Installation
SRP-280 3-5 Paper Installation 1) Turn on the printer power. 2) Open the printer cover. (Remove any core of a fully used paper roll if present.) 3) Undo the paper roll, and make sure that the lower edge is cleanly cut. 4) Insert the paper roll as shown below. - Page 14 5) Insert the end of the paper roll into the paper slot as shown below. The paper then feeds automatically. Automatic cutting is available for printer models equipped with auto cutters. (SRP-280C) - For printer models without auto cutters, tear off the paper as shown below. (SRP-280A) - 14 - Rev.
-
Page 15: Control Panel Usage
SRP-280 3-6 Control Panel Usage O Feed Press this button to feed paper. This button is also used for self-tests and hexa-printing. - Refer to “4. Self-Test” for details related to self-tests. - Refer to the service manual for information on hexa-printing. O Power This lamp turns green when the printer power is on. -
Page 16: Self-Test
SRP-280 4. Self-Test Run the self-test when first setting the printer or when encountering a problem. The following printer attributes can be assessed. - Control Circuits, Mechanisms, Print Quality, and ROM Version. If no issue is found with the printer after running the self-test, examine the other devices or peripherals and software. -
Page 17: Fine Tuning
SRP-280 5. Fine Tuning 5-1 Dip Switch Adjustment The dip switches can be used to select the following printer functions. - Emulation - Auto Cutter, Font Interval, Auto Line Feed - Serial Communications Settings, Hexa-Printing The dip switches are located on the under side of the printer. Dip switch adjustment instructions are as follows. - Page 18 SRP-280 [Diagram 1] Dip Switch 1 Settings Switch Function Default SW1-1 Emulation Selection STAR BXL/POS SW1-2 Language Selection Standard Chinese SW1-3 Auto Cutter Setting Enable Disable by Model SW1-4 Font Interval Setting 2 (46 column) 3 (42 column) SW1-5 Vertical Alignment Refer to Chart (1) below.
-
Page 19: Paper Width Adjustment
SRP-280 5-2 Paper Width Adjustment This printer supports the use of two-inch and three-inch paper. To use two-inch paper, install the two-inch paper guide as shown below. Two-Inch Paper Guide Printer Front Printer Rear 1) Turn off the printer power and open the printer cover. 2) Confirm the location of the hole for the “two-inch paper guide”... -
Page 20: Paper Jam Removal
SRP-280 5-3 Paper Jam Removal Remove jammed paper as shown below. Ribbon Cartridge Auto Cutter Coin 1) Open the printer cover. 2) Raise the auto cutter. 3) Remove the ribbon cartridge. 4) Use a screwdriver or coin to loosen the screw as shown above. 5) Remove the head cover. - Page 21 SRP-280 ※ CAUTION If the cutting edge of the auto cutter is not in its normal position, paper cannot be inserted properly. Insert a screwdriver into the hole near the bottom of the auto cutter as shown below, and turn the gear within the auto cutter to adjust the cutting edge to its normal position. Cutting Edge [Cutting Edge Position] Normal Position...
-
Page 22: Appendix
SRP-280 6. Appendix 6-1 Specifications Item Description Printing Method Serial Impact Dot Head Pin Number 9 Print Direction Two-way Print Speed 4.3 LPS (lines per second) ASCII Printer 9 X 9 7 X 9 3” printing Characters Per 35 char. 42 char. -
Page 23: Rs-232C (Serial Interface) Cable Specifications
SRP-280 6-2 RS-232C (Serial Interface) Cable Specifications 1) Printer Rear Image Cash Drawer Power Connector Serial Interface Connector ※ Turning the dip switch on the Serial interface to the ON position connects DTR and RTS signals together. 2) Cable Specifications Printer Side Host Side Printer Side... -
Page 24: Ieee1284 (Parallel Interface) Cable Specifications
SRP-280 6-3 IEEE1284 (Parallel Interface) Cable Specifications 1) Printer Rear Image Cash Drawer Power Connector Parallel Interface Connector 2) Cable Specifications Compatibility Source Nibble Mode Byte Mode Mode Host nStrobe HostClk HostClk Host / Printer Data 0 (LSB) Data 0 (LSB) Host / Printer Data 1 Data 1... -
Page 25: Usb Interface Cable Specifications
SRP-280 6-4 USB Interface Cable Specifications 1) Printer Rear Image Cash Drawer Power Connector USB Interface Connector 2) Cable Specifications Pin No. Signal Wire Color Function VBUS Host Power White Data (D-) Green Data (D+) Black Signal Ground Shell Shield Drain Wire Frame Ground 6-5 Cash Drawer Cable Specifications... -
Page 26: Certification
• Europe: CE EMC,CB-Scheme:IEC60950-1, GS: EN60950-1: 2001 • North America: FCC rules parts 15B WARNING Use of an unprotected interface cable with this printer conflicts with EMC standards. Users should only use cables approved by BIXOLON. 2) CE Mark • EMC Directive 89/336/EEC EN55002:1994+A1:1995+A2:1997...
Need help?
Do you have a question about the SRP-280C and is the answer not in the manual?
Questions and answers