Table of Contents
Advertisement
Quick Links
Advertisement
Table of Contents

Summary of Contents for Leica Leica S8 APO B
-
Page 1: User Manual
Living up to Life User Manual Leica S8 APO B Leica S Series User Manual... -
Page 2: Copyright
(in whole or in part) by print, photocopy, microfilm or other method (including electronic systems) is not allowed without express written permission from Leica Microsystems CMS GmbH. The instructions contained in the following documentation reflect state-of-the-art tech- nology. -
Page 3: Function Of The Microscopes
Function of the Microscopes • • The Leica S8 APO B microscope, for which The manufacturer assumes no liabil- These (IVD) instruments are not intended for use in the patient environ- this User Manual has been written, is used for ity for damage caused by, or any ment defined by DIN VDE 0100-710. -
Page 4: General Notes
Use in clean rooms The cleaning of glass surfaces and objec- Servicing ▶ The Leica S series can be used in clean rooms tives in particular should be carried out Repairs may only be carried out by Leica without any problems. -
Page 5: Important Safety Notes
This User Manual describes the special func- ments, read the user manuals listed above. In Our guarantee covers all faults in materials tions of the Leica StereoZoom® stereomicro- particular, please follow all safety instructions. and manufacture. It does not, however, cover... -
Page 6: Symbols Used
11 / 2011 for ▶ Hazards to personnel (1) Numbers in parentheses within the MM/YYYY November 2011. ▶ Functional disturbances or damaged descriptions relate to the figures and the instruments items within those figures. Leica S Series User Manual... -
Page 7: Safety Instructions
▶ of objects or specimens through magnifi- non-Leica components that are outside of the Electrical components must be placed at cation. Accessories such as optical acces- scope of this manual! least 10 cm away from the wall and away from flammable substances. - Page 8 EC directives such as Repairs, service work and disassembled by the customer and WEEE. ▶ Repairs may only be carried out by Leica pack them separately. Microsystems-trained service technicians. Like all electronic devices, the micro- scope, its accessory components and ▶...
- Page 9 Declaration of Conformity. See page 50. nel, giving consideration to ergonomic and organizational aspects. The ergonomic design and construction of the Leica M stereomicroscopy series are intended to reduce the exertion of the user to a minimum. Leica S Series User Manual...
- Page 10 User Manual for the instru- ment. ▶ Check the power cables regularly. Defective power cables can cause injuries. ▶ Wait for bulbs to cool off before changing them. Touching hot bulbs can cause burns. Leica S Series User Manual...
-
Page 11: Table Of Contents
Leica TL ST Transmitted Light Base: Lamp Replacement Optics Carrier and Additional Objective Photography with the Leica S8 APO B Available Graticules Inserting the Graticules Dimensional Drawings in mm Eyepieces Leica S8 APO B with Transmitted Light Illumination Mounting a Camera Leica S Series User Manual... - Page 12 Technical Data Technical Data Leica TL ST Transmitted Light Base Appendix Calculating the Total Magnification/Field of View Diameter Troubleshooting Care, Maintenance, Contact Persons Leica S Series User Manual...
-
Page 13: Leica S8 Apo B
Leica S8 APO B Leica S Series User Manual... -
Page 14: Congratulations
Though the reliability and robustness of Leica stereomicroscopes is world- microscope (S series). We are convinced that it will more than meet your renowned, like any high-tech product, the Leica S series requires a certain expectations. This instrument embodies all the qualities you associate degree of care and attention. -
Page 15: What Your Stereomicroscope Offers You
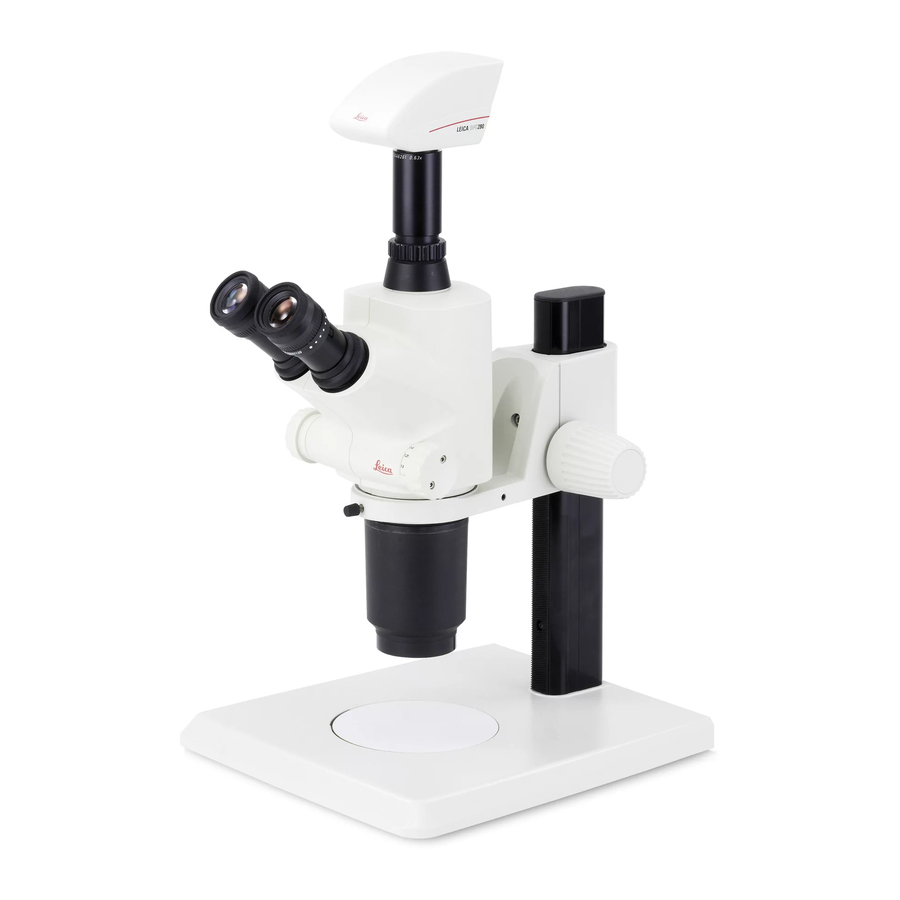
Apochromatic correction line consists of two beam paths converging at The StereoZoom® Leica S8 APO B model is The Leica S8 APO B is a completely apochro- 12°. The objective pairs of each optical path are equipped with an integrated video/phototube, matically corrected Greenough system. -
Page 16: On We Go
If, on the other hand, you are assembling the been assembled and commissioned by your stereomicroscope yourself, continue with the Leica consultant, click here to skip through the "Assembly" chapter, which begins on page installation instructions and go directly to the Quick Start Guide on page 24. -
Page 17: Assembly
Assembly Leica S Series User Manual... -
Page 18: Tl St Transmitted Light Base
3. Reattach the adapter plate to its original position using the 6 Allen screws. 1. Unscrew the extension plate from the base using the Allen key provided. 2. Attach your focusing drive column to the bottom using the 4 Allen screws. Leica S Series User Manual... -
Page 19: Optics Carrier And Additional Objective
1. Screw the desired objective counterclock- 1. Screw the objective protective glass directly microscope carrier and fasten it in the wise into the optics carrier. onto the StereoZoom® or on the additional desired position with the clamping screw. objective. Leica S Series User Manual... -
Page 20: Available Graticules
Graticule, 5 mm/0.1 mm ▶ Graticule, 5 mm/0.05 mm ▶ Graticule, 100 div./0.002" ▶ Graticule, 100 div./0.001" ▶ Graticule, 150 div./0.0005" ▶ Crosshair ▶ Stage micrometer, 50 mm, 0.1/0.01 mm graduation ▶ Stage micrometer, 1", 0.001" graduation Leica S Series User Manual... -
Page 21: Inserting The Graticules
4. Replace the insert in the eyepiece and press it firmly into place. 5. Insert the eyepiece in the tube and turn the eyepiece in the tube to align the graticule correctly. Leica S Series User Manual... -
Page 22: Eyepieces
The risk can be needed. We recommend that you also equip kept to a minimum by using personal eyepieces the high-powered StereoZoom® Leica S8 APO B for each individual or detachable eyecups. with two adjustable eyepieces. -
Page 23: Mounting A Camera
Mounting a Camera The Leica S8 APO B is equipped with Installing the camera 3. Insert the unit into the video/photo output an integrated video/phototube, which 1. Remove the protective dust cover from the of the stereomicroscope and screw it in. -
Page 24: Quick Start Guide
Quick Start Guide Leica S Series User Manual... -
Page 25: Overview Of The Leica S8 Apo B
Overview of the Leica S8 APO B Eyepieces Adjustable tubes: Interpupillary distance adjustable from 55 – 75 mm Magnification changer, right drive knob with magnification scale Fixing screw for optics carrier in the microscope carrier TL3000 ST transmitted light base... -
Page 26: Tips For Working Ergonomically
▶ Use the whole seat surface and the back- rest. ▶ Ensure that your lower arms are supported. ▶ When carrying out other tasks, perform exercises to relax and relieve muscle tension. Leica S Series User Manual... -
Page 27: Using The Eyepieces
All stereomicroscopes from Leica Microsystems are parfocally matched. However, the parfocality requires a personal dioptric correction for the user. -
Page 28: The Correct Interpupillary Distance
An "exit pupil distance" is the distance between eye and eyepiece. With the ✓ ✗ 10×/23B wide-field eyepiece for eyeglass wear- ers, it is approx. 22 mm. For those who do not use the eyepiece for eyeglass wearers, it is 12 Leica S Series User Manual... -
Page 29: Focusing
2. Set the lowest magnification level. The focusing drive can be operated At the lowest magnification, the desired either left- or right-handed. specimen detail can be easier to localize due to the large field of view. Leica S Series User Manual... -
Page 30: Changing Magnification (Zooming)
29). 3. Rotate the magnification changer until the The basis for the calculation of the total desired magnification is configured. magnification and the field of view can be found on page 48. Leica S Series User Manual... -
Page 31: Limiting Zoom Range
Allen key provided. ple shows the limit to the range between 1 to 3.2. 2. Turn the right drive knob to position "1". 4. Carefully tighten the Allen screw. Continued on next page. Leica S Series User Manual... -
Page 32: Limiting Zoom Range (Continued)
1. Loosen the Allen screws on the right drive knob until it touches the built-in zoom knob with the Allen key provided. stop. 4. Carefully tighten the Allen screw. 2. Turn the right drive knob to position "3.2". Leica S Series User Manual... -
Page 33: Regulating The Resistance Of The Focusing Drive
The resistance can be adjusted individually depending on the equipment weight and personal preferences as follows: 1. Grip the outer drive knobs with both hands and turn them towards each other until the desired resistance is reached during focus- ing. Leica S Series User Manual... -
Page 34: Changing The Position Of The Optics Carrier
1. Unscrew the clamping screw. wants to work from the side. 2. Turn the optics carrier laterally to the desired position. 3. Carefully tighten the clamping screw. Leica S Series User Manual... -
Page 35: Dioptric Correction With Two Adjustable Eyepieces
Use this advantage as often as possible, it is not available on all stereomicroscopes. 2. Turn the dioptric correction on both eyepieces to the center position. The diopters can be set between +5 and Continued on next page Leica S Series User Manual... - Page 36 5. Observe the specimen through the eyepieces and bring it into sharp focus with 8. Set the lowest magnification level. 12. Repeat steps 10 and 11 with the other eye. the focusing drive. Continued on next page Leica S Series User Manual...
- Page 37 1. Select the highest magnification level. 2. Observe the specimen; if necessary, refocus it slightly. 3. Change from the highest to the lowest magnification. The sharpness should be constant (parfocal). If this is not the case, repeat this procedure. Leica S Series User Manual...
-
Page 38: Leica Tl St Transmitted Light Base: Controls
Leica TL ST Transmitted Light Base: Controls Refer also to the separately provided User Manual for the TL ST transmitted light base. Extension plate of the transmitted light base TL ST Rear side of the transmitted light base TL ST... -
Page 39: Leica Tl St Transmitted Light Base: Operation
Leica TL ST Transmitted Light Base: Operation Light intensity control Transmitted light control Bright field The left control adjusts the intensity of the The transmitted light base TL ST has a slider that Bright field is suitable for examining translu- 12 V/20 W halogen illumination. -
Page 40: Leica Tl St Transmitted Light Base: Lamp Replacement
Leica TL ST Transmitted Light Base: Lamp Replacement Changing the halogen lamp Changing lamps Safety precautions • • Before you change the lamp, it is abso- 1. Unscrew the two screws on the cooling unit When inserting the lamp, ensure that... -
Page 41: Photography With The Leica S8 Apo B
Photography with the Leica S8 APO B The observation beam path and the The focusing and the framing are done Capturing images and videos photobeam path can be switched. For with the left eyepiece (video/photo 1. If the image detail and image sharpness are this, the light splitting is influenced as follows: beam path). -
Page 42: Dimensional Drawings In Mm
Dimensional Drawings in mm Leica S Series User Manual... -
Page 43: Leica S8 Apo B With Transmitted Light Illumination
ø76 Leica S8 APO B with Transmitted Light Illumination ø58 ø76 ø58 ø76 Leica S Series User Manual... -
Page 44: Technical Data
Technical Data Leica S Series User Manual... - Page 45 Technical Data StereoZoom Leica S8 APO ® Optical system, 12°-Greenough lead-free using best-corrected central part of the objective Zoom 8:1, apochromatic Viewing angle 38° ESD protection Antistatic Specific 2 ×10 Ω / square, surface resistivity discharge time <2 seconds from 1000 V to 100 V Magnification (basic configuration) 10×...
-
Page 46: Leica Tl St Transmitted Light Base
Leica TL ST Transmitted Light Base Light source Halogen lamp 12V/20W Quick illuminant change Illuminated area 50 mm Power supply Input voltage 100 – 240 V~, frequency 50/60 Hz Energy consumption 30 W max. Ambient temperature 10 – 40 °C... -
Page 47: Appendix
Appendix Leica S Series User Manual... -
Page 48: Calculating The Total Magnification/Field Of View Diameter
Calculation example: field of view diameter in the specimen M TOT VIS = M O × M E × z N FOV = 1.9 mm ∅ OF: M O × z 1.6 × 4 1.6 × 20 × 4 = 128 Leica S Series User Manual... -
Page 49: Troubleshooting
The focusing drive gradually sinks on its Switch the beam splitter on the photo tube own or is difficult to turn. to the "Doc" setting (page 41). ▶ Regulate the ease of movement (page 33). Leica S Series User Manual... -
Page 50: Care, Maintenance, Contact Persons
Leica stereo- http://www.leica-microsystems.com/ chemicals away from the instruments. microscope will continue to work as well as it products/stereo-microscopes-macroscopes/ ▶... - Page 51 ▶ Keep accessories in a dust-free place when Remove dust with a pneumatic rubber bulb not in use. and a soft brush. ▶ Clean eyepieces and objectives with special optics cleaning cloths and pure alcohol. Leica S Series User Manual...
- Page 52 Copyright © Leica Microsystems CMS GmbH • Ernst-Leitz-Straße • 35578 Wetzlar Germany 2013 • Phone +49 6441-29-0 • Fax +49 6441-29-2599 LEICA and the Leica logos are registered trademarks of Leica IR GmbH. Printed on chlorine-free bleached paper. III/13/M.H. Revision 1.0, issued March 14th, 2013...
Need help?
Do you have a question about the Leica S8 APO B and is the answer not in the manual?
Questions and answers