Table of Contents
Advertisement
Advertisement
Table of Contents

Related Manuals for Condor 260 BAIT

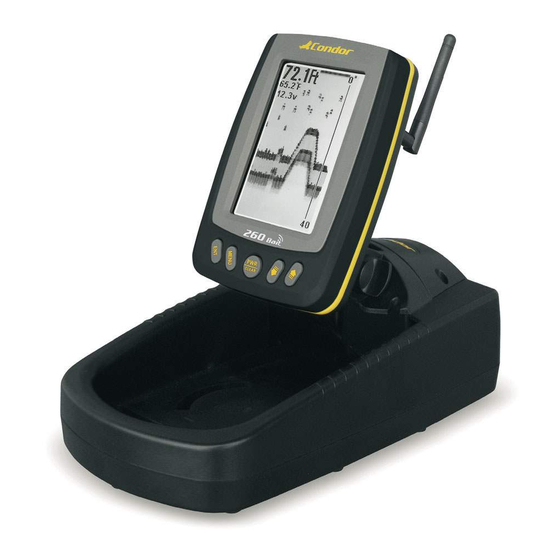
Summary of Contents for Condor 260 BAIT
- Page 1 Installation and Operation Manual...
-
Page 2: Introduction
Introduction Thank you for choosing our Fish Finder and welcome to the innovations of Condor Marine! Your Fishfinder is a high-quality sonar designed for both professional and novice fisherman with trouble-free use in a variety of water areas. To familiarize yourself better with the product’... -
Page 3: Table Of Contents
Index Introduction ......................2 Installation ......................4 Packing list ......................4 Using the product ....................5 Powering .......................6 Sonar unit installation ....................7 Install the RES sensor to bait boat ................8 Tool list ........................9 Introduction of RES sensor ...................9 RES sensor installation method – 1 ..............10 RES sensor installation method –... -
Page 4: Installation
Before you install the transducer to your bait boat, please check the packing list below, and make sure you are not missing any items. The packing list of Condor 260 Bait includes 2 parts as shown following: 1. RES Sensor The electric control &... -
Page 5: Using The Product
Note: the above sonar units has been assembled in the gift box before shipment Using the product Condor 260 Bait is specially designed to be used with bait boat. Properly install the RES sensor to your bait boat, powering the unit, and put the assembled bait boat &... -
Page 6: Powering
Note: to get the best sonar performance, we suggest adopting the way-B Powering There are 2 ways to power the Condor 260 Bait: 1) Use 8 x AA battery Please assemble the batteries according to the instruction figure curved on the... -
Page 7: Sonar Unit Installation
Instruction figure of battery installation 2) Use your bait boat battery Sometimes, you may prefer using a battery for power supplying. In the package, you can find a separate power cable, which is used to connect the sonar unit to your bait boat battery. Power Cable Connect to a battery... -
Page 8: Install The Res Sensor To Bait Boat
- The red one is for positive electrode. - The black one is for negative electrode. Note: Condor 260 Bait can be powered by almost all kinds of battery with voltage of 6~18v Warning: when use the boat battery for power supplying; we are not responsible for over-voltage or over-current failures. -
Page 9: Tool List
Note: the selected bait boat here is just for your reference, the installation way may vary according to the structure of different bait boats. Tool List (not included) 1) Hand drill 2) 5/32” drill bits 3) Phillips and flat-head screwdriver 4) Marine sealant Introduction of the RES sensor RES sensor indicates the whole set of electric &... -
Page 10: Res Sensor Installation Method - 1
RES sensor installation method - 1 1. Make a supporting plate to hold the wireless sensor. The shape of supporting plate may be different according to the shape of your bait boat. Note: we provide a simple metal bracket (see packing list), which could help you making a simple sensor installation on some bait boats. - Page 11 2. Find a proper position and drill two holes on the top cover of your bait boat, as figured below: The hole-1 is used to be through the sensor cable, the diameter should be about 11.5mm. The hole-2 is used to mount the antenna; the diameter should be about 5.8mm 3.
- Page 12 Firstly, take out the screw from the antenna-extended cable, and then hold one end of the cable through the hull of bait boat (as instructed below). Finally, tighten the screw. b) Screw the antenna to the antenna-extended cable.
- Page 13 4. Mount the wireless sensor on the supporting plate, as instructed below a) Drill three holes on the supporting plate. - Diameter of hole-1 is about 12.5mm - Diameter of hole-2 and hole-3 is about 3.5mm b) Tighten the senser by screws Note: use a pencil to mark the position before drilling the hole-2 and hole-3.
- Page 14 6. Find a proper position and place the control box into the bottom cover of your bait boat. Note: It could be better to find a way to fix the control box in the bottom cover of your bait boat. As when used with your bait boat in the water, the control box may wobble with the shave, which may damage the inner electronic parts.
- Page 15 9. Connect the control box to the battery. Connect to the battery There are 2 ways to power the control box a) Connect to a 9v alkaline battery In the package you can find a battery buckle, which is used to connect the cable to a 9v alkaline battery.
- Page 16 Note: correctly connect the control box to the bait boat battery, and then you can monitor the remained voltage of your bait boat all the time. Avoiding using under a low battery. Note: the range of battery monitoring is 5.2~15v. Warning: be careful not reversing connection of positive &...
-
Page 17: Res Sensor Installation Method - 2
RES sensor installation method - 2 As the structure of bait boats is different, sometimes maybe you prefer mounting the sensor to your bait boat in other method, see the following example: Note: for such installation method, finding a proper mounting location for the sensor is very important. - Page 18 Sonar working method When sonar works, the signals are remitted in the direction as instructed below: So, in the area A and area B, there should be no any obstacle, otherwise the sonar signals will be “ blocked” , thus sonar unit will not be able to receive the signal normally, which will cause short Remote Control distance, or abnormal display on the screen.
- Page 19 1. Find a proper mounting position, and drill 3 holes on the bottom of your bait boat 3 holes Note: the 3 holes should be drilled with the following dimension 2. Hold the sensor cable through the 12mm-hole...
- Page 20 3. Fix the sensor with 2 screws Note: please spread some sealed glue on the screws before fixing the sensor. 4. Spread some sealed glue to the drilled location, preventing water leakage from happening. 5. Carry out the following steps same with step 6~10 instructed in “ RES sensor installation method –...
-
Page 21: Operation
Operation Understand sonar If you are familiar with how sonar works, skip ahead to the next segment. But, if you have never owned sonar Fishfinder before, this segment will tell you the basic working theory about sonar. Based on the sonar technology, the Fishfinder could detect the underwater condition, including fish, structure, or bottom. -
Page 22: Keyboard Instruction
Keyboard instruction The Fish finder sound a tone when you press the key which means the unit has accepted a command. 1. POWER & Exit Key The POWER & Exit key is used to turn the Fish finder on or off. It is also used to exit a menu setting. -
Page 23: Sonar
1. Sonar Sensitive Sensitive determines how echoes will be displayed on the screen. Increasing the sensitivity will make you see more details on the screen. In deep water, increasing the sensitivity. whereas in shallow decreasing the sensitivity. In most situation, just setting sensitivity to “ Auto” will work well To set the Sensitive: 1) Press Menu to enter into menu setting. -
Page 24: Magic Grayline
In such situations when you see too much clutter on the screen, increasing the Noise Filter will play an effect. The larger the value is, the more unexpected sonar returns will not be displayed. If the Noise Filter is increased too high, most sonar returns (which maybe fish) will not be displayed In situation while water is clear, try decreasing the Noise Filter, however in situation while water is turbid, try increasing the Noise Filter will be helpful. -
Page 25: Fish Id Sens
If Grayline is “ on” , strong returns will be shown with dark pixels and weak returns with lighter pixels. This is very helpful of ensuring that strong signals will be clearly visible on the display; To set the Magic Grayline: 1) Press Menu to enter into menu setting. -
Page 26: Display
6) Press Ent to confirm the setting. 7) Press Exit to exit the setting 2. Display Depth Range Depth Range determines in which portion the bottom will display in the screen. (for example, if the actual depth is 10m, and the current Depth Range is 20m, then the bottom will display on 50% portion of the screen). -
Page 27: Zoom Range
4) Press Ent to enter into setting. 5) Use the Up/Down Arrow to change the value. 6) Press Ent to confirm and exit the setting. Note: after you enter into the setting by press Ent key, the operation figure will change from A to B, then just press Down Arrow key to change the levels. -
Page 28: Backlight
Backlight Backlight allows the unit to be used at night. There are 10 levels for you to adjust the brightness of backlight. To set the Backlight: 1) Press Menu to enter into menu setting. 2) Repeatedly press Menu to switch to DISPLAY menu. -
Page 29: Alarm
To set the Overlap Data: 1) Press Menu to enter into menu setting. 2) Repeatedly press Menu to switch to DISPLAY menu. 3) Use the Up/Down Arrow to select Overlap Data option. 4) Press Ent to enter into setting. 5) Use the Up/Down Arrow to select the option. 6) Press Ent to confirm the option being displayed or not. -
Page 30: Fish Alarm
Fish Alarm The Fish finder sound an alarm tone when it detects what it determines to be a fish. To set the Fish Alarm: 1) Press Menu to enter into menu setting 2) Repeatedly press Menu to switch to ALARM menu 3) Use the Up/Down Arrow to select Fish Alarm option. -
Page 31: Boat Battery
You can manually choose exiting the alarm mode by entering into Main Battery Alarm menu setting, and just changing the setting to a safe value will be ok. Boat Battery The Fish finder sounds an alarm tone when the battery strength of your bait boat is lower than the setting. -
Page 32: Units
To set the Beeper 1) Press Menu to enter into menu setting. 2) Repeatedly press Menu up to SYSTEM menu. 3) Use the Up/Down Arrow to select Beeper option. 4) Press Ent to enter into setting. 5) Use the Up/Down Arrow to select the option. 6) Press Ent to confirm the setting. -
Page 33: System Reset
5) Use the Up/Down Arrow to select the option. 6) Press Ent to confirm the setting. 7) Press Exit to exit the setting. System Reset System Reset is used to restore original factory setting. To set the System Reset: 1) Press Menu to enter into menu setting. 2) Repeatedly press Menu to switch to SYSTEM menu. -
Page 34: Troubleshooting
Under any circumstances, if the sonar unit cannot receive signals transmitted by the RES sensor the screen will seem the same until signals are restored. Condor 260 Bait is a product depending upon line of sight. Obstacles between the handheld and the sensor can contribute to signal loss. - Page 35 3. When using the device in shallow water areas, the screen does not display things normally and depths are not indicated with consistency. Condor 260 Bait has a depth capability from 0.6 to 30m, however due to the sonar character, the sensor cannot achieve the best performance in shallow water.
- Page 36 b) Please check the RES sensor installation, and confirm the antenna mounted on your bait boat is correctly connected to the control box through the antenna-extended cable. c) The radio performance is easily affected by cloudy or rainy day, which will cause the Remote Control distance decreasing greatly.
-
Page 37: Specifications And Features
Specifications and features • Large, high contrast, 4.3” triple supertwist LCD screen, provides perfect visibility even with polarized sunglasses • High resolution 240 x 128 pixel with 4 levels of gray • High intensity, fully dimmable LED backlighting for night use •... - Page 38 Notes...
- Page 39 Notes...
- Page 40 1501 Minnesota Avenue Winter Park, FL 32790 U.S.A. info@condorsonar.com www.condorsonar.com...
Need help?
Do you have a question about the 260 BAIT and is the answer not in the manual?
Questions and answers