Table of Contents
Advertisement
Advertisement
Table of Contents

Related Manuals for Condor 242 DC

Summary of Contents for Condor 242 DC
- Page 1 Operation and Installation manual...
- Page 2 Introduction Thank you for choosing our Fish Finder and welcome to the innovations of Condor Marine! Your Fishfinder is a high-quality sonar designed for both professional and novice fisherman with trouble-free use in a variety of water areas. To familiarize yourself 7better with the product’...
-
Page 3: Table Of Contents
INDEX Understand sonar ......… … … … … … … … … … … … … … … … … … … … … … … … … … … … … … … … .… … No-skipping detection .…... -
Page 4: Understand Sonar
Understand sonar If you are familiar with how sonar works, skip ahead to the next segment. But, if you have never owned sonar Fishfinder before, this segment will tell you the basic working theory about sonar. Based on the sonar technology, the Fishfinder could detect the underwater condition, including fish, structure, or bottom. -
Page 5: Dual Beam Sonar
Dual Beam Sonar The Condor 242 dc fishfinder adopts a Dual Beam 200 / 83 kHz sonar system (or Double Cone), with which the sonar coverage has two different areas of 20°/60°, which enable you to get better performances in deep sounding and best bottom information. By the dual beam sonar setting, you can use the narrow 20°... -
Page 6: Installation
Installation Do not begin the installation unless you have read the manual instruction carefully, which contains information critical to the correct installation of your Fishfinder. And for any problems you meet during the installation, please contact your local dealer for help. Tranducer transom location (suction cup version) 1. -
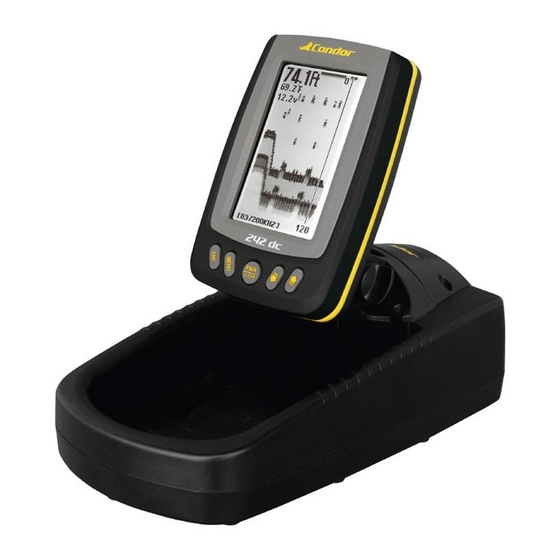
Page 7: Portable Sonar Installation
Portable Sonar Installation You have the sonar Condor 242 DC portable version, that uses the portable power box. The power pack and the portable transducer expand the uses for your sonar. It doesn’ t matter whether you have the portable version with the suction cup transducer or with the floating transducer, you can use your unit on your boat or take it to the dock, on a float tube, on an ice fishing trip or use it as a second sonar in a friend's boat. -
Page 8: Installing The Batteries
Installing the Batteries Open the battery case, that is on the rear top of the box, with a screw driver. Insert eight "AA" size batteries into the battery adapter, place it into the battery compartment and then close the battery cover with the screw driver. To correctly orient the batteries follow the small image that is shown near the battery slot. -
Page 9: Floating Transducer Version
If it still doesn't work, check the battery voltage. Most complaints we hear about portable units result from stale batteries. Make sure you buy fresh ones. Always remove batteries from the compartment when storing the unit because dead batteries can leak and corrode the contacts. -
Page 10: Operation
Operation Understanding the Fishfinder screen This chart shows all the information that your Fishfinder display during the operation. The upcoming sonar information will firstly appears in the Real-time sonar window, and then scrolls across the screen from right to left. So, what you see on the screen (Fish symbols, Fish arches, bottom shape, etc.) is formed by the sonar history. -
Page 11: Keyboard Instruction
Keyboard instruction The Fishfinder sound a tone when you press the key which means the unit has accepted a command. Your Fishfinder user interface is designed with 5 easy-to-use keys. Just by simple operation you could have various on-screen views and menus. PWR / CLEAR Key The PWR / CLEAR key is used to turn the Fishfinder on or off and to go out from the menu pages. -
Page 12: Sonar
SONAR Sensitivity Sensitivity determines how echoes will be displayed on the screen. Increasing the sensitivity will make you see more details on the screen. In such situations when you see too much clutter on the screen, decreasing the sensitivity will play an effect. The larger the sensitivity is, the more relatively strong sonar returns the screen will display. -
Page 13: Noise Filter
Noise Filter In many situations, your Fishfinder display will be effected by undesired signal which maybe caused by your boat engine, turbulence, wiring, or other electrical and mechanical sources. Such undesired signal will produce unwanted mark on the screen, which may cause a misunderstanding of the underwater condition. -
Page 14: Fish Id. Sens
b) Repeatedly press MENU to switch to Sonar menu. c) Use the Up / Down Arrow to select White Line option. d) Press ENT to enter into setting. e) Use the Up / Down Arrow to increase / decrease the value. Press ENT to confirm and exit the setting. -
Page 15: Frequency
Frequency Frequency is used to set which sonar returns will be displayed on the screen when the transducer is working. a) In 200 KHz, the screen and Real Sonar Window will only display the 200 KHz narrow beam sonar returns. b) In 83 KHz the screen and Real Sonar Window will only display the 83 KHz narrow beam sonar returns. -
Page 16: Tcg Control
TCG Control This function is optimized fog high power-output sonar system. It could help the sonar work properly in a noisy environment. In order to control the surface noise and the self-ring of the transducer, it changes the sensitivity automatically at the depth’ s changes. The diagram below shows the sensitivity changes according to depth. -
Page 17: Display
DISPLAY Chart Speed Chart Speed control how fast the sonar information moves across the screen. With the high speed, you could see more information across the screen; however the fast moving information makes you feel difficult to interpret the fish details and bottom. With the low speed, you fell easeful to have enough time to interpret the fish details and bottom. -
Page 18: Zoom Range
To set the Depth Range: a) Press MENU to enter into menu setting. b) Repeatedly press MENU to switch to Display menu. c) Use the Up / Down Arrow to select Depth Range option. d) Press ENT to enter into setting. e) Use the Up / Down Arrow to increase / decrease the value. -
Page 19: Backlight
b) Repeatedly press MENU to switch to Display menu. c) Use the Up / Down Arrow to select Zoom Range option. d) Press ENT to enter into setting. e) Use the Up / Down Arrow to increase / decrease the value. Press ENT to confirm and exit the setting. -
Page 20: Contrast
Contrast Contrast can let you to get a suitable display when you operate the unit. To set the Contrast: a) Press MENU to enter into menu setting, b) Repeatedly press MENU to switch to Display menu. c) Use the Up / Down Arrow to select Contrast option. d) Press ENT to enter into setting. -
Page 21: Alarm
ALARM Depth Alarm The Fishfinder sound an alarm tone when the bottom goes shallower or equal than the alarm’ s setting. You also could exit alarm mode by enter into Depth Alarm menu and artificially increase the current depth alarm value to a safe grade. Note: once triggered, an alarm message will appear on the screen. -
Page 22: Battery Alarm
Battery Alarm If the input battery voltage is less then the alarm’ s setting, the Battery Alarm will sound and a message will appear on the screen. The available setting is 10.0~18.0 volts. At the lower right corner of Battery Alarm interface, the currently working voltage is displayed. To set the Battery Alarm: a) Press MENU to enter into menu setting, b) Repeatedly press MENU to switch to Alarm menu. -
Page 23: Units
Language Language is used to change to language of all menus of the instrument. This is the first thing you have to do when power the Condor for the first time. It is possible to choose from 16 different languages. -
Page 24: System Reset
a) Press MENU to enter into menu setting, b) Repeatedly press MENU to switch to System menu. c) Use the Up / Down Arrow to select Language option. d) Press ENT to enter into setting. e) Use the Up / Down Arrow to select the option. Press ENT to confirm and exit the setting. - Page 25 a) Press MENU to enter into menu setting, b) Repeatedly press MENU to switch to System menu. c) Use the Up / Down Arrow to select Simulator option. d) Press ENT to enter into setting. e) Use the Up / Down Arrow to select the option. Press ENT to confirm and exit the setting.
-
Page 26: Troubleshooting
Troubleshooting Unit doesn’ t power up. a) Check the cable connection and wiring. Make sure the cable is properly connected to the Fishfinder and the batteries are charged. b) Make certain the batteries voltage is not lower then the warning value (10 V) Weak Bottom Echo, Unstable Depth Reading, or No Fish Signals. -
Page 27: Specifications And Features
Specifications and features Specifications Condor 242 dc Portable Depth Cability 500 feet (160 m) ......… … … … .… … ........… … … … … … … … … … … … ... Operating frequency 200 / 83 KHz ..… ........… … … … … … … ......… … … … … … … … .…... - Page 28 1501 Minnesota Avenue Winter Park, FL 32790 U.S.A info@condorsonar.com www.condorsonar.com...
Need help?
Do you have a question about the 242 DC and is the answer not in the manual?
Questions and answers