
Related Manuals for Sandstrom SINHOBB13

Summary of Contents for Sandstrom SINHOBB13
-
Page 1: Instruction Manual
Instruction Manual Built in Induction Hob SINHOBB13 / SINHOBW13 SINHOBB13/W13_IB.indd 1 05/08/2013 12:55... - Page 2 SINHOBB13/W13_IB.indd 2 05/08/2013 12:55...
-
Page 3: Table Of Contents
Automatic heat up ......................Bridge mode ........................Setting the child lock ..................Timer function ....................Alarm function ........................Setting a cooking zone timer ..................Deleting a cooking zone timer ..................Cleaning and maintenance ................Using the scraper ......................SINHOBB13/W13_IB.indd 3 05/08/2013 12:55... - Page 4 Wiring the hob ....................Opening the connection cover ..................Fitting the links ....................... Installing the hob ................... Fitting the foam gasket ....................Fitting the hob into the work surface ................. Troubleshooting ..................... Fault codes ...................... Technical specification ................. SINHOBB13/W13_IB.indd 4 05/08/2013 12:55...
-
Page 5: Safety Warnings
• This appliance is not intended for use by persons (including children) with reduced physical, sensory and mental capabilities, or lack of experience and knowledge, unless they have been given supervision or instruction concerning the use of the appliance by a person responsible for their safety. SINHOBB13/W13_IB.indd 5 05/08/2013 12:55... - Page 6 • Metallic objects such as knives, folks, spoons and lids should not be placed on the hob surface since they can get hot. • After use, switch off the hob element by its controls and do not rely on the pan detector. SINHOBB13/W13_IB.indd 6 05/08/2013 12:55...
-
Page 7: Unpacking
Remove all packaging from the unit. Retain the packaging. If you dispose of it please do so according to local regulations. The following items are included: Scraper Induction Hob Sealing Tape If items are missing or damaged, please contact Partmaster (UK only). Tel: 0844 800 3456 for assistance. SINHOBB13/W13_IB.indd 7 05/08/2013 12:55... -
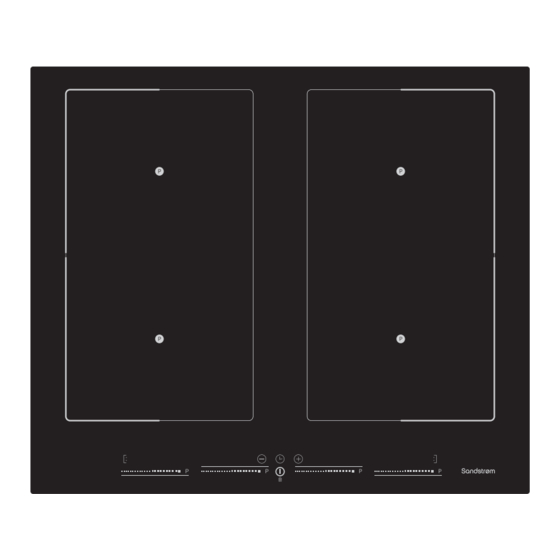
Page 8: Product Overview
10. Sliding power control (zone 2) 4. Timer indicator 11. Timer control 5. — Timer control 12. Power/lock control 6. Timer display 13. Sliding power control (zone 3) 7. + Timer control 14. Sliding power control (zone 1) SINHOBB13/W13_IB.indd 8 05/08/2013 12:55... -
Page 9: Before Using Your New Induction Hob
Excessive switching may however be caused by the use of an unsuitable saucepan. If excessive switching occurs, discontinue the use of the saucepan. • To improve performance, and reduce energy, always use pans with close fitting lids. SINHOBB13/W13_IB.indd 9 05/08/2013 12:55... -
Page 10: Suitable/Unsuitable Pans
• Make sure the controls are always clean and dry, and that there is no object (e.g. a utensil or a cloth) covering them. Even a thin film of water may make the controls difficult to operate. SINHOBB13/W13_IB.indd 10 05/08/2013 12:55... -
Page 11: Using Your Induction Hob
This is to prevent the hob accidentally being left on. Each power level has a specific operating time (see table below). The cut off time is measured from the last power level adjustment made per cooking zone. Power Level Maximum operating time (hours) SINHOBB13/W13_IB.indd 11 05/08/2013 12:55... -
Page 12: Selecting A Cooking Zone
2. You can slide your finger up and down the scale to adjust the power level. Slide right to increase and left to decrease the power level. You can adjust the power level at any point during cooking. SINHOBB13/W13_IB.indd 12 05/08/2013 12:55... -
Page 13: Warming Function
The power boost function can only be used on two cooking zones at once, one on the left zone and one on the right zone. It cannot be activated on both left or right cooking zones at the same time. It can also not be activated if the cooking zones are bridged. SINHOBB13/W13_IB.indd 13 05/08/2013 12:55... -
Page 14: Automatic Heat Up
Touch the right bridge symbol to connect cooking zones 2 and 4 together. The Bridge indicator will light in the display of zones 1 and 3 and the bridge indicator light will also light. SINHOBB13/W13_IB.indd 14 05/08/2013 12:55... -
Page 15: Setting The Child Lock
• To switch the child lock off touch and hold the power/lock control for 3 seconds. The light above the control will switch off and you will hear a long beep. SINHOBB13/W13_IB.indd 15 05/08/2013 12:55... -
Page 16: Timer Function
We recommend you don’t touch the Power/lock control because this If you do not switch off the alarm sound will switch your hob off if you are it will automatically switch the sound off cooking. in approximately 2 minutes. SINHOBB13/W13_IB.indd 16 05/08/2013 12:55... -
Page 17: Setting A Cooking Zone Timer
(max 99 mins). If you only want to set one timer, wait for the hob to beep and it’s now set. The indicator light will flash and the time will start to count down. SINHOBB13/W13_IB.indd 17 05/08/2013 12:55... -
Page 18: Deleting A Cooking Zone Timer
2. Touch the controls at the same time and the time in the display will be set to ‘00’. The cooking zone timer is now deleted. The cooking zone will not switch off if you cancel a timer. SINHOBB13/W13_IB.indd 18 05/08/2013 12:55... -
Page 19: Cleaning And Maintenance
Make sure you wipe the touch control area dry before turning 4. Wipe the area completely dry with the hob back on. a paper towel. SINHOBB13/W13_IB.indd 19 05/08/2013 12:55... -
Page 20: Using The Scraper
• Do NOT use the scraper at 90˚to the hob as this could damage the hob surface. • Always keep the blade flat on the surface of the hob, do NOT use the corners of the blade as this will scratch the hob surface. SINHOBB13/W13_IB.indd 20 05/08/2013 12:55... -
Page 21: Wiring The Hob
• All repairs must be carried out by an authorised service personal or a qualified electrician. • Make sure your hob is disconnected from the mains supply before any maintenance. • Cooking hobs are not provided with a supply cord. SINHOBB13/W13_IB.indd 21 05/08/2013 12:55... -
Page 22: Opening The Connection Cover
Fitting the links The links are stored in the slot inside the connection box. Fit one link into positions 1 and 2 and the other link into positions 4 and 5. SINHOBB13/W13_IB.indd 22 05/08/2013 12:55... - Page 23 4. Un-screw the cable clamp and place the cable under the clamp and then screw the clamp closed. 5. Replace the lid on the connection box, making sure it clips into place. • Do NOT over tighten the screws SINHOBB13/W13_IB.indd 23 05/08/2013 12:55...
-
Page 24: Installing The Hob
2. Cut 4 lengths of the gasket to fit neatly around the hob. Peel the back off the gasket and stick it to the hob as shown. Make sure you do NOT overlap the ends of the gasket. ✘ ✔ SINHOBB13/W13_IB.indd 24 05/08/2013 12:55... -
Page 25: Fitting The Hob Into The Work Surface
Cut a hole in the work surface 560mm(w) x 490mm(D) and slot the hob into the hole. 510mm 600mm 560mm 490mm 600mm 40mm(min) 2. You must leave a 20mm space below the hob. 20mm ✔ 20mm ✘ ✔ • Do NOT install a drawer directly under the hob. SINHOBB13/W13_IB.indd 25 05/08/2013 12:55... -
Page 26: Troubleshooting
Check the connections match the switched on. connected correctly. connection diagram in this instruction book. The hob switched off. You may have accidentally touched Touch the power control again to switch the power control. the hob back on. SINHOBB13/W13_IB.indd 26 05/08/2013 12:55... -
Page 27: Fault Codes
Dimensions (w x d x h) (mm) 600 x 510 x 48 Voltage (V) 220 – 240 ~ Frequency (Hz) Max Power Consumption (W) 7400 Standby Power Consumption (W) < 0.5 Features and specifications are subject to change without notice. SINHOBB13/W13_IB.indd 27 05/08/2013 12:55... - Page 28 There are separate collection systems for recycling in the EU. For more information, please contact the local authority or your retailer where you purchased the product. DSG Retail Limited (Registered in England No. 504877), Maylands Avenue, Hemel Hempstead, Hertfordshire HP2 7TG. UK IB-SINHOBB13_W13-130805V2 SINHOBB13/W13_IB.indd 28 05/08/2013 12:55...
Need help?
Do you have a question about the SINHOBB13 and is the answer not in the manual?
Questions and answers