Table of Contents
Advertisement
Available languages
Available languages
http://waterheatertimer.org/GE-timers-and-manuals.html
http://waterheatertimer.org/How-to-wire-GE-15312-timer.html
SunSmart
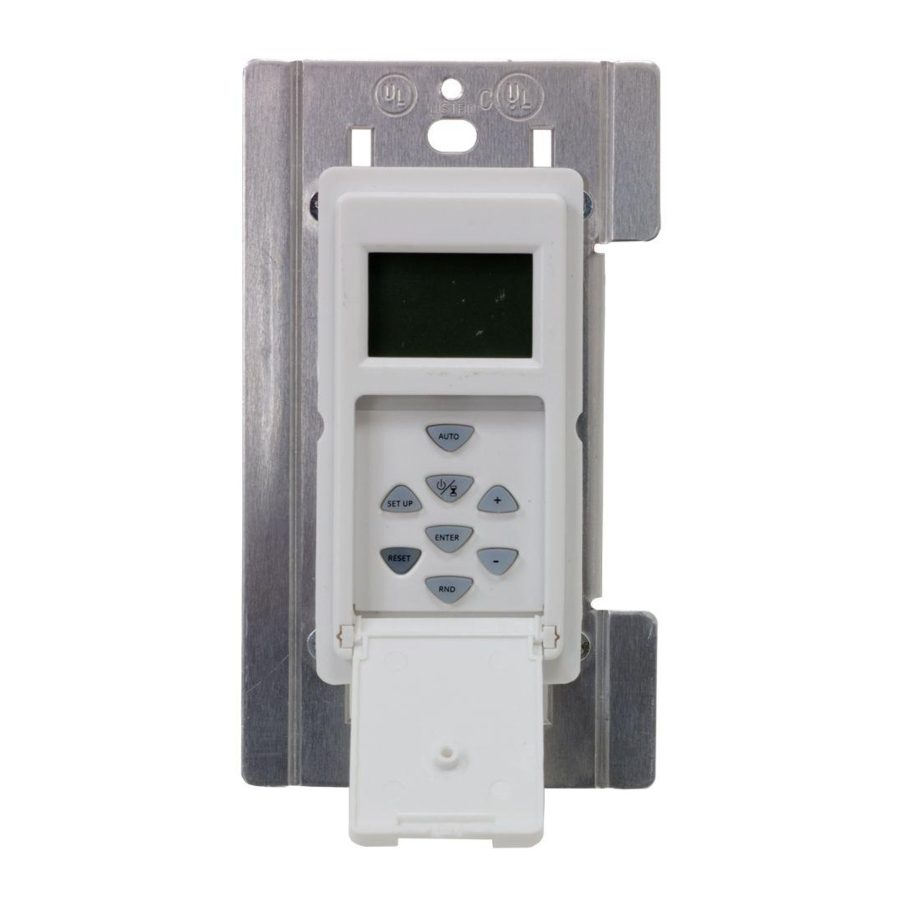
ON/OFF - Timer Override
(Push to turn ON/OFF)
SETUP
- Push once to set
Calendar/Clock.
- Push twice to set or
change programming.
RESET - Hold firmly for 3
seconds to clear all settings
and program timer.
RANDOM - Push once after
program is set to randomly
vary ON/OFF timers within 30
minutes of programmed times.
Note: The timer will automatically return to the clock mode if a button is not pushed for 20
seconds. Push the setup button once to return to program mode if this happens.
Initial Setup:
Setting the Calendar, Clock, DST, Zone
1. Using a paper clip or pen press firmly and hold the reset button for 3 seconds or until you
see the word "RESET" scroll across the screen. Release the "RESET" button and the screen will
be flashing 12:00 AM
2. Press the "SETUP" button and CAL will be flashing on the screen. Press "Enter" to begin
setting the Calendar.
3. The Year will be flashing: Use the + or – buttons until the year is correct. Press "ENTER"
to confirm.
4. The Month will be flashing: Use the + or – buttons to find the current month is correct. Press
"ENTER" to confirm.
5. The Day will be flashing: Use the + or – buttons to find the current day. Press "ENTER"
to confirm.
6. The screen should be blinking CLK for Clock. Press "ENTER" to begin setting the clock.
7. The hour should be blinking. Use the + or – to set the correct hour. If you pass 11 to 12 you
will change the AM to PM. Once the correct hour is found press "ENTER" to confirm.
8. The Minute should be blinking. Use the + or – to set the correct minute. Press "ENTER"
to confirm
9. The Screen should be blinking DST for "Daylight Savings Time" Press "ENTER" to set DST.
10. DST is either "ON" or "OFF". DST will automatically reset the times in the timer to match the
time change. Use the + or – button to change DST setting in the timer and press "ENTER"
to confirm.
11. The screen should show the word ZONE blinking. Press "ENTER" to set your ZONE.
Look at the map below and determine which zone best fits your location. Use the + or – to
scroll through the available zones in the timer and stop when you find the zone where the
timer is being installed. Press "ENTER" to confirm.
The screen will show DAWN (Sunrise) and a time with the hour blinking. This is the timers
preset time for DAWN. If the hour is not correct use the + or – buttons to adjust the hour to
match DAWN for your area. Press "ENTER" to confirm. If the hour is correct press "ENTER"
to move to the next step. The minutes are now blinking. If the minutes are not correct use
the + or – buttons to adjust the minutes to match DAWN for your area. Press "ENTER" to
confirm. If the minutes are correct press "ENTER" to move to the next step.
ALASKA
NORTH
CENTRAL
SOUTH
Digital Timer
TM
AUTO - Push when
programming is complete
AUTO
to activate timer.
UP/DOWN - Use to scroll
+
SETUP
through menu options.
ENTER
-
RESET
ENTER - Push to
confirm settings
RND
during programming.
TIMER DOOR
- Close after programing.
- Push to turn ON/OFF.
(Timer Override)
HAWAII
The screen will show DUSK (Sunset) and a time with the hour blinking. This is the timers
preset time for DUSK. If the hour is not correct use the + or – buttons to adjust the hour to
match DUSK for your area. Press "ENTER" to confirm. If the hour is correct press "ENTER" to
move to the next step. The minutes are now blinking. If the minutes are not correct use the
+ or – buttons to adjust the minutes to match DUSK for your area. Press "ENTER" to confirm.
If the minutes are correct press "ENTER" to move to the next step.
12. The screen will now say "SAVE." Press "ENTER" to save data to the timer.
Programming ON/OFF Events:
1. Press "SETUP" twice to begin programming times.
2. P1 (Program 1) ON should be blinking. Press "ENTER" to begin setting P1 ON time. You may
also use the + or – buttons to scroll through all 7 programs.
3. The screen will show SET, if you wish to set a time press "ENTER" to confirm. You may also
use the + or – button to scroll to DEL. If you press "Enter" on DEL you will delete the program
you are on.
If you pushed "ENTER" at SET for P1 the screen will show PRG, P1 ON and the days of the week
will be blinking. Use the + or – buttons to scroll through the options in which the timer will be
active. The options are:
• S, S • M, T, W, F • M through S: Individual days • T, TH • M, W, F • S, M, T, W, Th, F, S (default)
Choose the days you want the program to be active and press "ENTER."
Now that you have chosen the days the timer will function the next step is to choose the time.
The screen should show DAWN blinking. There are 3 options to choose from when selecting the
program ON time. Use the + or – to scroll through the options. • DAWN • DUSK • TIME (to set
custom time).
If you would like the timer to turn on at the Pre Set time for DAWN press "ENTER" and move to
P1 OFF setting.
If you would like the timer to turn on at the Pre Set time for DUSK use the + or – buttons to
change the option on the screen to DUSK and press "ENTER" and move to P1 OFF setting
If you would like choose a custom time other than DAWN or DUSK use the + or – buttons to
change the option on the screen to TIME and press "ENTER". The hour should be blinking. Use
the + or – to set the correct hour. If you pass 11 to 12 you will change the AM to PM. Once the
correct hour is found press "ENTER" to confirm. The Minute should be blinking. Use the + or – to
set the correct minute. Press "Enter" to confirm.
The screen will show PRG, P1 OFF and the days of the week will be blinking. Choose the days
you want the program to be active and press "ENTER". Now that you have chosen the days the
timer will function the next step is to choose the time the program will turn off. There are 3
options to choose from when selecting the program OFF time. Use the + or – to scroll through
the options. • DAWN • DUSK • TIME
If you would like the timer to turn off at the Pre Set time for DAWN press "Enter" .
If you would like the timer to turn off at the Pre Set time for DUSK use the + or – buttons to
change the option on the screen to DUSK and press "ENTER" .
If you would like choose a custom time other than DAWN or DUSK use the + or – buttons to
change the option on the screen to TIME and press "ENTER". The hour should be blinking. Use
the + or – to set the correct hour. If you pass 11 to 12 you will change the AM to PM. Once the
correct hour is found press "ENTER" to confirm. The Minute should be blinking. Use the + or – to
set the correct minute. Press "ENTER" to confirm. The screen will now say "SAVE" Press "ENTER"
to save program 1 to the timer. P2 (Program 2) ON should be blinking. Press "ENTER" to begin
setting P2 ON. You may also use the + or– buttons to scroll through all 7 programs or push
NORTH
AUTO to complete the programming.
Random Security Option:
CENTRAL
The random feature will turn lights on and off using the programmed times + or – 30 minutes,
giving the house a more lived in appearance while occupant is away.
1. Push RND (Random) button to activate the Random feature. The screen will change from
AUTO to RDM.
SOUTH
2. Push AUTO button to de-activate the Random feature and return the timer to its current
programming.
Programming
Instructions
15312
12-17-2010
www.jascoproducts.com
Advertisement
Table of Contents

Related Manuals for GE SunSmart 15312


Summary of Contents for GE SunSmart 15312
- Page 1 SunSmart Digital Timer Programming Instructions The screen will show DUSK (Sunset) and a time with the hour blinking. This is the timers ON/OFF - Timer Override preset time for DUSK. If the hour is not correct use the + or – buttons to adjust the hour to (Push to turn ON/OFF) match DUSK for your area.
-
Page 2: Programación De Eventos De Encendido Y Apagado
Temporizador Digital SunSmart Instrucciones de programación Aparecerá DUSK (atardecer) y una hora parpadeando en la pantalla. Se trata de la hora preestablecida ENCENDIDO/APAGADO: de los temporizadores para DUSK. Si la hora no es la correcta, utilice los botones + o - para ajustar la Anulación del temporizador hora de manera que coincida con DUSK de su zona. -
Page 3: Changing Color Of Timer
SunSmart Digital Timer Installation Instructions Changing the color of the timer Line Load This device includes a Light Almond Faceplate. To switch faceplates proceed as follows: GROUND BLACK 1. Gently remove the White Faceplate using a flat head screwdriver. Starting at the top left corner WHITE gently pry the faceplate loose. -
Page 4: Cambiar El Color Del Temporizador
Temporizador Digital SunSmart Instrucciones de instalación Cambiar el color del temporizador Cable Carga Este dispositivo incluye una placa frontal color almendra claro. Para cambiar las placas frontales siga los siguientes CONEXIÓN A TIERRA NEGRO pasos: 1. Retire cuidadosamente la placa frontal blanca con un BLANCO destornillador de cabeza plana.
Need help?
Do you have a question about the SunSmart 15312 and is the answer not in the manual?
Questions and answers
How do I delete a program
To delete a program on the GE appliance with part number 15312:
1. Press “SETUP” twice to begin programming.
2. When the desired program (e.g., P1 ON) is blinking, press “ENTER.”
3. The screen will show “SET.” Use the + or – button to scroll to “DEL.”
4. Press “ENTER” on “DEL” to delete the selected program.
This answer is automatically generated
Timer is programmed but is only working manually
The GE SunSmart 15312 timer might only be working manually despite being programmed due to the following reasons:
1. Incorrect Wiring: Verify that the timer is wired correctly, as per the manual. Ensure proper connections, including neutral wires if required.
2. Power Issue: If the timer display is not functioning properly, there may be an issue with the power supply. Check if wires (1) and (5) need to be swapped, as mentioned in the manual.
3. Programming Not Saved or Activated: Ensure that the programming has been saved by confirming the "SAVE" step during setup and that the timer is set to "AUTO" mode to activate the programmed schedule.
4. Reset Needed: Perform a reset by holding the reset button firmly for 3 seconds, then reprogram the timer.
By addressing these possibilities, the timer should function as programmed.
This answer is automatically generated
Lights not turning off or on when supposed to.