
Related Manuals for Navig8r Crashcam-PRO


Summary of Contents for Navig8r Crashcam-PRO
- Page 1 USER MANUAL NAVCAM‐PRO (Note: The Product Name is Crashcam‐(FHD)PRO; The Model Number (for warranty, service and ordering) is Navcam‐PRO. 1 Crashcam‐PRO (Navcam‐PRO) Manual Ver 3.0 09/2013 ...
-
Page 2: Table Of Contents
USER MANUAL NAVCAM‐PRO Table of Contents Important safety instructions and precautions .............. 3 What’s in the box ......................... 3 Camera button and hardware overview ................ 4 ON SCREEN DISPLAY ...................... 5 What do the buttons do? .................... 5 What do the LED ICONS mean? ................... 6 Can I “hardwire” the power cable to my car/TRUCK internal wiring? ........ 7 Attaching the adhesive pads to the backing plate .............. 7 Attaching the mounting bracket .................. 8 ... -
Page 3: Important Safety Instructions And Precautions
USER MANUAL NAVCAM‐PRO IMPORTANT SAFETY INSTRUCTIONS AND PRECAUTIONS ‐ Read all instructions carefully before use. ‐ Retain manuals for future reference. ‐ Use this product only in the manner described. ‐ Only use a water‐dampened soft‐cloth to clean the surface of this product. ‐ The following will damage this product: any liquid such as water or moisture, extreme heat; cold; humidity, dusty or sandy environments. ‐ The Crashcam Pro is designed to be mounted on a vehicle windscreen, as high as possible, to ensure a maximum viewpoint. Please ensure that any attached cables are secured and will not cause the device to fall. ‐ The Crashcam Pro has no internal battery so charging is not required. ‐ There are no user serviceable parts in this product. ‐ Un‐authorized attempts to dismantle or repair this product will void product warranty WHAT’S IN THE BOX 1)Crashcam‐Pro, 2)12v/24v Car Charger with extra‐long cable and in line 5v transformer, 3)Backing plate (buckle) and bracket assembly, 4) 2 x “3M” adhesive windscreen stickers, 5) This user manual, 6) CD disc to install the tracking and review software on a Windows® PC. 3 Crashcam‐PRO (Navcam‐PRO) Manual Ver 3.0 09/2013 ... -
Page 4: Camera Button And Hardware Overview
USER MANUAL NAVCAM‐PRO CAMERA BUTTON AND HARDWARE OVERVIEW 4 Crashcam‐PRO (Navcam‐PRO) Manual Ver 3.0 09/2013 ... -
Page 5: On Screen Display
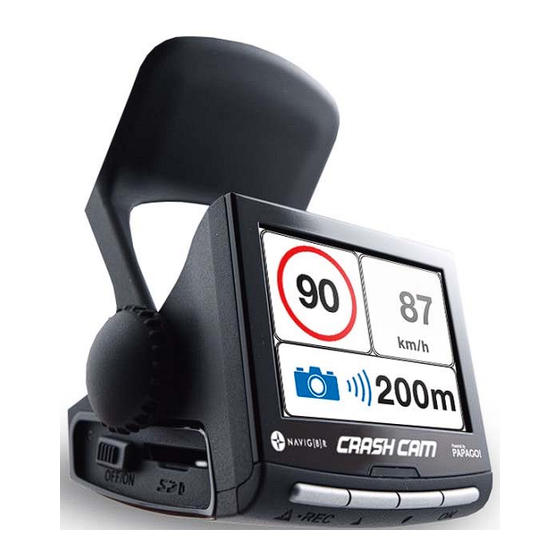
USER MANUAL NAVCAM‐PRO ON SCREEN DISPLAY Microphone | Speed Sign Detect | Driver Fatigue | Stop & Go | GPS Signal Status Number of “emergency Recording | time saved files” out of 10 Line up Grid overlay for “Stop & Go” feature Emergency Menu Cycle between: Playback File save / Settings ‐Forward view, ‐Speedo, ‐Time, ‐LCD off recorded Record / files Back button WHAT DO THE BUTTONS DO? Function Button What does it do? On / Off Slide this switch to turn the power On or Off In Recording mode ‐ Press briefly to protect the video being recorded ... -
Page 6: What Do The Led Icons Mean
The fatigue alarm is active and you have been driving for more than Coffee cup icon the (user) set time 10 in red circle icon The speed sign detect feature is active Microphone Microphone is on (if with red line – mic is off) Green “headlight” icon Night time or dark outside – lights on reminder Insert an SD card SD card out of memory (format your SD card or remove the autobump save files) LED Constant flashing SD card is not compatible (check the speed class / capacity of the Card) Temperature warning (auto shut down) Connecting the CRASHCAM-PRO in the Car 1, 2: 12/24v DC cable routed behind rear vision mirror 3: Cable hidden behind roof lining / sun visor 4: Cable hidden behind the “A” pillar moulding (beware of airbag equipped cars) 5: Cable is routed beside the dashboard / near the door hinges 6: Cable is passed under the passenger carpet (or under the d ashboard) ... -
Page 7: Can I "Hardwire" The Power Cable To My Car/Truck Internal Wiring
USER MANUAL NAVCAM‐PRO The Crashcam‐Pro has a Mini USB DC5V input. Please use the original car charger which will step down the car (or truck) 12/24VDC to 5VDC. Hints and tips: The Crashcam‐Pro works best when mounted centrally and high up on the windscreen (typically behind or close to the rear vision mirror). Avoid fastening the adhesive pads to the upper tinted section of the windscreen. CAN I “HARDWIRE” THE POWER CABLE TO MY CAR/TRUCK INTERNAL WIRING? Yes, the 12/24v Cigarette socket plug can be cut off exposing a black (negative) and red (positive) wire. The black wire should be connected to the vehicle’s ground / negative and the red wire connected to the vehicle’s “ignition on” (so that when you turn off the ignition, the camera turns off as well). Note: if you are not confident in doing this yourself, it is recommended that you seek the assistance of an automotive electrician. Note: Do not remove the inline transformer which is 15cm from the USB socket end of the cable. ATTACHING THE ADHESIVE PADS TO THE BACKING PLATE Connect the camera to the backing plate and find ... -
Page 8: Attaching The Mounting Bracket
Memory card required for operation The Crashcam-Pro requires an SD card (not included) to record video content. (see page 12 for a table showing SD card capacity and the relevant amount of video content able to be stored). For optimal performance, we recommend using at least a class 6 (UHS-1 if possible) SD card with a minimum capacity of 8GB. -
Page 9: Power On/Off (Auto On/Off)
To turn the Crashcam‐Pro ON, switch the power button on the side of the device to ON. This will also lock the SD card into place. To turn off, slide the switch to OFF. When connected to the 12/24v DC socket (cigarette socket) of your car, the Crashcam‐Pro will turn ON or OFF automatically when the car’s ignition is turned ON or OFF. If the Crashcam‐Pro does not turn off immediately it means the device is completing the file save process before turning off (usually only a few seconds). If the 12/24v socket is “constant on” (in some European vehicles), then the Crashcam‐Pro will need to be turned ON/OFF manually using the power switch. To turn the LCD display OFF (but leave the unit recording) toggle the screen views using the OK button. (Ideal for night time driving) AUTO RECORD WHEN TURNED ON When the Crashcam‐Pro is turned on (either by pressing the power button or via the auto on feature) the device will automatically begin recording. To stop recording, press the Settings button or turn the power switch OFF. OPERATING THE CRASHCAM-PRO FOR THE FIRST TIME Connect the car charger to the car’s12/24v Cigarette lighter socket and the other end to the Mini USB port on the Crashcam Pro Insert an SD card into the SD slot and switch the power to ON. When the ignition is turned on, the Crashcam Pro will turn on. Note: When the internal vehicle temperature is higher or lower than the recommended operating temperature, the unit may enter a protection mode and will not function until the temperature range is within operating limits. USER SETTINGS Note: The main menu screen will show 4 on‐screen menu options for each button at the bottom of the screen together with the live video image from the video camera. From the main screen, press the SETTINGS button, then using a combination of the arrow keys and ... - Page 10 USER MANUAL NAVCAM‐PRO Check satellite status. 3 to 5 satellites are required for a positive GPS status location fix. G‐sensor status Allows you to reset the 3 axis G – Sensor Select off/low/middle/high sensitivity for the auto file protect Bump auto‐record feature Auto update – Set the time according to satellite time Time auto update (depending on daylight savings, satellite time may be +/‐ 1 hour) Or – set the time manually Change system time (only available if “time auto update” is set Time setting to manual Time zone setting Adjust the time zone setting for your current location Video built in time Select on/off to add a time‐stamp to the recorded video Select on/off to add a speed‐stamp to the recorded video (GPS Video built in speed signal required) Select on/off to add GPS coordinates to recorded video (GPS Video built in GPS signal required) 1080p / 30fps ‐ full HD quality 30 frames/sec Video resolution 720p / 60fps ‐ HD quality 60 frames / sec 720p 30fps ‐ HD quality 30 frames / sec Voice recording Switch microphone recording ON or OFF Button sound ...
-
Page 11: Recording Files
USER MANUAL NAVCAM‐PRO RECORDING FILES Turn on the Crashcam‐Pro. Recording should start automatically, if not press the REC button. When recording has started, an image of a disc will appear on the screen together with a record timer. The recorded files are saved onto the SD Card. Recording can be stopped, by either pressing the Settings button or by turning the car ignition off (stopping power to the device) The Crashcam‐Pro supports cycle recording. It will overwrite the oldest video files with new ones. Depending on the size of the SD card and the speed rating of the card, there may be as much as a 3 second pause whilst old files are selected and overwriting begins with newer files. This pause time will not be recorded. AUTO BUMP FILE RECORD - SAVING RECORDING VIDEO FILES ‐ Due to the “cycle recording” nature of this technology, older recorded files will be overwritten (depending on the chosen resolution settings and the memory capacity of the SD card). ‐ Alternately the G sensor will trigger an auto save lock if it senses a bump (sensitivity is selectable via the Menu), so that the file being recorded is not overwritten in the cycle record process. Note; You can save a maximum of 10 locked files (which are indicated in the display as xx/10) OTHER SHORTCUTS FROM THE MAIN SCREEN Voice recording: Push and hold the OK button to toggle the microphone ON or OFF. A mute icon (a crossed out microphone) will appear or disappear accordingly. Self input speed camera data: Once a GPS signal is fixed press and hold the REC button to save self‐inputted speed camera or speed trap locations. PLAYING BACK A RECORDED FILE From the main screen, press the PLAY button, then select the source folder of the file ie. ... -
Page 12: Playback On Tv (With Hdmi)
USB CONNECTION Connect the Crashcam‐Pro to a Windows PC with a Mini USB to USB cable (not included). The welcome screen will appear. The screen will turn black and the LED indicator will turn green. The unit is now connected. Find the device Under “My computer” or “Windows Explorer” where you should see a drive which will resemble a “Removable Disk (?:)” (like a USB Flash drive or Hard drive). Recorded files are stored in the EmgRec or REC folders. These files can be played back using Windows Media player, VLC or a compatible .MOV media player or an image viewer (for images) PLAYBACK ON TV (WITH HDMI) Connect the Crashcam‐Pro to a HDMI equipped TV or AV monitor with a mini‐HMDI to HDMI cable (not included). Turn on the Crashcam‐Pro and select PLAY. SD CARD REQUIREMENTS The CRASHCAM‐Pro requires an SD card (not included) to record video/image content. For optimal performance, we recommend using a Class 6 or 10 SD card (preferably UHS class 1) to ensure fast data transfer rates (Class 4 cards will still work however may result in slower transfer rates). Note, some “Extreme Speed” class 10 UHS 2 cards will not work correctly with the Crashcam Pro The recording time table (right) is an estimate to recording time / car capacity and resolution. FIRMWARE AND SPEED CAMERA UPDATES To update speed camera, red light camera and average speed camera locations, please go to www.navig8r.com.au/crashcam. Instructions will be posted on how to obtain the latest camera updates. Firmware updates need to be completed by an Authorised Navig8r service centre. Please see www.navig8r.com.au/service for details on service and firmware updating. Note: Speed Camera updates will be posted as they become available. (normally 2 x per year) 12 Crashcam‐PRO (Navcam‐PRO) Manual Ver 3.0 09/2013 ... -
Page 13: Tracking Software - Quick Guide
TRACKING SOFTWARE – QUICK GUIDE INSTALLING THE SOFTWARE Step 1: Install the software disc and click the Installation icon (or view the user manual) Install software View User Manual Step 2: To install the software Please click “Install Navig8r Crashcam Pro” button. Step 2: Click “Run” when the security message pops up. 13 Crashcam‐PRO (Navcam‐PRO) Manual Ver 3.0 09/2013 ... - Page 14 Step 3: Click “Run” again upon the second security message Step 4: Finally click “Next” to complete the installation. Step 5: Top launch the software, go to your desktop and click the Navig8r icon. USING THE SOFTWARE Upon launching the software, the Navig8r welcome screen will briefly pop up. The main viewing screen will then appear Note: Please click and drag the screen dividers if you can not see the full screen features shown here (image to the left) Connect your NAVCAM‐PRO to begin playback and select the folder location using the folder icon shown below. All files from that location will then appear together with other supported ...
- Page 15 Maximise / Minimise Screen Capture Screen shot of video INTERFACE GUIDE 1. Video list from selected folder location Save current file to another 2. Google Map display location 3. Video playback screen Visit www.navig8r.com.au 4. Tool bar 5. Speed / G‐sensor / 3‐Axis display About (Software) 6. XY coordinate / file name & path / display time Volume bar Previous file, Play/Pause, Next file 15 Crashcam‐PRO (Navcam‐PRO) Manual Ver 3.0 09/2013 ...
-
Page 16: Faq
USER MANUAL NAVCAM‐PRO Fault Suggestion Device does not If in vehicle: check that the 12V socket is not still powered (on) when the turn off key is removed (as with some European cars). Wait 20 seconds for file finalization / closure. Disconnect power lead to device Press “ok” to stop recording, then turn off. Cant playback Upgrade your windows media player version or use an alternate media the .MOV video player such as VLC media player files My Check the capacity of your SD card, the files may have been overwritten in video/pictures of the record cycle process. If the Bump file record feature did not an incident are automatically preserve the footage, then be sure to manually save the NOT there footage next time by pressing the “rec” button (left most yellow triangle) The device has Check the speed of your SD card. We recommend class 6 for faster frozen / stopped transfer rates, especially If the record file size is bigger (say 15 min working. recording increments at 1080Full HD). Alternately, check the car’s internal temperature. The device will enter standby mode if the ambient vehicle temperature is below 0 or above 30 degrees C. The date/time is Reset the date / time in the settings menu. Otherwise check the time incorrect settings to see if it is set by GPS. If the battery runs completely flat, then the date/time will need to be reset Can’t see the ... -
Page 17: Product Specifications
USER MANUAL NAVCAM‐PRO PRODUCT SPECIFICATIONS 2.4” TFT Colour LCD Display showing forward video image and Menu LCD Screen settings as well as playback for recorded video Video Resolution 1080p or 720p (both at 30fps) USB Port For Power or sync with a PC (USB2.0) TV Standard PAL or NTSC – via HDMI output Built‐in Speaker / Yes / Yes Microphone AV Output Options HDMI Auto Recording on Yes. Recording starts on ignition power (Charging socket) power‐up Date / Time stamp Supported – on video and on photos GPS location and Speed Supported – on video stamp Power off auto save Yes. Current file will auto save when power is turned off. Auto power on/off Yes – when ignition turned on / off High quality multiple glass lens elements with low dispersion Lens coatings. Low light capable with minimal edge distortion. Photo Resolution 2MP File preservation ... - Page 18 USER MANUAL NAVCAM‐PRO Feature Description Example Location and speed information is When playing back your video on the PC GPS Tracking recorded along with video for software you can see where you were on later review on PC software Google Maps as well as other data Speed Preloaded camera locations Reminders will sound when you approach a Camera allows the device to warn you speed or red light combo speed camera Warning when approaching spd. Cameras By measuring X:Y:Z axis, you can see how 3 Axis Gravity sensor to record G sensor hard an impact was and from what impact force direction Speed Sign Road speed signs are detected To remind the driver of the actual speed recognition and redisplayed on the device limit for the road they are travelling on When the vehicle in front moves Ideal for traffic situations where the driver Stop & Go off, a reminder chime alerts the may be distracted and not be aware of the Alert driver to start moving. ...
- Page 19 USER MANUAL NAVCAM‐PRO For further product information please visit our product web page at www.laserco.net or email support@laserco.com.au Please note: As continual improvements are made to this product, slight operational differences may occur. For the most up‐to‐date user manual, please visit our web site. Warranty Against Defects Laser Corporation Pty Ltd (“Laser”) warrants your new product to be free from defects in materials and workmanship for 12 months, from the date of purchase, provided that the product is used in accordance with accompanying recommendations or instructions where provided. The benefit of this warranty is in addition to your rights under the Australian Consumer Law and to other rights and remedies of the consumer under a law in relation to the goods or services to which the warranty relates. Through a network of retailers and resellers, Laser will provide you with your choice of a refund, repair or exchange (where possible) for this product if it becomes defective within the warranty period. This warranty will no longer apply where the defect is a result of alteration, accident, misuse, abuse, normal wear and tear, neglect or improper storage. Please retain your receipt as proof of purchase How to make a product warranty claim: Step 1: Find your receipt which proves the date of purchase. Where the date of purchase cannot be verified, your place of purchase or Laser will make an assessment based on the date of manufacture, the condition of the Laser Product and the type of defect. Step 2a): Contact your place of purchase. They will assess the nature of the fault and refund or replace the product as per their store refund or warranty policy. Step 2b): If your place of purchase cannot be contacted, then you can contact Laser . Customer Service with details of your defective Laser Product: Phone: (02) 9870 3355; or Email: service@laserco.com.au or online www.laserco.net/support/warranty (click on “Consumers (End Users)”). Our business address is at 1/6‐8 Byfield Street, North Ryde, NSW 2113 Step 3: Laser will issue you with a Return Authorisation (RA) number within 48 hours. When requested, send us the defective Product and a copy of your receipt. Laser will cover the cost of the return delivery. Step 4: Wait for us to contact you. Once we have received your defective Laser Product for inspection, we will inform you of our assessment of your claim within 7 days. When we contact you, we will firstly let you know whether you have a valid claim under this Warranty, and if so, we will inform you whether your defective Laser Product will be replaced or repaired, together with the number of days you can expect to wait to receive your replaced or repaired Laser Product. Our goods come with guarantees that cannot be excluded under the Australian Consumer Law. ...
Need help?
Do you have a question about the Crashcam-PRO and is the answer not in the manual?
Questions and answers