Advertisement
Multi-Card
reader
with Built-in
data Panel
QuiCK
inStall
Guide
Model 100908
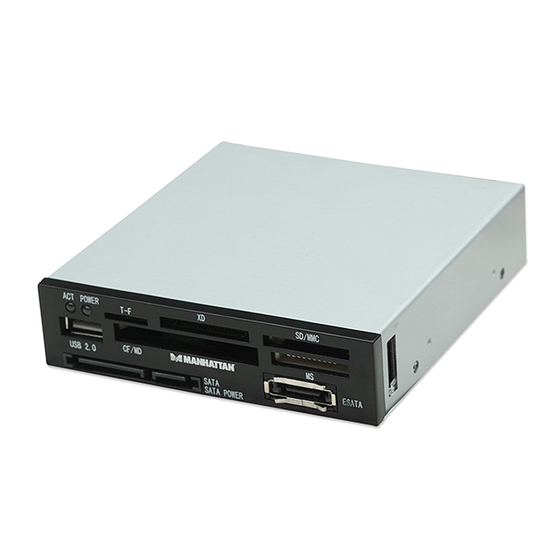
• Slot-to-slot read/write/copy and
USB mass-storage capabilities
• Front-mount SATA, eSATA and
Hi-Speed USB 2.0 ports
• Compatible with Memory Stick,
SecureDigital, MultiMedia, XD
and CompactFlash
MANHATTAN
Accessories. Ask your local computer dealer for more information or visit us online at
All products mentioned are trademarks or registered trademarks of their respective owners.
®
offers a complete line of PC Components, Peripherals, Cables and
www.manhattan-products.com
Thank you for your purchase of the
MANHATTAN
Built-In Data Panel, Model 100908.
For use with many of today's popular
flash memory card formats, this handy
device lets you copy, back up, restore or
recover data without opening your PC
case or installing additional drives! Just
connect SATA, eSATA and Hi-Speed
USB 2.0 storage devices/peripherals
through the front-mount ports. (See the
back of this sheet for basic installation,
Specifications and a compatibility list.)
• Supports automatic card
detection and data transfer
speeds up to 480 Mbps
• Fits in 3.5" drive bay
• Windows and Mac compatible;
hot swappable, Plug and Play
• Lifetime Warranty
Copyright © MANHATTAN
®
Multi-Card Reader with
MH-100908-miniQIG-0608-01
Advertisement
Table of Contents

Related Manuals for Manhattan 100908


Summary of Contents for Manhattan 100908
- Page 1 Thank you for your purchase of the ® MANHATTAN Multi-Card Reader with reader Built-In Data Panel, Model 100908. with Built-in For use with many of today’s popular flash memory card formats, this handy data Panel device lets you copy, back up, restore or...
- Page 2 BaSiC inStallation 1. Insert the Multi-Card Reader into an available 3.5” bay and secure it in place with the included screws. 2. Connect the two SATA cables Wire Connector Label to the controller card; the USB Red, orange POWER, VCC, SVCC, +5V White, yellow P–, DATA–, SBD–...
Need help?
Do you have a question about the 100908 and is the answer not in the manual?
Questions and answers