Advertisement
Available languages
Available languages
Quick Links
Thank you for purchasing the Logic3 MIP190. As with all Logic3 products the MIP190 has been
built to the highest manufacturing standards and testing throughout its development to ensure
you get the best possible product. Please read through and familiarise yourself with this manual
before you use the product.
CONTENTS
i-Station Clock Dock
AC Adaptor
Remote Control
3.5mm to 3.5mm Audio-In cable
Universal Dock Cradles
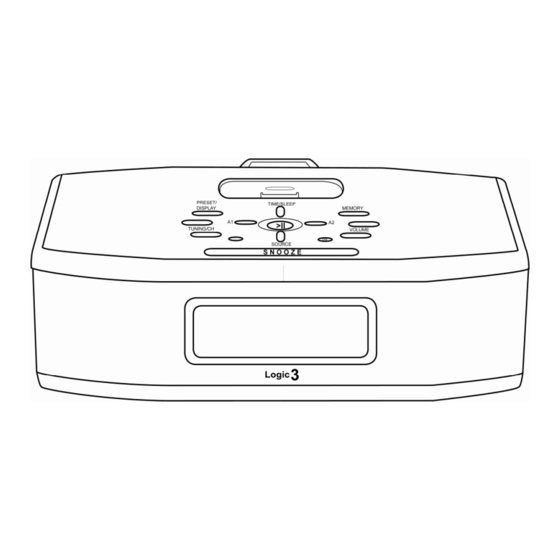
PRODUCT OVERVIEW
FRONT/ TOP
BACK
REMOTE CONTROL
STANDBY :
MUTE:
SOURCE:
VOL. UP:
DIMMER:
RW/ TUNER-:
PLAY/ PAUSE:
FF/ TUNER+:
REPEAT:
VOL.DOWN:
SHUFFLE:
SLEEP/TIME:
ALARM 1:
ALARM 2:
PRESET:
MEMORY:
MIP190 – i-Station Clock Dock
INSTRUCTION MANUAL
Power the unit ON/OFF
Mute the speaker volume
Select the input source
Volume Up
Adjust the LCD backlight
Skip backwards the iPod track, or scan backwards in radio mode.
Play and Pause the iPod
Skip forwards the iPod track, or scan forwards in radio mode.
Set the iPod to Repeat one/ Repeat all/ No Repeat.
Volume Down
Play iPod songs randomly.
Set the time / sleep.
Turn alarm 1 ON/OFF.
Turn alarm 2 ON/OFF.
Recall a preset radio station.
Store the radio station in memory.
Advertisement

Related Manuals for Logic3 MIP190


Summary of Contents for Logic3 MIP190
- Page 1 MIP190 – i-Station Clock Dock INSTRUCTION MANUAL Thank you for purchasing the Logic3 MIP190. As with all Logic3 products the MIP190 has been built to the highest manufacturing standards and testing throughout its development to ensure you get the best possible product. Please read through and familiarise yourself with this manual before you use the product.
- Page 2 POWER 1. Connect the AC Adaptor to the ‘AC-12V’ connection on the back of the MIP190 and to your AC mains power socket. 2. Press the button on the top of the unit or the ‘I/ STANDBY’ button on the remote control to switch the unit ON / OFF.
- Page 3 1. Remove the dock blanking plate on the top of the unit. 2. Fit the appropriate dock cradle required for your iPod. The MIP190 is provided with a selection of different universal dock cradles and 1 blanking plate for use with other portable audio devices..
- Page 4 LCD when the alarm is set ON. DIMMER The MIP190 has a 3 level dimmer for the front display when the unit is active. To control the brightness of the light press the ‘DIMMER’ button on the unit or remote control.
- Page 5 Nous vous remercions d’avoir acheté la dernière née de notre gamme réputée de longue date de haut-parleurs, l’MIP190 Logic3, utilisable avec un iPod. Comme tous les produits Logic3, l’i- Station a été élaborée selon les normes de fabrication les plus exigeantes, pour vous offrir les technologies les plus récentes et les plus avancées qui soient disponibles.
- Page 6 MISE SOUS TENSION 1. Connectez l’adaptateur AC à la prise de connexion AC-12V à l’arrière du MIP190 et à votre prise d’alimentation secteur AC. 2. Appuyez sur le bouton sur le dessus de l’unité ou sur le bouton I/ STANDBY (VEILLE) sur la télécommande pour ALLUMER/ÉTEINDRE l’unité...
- Page 7 1. Retirez le cache de la station d’accueil au sommet du système. 2. Placez le socle d’accueil adapté à votre iPod. L’MIP190 est fournie avec plusieurs socles d’accueil universels et 1 cache pour l’utilisation d’autres appareils audio portables. Numéro de socle Modèle d’iPod...
- Page 8 7. Appuyez sur le bouton SOURCE pour sélectionner votre mode de réveil, iPod, radio AM/FM ou buzzer. (Si le mode de réveil est réglé sur iPod mais aucun iPod n’est connecté, le MIP190 se réglera automatiquement sur le mode de réveil Buzzer.) 8.
- Page 9 DIMMER The MIP190 has a 3 level dimmer for the front display when the unit is active. To control the brightness of the light press the ‘DIMMER’ button on the unit or remote control. Entrée auxiliaire ’MIP190 peut aussi être utilisée comme système de haut-parleurs associé à plusieurs autres appareils audio portables comme l’iPod Shuffle, le MiniDisc, les lecteurs MP3 ou les lecteurs de...
- Page 10 MIP190 – i-Station Clock Dock BEDIENUNGSANLEITUNG Vielen Dank dass Sie sich für den Kauf einer iPod-kompatiblen Logic3 MIP190 entschieden haben. Diese Station Spitzenreiter unserem erfolgreichen, vielseitigen Lautsprechersortiment. Wie alle Logic3 Produkte wurde die MIP190 entsprechend den höchsten Qualitätsanforderungen hergestellt und garantiert Ihnen damit die modernste und hochwertigste Technologie auf dem Markt.
- Page 11 EINSCHALTEN 1. Stecken Sie Ihren AC-Adapter in den AC-12V-Anschluss auf der Rückseite Ihres MIP190 und in die Steckdose. 2. Drücken Sie die Taste auf der Oberseite Ihres Gerätes oder die Taste ‘I/ STANDBY’ auf Ihrer Fernbedienung, um es EIN-/AUSZUSCHALTEN. UHR/ZEIT EINSTELLEN 1.
- Page 12 1. Entfernen Sie den Docking-Verschlussstreifen an der Oberseite des Gerätes. 2. Stecken Sie die für Ihren iPod passenden Dock Cradle auf. Eine Auswahl verschiedener universeller Dock Cradles und ein Verschlussstreifen für andere Musikabspielgeräte liegen der MIP190 bei. Adaptor Cradle iPod Model...
- Page 13 Der MIP190 ermöglicht mit Hilfe eines USB- Anschlusskabels A-Stecker B-Stecker (nicht im Lieferumfang enthalten) eine Datensynchronisierung Ihres iPods. 1. Stecken Sie den Mini USB-Stecker in den USB-Port an der Rückseite Ihrer MIP190. 2. Stecken Sie das USB-Kabel in den USB-Port an Ihrem PC ein.
- Page 14 DIMMER Die MIP190 verfügt über eine LCD Hintergrundbeleichtung, wenn das Gerät angeschaltet ist. Um die Helligkeit einzustellen, benutzen Sie den „DIMMER“-Knopf am Gerät oder der Fernbedienung. AUDIO IN Die MIP190 lässt sich ebenfalls als Lautsprechersystem mit vielen anderen mobilen Musikabspielgeräten wie dem iPod Shuffle, MiniDisc, MP3-Spielern und tragbaren CD-Spielern benutzen.
- Page 15 MIP190 – Dock orologio i-Station MANUALE D’ISTRUZIONI Grazie per aver acquistato la MIP190 Logic3 per iPod, l’ultimo prodotto della nostra lunga e affermata gamma di amplificatori. Come con tutti i prodotti Logic3, l’MIP190 è stato costruito secondo gli standard di fabbricazione più elevati, per garantire ai nostri clienti la tecnologia più...
- Page 16 ACCENSIONE 1. Collegare l’adattatore CA fra la presa “AC-12V” che si trova sul retro dell’MIP190 e la presa della corrente di rete. 2. Premere il tasto sul dispositivo, oppure il tasto “I/ STANDBY” del telecomando, per accendere o spegnere il dispositivo.
- Page 17 1. Togliere la piastra di protezione della stazione dock posta sulla parte superiore del dispositivo. 2. Inserire l’alloggiamento dock più adatto all’iPod in vostro possesso. L’MIP190 è dotato di una serie di alloggiamenti per dock universale e di una piastra di protezione da utilizzare con altri dispositivi audio portatili.
- Page 18 MUTE [muto] o premere i tasti VOLUME ▲▼ del dispositivo o quelli VOL+, VOL- sul telecomando. L’indicatore MUTE [muto] scompare. IPOD SINCRONIZZAZIONE L’MIP190 offre la possibilità di sincronizzare i dati con l’iPod mediante un cavo mini-USB - USB (non in dotazione). 1. Collegare la mini-spina USB nella porta “USB” sul retro dell’MIP190.
- Page 19 VARIATORE DI LUMINOSITA L’MIP190 è dotato di LCD a retroilluminazione, in funzione quando il dispositivo è attivo. Premere il tasto “DIMMER” (regola luminosità) sul dispositivo o sul telecomando per regolare la luminosità. AUDIO IN L’MIP190 può essere inoltre utilizzato come sistema d’amplificazione di vari dispositivi audio portatili, quali iPod Shuffle, MiniDisc, lettori MP3 o lettori cd portatili.
- Page 20 MIP190 – i-Station Dock de Relógio MANUAL DE INSTRUÇÕES Obrigado por ter adquirido o MIP190 da Logic3 para utilização com o iPod, o mais recente da nossa variada gama de altifalantes. Como todos os produtos da Logic3, o MIP190 foi produzido de acordo com os padrões de fabrico mais elevados, disponibilizando a tecnologia mais recente...
- Page 21 ALIMENTAÇÃO 1. Ligue o adaptador CA à ligação ‘AC-12V’ na traseira do MIP190 e à sua tomada de corrente eléctrica. 2. Prima o botão no topo da unidade ou o botão do o botão ‘I/ STANDBY’ no controlo remoto para ON / OFF [LIGAR/DESLIGAR] a unidade.
- Page 22 1. Remova a placa de cobertura de ancoragem na parte superior da unidade. 2. Colocar o carregador de ancoragem adequado ao seu iPod. O MIP190 é fornecido com diferentes carregadores de ancoragem universais e 1 placa de cobertura para utilizar com outros dispositivos de áudio portáteis.
- Page 23 IPOD SINCRONIZAÇÃO O MIP190 oferece a capacidade de sincronização de dados com o seu iPod utilizando um cabo de dados mini-USB [não fornecido]. 1. Ligue o mini USB à porta “USB” na parte de trás do MIP190. 2. Ligue o USB numa porta USB livre do seu PC.
- Page 24 “DIMMER” na unidade ou controlo remoto. AUDIO IN O MIP190 também pode ser utilizado como sistema de som em conjunção com vários outros dispositivos de áudio portáteis como, por exemplo, iPod shuffle, MiniDisc, Leitores MP3 ou Leitores de CD portáteis.
- Page 25 MIP190 – Base de acoplamiento del reloj de la i-Station MANUAL DE INSTRUCCIONES Gracias por adquirir la MIP190 de Logic3 para utilizar con iPod, la última novedad en nuestra extensa y consolidada gama de altavoces. Al igual que todos los productos de Logic3, la MIP190 ha sido creada siguiendo los procesos de fabricación de más alta calidad para ofrecerle la...
- Page 26 ENCENDIDO 1. Conecte el adaptador de CA a la conexión ‘AC-12V’ de la parte posterior de la MIP190 y a la toma de red para suministro de CA. 2. Pulse el botón de la parte superior de la unidad o el botón ‘I/ STANDBY’...
- Page 27 1. Extraiga la placa de protección de la base de conexión en la parte superior de la unidad. 2. Ajuste la base dock adecuada para su iPod. La MIP190 dispone de una selección de bases dock universales diferentes y una placa de protección para utilizar con otros dispositivos de audio portátiles.
- Page 28 La MIP190 ofrece la capacidad de permitir la sincronización de datos a su iPod utilizando un cable mini-USB to USB (no suministrado). 1. Conecte la mini conexión USB en el puerto USB de la parte posterior de la MIP190. 2. Conecte la conexión USB a un puerto USB disponible de su ordenador.
- Page 29 DESACTIVACIÓN AUTOMÁTICA Para activar la desactivación automática pulse el botón “SLEEP” en la unidad o el mando a distancia. Puede escoger desde 15, 30, 45, 60, 75 ó 90 min. para que la MIP190 se detenga automáticamente. Si tiene algún problema con la configuración de la MIP190 de Logic 3, contacte con nuestro Departamento de Asistencia Técnica...
Need help?
Do you have a question about the MIP190 and is the answer not in the manual?
Questions and answers