
Related Manuals for Abus TVAC19000B


Summary of Contents for Abus TVAC19000B
- Page 1 TVAC19000B User guide Betjeningsvejledning Instrukcja obsługi Manual de instrucciones Bruksanvisning Инструкция по эксплуатации Version 10/2014...
- Page 2 English This user guide contains important information on starting operation and using the device. Make sure that this user guide is handed over when the product is given to other persons. Keep this user guide to consult later. For a list of contents with the corresponding page numbers, see page 7. Dansk Denne betjeningsvejledning indeholder vigtige henvisninger til idriftsættelse og håndtering.
- Page 3 TVAC19000B User guide You can find important information and FAQs about this product and additional products on the website www.abus.com/plug-and-play Version 10/2014 English translation of the original German user guide. Keep for future use.
- Page 4 The ABUS Security-Center GmbH assumes no liability for technical and typographical faults and reserves the right to make at any time modifications to the product or user manual without a previous announcement.
- Page 5 The warranty will expire for damage due to non-compliance with these operating instructions. ABUS will not be liable for any consequential loss! ABUS will not accept liability for damage to property or personal injury caused by incorrect handling or non-compliance with the safety-instructions.
- Page 6 English 7. Wireless transmission The range of wireless transmission depends on various environmental factors. The local conditions at the installation location can have a negative impact on the range. For this reason, if there is a clear line of sight between the receiver and the transmitter, the range can be as much as 200 m, but in buildings it is significantly less.
-
Page 7: Table Of Contents
English Table of contents Intended use ............................8 Scope of delivery ............................ 8 Features and functions .......................... 8 Device description ..........................9 4.1 Overview ............................9 4.2 Camera description ........................9 Installation ............................. 11 5.1 Camera mounting ......................... 11 Operating and configuring via app ..................... 12 Maintenance and cleaning ........................ -
Page 8: Intended Use
English 1. Intended use The WLAN pan/tilt camera & app make powerful monitoring possible. This camera is designed for indoor installation. The integrated infrared LEDs enable day and night surveillance for objects up to a maximum distance of 3 metres. Thanks to the ceiling mount, the camera can be installed individually indoors. -
Page 9: Device Description
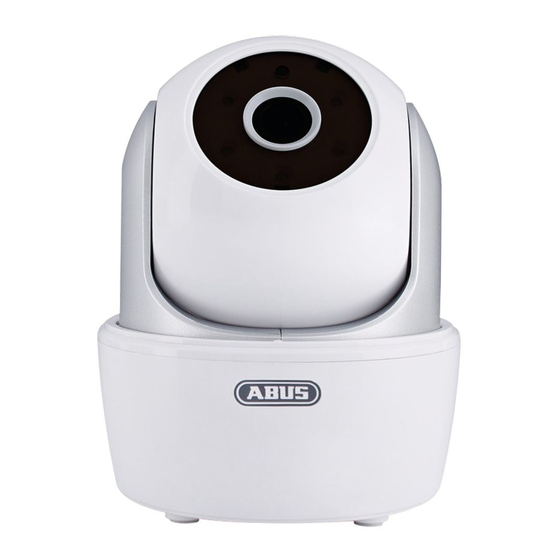
English 4. Device description 4.1 Overview Item number TVAC19000B Resolution 720p IR LEDs IR swivel filter (ICR) Operating voltage 5 V DC 4.2 Camera description Front: Light sensor IR LEDs Microphone... - Page 10 English Rear: Reset button Micro SD card slot Power LED Antenna connection Power supply connection 5 V DC/1 A LAN interface...
-
Page 11: Installation
English 5. Installation 5.1 Camera mounting Use the camera to help you find a suitable place for installation. Use the base plate to mark the drill holes on the surface, then drill the holes. Insert the wall plugs supplied before you attach the base plate with the screws. Next, tighten the base plate of the camera;... -
Page 12: Operating And Configuring Via App
English Then place the camera on the base plate and turn it so that the arrow is pointed at Lock. The camera is now securely mounted. Connect the power supply unit with the camera. 6. Operating and configuring via app The TVAC19000 Wi-Fi pan/tilt camera &... - Page 13 English Option 2: No adapter cable necessary Connect the camera with the power supply unit and wait approx. 1 minute until the red and green LEDs light up. Look in the network settings on your mobile end device in the “Wireless”...
- Page 14 English Entering system information 1. Enter a name for your camera at “System Name” which should then be displayed on your mobile phone. 2. To enter the DID automatically, click on “Search” to display all the cameras which are connected to your network or directly to your mobile end device.
- Page 15 English Firmware information / PIN code / Notify setting Here you can see the current firmware version of the system and save a PIN code. You can find out how to enter a PIN code at. Saving the PIN code If you want to save a PIN code for this app, proceed as follows: 1.
- Page 16 English Saving the preset position Here you have the option to define a preset position. To save a position, proceed as follows: Android: Navigate to the desired position by swiping. To save the position, press and hold your finger on the centre of the image for 5 seconds.
- Page 17 English Settings Click on to go to the settings. You can change the camera settings here. You can also activate or deactivate the e-mail messages here. on “Advanced settings” to start the configuration. Click E-mail alert E-mail notifications are activated by motion. Please note that false alarms can occur for video surveillance in outdoor areas.
- Page 18 English You can configure the camera at settings. Admin password The Admin password must be entered to add the camera and to go to the settings. The standard password is “123456”. Change this at the initial installation to protect your camera from unauthorised access.
- Page 19 English Video setting The video settings allow you to adjust the video quality and ambient conditions for the camera. Video quality The video quality setting allows you to select the quality for video streaming. Better streaming: The video display is smoother. Better picture: The video picture is displayed with a higher resolution.
- Page 20 English Reverse: The image is displayed in mirror reverse. Flip & reverse: The image is rotated 180 degrees and displayed in mirror reverse. WiFi Setting In the Wi-Fi settings you can select the network to be used for the internet access by the camera. When selecting the menu item, all the networks located in the area are shown.
- Page 21 English Motion detection The settings for motion detection are required for e-mail notification or push notification as well as for motion-controlled recording. Detect mode Here you can select which mode should be used for the notifications. You can choose between Off, PIR or Software. Off: No notifications are sent or recordings made if motion is detected.
- Page 22 English Receiver: Enter the recipient's e-mail address here. e.g. xxxx123@test.com We recommend using “googlemail” for sending e-mails. Format SDCard Format the SD card. For the permanent use of an SD card, please use a Class 10 SD card. All the data is deleted when the SD card is formatted. Please make sure you save the data before formatting.
- Page 23 English Removing the system Removing the system After pressing the icon, a new window appears to ask you whether you really want to delete the system. If you want to remove the system, press “Yes” to confirm or “No” to cancel. Access to the recordings Access to the recordings Here you can view the recordings for the required camera on...
- Page 24 English Filtering the event list You have the option of filtering the recordings according to certain preferences. To do this, press the symbol or “Search”. A window appears with various search options. You can search using the start and end dates and times. Click “Search”...
-
Page 25: Maintenance And Cleaning
English 7. Maintenance and cleaning 7.1 Maintenance Regularly check the product's physical state, e.g. check for damage of the housing. If you suspect that safe operation cannot be guaranteed anymore, disconnect the product and ensure that it cannot be used by mistake. You can assume that safe operation is not possible anymore when ... -
Page 26: Tips For Troubleshooting
English 9. Tips for troubleshooting Questions Answers The camera has not been Check the following points: found. 1. Make sure that your network supports DHCP. 2. Are the mobile device and the camera in the same network? Make sure that both devices are in the same network at the initial configuration. -
Page 27: Technical Data
English 10. Technical data Model number TVAC19000B Wireless standard IEEE 802.11 b/g/n Network connection Ethernet (10/100 Base-T/Base-TX); Wi-Fi Network protocols TCP/IP, UDP, SMTP, NTP, DHCP, ARP Simultaneous users 3 simultaneous access sessions Security WPA/WPA2/WPA2-PSK (TKIP, 128 bit AES) Image sensor...
Need help?
Do you have a question about the TVAC19000B and is the answer not in the manual?
Questions and answers