Advertisement
Quick Links
Advertisement

Related Manuals for Amicroe AMI-TT2


Summary of Contents for Amicroe AMI-TT2
- Page 2 This manual contains detailed instructions and notes on the operation and use of this device. For your safety and bene t, read this manual carefully before using the device. Keep this manual in a handy place for quick reference. DO NOT place this device in a hot, wet or dusty environment Avoid leaving this device in a hot car or motor vehicle for prolonged periods of time.
- Page 3 Hardware ware ARM Cortex A8 1.2Ghz Processor, GPU 400Mhz Android 4.0.4 Ice Cream Sandwich (ICS) DDR3 512MB RAM (3D accelerator possible for 3D games) Google browser 4GB onboard Flash memory MicroSD Card slot – Max 32GB Micro USB port ayback 802.11 b/g Video –...
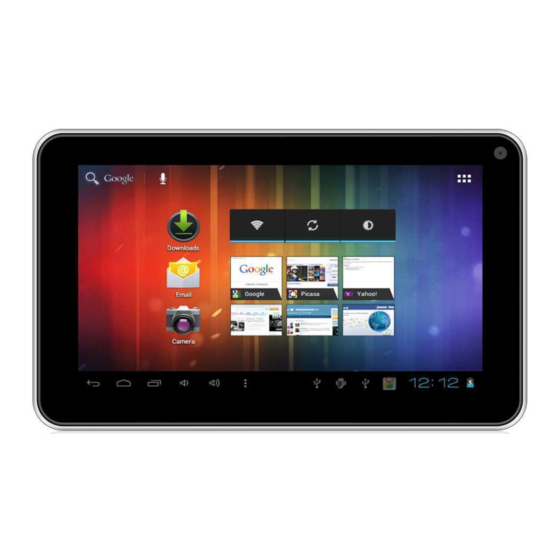
- Page 5 1.Pow To turn ON The device may take a minute to boot. To place the device in “Standby Mode To turn OFF (Shut Down) 2.Desktop desktop picture here Page 4 Page 4...
- Page 6 Page 4 Page 5...
- Page 7 On the desktop, press the and then select “ Page 4 Page 6...
-
Page 8: Wireless Networks
1. Wireless Networks 2. Sound 1. Press “Wi-Fi” to turn ON/OFF. 2. Press “Sound” to access: - Volumes. - Silent Mode. connect to. - System Sounds. Page 4 Page 7... - Page 9 3.Display 4. Storage 4. Press “Storage” to access the devices memory 3. Press “Display” and microSD status. To safely remove the microSD card select “Unmount shared storage”. Page 4 Page 8...
- Page 10 6.Apps 5. Press press “Apps” to access: - Downloaded. - On SD card. - Running. - All. Page 4 Page 9...
- Page 11 6.1. Apps 6.2. Apps - Select the “Force stop” “Running Services”. - Select the “Uninstall” Page 4 Page 10...
-
Page 12: Account & Sync
7. Account & Sync Add your Exchange / Email / Google Account. loaded to the device. Page 4 Page 11... - Page 13 9. Security Screen lock - Protect your device from unauthorized access by ON the device to Make passwords visible Page 4 Page 12...
-
Page 14: Language And Input
10. Language & Input Language - Choose your preferable onscreen language. - You can enter words to the Keyboard & Input Methods - Turn ON/OFF. Voice - Enable & manage Mouse/Trackpad - Adjust the “Pointer Speed” when using with a mouse or trackpad. - Page 15 11. Backup & Reset 12. Date & Time Page 4 Page 14...
- Page 16 13. Accessibility needs. Page 4 Page 15...
- Page 18 How to enable USB Storage mode with a PC When connected to your PC, on the home screen “USB Connected” Page 4 Page 17...
- Page 19 ふIラミ ミ WSぶ How to enable USB Storage mode with a PC Press “Turn on USB Storage” to connect the device. The device will appear on your PC as a Removable Disk. You can now use it as an external storage drive. To disconnect the device, press the “...
- Page 20 Apps Icon Play Store Button/Icon “Shop” or the “Play Store” Icon. Google Play Store. Page 4 Page 19...
- Page 21 How to create Desktop icons/shortcuts 2. Press and hold an App icon and 3. Press and hold a Widget icon and 1. On the Home screen, press the the Home Page (Desktop) will the Home Page (Desktop) will Apps icon. appear.
- Page 22 How to change your Home Screen (Desktop) background 2. Select “Wallpapers”. 3. Select a category and follow the 1. On the Home screen, press the Page 4 Page 21...
- Page 23 How to Change the Keyboard Input Method 1. With the Keyboard on-screen, press the keyboard icon to select needs. Page 4 Page 22...
-
Page 25: Warranty
Warranty Our goods come with guarantees that cannot be excluded under the Australian Consumer Law. Amicroe Australia Amicroe TM and the Amicroe logos are internationally registered trade marks. Page 4...
Need help?
Do you have a question about the AMI-TT2 and is the answer not in the manual?
Questions and answers