
Related Manuals for Aristel CL100

Summary of Contents for Aristel CL100
- Page 1 Aristel CL100 Big Button Caller ID Telephone Keep this user guide for future reference...
-
Page 2: Table Of Contents
CONTENTS Warnings ………………………………………………………….. 3 Location of Controls…………………………………………..… 4 Key Features…………………………………………...………..5 PARTS LIST ………………………………………..………….…. 5 INSTALLATION …………………………………….………….… 6 Installation of batteries………………………………………… 6 Connecting Your Telephone …………………………………. 6 TELEPHONE OPERATION …………………………………….. 7-8 Answering a Call………………………………………………... 7 Using the Ringer HI/LOW/OFF Switch ……………………… 7 Making Calls …………………….………………………………... -
Page 3: Warnings
Warnings Do not use your telephone during an electrical storm or thunderstorm, as it is possible to receive an electric shock. The earpiece of the handset may attract small metal objects such as staples and pins. Care should be taken when placing the handset near these items. -
Page 4: Location Of Controls
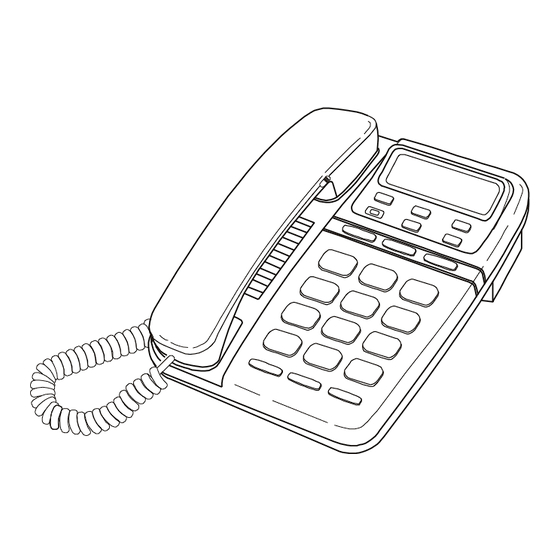
Location of Controls 1. Coiled Handset Cord 2. Memory Index Card – Use to memorize your speed dial memory. 3. Store Button - Use to store numbers into the speed dials. 4. Volume Switch - Use to adjust the handset receiver volume (NORM or LOUD). -
Page 5: Key Features
Key Features Caller ID: If available from your Service Provider, the telephone displays the caller‟s name and telephone number, plus the date and time of the call, for the last 100 incoming calls that you have received. Extra large three-line high resolution LCD display. ... -
Page 6: Installation
Installation Installation of Batteries Note: Before installing or changing the batteries make sure that the telephone is not connected to the telephone network. To open the battery door and install the batteries, follow the procedure below: 1. Open the battery door on the bottom of the base by using the tip of a screwdriver or other pointed object to lift the latch. -
Page 7: Telephone Operation
There are two levels to adjust between: Normal and Loud (NORM - LOUD). Last Number Redial The CL100 will store the last 16 numbers you called. Follow the instructions below to access any of these numbers: 1. To redial the last number leave the handset on the base, press REDIAL repeatedly until you find the number you wish to dial. -
Page 8: Call Timer
([0] to [#]). The number is now stored. 4. Repeat steps 1 to 3 to store additional numbers. Note: There is a time-out for storing numbers. If the CL100 times out before the number is stored, try again. -
Page 9: Listing Your Memory Numbers
The old one will be erased automatically. MENU PROGRAMMING INSTRUCTIONS The CL100 has a simple menu system used to handle and set up the phone book operation. Accessing the Menu 1. With the handset on the base, press DIAL/SET to enter the menu mode, and LCD will display: VIEW MENU ↓↑. -
Page 10: Setting The Area Code, Long Distance Access Code
(English / French / Spanish / Italian / German / Turkish / Polish / Slovenian) as required. Press SET to confirm. SETTING DATE/TIME If you subscribe to caller ID the Time and date will be set up automatically when the phone rings. If no caller ID is activated you can set the time and date manually 1. -
Page 11: Caller Id Operation
Legend of letters and symbols in numeric keypad: P Q R S 7 A B C 2 T U V 8 D E F 3 W X Y Z 9 G H I 4 0 Space J K L 5 M N O 6 EDITING PHONE BOOK ENTRIES 1. -
Page 12: Checking Incoming Calls
Dialing Numbers from the Caller ID Memory The CL100 allows you to dial a phone number stored in its caller ID memory. This is the “call back” feature of this phone. To dial a number from caller ID memory, do the following: 1. -
Page 13: Using Message Waiting/Mail Box
Message Wait signal has been cancelled on the PABX. DESK AND WALL MOUNTING Your CL100 can be mounted to a standard wall phone plate. lf you do not have a modular wall phone plate installed, consult with your phone company or licensed installer to get one, or install without a wall plate. -
Page 14: Wall Mounting With A Modular Wall Phone Plate
Wall Mounting with a Modular Wall Phone Plate 1. HANDSET CLIP - When the phone is mounted on the wall, the HANDSET CLIP must be adjusted so it will hold the HANDSET. A. SLIDE OUT B. REVERSE C. SLIDE INTO PHONE DESK BRACKET: For DESK use, put bracket here;... -
Page 15: Wall Mounting Without A Modular Wall Phone Plate
Phone Plate 1. Locate a wall stud. lf the selected area does not have a wall stud directly behind it, use dry wall expanders or a similar type fastener. 2. Drill 2 6mm holes 100 mm apart, as per template at the end of this user guide. -
Page 16: Troubleshooting
TROUBLESHOOTING No dial tone / phone will not dial out. Check all telephone cord connections or try another wall socket. Can’t hear the phone ring. Verify the ringer switch is not set to “Off.” Other party cannot hear you. Ensure handset cord is connected properly. - Page 17 Note: Caller ID memory loss as well as one and two-touch memory loss may occur when resetting. Therefore, please make sure that you record all important information before you proceed with the reset. Handset falls out of phone base when wall mounted Handset clip was not installed properly for wall use.
-
Page 18: Warranty
Warranty Always retain your proof of purchase (receipt) from the retailer as this will be needed for any warranty claim. This product is covered by a 12 months warranty against defective workmanship or parts, effective from the date of purchase. The warranty does not extend to damage caused by misuse, negligence, excessive voltage,... - Page 20 Memory Dial Telephone Index Name Telephone Number Aristel Networks Pty Ltd Unit 1, 25 Howleys Road Notting Hill VIC 3168 Australia Tel: +613 8542 2300 Fax: +613 95443299 www.aristel.com.au...
Need help?
Do you have a question about the CL100 and is the answer not in the manual?
Questions and answers