Table of Contents
Advertisement
OWNER'S
MANUAL
MODEL NO.
315.101390
CAUTION:
Read and follow
ALL safety rules
and instructions
before operating
this equipment.
SAVE THIS
MANUAL FOR
FUTURE REFERENCE
Thank You for Buying A
Craftsman Hammer Drill
972000-148
9-00
1/2 Inch
Hammer Drill
DOUBLE INSULATED
Rules for Safe Operation
Warranty
Operation
Maintenance
Repair Parts
SEARS, ROEBUCK AND CO., Hoffman Estates, IL 60179 U.S.A.
®
Printed In U.S.A.
Advertisement
Table of Contents

Related Manuals for Sears craftsman 315.101390


Summary of Contents for Sears craftsman 315.101390
-
Page 1: Repair Parts
DOUBLE INSULATED SAVE THIS MANUAL FOR FUTURE REFERENCE Rules for Safe Operation Warranty Thank You for Buying A Operation Craftsman Hammer Drill Maintenance Repair Parts SEARS, ROEBUCK AND CO., Hoffman Estates, IL 60179 U.S.A. 972000-148 9-00 Printed In U.S.A. -
Page 2: Rules For Safe Operation
For service we suggest you return the tool to your nearest complete sets of insulation to protect the user. All exposed Sears Store for repair. Always use original factory replacement metal parts are isolated from internal metal motor components parts when servicing. - Page 3 37. SAVE THESE INSTRUCTIONS. Review them 26. INSPECT TOOL CORDS PERIODICALLY and if frequently and use them to instruct others who damaged, have repaired at your nearest Sears may use this tool. If you loan someone this tool, Repair Center. Stay constantly aware of cord loan them these instructions also.
-
Page 4: Specifications
If this Craftsman Hammer Drill fails to give complete satisfaction within one year from the date of purchase, RETURN IT TO THE NEAREST SEARS STORE IN THE UNITED STATES, and Sears will repair it, free of charge. If this Craftsman Hammer Drill is used for commercial or rental purposes, this warranty applies for only 90 days from the date of purchase. -
Page 5: Operation
OPERATION ELECTRICAL CONNECTION WARNING: Your hammer drill has a precision built electric motor. It should be connected to a power supply that is 120 volts, 60 Hz, AC only (normal household current). Do not Always wear safety goggles or safety glasses with side operate this tool on direct current (DC). - Page 6 OPERATION SWITCH See Figure 2. To turn your hammer drill ON, depress the switch trigger. Release switch trigger to turn your hammer drill OFF. LOCK-ON BUTTON See Figure 2. Your hammer drill is equipped with a "lock-on" feature, which is convenient when continuous drilling for extended periods of time is required.
-
Page 7: Variable Speed
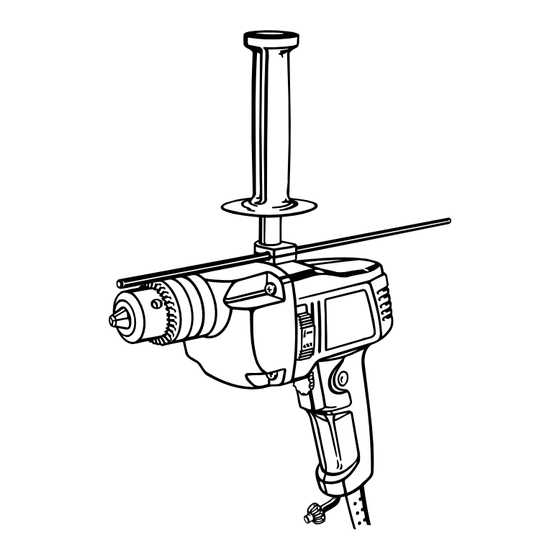
OPERATION VARIABLE SPEED See Figure 5. Your hammer drill has a variable speed control selector designed to allow operator control and adjustment of speed and torque limits. Speed and torque can be increased or decreased by rotating the variable speed control selector in the direction of the arrows shown in figure 5. - Page 8 OPERATION INSTALLING AUXILIARY HANDLE (Continued) NOTE: For convenience the screw has been trapped inside TIGHTEN the auxiliary handle. AUXILIARY TO LOOSEN AUXILIARY HANDLE Remove depth gage clamp and auxiliary handle from HANDLE AND CLAMP AND CLAMP plastic bag in hammer drill box. Orient depth gage clamp so that the tabs will fit into INCREASE DEPTH...
- Page 9 OPERATION TO INSTALL BITS See Figure 9. CHUCK UNPLUG YOUR HAMMER DRILL. WARNING: Failure to unplug your hammer drill could result in accidental starting causing serious injury. DRILL Open or close the chuck jaws to a point where the CHUCK opening is slightly larger than the drill bit you intend to JAWS use.
-
Page 10: Wood Drilling
OPERATION DRILLING See Figure 11. Depress and release switch trigger to be sure your drill is in OFF position before connecting it to power supply. Check the direction of rotation lever for correct setting (forward or reverse). See Figure 3. Secure the material to be drilled in a vise or with clamps to keep it from turning as the drill bit rotates. -
Page 11: Chuck Removal
OPERATION CHUCK REMOVAL See Figures 12, 13, and 14. The chuck must be removed in order to use some MALLET accessories. To remove: UNPLUG YOUR HAMMER DRILL. WARNING: CHUCK Failure to unplug your hammer drill could result in accidental starting causing serious injury. Close chuck jaws. -
Page 12: Maintenance
All other parts represent an important part of the double insulation system and should be serviced only by a qualified Sears service WARNING: technician. Avoid using solvents when cleaning plastic parts. Most... - Page 13 NOTES Page 13...
- Page 14 CRAFTSMAN 1/2 INCH HAMMER DRILL — MODEL NUMBER 315.101390 SEE NOTE "A" PAGE 15 Page 14...
-
Page 15: Parts List
NOTE: "A"— The assembly shown represents an important part of the Double Insulated System. To avoid the possibility of alteration or damage to the system, service should be performed by your nearest Sears Repair Center. Contact your nearest Sears Retail Store for Service Center information. -
Page 16: How To Order Repair Parts
Sears Service Center or the Service Department at most Sears stores. Be sure to provide all pertinent facts when you call or visit. The model number of this tool will be found on a serial MODEL NO.
Need help?
Do you have a question about the craftsman 315.101390 and is the answer not in the manual?
Questions and answers